If the developer has chosen a house project with an open plan, he will most likely be faced with the problem of non-standard flooring.
Consequently, he will have to abandon the factory panels and install a monolithic floor slab (MPS).
This is a very economical option, which is used even when constructing standard premises.
Their installation does not require expensive lifting equipment, they have higher production characteristics, and the seamless surface of the floors significantly saves the customer’s money on finishing work.
Preparation for concreting
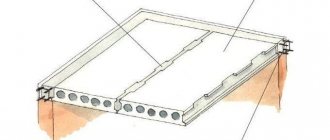
Next, a monolithic reinforcing belt is provided along the entire perimeter of the floor, in its plane.
It allows you to reliably connect the floor with the load-bearing walls, as well as impart spatial rigidity to the entire building and prevent the appearance of cracks in it. A frame of four longitudinal rods with a diameter of 8 to 12 mm is attached to the reinforcement outlets at the ends of the beams. The reinforcement is connected to each other with metal wire with a diameter of 6 mm, the distance between the clamps is 200 mm. The reinforcing belt will be concreted simultaneously with the entire ceiling. Then formwork is constructed around the perimeter of the floor. It is made from aerated concrete blocks with a thickness of 100-150 mm. They are fixed to the walls in the same way as wall blocks - using thin-seam glue. On the inside, thermal insulation slabs made of expanded polystyrene - regular or extruded - are glued to the blocks. The standard thickness of the slabs is 50 mm. They serve as a thermal break - they prevent the building from freezing through the ceiling.
Aerated concrete blocks are laid between the beams, tightly joining them to each other. A welded reinforcing mesh with cells 100 x 100 mm is rolled out on top of the blocks and armored belt, its wire diameter is 5 mm. The mesh will be located approximately in the middle of the concrete slab (at a height of 20-25 mm), since it rests on the upper reinforcing belt of the beams, and it rises above the blocks. If necessary, plastic clamps are placed under the mesh, which prevent it from sagging and thereby guarantee a uniform layer of mortar under it during concreting. The mesh can be simply laid, or for greater reliability it can be attached to the reinforcing belt with knitting wire.
Instructions for monolith reinforcement
It is necessary to cover the spans between floors using monolithic platforms. To make them as strong as possible, they need to be reinforced. The technology for carrying out this work includes a certain sequence of actions:
Installation of formwork. The first step is to make a box for which boards and also sheets of plywood can be used. To keep the formwork in place, tripods are installed underneath it.
You need to understand that concrete is a very heavy material, and therefore it is important to provide good support for it. To ensure that the concrete does not stick to the plywood or boards, and the box can then be removed, you should choose materials with a laminated or oil-treated surface.
Frame installation
To do this, steel rods are placed in a box and tied together. The cells should have a length and width of approximately 15-20 centimeters. If suddenly the length of any of the rods is not enough, you need to apply another one, but with more overlap.
Filling the box. At this stage, it is recommended to use factory-produced concrete mortar. Firstly, it clearly complies with all the necessary quality standards, as well as the proportions of the required components. Often the material also includes additional components that improve the strength properties of concrete. When the concrete solution is delivered to the construction site, the formwork is poured using a concrete pump. A special construction vibrator compacts the solution over the entire area of the platform and distributes it evenly, eliminating bubbles from the solution. At the end of this work, the surface is leveled again by hand and then sprinkled with dry cement on top.
It is worth considering that when filling the platform, the air temperature should be at least 5 degrees. Low temperatures can negatively affect the quality of the platform. An example is the appearance of cracks caused by the freezing of moisture in a concrete solution. Any cracks and damage to concrete structures entail a reduction in the service life of the slab, as well as a deterioration in strength characteristics. If conditions are favorable, the concrete platform dries completely within one month.
Pouring concrete
Before pouring concrete into the formwork, it is necessary to check its reliability and check the presence of all technological holes. The latter include chimneys, ventilation ducts, openings for pipes, cables - ducts, embedded parts, and other solutions are provided for all.
The concrete mixture is usually supplied through the distribution hose of a concrete pump. Before delivering concrete to the site, you need to find out whether the automixer kit includes a sleeve of sufficient length.
To accept concrete, two people are required: one delivers a hose with concrete to the desired place on the formwork, the other levels the mixture to a given level. If the plasticity of the concrete mixture is low, the operator can add a little water to it - this will not affect the quality of the concrete, and it will be much easier to level and distribute the mixture to the farthest corners.
Concrete is compacted using a deep vibrator; it can be rented; the cost is low, especially considering that it is needed for several hours.
After pouring the entire formwork, the concrete is finally leveled and smoothed.
Additional reinforcement of floors - advantages and disadvantages
The need to strengthen concrete floors is related to the characteristics of concrete. The concrete mass is capable of withstanding increased compressive loads, but is susceptible to tensile forces and the influence of bending moments. Concrete is not capable of damping loads on its own and requires additional reinforcement. To compensate for tensile forces and maintain the integrity of reinforced concrete structures, additional reinforcement of floor slabs is performed.
A concrete slab, the strength of which is increased due to additional reinforcement, is a reliable structure with a number of advantages. Main advantages:
- long service life. Thanks to the increased safety margin, the service life of a reinforced concrete structure is calculated in decades;
- absence of butt seams, as well as smooth surface of ceilings and floors. There is no need to perform expensive and labor-intensive finishing work;
- reduced weight of the monolithic floor structure compared to purchased reinforced concrete panels. This significantly reduces the load on the foundation;
- increased strength characteristics. The combination of the properties of steel reinforcement and concrete makes it possible to increase the strength of the base and ensure its integrity under increased loads;
- increased reliability of reinforced concrete structures. Resistance to loads acting in different directions is achieved through reinforcement. Reinforced floors are capable of supporting from 0.5 to 0.8 tons per square meter of surface;
- Fire safety. The use of non-combustible building materials ensures the fire resistance of the structure. The stove is able to maintain its integrity for a long time under the influence of elevated temperatures and open fire;
This design weighs noticeably less compared to ready-made reinforced concrete slabs, however, this factor does not affect its strength
- reduced costs compared to using standard panels to form floors. The costs of constructing a monolithic floor are significantly lower compared to a similar prefabricated structure;
- no need to use special lifting equipment and rigging equipment. A crane is not required to form a monolithic slab;
- uniform transfer of forces from the monolithic slab to the load-bearing walls of the building or support columns. As a result of load equalization, the likelihood of crack formation is reduced.
Among other advantages, it should be noted the possibility of pouring a non-standard configuration of the ceiling. This allows the construction of buildings of varying levels of complexity with non-standard layouts. A serious advantage is the ability to create interfloor openings and communication openings at the concreting stage.
Along with the advantages, there are also weaknesses:
- increased labor intensity of carrying out activities for assembling the reinforcement frame;
- increased duration of the process of cement hydration and, accordingly, the gain of operational strength by concrete.
Calculation of the load on the slab and its parameters
Carrying out calculations of the floor slab is extremely necessary in order not to subsequently overload the existing space with additional partitions of the second floor
Important: according to SNIP SNiP 52-01-2003 “Concrete and reinforced concrete structures”, SNiP 3.03.01-87 and GOST R 52086-2003 for a private house, a standard monolithic type floor slab should have a thickness of 180-200 mm. This is the average of a solid monolithic second floor floor space or first level ceiling.
Carrying out calculations of the floor slab is extremely necessary in order not to subsequently overload the existing space with additional partitions on the second floor or increased floor finishing. As a result of exceeding the load on the ceiling, it may simply burst and collapse.
In order to correctly calculate the parameters of the floor structure with the recommended load-bearing capacity, it is better to entrust the work to a professional. As a last resort, you can use an online calculator, which contains all the data on the materials used for the monolith and its parameters:
Wooden floors between floors made of beams
- Length and width of the second floor floor;
- Floor height;
- Brand of concrete used;
- Load per 1 m2 of flooring (taken as the estimated value of 450-500 kg/m2).
Thanks to the available data, it is possible to calculate the cross-section of reinforcement rods that will withstand deflection and tension.
Important: the cross-section of the reinforcement rod should be maximum in the central part of the floor slab. Because closer to the supporting walls, the load on deflection and tension is reduced to almost zero.
To calculate the thickness of the ceiling (that is, its height), you must use a ratio of 1:30. Here 1 means the height of the monolith, and 30 means the length of the span from one outer wall to the other. For example, if a house has a span length of 8 m, then 800:30 = 26.6 cm. Accordingly, for a span length of 6 m, the ceiling height will be 20 cm.
Monolithic floor thickness
In accordance with the calculations performed, we can recommend, for the installation of monolithic floors, in private houses, a floor thickness of 150 mm, for spans up to 4.5 m and 200 mm up to 6 m. It is not advisable to exceed the span of 6m. The diameter of the reinforcement depends not only on the load and span, but also on the thickness of the slab. The often installed fittings with a diameter of 12 mm and a pitch of 200 mm will form a significant reserve. Usually you can get by with 8mm at 150mm pitches or 10mm at 200mm pitches. Even this reinforcement is unlikely to work to the limit. The payload is assumed to be 300 kg/m2 - in a home it can only be formed by a large closet completely filled with books. The actual load in residential buildings is, as a rule, significantly less.
The total required amount of reinforcement can be easily determined based on the average reinforcement weight coefficient of 80 kg/m3. That is, to install a floor with an area of 50 m2 with a thickness of 20 cm (0.2 m), you will need 50 * 0.2 * 80 = 800 kg of reinforcement (approximately).
Beam systems
Beam floor diagram.
Beams in floor structures are designed to bear the load; they are made of wood, reinforced concrete and metal. Reinforced concrete beams are mounted with a span width of 3 to 7.5 m. Their own weight ranges from 175-400 kg. Beams are installed parallel to each other on walls or columns with a pitch of 60-100 cm. Typically, lightweight slabs are laid on top of such beams.
In private construction, wooden beams are most widely used. The standards establish the following maximum spans: between floors - 5 m; for an attic - 6 m. Wooden flooring is usually placed on top of such beams. The dimensions of the beam itself depend on the width of the span. For example, for attic beams, the accepted condition is that their thickness must be at least 1/24 of the span width. The beam can be a board or timber.
Metal beams have increased strength and are used for spans of 6 meters or more. Such elements are made from different metal profiles - I-beam, channel, angle. The top covering is lightweight slabs.
Reinforcing reinforced concrete floors - we reinforce reinforced concrete floors with our own hands
To strengthen the overlap you should prepare:
- linings for reinforcing bars. Clamps are installed to ensure a constant distance between the frame and the concrete surface;
- rods with a cross section of 12-18 mm and annealed wire for tying reinforcement. A crochet hook will speed up the connection of elements.
You will need a device for bending rods, as well as a grinder with a circle for metal.
To ensure that the lower mesh is located at the required distance, special plastic clamps are placed under it
When assembling the reinforcement cage, follow the given sequence of operations:
- Cut the reinforcing bars into pieces of the required sizes.
- Tie the rods with wire, forming a mesh with cells 15x15 or 20x20 cm.
- Place the bottom mesh on the supporting elements.
- Install vertical bars in 1 m increments.
- Assemble the top tier of the frame and attach it to the vertical rods.
When assembling the reinforcement cage, pay attention to the amount of overlap, which is 35-40 times greater than the cross-section of the rods
Installation process
As with all work, the first thing you need to do is purchase all kinds of materials and equipment. In particular, to make formwork, you will need either a collapsible structure, which can be rented from construction companies, or material for making this structure yourself.
If the installation will be done with your own hands, then for the formwork you need to prepare moisture-resistant plywood or boards. The plywood must be at least 2 centimeters thick, and the boards must be at least 2.5 centimeters thick.
When constructing a building, in some cases it may be necessary to install a special reinforcing element. It is called a monolithic belt for floor slabs. It is a reinforced concrete strip that runs along the perimeter of the building and serves as a support for the structure being constructed.
- The process of installing the slab begins with the installation of racks or supports that will support the slab during its installation and hardening. They are installed with a certain step - it is regulated by the distance between the floor beams and its size.
- Next, the longitudinal beams are installed. They need to be placed in special fastenings on previously installed supports. People call these mounts “crowns” or “forks.” When laying beams, you need to take into account that the surface of the formwork must be strictly horizontal. All beams are covered with plywood or boards. After forming the slab, these parts of the formwork will need to be removed, so it is necessary to take into account these nuances of their installation.
When the beams are laid, you can begin assembling the horizontal part of the formwork, checking the horizontal plane
It must be observed absolutely throughout the entire area. When assembling, you should pay attention to how smooth the plane will be - this determines how smooth the ceiling, which is its lower part, will be. In order to obtain a surface of the highest quality, as well as to prevent concrete from leaking into the cracks, a waterproofing film is laid. Next, the vertical elements are installed
They need to be installed so that after pouring, the edges of the slab overlap the walls with sufficient margin. The required distance is indicated in SNiP. After this, they begin to reinforce the entire surface of the future slab. Two rows of mesh made from reinforcing bars are laid. The cell of the resulting grid should be about 20 centimeters. The first layer is laid at a distance of about 2.5 centimeters from the bottom plane of the formwork. In order to raise the mesh, special plastic spacers are used.
- The second layer of mesh is mounted at the same distance from the upper plane of the future slab. To secure two layers of mesh at the required distance, special stands are bent from reinforcing bars. All layers of the mesh and all its elements are connected to each other with knitting wire.
- When the reinforcement is laid and all the formwork elements are in place, the process of pouring the mortar begins. The grade of concrete is chosen for a reason, but based on data on the expected load on the slab. Do not forget that all technological holes in the resulting slab must be fenced in advance with specially made boxes.
- After pouring the solution, it must be compacted with a special vibrating machine for concrete. This will make the poured ceiling more uniform in structure, and will also expel all air bubbles formed during pouring.
- The resulting surface is moistened within a week from the moment the solution is poured. After this, constant moisturizing is not required. But you still need to control the drying of the surface.
- It may take up to 30 days for the concrete to completely harden. It all depends on the chosen brand of concrete and the thickness of the structure being created.
After the specified period, the formwork is completely removed, and the ceiling is ready for use.
Advantages of a monolith over the installation of concrete slabs
The layout of a house with such a floor has a greater chance of self-expression, since there is no need for standard solutions adjusted to the parameters of factory slabs
The technology of pouring ceiling slabs with your own hands has a number of advantages over laying standard factory-made reinforced concrete slabs. The main positive aspects of the monolith are:
- The entire ceiling has an even and uniform structure without seams, connections or joints, which allows the load to be distributed as evenly as possible on the poured slab, the walls of the house and its foundation;
- The layout of a house with such an overlap has a greater chance of self-expression, since there is no need for standard solutions adjusted to the parameters of factory slabs;
- All bay windows and balconies can be poured directly to the existing design data, without the need to look for a floor slab of the required size and configuration;
- And in the interior of the first floor, columns can be used, which will make the design of the room richer and more original.
Important: there is no need to use complex construction equipment to pour the monolith. All work can be done with your own hands, understanding the installation technology.
Approximate cost of floors made of different materials
Of course, prefabricated monolithic floors cannot be called the cheapest (judging by the cost of the material). However, if you take into account the cost of materials, transportation costs, and wages for workers, you can understand that this is more profitable than, for example, pouring monolithic reinforced concrete. Let's try to compare the total costs when installing a floor between the first and second floors with an area of 10.5 × 8 m and a thickness of gas silicate walls of 30 cm. With these parameters, the cost (in rubles, as of the beginning of 2022):
- prefabricated monolithic floor 25 cm thick ≈ 198,000;
- reinforced concrete slab (25 cm + screed 5 cm) ≈ 241,000;
- self-leveling monolith 20 cm thick ≈ 254,000.
Similar installation is allowed, but only if blocks made of lighter materials are used and there is no additional load on top
How to determine the thickness of a concrete layer
Thickness is the determining parameter of a monolithic floor. It is on the basis of this parameter that the formwork diagram is drawn up and the reinforcement is laid out. In the absence of a project, the developer should focus on standard recommendations for the construction of a monolithic layer.
Important! The longer the span from one supporting wall to another, the thicker the monolithic layer is made.
Averaged design standards determine the thickness indicator in relation to the length of the span between supports to be 1: 30. Otherwise: for 1 linear meter of span, the thickness of the concrete layer should be approximately 3 cm, and on a standard 6-meter span it will be 18 cm.
In practice, it is allowed to reduce the thickness by 10-15% in cases where the loads of the future floor do not exceed average values.
Slab reinforcement
The monolith must undergo a reinforcement procedure.
- First you need to prepare the fittings. The required diameter of the rods should be selected, knowing the design loads. Typically, rods with a diameter of 12-14 millimeters are used for this.
- We lay the first reinforcing mesh at the bottom of the structure - it will become a monolithic slab in the future. This will be a kind of armored belt. First, you should lay the longitudinal rods, then the transverse ones. The best cell size for such a grid is 12-15 centimeters. If the overlap is not very large in area, then the size of the cells can be increased to 20 centimeters.
- The joints of the rods should be tied using steel wire.
- We lay the second reinforcing mesh similarly to the first. We carry out tying the meshes with wire. If there are not enough rods, then you can take an additional rod, which should be tied with an overlap equal to at least 40 times the reinforcing diameter. If rods with a diameter of just over a centimeter are used, then the overlap should be 48 centimeters. The joints of the rods should be placed in a checkerboard pattern. The ends of the reinforcement rods must be on load-bearing type beams.
How to calculate costs and productivity?
Thanks to the frame structure, the use of coffered floors makes it possible to significantly reduce the cubic capacity of the building, and therefore the cost of its construction. Their arrangement at industrial, civil and administrative facilities is considered the most profitable. With their help, spans up to 6 m long are covered, and the load-bearing capacity of frame systems is up to 500 kg/m2.
The financial costs of the device are minimized due to the economical consumption of concrete. This also affects the labor intensity and speed of construction.
However, when designing such systems, it is important to take into account that in the places where columns and capitals are located, the floor must be continuous - i.e. Caisson formers are not installed in these areas.
Photo 11. The process of concreting a coffered floor
Cost calculations for a monolithic floor of this type are carried out taking into account the consumption of necessary materials and devices:
- Formwork made of metal lathing and support posts, as well as plastic caisson formers, are in most cases rented.
- Concrete - usually a “mixer” is ordered with a concrete pump to automatically supply the mixture to the floor.
- Armature for reinforcement.
However, keep in mind that no one is insured against additional and unexpected expenses.
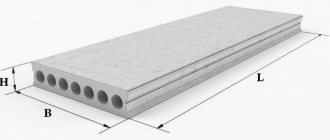
Floor slabs PK 25-12-8 (Ryazan reinforced concrete plant No. 2) Only new slabs from the factory. PC floor slab for all types of buildings, length 2.5m, width…
From 3567 RUR/pcsMore details
Floor slabs PC 60-12-8 AtV (Ryazan reinforced concrete plant No. 2) Only new slabs from the factory. PC floor slab for all types of buildings 6 m long, wide…
From 7764 RUR/pcsMore details
Floor slabs PK 63-12-8 AtV (Ryazan Concrete Concrete Plant No. 2) Only new slabs from the factory. PC floor slab for all types of buildings, length 6.3 m, width…
From 8157 RUR/pcsRead more
Floor slabs PK 58-12-8 AtV (Ryazan reinforced concrete plant No. 2) Only new slabs from the factory. PC floor slab for all types of buildings, length 5.8 m, width…
From 7699 RUR/pcsRead more
Floor slabs PK 48-12-8 AtV (Ryazan reinforced concrete plant No. 2) Only new slabs from the factory. PC floor slab for all types of buildings, length 4.8 m, width…
From 6929 RUR/pcsRead more
Floor slabs PK 42-12-8 (Ryazan reinforced concrete plant No. 2) Only new slabs from the factory. PC floor slab for all types of buildings, length 4.2 m, width…
From 6227 RUR/pieceMore details
Floor slabs PK 35-12-8 (Ryazan reinforced concrete plant No. 2) Only new slabs from the factory. PC floor slab for all types of buildings 3.5 m long, width...
From 5003 RUR/pcsMore details
Floor slabs PK 30-12-8 (Ryazan reinforced concrete plant No. 2) Only new slabs from the factory. PC floor slab for all types of buildings 3 m long, wide…
From 4349 RUR/pcsRead more
Floor slabs PK 72-12-8 AtVt-1 (Ryazan reinforced concrete plant No. 2) Only new slabs from the factory. PC floor slab for all types of buildings, length 7.2 m, width…
From RUB 11,477/pieceMore details
Floor slabs PB 60-12-8 (Ryazan reinforced concrete plant No. 2) Only new slabs from the factory. PB floor slab for all types of buildings, 6m long,…
From 9196 RUR/pcsRead more
Errors and difficulties, their consequences
Almost no one does the calculation of a monolithic slab on their own; it is performed when designing a house using a software package . This is due to the fact that the calculation is quite complex even for many engineers, and errors made during the calculations have a high cost, and sometimes become catastrophic for the entire building.
The most common mistakes are made in the following cases:
- The beam calculation scheme and errors in determining the supports were incorrectly adopted.
- Inaccurate measurements of actual span.
- The thickness of the monolithic slab was calculated incorrectly, exceeding the ratio of 1/30.
- Violations of calculations for bending moments.
- The indicators for the reinforced frame were incorrectly determined.
How to install formwork for a monolithic floor
To make a formwork structure, prepare:
- moisture-resistant plywood up to 25 mm thick, covered with laminate. The smooth surface of the plywood will make it easier to remove the panels after the concrete has hardened;
- planed boards made of durable types of wood. Make the lower shield from a board 50 mm thick and up to 200 mm wide;
- wooden logs with a diameter of 120-150 mm or standard telescopic supports. They are designed to fix the formwork structure;
- boards or beams used as transverse beams of formwork. The cross members support the prefabricated panel frame.
- hardware and a standard set of tools, including a saw for cutting wood, a hammer and a building level.
The construction of a monolithic floor slab assumes that concrete will be poured into horizontal formwork
. Procedure:
- Mark the level of the formwork on the surface of the walls.
- Install vertical beams, logs or supports in 1-1.2 m increments.
- Secure cross bars or metal profiles into the support forks.
- Lay sheets of plywood or planed boards without gaps and secure them.
- Secure the vertical walls around the perimeter of the wooden formwork.
- Check the levelness of the surface and the tightness of the corner areas.
Dismantling of the formwork is carried out a month after pouring concrete.
Design requirements
The arrangement of floors must meet fairly high requirements for functional purpose and general requirements for the entire structure. First of all, the floor must have high mechanical strength for bending, tearing and compression. Thus, basement systems must withstand loads of up to 2.1 kN/sq.m, and attic systems - up to 1.1 kN/sq.m. Interfloor and attic structures must have sufficient sound insulation. High demands on waterproofing properties are placed on basement and attic systems, which should protect the room from precipitation from above and water from below. All floors (especially basement and attic) must have high thermal insulation characteristics. Common to all building elements is the requirement for fire and seismic safety.
The installation of floors raises additional conditions in terms of reliability of fastening to supporting elements, manufacturability, accessibility of production and transportation in specific circumstances.
In addition, there are requirements regarding the placement of communication systems.
Calculation and production of ceilings using corrugated sheets
The technology for pouring a monolith is practically no different from a similar process using boards, laminated plywood and laminated chipboard. Since the ceiling will be ribbed, it will have to be covered with a tension or suspension system. To create the formwork you will need a profiled wall sheet, which is characterized by increased strength.
The panels can be laid end-to-end or overlapping. This depends on the configuration of the support system. To prevent the sheets from moving, they need to be screwed to the beams. Cellophane laid on top of the formwork will protect the corrugated sheet from contamination and prevent leaks.
The formwork manufacturing procedure, reinforcement and pouring are carried out according to standard methods.
Installation
Installation of foundation beams will not be possible without the participation of special equipment - a crane. To be engaged by a winch, the grand beam must be equipped with special loops or sling holes, which are made during its production. Installation can begin only after completion of the preparatory work, namely:
- Conducting geological studies of the soil to determine the composition of the soil.
- Calculation of the total building load
- Completion of work on the construction of a monolithic foundation. A solid foundation is formed by compacting the soil and filling it with sand or other heavy soil.
- Organization of delivery and storage. During this work, it is necessary to check each product for integrity and absence of damage.
- Carrying out quality control of all materials.
- Clearing the construction site of dirt, snow and debris.
- Carrying out marking of the future structure. Marking is done using pegs, between which a thread is stretched.
Therefore, it is necessary to use a building level in your work.
When performing installation work, it is important not to rush. The slightest mistakes can be costly
There are often cases when the mounting loops of beams break due to errors in operation. After such a cliff, if the foundation beam is on the ground, it will be almost impossible to lift it. In addition, due to the hasty actions of the crane operator, the beam may crack if it is touched or dropped. And in some cases it will even break if it is not reinforced.
During installation, the foundation beam must rest on a stepped structure of support pillars. The steps can be made of brick or cast from concrete using formwork. The contact area should not be less than 200–300 mm. Otherwise, it will be difficult to secure the beam, which will lead to the risk of its displacement. The final stage in the construction of fundamental beams will be the processing of their surface. In this work, it is necessary to use waterproofing materials, for example, roofing felt or waterproofing to ensure the safety of the walls.
Advantages
The positive characteristics of the design are revealed as follows:
- no expensive unloading/loading work;
- high quality of the finished surface;
- possibility of free layout of premises;
- strength, durability.
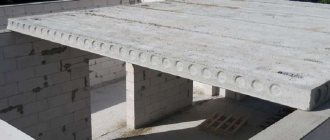
Structurally, the load-bearing part of the floors is divided into beamless (created from slabs or panels) and beam (consists of beams and filling)
Overlappings can be:
- monolithic - produced on site;
- prefabricated - formed on the basis of finished factory products - reinforced concrete slabs or panels;
- often ribbed - made on the basis of hollow blocks and reinforced concrete beams;
- structures made of lightweight concrete.
Creating formwork
The monolithic slab floor is poured into horizontal formwork, which you can make yourself or purchase a ready-made version. Using ready-made formwork provides two advantages: first, the structure is collapsible, and second, it comes with telescopic supports. With their help, the formwork is installed at the same level.
By the way, earlier we looked at how to make formwork from plywood.
However, many private developers prefer self-made formwork. In this case, it is recommended to adhere to the following rules:
- To make it, you need to take a 25-35 mm thick edged board or 20 mm thick plywood sheets. In the first case, it becomes necessary to tightly fit the boards to each other, and if there are cracks, it is recommended to use waterproofing material. Plywood sheets provide a smoother surface, while minimizing the risk of cracks.
- Vertical racks can be made from timber or logs with a diameter of 8-15 cm. Install the supports at a distance of 1 meter from each other and 20 cm from the walls. The height of the racks is adjusted according to the height of the wall; the upper edge of the formwork and the upper edge of the wall should be located at the same level.
- Crossbars are placed on top of the racks. A timber, I-beam or channel is suitable for this purpose.
- Horizontal formwork is laid directly on the crossbars. First come the cross beams, then the plywood or boards.
- The installation of the vertical parts of the formwork is carried out taking into account the approach to the walls by approximately 15-20 cm. Therefore, the vertical fence of the slab should be located at this distance from the internal level of the wall.
- The horizontality of the formwork and its level position are determined using a building level or level.
It will also be useful to study our material on the topic: calculation and installation of removable formwork.
Creating formwork for a monolithic floor slab
Positive design characteristics
A floor slab with an armored belt has a high load-bearing capacity.
Compared to prefabricated structures made of wood, metal and reinforced concrete, a monolithic floor has a number of significant advantages:
- there is no need to use cargo and lifting equipment to deliver and install structural elements;
- no seams or cracks, perfect horizontal surface;
- minimum amount of finishing work on the finished structure;
- homogeneity of the slab, uniform deformation over the entire area;
- strength, high load-bearing capacity;
- complete tightness, no risk of leaks;
- the ability to make it yourself without purchasing professional tools and equipment.
Even with such an impressive list of advantages of a monolithic structure, the condition for achieving a high-quality result is compliance with the sequence of work and the timing necessary for the maturation of concrete.
Types of floors
Horizontal floor slabs are mainly necessary to provide separation between the floors of the structure. In this case, one side of such a platform serves as the floor for one floor, and the other as the ceiling. Floors are classified according to their purpose:
- Basement. Such slabs separate the first floor of the building from the basement.
- Interfloor. These floor platforms divide the floors of the building into different levels.
- Attics. In this case, floor slabs separate the space that is located under the roof of the building and the rest of the residential part of the building.
In addition, floor slabs also differ depending on the manufacturing technology:
- Monolithic. Such platforms are cast directly at their location and installation. Their special feature is reinforcement with steel rods.
- Prefabricated. Such structures are manufactured at the factory and are installed using separate elements.
- Prefabricated monolithic. A special feature of the design is the structure, which consists of blocks that are empty inside and a lightweight version of metal beams.
Disadvantages of floors on the ground
Let's start with the negative side of the issue and describe the disadvantages of ground floors, which customers often talk about.
- The soil is not a reliable foundation - on subsidence soils, floors on the ground can sag and become warped, and such facts occur in construction. This suggests that the preparation for the floors was carried out incorrectly, while not only the floors rest on the ground, but also the foundation itself, blind areas, and roads. The very fact that all these structures rest on the ground does not lead us to the conclusion that they need to be abandoned.
To avoid mistakes when compacting soil under the foundation, read the article (8 mistakes when compacting soil) on our website.
- Difficulty of control - in the case of floors on the ground, it is very important that the work at all stages is carried out efficiently. For example, you need to ensure that the compaction and concrete preparation are correct. This problem is less relevant for self-builders; here it is more correct to talk about monitoring one’s own work.
article to the mistakes that are often made when laying floors on the ground (9 mistakes when laying floors on the ground).
- A house without a basement - in houses with floors on the ground, you will have to abandon basements, since the technology does not provide for them. If the house needs a basement, then in this case it will be necessary to make floors.
- Construction on difficult soils - in some cases, floors on the ground turn out to be unprofitable from an economic point of view. For example, if the soil under the house is difficult to compact or there is a large black soil layer, replacing which will cost more than installing floors.
Features of the work
It is worth noting that pouring a monolithic floor is considered not the easiest and cheapest option to implement, but in the end it is possible to obtain a structure that is distinguished by its versatility and durability. This makes monolithic reinforced concrete flooring the most popular among others.
If installation is done by yourself, then moisture-resistant plywood is used for formwork, the thickness of which should not be less than 2 centimeters. As for formwork boards, this parameter should not be less than 2.5 cm.
When constructing a building, in some cases there is a need to install a reinforcing element, which is called a belt. In this case, a reinforced concrete strip runs along the perimeter of the building and acts as a support for the structure.
In order to raise the mesh during the formation of the reinforcing layer, special stands made of plastic are used. The second layer of mesh should be laid out at the same distance from the top plane of the future structure. To attach two layers of mesh at the required distance, it is necessary to prepare special stands, which are made of reinforcing bars. All mesh layers and elements must be connected to each other with wire.
It is important not only to reinforce the monolithic floor to obtain a reliable structure, but also to moisten it after pouring, which is done within a week. Then constant moisturizing will no longer be required
However, it is still necessary to control the drying of the surface.
Technology of work execution
To fill a monolithic floor with your own hands, you need to prepare boards for formwork and sheets of plywood
To fill a monolithic floor with your own hands, you need to prepare the following tools and raw materials:
- Boards for formwork and plywood sheets (preferably glossy so that the concrete has minimal adhesion to the wood when drying);
- Supports for the monolith at the rate of 1 piece/1 m2 of floor slab;
- Rods for knitting reinforcing mesh with a cross section of 8-12 mm;
- Plastic clamps-stands for fittings;
- Concrete grade M-350 and higher (it is better to order ready-made in the required volume);
- Tool for bending reinforcement.
How to choose?
When choosing a monolithic floor to be installed in a house, it is better to take all factors into account. For a building with several floors, it is better to use removable inventory formwork, which can be easily and quickly installed on site. In the private sector, beamless structures can be used. But if the load is significant, the force of the columns and supports may not be enough.
The interfloor space filled with reinforcement frame may require additional insulation for insulation and noise reduction. In this case, the space between floors is filled with concrete with the addition of expanded clay. The option with columns is more suitable for non-residential buildings, commercial, retail buildings or spaces with an open plan. For walls made of foam blocks, it is better to use lighter floors rather than a monolithic concrete slab. If a one-piece option is chosen, load calculations must be as accurate as possible.
Disadvantages of floors on the ground
Let's start with the negative side of the issue and describe the disadvantages of ground floors, which customers often talk about.
- The soil is not a reliable foundation - on subsidence soils, floors on the ground can sag and become warped, and such facts occur in construction. This suggests that the preparation for the floors was carried out incorrectly, while not only the floors rest on the ground, but also the foundation itself, blind areas, and roads. The very fact that all these structures rest on the ground does not lead us to the conclusion that they need to be abandoned.
To avoid mistakes when compacting soil under the foundation, read the article (8 mistakes when compacting soil) on our website.
- Difficulty of control - in the case of floors on the ground, it is very important that the work at all stages is carried out efficiently. For example, you need to ensure that the compaction and concrete preparation are correct. This problem is less relevant for self-builders; here it is more correct to talk about monitoring one’s own work.
article to the mistakes that are often made when laying floors on the ground (9 mistakes when laying floors on the ground).
- A house without a basement - in houses with floors on the ground, you will have to abandon basements, since the technology does not provide for them. If the house needs a basement, then in this case it will be necessary to make floors.
- Construction on difficult soils - in some cases, floors on the ground turn out to be unprofitable from an economic point of view. For example, if the soil under the house is difficult to compact or there is a large black soil layer, replacing which will cost more than installing floors.