In private housing construction, aerated concrete is especially popular, as it allows you to quickly build a two-story house with an area of up to 100 m² for little money - this is a budget option. The ceilings of the first and second floors can be monolithic or prefabricated from reinforced concrete or cellular concrete slabs, metal, wood. When choosing a method for arranging floors, many factors are taken into account: load-bearing capacity, level of reliability and weight of the selected structure, financial calculations and the time frame allocated for building a house. The method of constructing the floor depends on the type of foundation chosen. Today’s material is about how to make the first floor floor in a house made of aerated concrete.
First floor floor in aerated concrete house
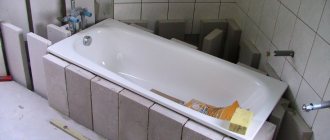
Installing a floor in a house made of aerated concrete
The peculiarity of a house made of aerated concrete is that it is not recommended to use heavy materials, for example, reinforced concrete slabs. Therefore, wooden flooring is the best option for such buildings. However, it is worth considering that wooden floors are not power supporting elements, especially in a house made of aerated concrete. Therefore, if such a building has more than two floors, and the seismic activity of the area is above average, then using a wooden floor is not recommended.
Many private developers prefer to use aerated concrete blocks to build a country house. It should be noted that the materials in question have many advantages. First of all, this is the low cost of products and the ability to build a building in a short time. Other advantages of aerated concrete are light weight, safety for the environment and human health, as well as resistance to high temperatures, fungus, mold, and good thermal insulation properties.
Along with a significant number of advantages, the blocks also have their disadvantages: low strength and the need for wall finishing due to high porosity, which ultimately leads to saturation of the material with moisture and its further destruction.
Types of flooring
Floors in a house made of foam blocks can be made from various materials; let’s look at the most popular types.
Wooden floors
Construction of the floor on wooden floor beams.
They are laid on the subfloor, using a floor strip 27–32 mm thick and 120–150 mm wide. Before laying, floorboards are coated with an antiseptic composition on three reverse sides to protect against rot, insects, and microorganisms.
After installing the floor, the boards must be planed to level the surface, then dusted off and a special impregnation applied, after which they can be painted or covered with waterproof varnish in several layers. If you plan to lay parquet, then a continuous flooring made of chipboard, thick plywood or OSB is made under it along the beams.
Linoleum
This is the most common and relatively inexpensive material, it is easy to install, easy to cut, and does not require special preparation or special devices. The variety of colors, sizes and types allows you to choose a coating for any room, style, or interior.
It can be laid on either a wooden or concrete base, but for the second it is advisable to take insulated linoleum, produced on a special substrate. Before laying out, the base must be leveled, potholes in the concrete must be repaired, protrusions must be knocked down, debris must be removed and the surface must be dedusted.
Important! For a more even installation without waves and bubbles, the linoleum must be spread on the floor and allowed to rest for 24 hours.
To avoid shifts, the coating can be glued to the surface completely or only the seams can be coated, aligning the stripes with the pattern before applying the glue.
Laminate
Laying laminate, tightening strips using clamps.
Laminated boards are deservedly in demand as a reliable and high-quality floor covering:
- It is resistant to mechanical damage, non-flammable, easy to clean, and has a long service life.
- The material is perfectly mounted on a flat wooden or concrete base.
- Special locks on each strip make it easy to connect the elements into a single sheet without the use of additional devices.
- The foam backing absorbs noise when walking.
- Manufacturers offer a huge selection of colors and textures like stone, wood and even fabric.
- The small size of the individual elements allows you to lay laminate even in small rooms.
- Laminated boards must be laid on a flat base, otherwise the floor will creak and the locks will break, even despite the soft substrate.
- When laying around the perimeter of the room, leave a gap of 15–20 mm between the wall and the laminate to allow for thermal expansion of the material.
MZLF device
To understand how to build a foundation, you need to know what it consists of. The first element is a sand cushion. It levels out soil vibrations and strengthens the structure.
The second part is the concrete strip itself, reinforced with reinforcement. Also important components are waterproofing, drainage and insulation.
Construction stages
1. Planning. First of all, a calculation is made of the total weight of the structure, including the useful mass and the frame of the aerated concrete building itself. A drawing of the structure is being prepared, and soil characteristics are being studied. After this, a diagram of the base is drawn with all the corners, load-bearing walls and internal partitions.
2. Preparation of the land plot. It all starts with clearing the area of debris and vegetation. Trees and shrubs are removed along with the root system. If reinforcement with piles and grillage is planned, you need to dig a control hole 1-1.5 meters deep to study the soil layer.
3. Digging a trench. The depth of the ditch will not exceed 15 cm. But you need to take into account approximately the same thickness of the sand cushion. In addition, the tapes must be 15 cm wider than the load-bearing walls. The bottom of the finished trench must be leveled from bumps and recesses.
4. Creating a sand cushion. To do this, you need to take coarse sand, pour it into the bottom of the trench in a layer of 10-15 cm. After that, pour it with water and compact it well so that the surface is even. On very heaving soils, sand can be reinforced with fine crushed stone, up to 5 cm.
5. Creation of formwork. The form is made from smooth wooden boards or panels. It can be arranged at different depths. The formwork is placed directly in the trench or on the surface of the earth.
In the finished structure it is necessary to calculate and make ventilation holes.
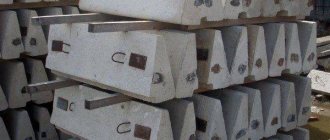
6. Reinforcement. A necessary step for strengthening the tape on heaving soils. Reinforcement is made from special metal rods or fittings. All elements are connected to each other with wire; welding cannot be used.
Reinforcement.
7. Drainage. Water drainage is necessary to prevent underground flows and moisture from destroying the foundation. The system must be calculated immediately before pouring the concrete solution, separately from the ventilation.
The drainage itself is a drainage system made of pipes coated with an anti-corrosion layer. Immersed in the ground, they remove accumulated water to the outside. To plan drainage, you should contact a specialist.
8. Main tape. It is necessary to prepare and pour concrete in layers. The depth of the bottom layer should not exceed 15 cm. After drying, a second layer is made, then a third, and so on. When everything is filled in, the surface is covered with film until completely hardened.
Pouring concrete.
9. Waterproofing and insulation. Sheets of roofing felt are laid out on the base of the tape treated with mastic. When the waterproofing has adhered, thermal insulation can be done. Insulating materials for heaving soil should be selected with the help of a specialist.
Near-foundation structure.
Creating a shallow foundation for a house made of aerated concrete involves calculating an entire system to protect the foundation from adverse factors. A foundation created in accordance with technical requirements will be able to level out any soil vibrations. It reliably holds the structure of the house, preventing it from collapsing.
Construction of a simple foundation and construction technology for a private house
It is recommended to entrust geodetic inspection and calculations to professionals. The foundation can be made independently in strict accordance with the project.
Design and calculation
Self-construction of the foundation begins with design and calculation:
- determine the type of soil;
- determining the location of the aquifer;
- calculate the area of the base;
- calculate the loads from the building;
- calculate the depth, width and height of the tape.
The minimum depth of the tape for heavy buildings is calculated by the formula:
Usually developers play it safe and increase this value by another 30 cm. The cost of materials can be calculated here.
Installation in stages
Before starting work, you should stock up on the necessary materials for the current production stages. You can order ready-made concrete mortar or make it yourself, in which case you need to stock up on crushed stone, sand and cement.
To calculate the choice of concrete grade, the easiest way is to use a calculator.
The construction of the foundation is carried out in the following order:
- After clearing the area, markings are made and a trench is dug. The area is marked using pegs, tape measure and twine.
One of the pegs should correspond to the outer surface of the foundation strip, the second - to the inner one. When constructing a shallow foundation, you can get by with a shovel.
For buried areas, it is advisable to use an excavator with further manual alignment of the corners.
- The bottom of the trench is leveled with sand and fine gravel. Compact thoroughly, spilling with water. In regions with frosty winters, insulation material is installed to prevent heaving. Horizontal waterproofing is laid on top of the pillow.
- The formwork is being exposed. If the soil is very dense, the walls of the trench can act as formwork. All that remains is to build it up from above. When the soil is loose, the trench is dug with a reserve so that the formwork can be placed.
- At the same time, pipes for communications are installed.
- Reinforcement is performed using steel rods with a diameter of 14–16 mm and dressing wire. The iron must subsequently be completely covered with concrete.
- The concrete solution is poured over the entire surface at once. Concrete usually takes about four weeks to fully cure.
The formwork is removed when the moisture level of the concrete becomes no more than 4%, and waterproofing and insulation can begin. After filling the foundation, insulation is carried out and a blind area is made.
What does ground flooring mean?
Floors on the ground are a monolithic concrete base or screed. This design accumulates heat, making it suitable as an element of an energy-efficient home.
There are the following types of ground floors:
- A floor slab, rigidly connected to the tape, is poured onto the carefully compacted soil.
- A floor slab is poured onto the prepared base, not connected to the strip foundation - a “floating” screed.
Monolithic slab
It is kept until it hardens for 28 days. The edges of the monolith rest on the tape. This foundation combines the advantages of two types of foundation.
What kind of floor slabs should there be?
Finished reinforced concrete slabs are mounted on a belt using lifting equipment according to a pre-developed layout plan, taking into account the configuration and size of the spans.
Reinforced concrete slabs are installed on a cement-sand mortar up to 30 mm thick. The slabs are anchored to each other and to the foundation using iron rods with a cross-section of 10 mm.
Features of installation on a slope
A strip foundation is the most preferable option when it is necessary to build a house on a slope, if there is no danger of soil runoff and seasonal increases in hydrogeological activity.
The tape is well adapted to receiving and redistributing loads arising from movement or heaving of the soil. Difficulties may arise due to the inability of construction equipment to approach. An important and difficult point is to ensure that the bottom of the trench is perfectly horizontal. All other steps are performed in the traditional way.
On a slope, it is recommended to use a recessed type of monolithic structure: the greater the angle of inclination, the greater the depth of immersion.
An article about all the nuances of constructing a strip foundation on a slope is here.
Installation difficulties
The foam concrete floor screed depends on the quality of the mixture, which, in turn, is determined by a number of factors. The main ones are the durability and compatibility of the foam. Despite the ease of working with the material, there are certain nuances. So, during the pouring process, even professionals sometimes create mixtures of different densities and use them to lay them in one screed. This leads to differences in the density of different areas of the area - to the point that some areas may resemble oil in consistency. Cellular foam concrete is an excellent building material, but to obtain a good quality mixture at the output, it is necessary to create the right conditions: humidity level of about 65% (early ripening), temperature within + 25-30C, absence of serious loads and drafts.
Such requirements for foam concrete screed can greatly complicate the entire installation process, so builders are looking for ways to simplify installation and achieve the best results with minimal effort and cost.
Advantages and disadvantages of monolithic foam concrete
Foam concrete differs from ordinary mortar in that a foaming agent is added to its composition. This makes the material cellular - it contains a large number of closed pores, which provide it with certain characteristics, advantages and disadvantages.
The main advantages of foam concrete screed:
- Better sound insulation
- Light weight - minimal load on the foundation and floors of the room
- Good thermal insulation properties - for example, foam concrete floors are usually 3-4 degrees warmer than conventional concrete floors
- Reducing cement consumption – reducing costs for purchasing and transporting material
- Possibility of pouring onto deformed, multi-level, uneven surfaces - there is no need to pre-level the surface for laying the composition
- Drilling tolerance
- Long service life - from 50 years
- Simple technology for pouring floors, the ability to do the work yourself, without the involvement of qualified builders
- Minimum deadlines for completing work
- Easier maintenance, cheaper and faster repairs
The main disadvantage of making a floor screed from foam concrete is that after hardening the material does not demonstrate very high density and strength characteristics. Thus, foam concrete with a density of D800 can be pressed with little force. Therefore, during the shrinkage process, cracks may appear on the surface, and in the future, marks from heavy furniture and appliances may remain on the floor. Also, the disadvantages of the material include low fluidity during the pouring process, water permeability, and inability to withstand severe frosts.
About the arrangement of interfloor ceilings - choosing the optimal option
When thinking about constructing an enclosing structure above the basement of the building and between floors, developers have to look for an answer to the question: “Which floors are best for a house made of aerated concrete?” Some believe that the optimal solution is a wooden floor, which is lightweight, affordable and maintainable. The main argument for choosing this option is the ease of installation of wooden beams.
However, there are limitations:
- the permissible interval between walls is only 6 m;
- wood needs antiseptic treatment;
- the beams do not have the necessary fire resistance;
- mold and fungal colonies may form on beams.
That is why it is advisable to give preference to a floor formed on a metal profile, or to choose an interfloor structure made of reinforced concrete.
For the construction of houses made of aerated concrete, both prefabricated and monolithic floor structures can be used
When choosing an option, it is important to take into account the results of the load calculation, as well as the following factors:
- functional purpose of the building being constructed;
- distance between main walls;
- number of floors of the future building;
- the magnitude of the forces acting on the ceiling;
- variable and constant loads;
- properties of the building materials used;
- material and section size of floor beams.
It is advisable to entrust the choice of covering option to professional builders who will develop design documentation and correctly perform the necessary calculations.
Ground floor floor: requirements
In order to properly arrange the ceiling on the ground floor, you need to know about the requirements that it must meet:
- The material must be strong, reliable and durable.
- The ceiling must adequately withstand climatic, technological and temperature influences.
- The structure must withstand permanent and temporary loads from load-bearing walls and foundation.
- The base must be quite rigid, with regard to the permissible performance of the structure for deflection.
- The design should not create bridges of sound and cold;
- The material must have thermal insulation properties.
1st floor floor structure
Wall thickness for different regions
It is better for a specialist who knows all the standards and requirements to calculate the thickness of the internal and load-bearing walls to be able to take into account the features and nuances. Usually, when choosing thickness, they are guided by the required heat saving and strength indicators. The main calculations concern load-bearing walls; internal non-load-bearing partitions can be made thinner.
General advice from experts is as follows: for middle regions (Moscow and nearby cities) a standard 40 centimeters of thickness is enough, in warm regions they take 30 centimeters as a basis, in cold ones - from 50 centimeters. But these are fairly average indicators; it is advisable to focus on the most accurate calculations.
It is customary to take the following data as a basis: for central Russia, the heat transfer resistance of walls, according to SNiP, should be equal to 3.2 W/m*C. For colder regions the indicator is higher, respectively, for warmer regions it is lower. The required level of thermal protection (indicated in 3.2) is given by the following options: 30 centimeters of wall thickness from D300 blocks, 40 centimeters from D400, 50 centimeters from D500.
The overall thermal efficiency of a building is affected by the thickness of the walls, insulation (not only the walls, but also the ceilings, roofing, floors, reinforced belts, windows, lintels). Through insufficiently thick walls, the building loses about 30-40% of heat. For houses with permanent residence, the choice of D400/D500 blocks and a wall thickness of up to 40-50 centimeters is considered optimal. A country house can be built from D400 brand blocks with a wall thickness of 25-30 centimeters.
If you plan to insulate the walls, they can be thinner
Here it is important to ultimately obtain the proper thermal protection indicator, based on the values of aerated concrete and the selected insulation (it can be polystyrene foam, mineral wool, etc.). Thus, the cost of insulation increases, but the cost of aerated concrete decreases.
The higher the thermal protection value of the material, the better. The indicators are shown in the table:
This is a table with odds for different brands (the lower the better, the rule works here):
To understand the algorithm for performing calculations, you can consider the following example. If you want to build a house in Moscow and its environs, the thermal resistance should be R=3.28. D500 30 centimeters thick is used, insulation is used.
How to find the required parameter:
- The thickness of an aerated concrete wall (0.3 meters) is divided by the thermal conductivity coefficient of grade D500 (0.14) - the thermal resistance of a bare wall is R=0.3/0.14=2.14 m2*C/W.
- You need to subtract the resulting indicator from the desired value: 3.28-2.14 = 1.14. This is the thermal resistance of the insulation.
- Mineral wool, for example, gives a thermal conductivity coefficient of 0.04. If you multiply 0.04 by 1.14, you get the required insulation thickness: 0.04x1.14=0.0456=45 millimeters=4.5 centimeters. That is, the thickness of the insulation for walls of 30 centimeters should be about 5 centimeters.
Knowing the standard values, you can easily perform calculations for any brand of aerated concrete blocks and types of insulation.
Advantages of wooden floors
Advantages of using beams in the construction of buildings made of aerated concrete blocks:
- The low cost of materials compared to reinforced concrete structures makes it possible to reduce the cost of building construction.
- The low weight of building elements reduces the load on load-bearing wall panels and roofing and prevents the possibility of their deformation.
- Simple installation of elements, easy to fix with screws, staples, etc. You do not need to use special equipment for the work.
- Wood is easy to process; beams can be given different configurations to suit an architectural project. The elements can be used in buildings with bay windows.
- Installation work is carried out at different times of the year, including at sub-zero temperatures.
However, it is necessary to take into account the need for moisture-resistant and antiseptic treatment using special impregnations. Application of the compounds prevents the appearance of mold on wood.
There are special fire-resistant impregnations that are used to treat elements in buildings with high safety requirements in Moscow and other cities.
How monolithic floors are made
Before starting work, it is necessary to order equipment for transporting and supplying cement mortar to the required height, as well as a construction vibrator for compacting the material. When the concrete mixture is made on site with your own hands, it is necessary to have a concrete mixer. As reinforcement, you need to prepare metal rods and special wire for tying them. Formwork can be made from wooden beams, ordinary boards or plywood.
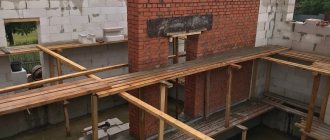
Creating a monolithic floor in a house made of aerated concrete with your own hands begins with the construction of formwork, which is a huge form into which the associated reinforcement is laid, and then liquid cement mortar is poured. It is made vertically stable so that it can withstand the weight of the entire solution poured into it. The sequence of the formwork construction work itself is as follows:
- First they make the supports. At this stage, it is recommended to strictly ensure that the horizontal level is maintained. Deviations will seriously affect the strength. It is necessary to make racks taking into account the load, which can reach 300 kg;
- The distance between the supports is 1 m;
- Next, the beams are installed across the future slab, and it is also attached directly to the walls. Additionally, to create maximum strength of the formwork, they are sewn to the posts;
- The parameters of the installed beam must prevent the structure from deflecting under the weight of the poured concrete;
- After creating the base, boards or sheets of plywood are laid out on it, which are additionally covered with an insulating film on top;
- During this period, all ventilation pipes and electrical wiring should be laid.
When the formwork is ready, you can begin to create the reinforcing mesh. This requires:
- Using metal rods with a cross-section of about 10 mm, you need to make a mesh by fastening them together with wire;
- The rods are fastened in a checkerboard pattern;
- Installation of reinforcement is carried out at several levels at once to ensure the resistance of the future structure to deformation;
- The mesh is laid in such a way that at least 2.5 cm remains before the formwork. This will create the proper thickness of concrete in such places;
- The top layer of reinforcement should be placed 10 cm above the bottom.
The next step is pouring concrete
Here it is important to strictly observe the parameters of strength, quality, and thickness:. It is important to use only high-quality concrete options with a strength grade of at least M200
This parameter determines the future characteristics of the constructed floor;
It is important to use only high-quality concrete options with a strength grade of at least M200. This parameter determines the future characteristics of the constructed floor;
- The thickness of the slab being erected must be at least 15 cm, but not more than 30 cm;
- Filling is possible only at air temperatures above +5°C. When it is required, but the weather does not allow it, special heaters are installed.
The procedure itself is carried out as follows:
- First, the required height is marked. The pouring itself is done at a time, so you need to have the required volume of concrete ready nearby, as well as a concrete pump that will allow you to continuously pour the solution into the mold. If this process was divided into several stages, then the ceiling will lose its strength;
- While the solution is being poured, it must be treated with a construction vibrator to remove bubbles from the composition. The mass of concrete itself is not enough to create the required level of compaction;
- Finally, you need to level the surface of the concrete so that it is flush with the formwork.
Creating floors between floors can be done in different ways. For this purpose, metal or wooden beams, reinforced concrete floor slabs, as well as monolithic structures are used. Each method has its own characteristics that need to be taken into account.
Making an armored belt
Since aerated blocks have a relatively fragile structure, before arranging the ceiling on the walls, it is necessary to form a reinforcing belt of reinforced concrete. It will evenly distribute pressure loads over the entire area of the walls, and will also additionally strengthen the walls of the house.
To create an armored belt, U-shaped gas blocks are used, which are laid as the top row. If such blocks are not available, you can make them yourself by cutting out recesses in ordinary aerated concrete. After laying the U-shaped blocks, a load-bearing frame of reinforcement is formed in the recesses. It consists of four longitudinal rods connected to each other into a single structure. Pieces of wood are placed under the lower reinforcement to create a monolithic layer of concrete under the metal.
After this, concrete is poured into the blocks. The surface for laying the ceiling is ready. An armored belt can be made without U-shaped blocks by simply pouring concrete into the formwork fixed on top of the walls, but this method is too labor-intensive.
Technology Features
- Floors on the ground - they are laid “on the ground”, which is why many people have associations with earthen floors, which historically were characteristic of poor dwellings. Here, most critics with similar arguments are mistaken, because floors on the ground have nothing to do with an earthen floor. This is a complex structure with a large number of layers, each of which performs its own function. At the same time, floors on the ground are not connected to the foundation, this is their fundamental difference from floors.
- Floors are a structure that rests not on the ground, but on the foundation. The slabs of the first floor rest on top of the slabs. Floors can be monolithic, prefabricated or prefabricated monolithic. Monolithic ones are poured directly on site; for this purpose, formwork is arranged, where a reinforcement cage is placed. Prefabricated slabs are made from ready-made slabs, which are delivered to the site and laid by a truck crane. Prefabricated monolithic include ready-made elements and parts that are poured on site.
(2)
Step by step guide
To carry out the process efficiently, it is necessary to strictly follow the rules for installing a heated floor on the ground:
- Remove the top fertile layer, remove large debris and stones. Level and compact the bottom of the resulting pit. This will be the basis for the layers being laid, so it is best to check the level using a level.
- Next, a layer of sand is poured, and any sand is suitable for filling. It must be compacted well and leveled.
- The next layer in the composition of a warm floor with water heating is expanded clay or crushed stone. However, it should be remembered that crushed stone has lower thermal conductivity. It is better to take stones of small or medium size. It takes a long time to compact until the surface becomes almost monolithic.
- Now it’s the turn of the preliminary screed, for the manufacture of which you can use two options. In the first case, sand and crushed stone are spilled with a liquid solution of sand and cement in a ratio of 2:1. In the second case, a rough screed 5-7 cm thick is poured with reinforcing mesh laid. This option is considered more reliable, capable of withstanding significant loads.
- After the screed has set and the concrete solution has hardened, they proceed to laying the waterproofing layer. In most cases, polyethylene film 200 microns thick, laid in two layers, is used for this.
- Expanded polystyrene slabs are laid on the waterproofing; the joints must be taped to prevent leakage of the solution.
- Metallized waterproofing must be laid on top.
- Then they begin installing the “warm floor” system. Install fasteners, lay cable and heating tubes.
- The entire structure of the heated floor on the ground is filled with reinforced heated floor screed.
Before making a heated floor in a private house, you need to take into account all the nuances. The thickness of each layer is determined by the climatic conditions of the region; for colder areas, thick layers of cake are required; for the southern regions, the layers can have a thickness of 2 to 5 cm. Careful compaction and leveling of the layers is the key to a higher quality and durable heated floor. To compact layers of heated floors on the ground with your own hands, you can use hand tools, but a mechanized process allows you to achieve maximum efficiency.
A fairly important point in the arrangement of a water heated floor is the waterproofing and thermal insulation of the foundation. It is expected that the surface of the base will be treated with waterproofing material before the start of all work. In addition, it is recommended to lay polystyrene foam boards around the perimeter, which will become an obstacle to the path of cold air inside.
How to make floors in a house made of aerated concrete - recommendations from professionals
Regardless of the design features of the floor for an aerated concrete house, the general algorithm for constructing an interfloor structure includes the following steps:
- Calculation of the strength of floor elements.
- Development of design documentation.
- Calculation of the need for building materials.
- Purchase of building materials.
- Preparation of equipment and working tools.
- Construction of a reinforced belt at the top of the walls.
- Ensuring the flatness of the supporting surface.
- Formation of the floor in accordance with the selected design option.
Professional builders recommend:
- select the floor design based on the results of strength calculations;
- use high-quality building materials;
- lay the beams in the prepared grooves on the aerated concrete walls;
- control the horizontality of the structure using a level;
- waterproof the overlapping structure with roofing felt or polyethylene;
- use sheet heat insulator to reduce heat losses;
- carry out installation in strict accordance with technology.
To ensure a long service life of the overlapping structure, it is important to choose the right type of overlapping and comply with the technology requirements
Nuances of constructing walls from aerated blocks: brand and thickness of blocks
For the construction of load-bearing walls from aerated concrete blocks, blocks of grade D500 and higher are used. The numerical index means volumetric weight in kg/m3. For internal non-load-bearing walls and partitions, the use of grade D400 is acceptable. The lower grade D300 is usually used as insulation for walls made of more durable material.
When the number of floors is three or more, blocks with a grade of at least D600 are used.
The thickness of the walls is determined by thermal engineering calculations. The thermal resistance of a wall is determined by the sum of the coefficients of resistance to heat transfer by the internal and external surfaces of the walls, as well as each layer of the wall itself.
Let's consider a thermal engineering calculation of the heat transfer resistance of a wall made of D500 blocks 375mm thick, insulated with a 50mm mineral wool board.
The thermal resistance of a wall layer to heat transfer is determined by dividing the layer thickness by the thermal conductivity coefficient (see table).
Thermal characteristics of aerated concrete blocks.
Very often in advertising brochures you can find a thermal conductivity coefficient for the D500 brand equal to 0.1. This is nothing more than a marketing ploy. This value is either deliberately rounded down or simply provided for a completely dry block condition. In real operating conditions, the thermal insulation properties are worse - their values are given in the column of design coefficients. The letters “A” and “B” indicate the humidity zone corresponding to the construction site. For the coasts of large bodies of water, zone “B” is accepted, for other places, as a rule, zone “A”. The higher the water saturation of the material, the worse its thermal insulation properties.
Characteristics of other materials are given below.
Thermal characteristics of common building materials.
The sum of the coefficients of resistance to heat transfer by wall surfaces (external and internal) is equal to 0.158 W/mS.
We determine the thermal resistance for masonry made of D500 blocks with a thickness of 375 mm (0.375 m) in the humidity zone “B”:
0.375 / 0.16 = 2.344 W/mS
Insulation with a 50mm (0.05m) mineral wool board will give the following indicators:
0.05 / 0.09 = 0.556 W/mS
The total heat transfer resistance of the wall will be:
R=0.158 + 2.344 + 0.556 = 3.058 m2/W*S
Is this result enough? It depends on the climatic zone of construction. Determination of the required value of R is carried out according to table. 4 SNiP 02/23/2003. The calculation is relatively cumbersome; it is easier to find out the required R value for your region using any search engine. The higher the value of this indicator, the warmer the house.
Optimal solution
As an independent floor covering, foam concrete screed is rarely used and where there are no constant loads - technical floors, attics. Provided that all requirements are met and a high-quality mixture is poured, the floor is made quickly and inexpensively. In other cases, linoleum, parquet, porcelain stoneware and other types of coatings are placed on foam concrete.
Installation diagram for self-leveling foam concrete floors:
- Thermal insulation layer - use foam concrete grades D300-D500
- Service layer - foam concrete grades D800-D1200 are suitable; for coatings with heavy loads, ordinary concrete mortar for screeds is chosen
- Facing layer - any type of coating
This is how foam concrete floors are installed today. This is the most optimal option for creating high-quality coverage with minimal investment of time, effort, and finances.
Size calculation
Before covering the first floor of a house made of aerated concrete, you need to make careful calculations, choose a structure, draw up a project, and decide on the type and quantity of materials needed. The maximum dimensions of beams depend on the type of lumber and the expected load. For solid boards, the maximum permissible length is 6 m, and for laminated timber - 12 m. At the same time, the optimal weight per 1 square meter is considered to be 400 kg for residential premises and 200 kg for auxiliary and technical premises. The standard frequency for installing timber is 60 cm. Load refers to the mass of finishing material, insulation, waterproofing, people, furniture, household appliances and other interior items.
For independent design, you can use the table, which displays the recommended ratio of the length and cross-section of beams.
| Purlin length | 2,0 | 2,5 | 3,0 | 4,0 | 4,5 | 5,0 | 6,0 |
| Beam section | 100x150 | 100x175 | 125x200 | 150x200 | 150x225 | 175x250 | 200x250 |
In addition to the distance and parameters of the beam, the material of its manufacture should also be taken into account. Each type of wood has its own parameters of strength, flexibility, hygroscopicity and durability. Oak has the best performance, followed by cedar, larch and eucalyptus. The lowest performance indicators are for spruce, pine and birch. However, higher quality material costs several times more. Each developer makes the choice himself, focusing on the purpose of the building, its estimated service life and his financial capabilities.
Fastening a monolithic floor
Before constructing the floor, an armored belt is made, since aerated concrete blocks are a fragile material that can easily burst under load. Under the armored belt, wooden formwork should be built that follows the contour of the walls
It is important that it be solid, that is, not interrupted. After this, the armored belt is filled with concrete solution
Preparing armored belt for ceilingsSource banya-ili-sauna.ru
Before you begin constructing the formwork, it will require the installation of supports. As a rule, steel supports are used at this stage
It is important to install the supports evenly, without errors, as the consequences can cause great difficulties. To level the stands it is convenient to use a building level
One rack can withstand a load of 300-500 kg.
Using a building level will help lay beams without distortions. Source lestorg32.ru
Afterwards, the transverse beams are laid (you can start either from the top or from the bottom, sewing them to the supports). At the next stage, the reinforcing mesh is installed. The cables are laid first, since if the concrete is poured first, laying them will be problematic. At the same stage, pipes for ventilation are installed and an unfilled area is left where there will be a staircase between floors. Wire is suitable for tying the reinforcement, after which the structure is filled with concrete.
Based on the volume of the concrete mixer, concrete is made according to the following proportion:
- Cement – 7 liters;
- Sand – 15 liters;
- Crushed stone and water – 30 liters.
An area is prepared in advance, where the finished mixture is subsequently poured. The monolithic floor itself should have a thickness of 150 to 300 mm. For the mixture to completely harden, it is enough to wait a few days. If the floor was divided into sections, then the beams used to separate it must be removed.
Base: monolithic reinforced concrete slab
The main advantages of a monolithic slab foundation include the following:
- This is the most reliable type of base that can be used on almost all types of soil. The formation of a concrete slab is carried out on top of a bed of crushed stone and sand.
- The construction of such a foundation does not involve complex preparation - you only need to clear the site and remove the fertile layer of soil.
- The technology of pouring the slab is extremely simple and does not require special skills.
- Such a base can withstand heavy loads.
- Due to the presence of a reinforcing element in the slab, the load from soil heaving, as well as from the weight of the structure, is distributed evenly over the base.
- Compared to other types of foundations, installing a slab foundation is not as labor-intensive.
Slab concrete foundation
Disadvantages include the lack of a basement and the high cost associated with a large volume of concrete solution.
After installing a rough screed on the surface of the monolithic slab, select the material for the floor. There are two options - make a clean insulated screed, install a screed with a “warm floor” system, or choose a wooden floor. It is worth noting that the screed can be not only traditional, but also semi-dry or dry.
How to make a heated floor correctly? This process will largely depend on what type of system has been chosen for installation. Installation is not as complicated as it seems, but it is quite a troublesome task. Read more about how to install heated floors in a special article.
Monolithic foundation slab
Floor by joists
Construction of a wooden floor on a monolithic reinforced concrete slab
To fasten the boardwalk, logs are used, which are fixed at a distance equal to the width of the insulation - usually 60 cm. First, a film layer of waterproofing is laid over the entire surface of the slab or a coating application technique is used. You can also use roofing felt, glassine or membrane.
Coating waterproofing of the slab
To increase heat conservation, cover the top with foil-foamed polyethylene foam.
Foil polyethylene
An important step is the installation of logs - they must be level and securely fixed. This will ensure the quality of the wood flooring and its service life. Joists can be adjusted using wooden or plywood wedges or shims on brick or wooden posts. As experienced craftsmen advise, the joists should be secured to the base through adjustable pads.
Fixing lag
You can choose a more modern method of fixation - adjustable logs.
Adjustable joists
Thermal insulating material is laid between the joists. You can use mineral wool boards or a rolled analogue, polystyrene foam or expanded polystyrene, and bulk heat insulator - expanded clay. The main condition is that the material must fit tightly to the joists without forming gaps. To ensure this, you need to think in advance about the width between the joists; it can be 1-2 mm less than the width of the insulation, so that it is laid as tightly as possible. In addition, at the stage of laying the insulation, if necessary, communications are laid inside the structure.
Communications inside a wooden floor structure
A vapor barrier film or polyethylene is placed on top of the thermal insulation layer. The canvases are overlapped by at least 15 cm, and the joints are taped.
Laying vapor barrier on insulation
If there is a desire for the house to have a wooden floor, then the next step is to install flooring made from tongue-and-groove boards. The advantages of such a coating lie not only in its naturalness and natural beauty, but also in durability and the possibility of repeated renewal of the decorative layer. If desired, the boardwalk can subsequently become the basis for other decorative coverings - laminate, wood, tiles.
Do you want to know what tools will help you lay laminate flooring quickly and with minimal effort? Read the article “Tools for laying laminate flooring.”
tongue and groove board
If you plan to lay other decorative coverings, then the base for them can be plywood or OSB boards. Moisture-resistant plywood is laid in two layers with the seams staggered, fixed with glue and self-tapping screws. The joints between the sheets are puttied, and the flooring before laying the decorative coating is sanded and cleaned of wood dust and other contaminants using a vacuum cleaner.
Plywood flooring
Economic comparison of options
Before choosing a construction technology, a technical and economic comparison of the options should be carried out; without it, it is impossible to talk about the cost of floors on the ground compared to floors. There are a number of factors to consider when making this comparison.
The need to replace the soil - if the soil in the internal backfill area is subsiding, then it needs to be replaced. This significantly affects the cost; when replacing large layers of soil, the cost may not be in favor of the floors.
Transport costs for the delivery of reinforced concrete products in the region - each region has its own conditions on the building materials market
When using ready-made slabs, it is important to consider the costs of delivering products to the site. Losses on logistics and rental of cargo equipment may affect total costs
Cost of materials in a specific region
In fact, you should compare the cost of backfilling and the cost of delivering the slabs. In the absence of problematic soils, floors on the ground are usually cheaper.
Floors in a wooden house
A private house is not one room but, as a rule, several which can also be located on different floors. Therefore, depending on their location, wooden floors are:
- for the first floor - these are those that are installed directly at ground level or on the basement slab;
- floor for interfloor coverings - must withstand significant loads;
- Let’s not forget about the wooden floor for the bath, toilet, as well as balconies and loggias. High humidity and strong influence of the external environment are important for it.
All these nuances must be taken into account when equipping your private home with wooden floors. But at the same time it must always meet the following requirements:
- be tough;
- able to withstand heavy weight;
- easy to assemble and install;
- have a high moisture resistance;
- increase the sound insulation of the room;
- have low thermal conductivity, provide vapor and waterproofing;
- meet all fire safety standards.
Video example of installing a wooden floor with your own hands:
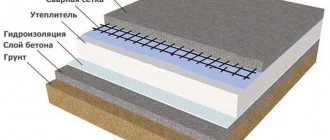
Description of the main floor layers based on the ground
Let's analyze the main layers (pie) of the floor according to the ground. Let's look at the structure from the bottom up. We will describe all the layers that may exist, without reference to a specific drawing.
Compacted soil - the base for the flooring, must be well compacted;
Bedding layers (sand 7-10 cm and crushed stone 7-10 cm). Bedding layers can be used to protect against capillary rise of water and can be used as a leveling layer. The crushed stone in the bedding layer should be of a fraction of 30-50 mm (large). The sand in the bedding layer can be of any kind, both river and quarry (gully). It depends on the purpose for which the bedding is made, whether it is possible to replace crushed stone with expanded clay, you can read about this in the paragraph Is it possible to replace crushed stone with expanded clay, in the same article, below
It is important that the bedding layers are well compacted. There are conditions when a bedding device is necessary, and when it is not necessary.
You can read about this in the paragraph What determines the design of a floor on the ground, in the same article, below;
Rough floor screed on the ground. This is a layer on top of bedding or compacted soil. It is carried out on a polyethylene film (it is spread on the ground or bedding), the thickness of the rough screed is 5-7 cm. It does not need to be reinforced. Sometimes the rough screed is replaced with a pour. About the pouring - in the next paragraph, about when you can replace the rough screed with the pouring - in the paragraph Is it possible to replace the rough screed with the pouring, in the same article, below. The crushed stone in the construction of the rough screed should be of a fraction of 5-10 mm (fine). The sand in the construction of the rough screed must be river sand, not quarry (gully);
Pouring (pouring) the floor over the ground. It is arranged by pouring a solution onto the bedding layer. The thickness of the pouring is equal to the thickness of the bedding layer. It fits without plastic film;
Waterproofing. Constructed from roofing felt, 1-2 layers. You can take the most ordinary roofing material, without sprinkling. There are conditions when waterproofing is mandatory. You can read about this in the paragraph What determines the design of the floor on the ground below;
Floor insulation on the ground. As insulation for floors on the ground, we recommend using EPS with a density of 28-35 kg/m3, or polystyrene foam with a density of 30 kg/m3 and higher. The thickness of the insulation is determined by calculation (depending on the climate zone);
Clean screed. The thickness of the finishing screed is 7-10 cm. The crushed stone in the construction of the finishing screed should be of a fraction of 5-10 mm (fine). The sand in the construction of the finishing screed must be river sand, not quarry (gully). The finishing screed (as opposed to the rough screed) must be reinforced. Reinforcement is performed with a mesh with a wire diameter of 3-4 mm. How to choose, 3 mm or 4 mm, is written in the paragraph What determines the design of the floor on the ground below;
Finish coating. The final finish of the floor on the ground can be anything. Accordingly, the details of the device are different for each type of coating.
Which floors to choose for an aerated concrete house
To decide on the choice of flooring for an aerated concrete house, you first need to make calculations on the load-bearing capacity of the walls, that is, what maximum load the walls can withstand.
After all, if your walls are only 200 mm thick, made of D400 aerated concrete with strength class B1.5, and at the same time the span length is quite large, then the load-bearing capacity for a monolithic or slab floor may not be enough. In such a situation, it is necessary to use wooden, aerated concrete or prefabricated monolithic floors.
Also important factors influencing the choice of floors are:
- Floor bearing capacity
- Maximum span length
- Soundproofing
- Price
- Construction time
- Possibility of access for special equipment
We will talk about all these factors and nuances further, considering and comparing each of the flooring options.
- Monolithic
- Prefabricated monolithic
- Reinforced concrete slabs
- Aerated concrete slabs
- Wooden or metal beams