The process of laying any foundation involves several stages:
- Site preparation and foundation marking
- Excavation work, trench digging, pillar drilling
- Preparing a pillow for the foundation
- Installation of reinforcement cage and construction of formwork
- Pouring concrete and leveling
In this article I will talk in detail and step by step about pouring the most popular today - strip foundation and about the distinctive features of the stages of pouring other types.
Pouring the foundation yourself
There are several types of strip foundations, but the do-it-yourself pouring technology is almost the same for everyone.
You can read about pouring a shallow strip foundation, as well as about a non-buried strip foundation, in my previous articles.
Site preparation and marking for strip foundation
The site preparation process is not difficult at all. First of all, you need to clear the site, or at least the place where you are going to build a house, from excess vegetation, debris, large roots, etc.
When the area is clean, we mark the future foundation strip according to the project.
If you don’t have a level or other special devices, don’t despair; for high-quality marking we only need a tape measure, pegs, a cord and, possibly, a sheet of paper.
We mark all external walls by installing pegs in the corners of the future house. After installing the pegs, measure the diagonals of each rectangle. It should turn out that the opposite sides of the rectangle and its diagonals are equal. If this does not happen, then we draw a sketch of the house on paper, put down the resulting dimensions and think about where and which peg needs to be moved. After corrections, be sure to repeat the measurements. And so on until you have all the sizes.
Try to make the markings of the future structure as accurately as possible, this will help in the future to avoid some difficulties with aligning the corners when building the walls of the house. And for those who want to learn more about marking the foundation for a house, read my article about this, which describes in detail the marking process with examples.
Digging a trench for a monolithic strip foundation
You can dig a trench for a strip foundation manually or mechanically.
It’s quick and cheap to dig with an excavator, but it doesn’t really adhere to dimensions; in some places it can end up being a little wider, in others a little deeper, which will subsequently affect the volume of concrete poured. The savings in this case are very doubtful.
If you don’t want to dig yourself, then it’s better to hire workers and ensure that all dimensions are observed, this will subsequently help you save on the volume of concrete you order.
You can easily calculate the depth of laying a strip foundation by studying one of my articles. It describes in detail all types of strip foundations, their depth and what factors it depends on.
We build a sand cushion for the foundation of a house
The foundation cushion is laid from washed sand, without various admixtures of clay, etc.
Sand, unlike the soil in which the foundation is laid, is much less susceptible to heaving and will evenly distribute water under the foundation, which will eliminate uneven shrinkage of the foundation.
Sand is poured into the trench and compacted. The layer of such a sand cushion should be at least 20cm.
If you do not have special devices for compacting sand, then you need to at least spill it well with water before pouring.
We reinforce the future foundation strip and construct the formwork
For the reinforcement cage, reinforcement with a diameter of 8-14 mm is used, and in order to more accurately determine the diameter and amount of reinforcement, you can use the calculation of reinforcement for a strip foundation. With it you will select the correct diameter and amount of reinforcement for your foundation.
As a rule, vertically laid rods are 8-10mm in diameter, and horizontal longitudinal rods are 12-14mm in diameter. The rods along the trench are always thicker because they will be subject to a greater load, and they, in turn, must cope with it.
In what way to knit the reinforcement frame, in a trench or next to a trench, and then lower the finished frame into it, you must decide for yourself what is more convenient for you. The disadvantage of tying reinforcement in a trench is that if the trench is not wide enough, you will cover it with your body.
It is advisable to construct a reinforcing cage using knitting wire, and not using a welding machine, because weak spots appear in the welding areas of the reinforcing rod.
Formwork for the foundation, if necessary, is constructed using boards 10-20 cm wide and 2.5 - 4.0 cm thick.
When constructing the formwork, it is necessary to eliminate large holes in the formwork and firmly secure it. Opposite formwork panels must be tied together with pins, thus preventing the formwork from bursting when pouring concrete.
The corners of the formwork also need to be firmly fixed, because these are the weakest points.
How to pour concrete for a foundation
Pouring concrete for any type of foundation is the same. As a rule, for large volumes purchased concrete is poured, since a monolithic reinforced concrete strip can only be achieved if the foundation is poured at one time.
And so, all the preparatory work has been done, now it is necessary to pour concrete for the future foundation of the house.
For pouring, concrete grades M200 - M400 are used, which depends on the composition of the concrete.
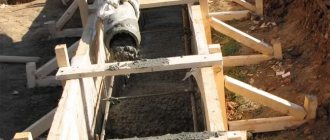
Pouring concrete into a trench always starts from the corners, and then the remaining voids are filled.
The ideal conditions for pouring the foundation for a house is that the mixer has access to all corners of the house.
The mixer drives up to the corner and the pouring process begins. At this time, one person should hold the gutter, guiding it, and the other (preferably two) should help the concrete to be evenly distributed throughout the trench using a shovel, for example.
In order to expel air from concrete, you need to use a deep vibrator; if you don’t have one, then you need to vibrate using improvised methods. You can vibrate with a bayonet shovel, this vibration is called the bayonet method. A good result can be obtained by tapping with a hammer on the reinforcement frame, or on the formwork (not too much!).
As I said that pouring a foundation for a house will not be difficult, at this stage we examined in detail the pouring of a strip foundation, the stages of which in most cases are suitable for pouring any type of foundation.
Construction technology of insulated slab
Energy saving is becoming a really hot topic, so few people build foundations without insulation anymore. Any slab foundation is a multi-layer structure, and in the case of insulation there are even more layers. To achieve the desired level of quality, each level must be carefully completed. Let's look at each in more detail.
Foundation structure: monolithic slab
Preparing the base
The dimensions of the pit for the monolithic slab must be at least 1 meter larger than the building itself. In this area, the fertile soil is completely removed. Its thickness varies in different regions - from 20-30 cm to 50 cm and more. In any case, everything is removed.
Dig a pit with a margin of 1 meter in all directions
Along the edge of the pit, just below the general bottom level, drainage pipes are laid to drain surface water into drainage wells. This measure is necessary so that the walls and the foundation itself do not get wet.
Complete foundation diagram monolithic slab
The bottom is leveled, the holes are filled in, the humps are removed, everything is carefully leveled to the horizon level and compacted. Geotextiles are rolled out onto the leveled bottom. It should cover not only the bottom, but also the walls. The canvases are spread with an overlap, the edges are glued together with reinforced tape. Geotextiles prevent plant roots from germinating and also prevent sand, which serves as a damping pad, from being washed away.
Leveling the bottom
Clean, medium-grain sand is poured onto the laid geotextile. The layer of sand is 20-30 cm. It is poured in thin layers, distributed evenly and compacted layer by layer. The layer of sand that can be properly compacted with a manual vibrating plate is 8-10 cm. These are the layers that sand is laid in. It must also be laid level, in an equal layer throughout the entire pit.
The sand is poured, it needs to be spilled and compacted
The thickness of the layer can be controlled using stretched cords. They are tied to driven stakes, specially made supports - benches, to formwork installed in a level (see photo below). All cords must be in a horizontal plane. Knowing the initial distance from the bottom of the pit to the tensioned threads, you can determine the height of the poured layer.
Crushed stone is poured onto the compacted sand. Fill the entire volume at once, distributing it evenly over the site. The leveled crushed stone is compacted to a high density.
Crushed stone is filled, sewerage and water pipes are installed
At this stage, sewer and water pipes are laid. Ditches of the required depth are dug in the already compacted crushed stone. They should be such that there is some space around the embedded elements. Pipes are laid in the ditches, filled with sand, leveled, and the sand is compacted with a shovel or board. More severe compaction may lead to cracks. That’s why the pipes are laid after compaction.
Concrete preparation
Formwork is placed around the perimeter of the pit. It is usually assembled from 40 mm thick boards or 18-21 mm plywood. The height of the formwork for a monolithic slab is the total thickness of the remaining layers. Along its edge it is convenient to control the level of concrete when pouring, so the board must be edged. To save material, you can set up the formwork only for preparation. After the concrete has set, it is dismantled and placed higher, reused to fill the main slab. But the loss of time with this approach is significant, so this is not always done.
In any case, the formwork is supported from the outside with stops and jibs. The structure must be rigid to support the mass of concrete.
A 100 mm layer of concrete is poured onto the compacted gravel. This can be low grade concrete - B7.5 - B10. Concrete preparation will be a reliable basis for laying waterproofing and insulation, and also serves to more evenly distribute the load from the house.
Concrete preparation poured
Waterproofing
Since the monolithic foundation slab is completely in the ground, it needs careful waterproofing. Therefore, two types of materials are usually used: coating and roll. The base is first thoroughly dust-free, then impregnated with diluted kerosene or solvent primer (and the sides of the concrete preparation are also coated). It is sold very thick and does not adhere well to concrete. As a result, the roll waterproofing adheres poorly and the foundation will get wet. When diluted, it becomes more fluid and penetrates deeper into the concrete. At the same time, it almost does not lose its properties.
When laying out rolled waterproofing, it is released 10-15 cm beyond the foundation. The panels are rolled out with an overlap, the connecting edges must be coated with bitumen mastic and pressed well. When laying out, you need to make sure that there are no creases or waves.
If the groundwater level is high, two layers of roll waterproofing may be needed. It is then rolled out crosswise and also glued onto a primer (bitumen waterproofing), but it can no longer be thinned.
Double waterproofing of a monolithic foundation slab - coating and roll
Of the rolled waterproofing materials, Gidroizol and TechnoNIKOL Technoelast EPP-4 on high-density polystyrene performed the best. Tekhnolnikol of this brand has a high tensile strength of about 60 kg, which increases the chances that it will not be damaged during further work. You shouldn’t use roofing felt, no matter how much you want to save money. In its modern version, it is too thin and brittle and quickly loses its properties. You cannot replace the waterproofing in the slab, so use the best material.
Capillary suction of moisture through the slab can also be reduced using liquid impregnations such as Betonite. It significantly reduces moisture absorption. Penetrates to a depth of 50-60 cm, so it saturates the concrete preparation through and through. The disadvantage of this material is its high price, but the properties of the material are excellent.
Insulation
To insulate the slab foundation, high-density extruded polystyrene foam is used. The thickness of the insulation layer is 10-15 cm, depending on the region (for the Middle Zone 10 cm is enough). Laying is carried out in at least two layers, overlapping the seams that form cold bridges. This requires more time, but heating costs will be lower. If the slabs have an L-shaped lock, they can be laid in one layer.
The insulation is laid
Since polystyrene foam is not friendly with petroleum products, a thick polyethylene film is spread on it, and then heat-insulating material is laid.
Reinforcement
For the reinforcing frame, ribbed reinforcement of class AIII, with a diameter of 12-14 mm, is used. It is laid lengthwise and crosswise, in increments of 15-30 cm, and can have one or two layers. It all depends on the type of soil and the mass of the building. All reinforcement parameters are calculated separately.
The reinforcement must be at a distance of at least 5 cm from the edge of the slab. Therefore, it is placed on special supports that provide the required clearance.
The first row of reinforcement is tied, some posts are exposed for tying the second belt
When reinforced, a cage is obtained; at each intersection, the rods are tied together with a special soft steel wire. There are also connection techniques - using plastic clamps or welding. Plastic clamps are quick to tie, but not everyone trusts them. It is not recommended to use welding, because the weld seam is the most vulnerable place to rust, and the connection is too rigid. When using wire and clamps, the entire structure can “play” a little without destroying the ligament, and when welding, such movements lead to the seam bursting. As a result, the reliability of such reinforcement is low.
Pouring the foundation slab with concrete
The thickness of the slab is calculated for each specific case and can be from 20 cm to 50 cm. When pouring, use concrete of at least grade B30. The entire perimeter must be filled in one day, avoiding the appearance of vertical seams. Therefore, for concreting a slab foundation, ready-made concrete is most often delivered: large volumes are required within a certain period of time.
Simultaneously with the distribution of concrete, it is vibrated
The arrival schedule of the vehicles must be calculated so that you have time to distribute the first portion and compact it. For compaction, construction deep vibrators are used, which create high-frequency vibrations. As a result, all air is removed, the concrete mixes better, becomes more fluid and plastic. The result of this treatment is not only a smooth concrete surface, but also a higher hygroscopicity class.
As a last resort, you can fill the slab in horizontal layers. Vertical division in this case is unacceptable, since cracks are likely to appear at the joints.
Curing
For the normal process of concrete hardening, a sufficient level of humidity of 90-100% and temperatures above +5°C are required. It is advisable to fill the slab in warm weather with a temperature of about +20°C. This temperature regime is optimal for the hardening process. Caring for concrete monolithic slabs consists of preventing mechanical damage and maintaining moisture.
Immediately after laying, the concrete is covered with a diaper or tarpaulin. This prevents it from heating up from the sun, and the wind does not affect it. The film is glued into large panels. The strips are laid with an overlap of 10-15 cm and taped with tape. It is desirable that there be as few unlined joints as possible, that is, the shelter should consist of one or two pieces, if one is too inconvenient. In this case, individual pieces of film overlap each other by at least half a meter.
After pouring, the monolithic slab is covered with film
The dimensions of the film are such that the side surface of the formwork is also covered, and a load can be placed on the edges of the film, which will prevent the wind from lifting it. Also, with a load - boards - they press the place where the two panels overlap to reduce windage; they can be spread out on the surface.
If the air temperature is above +5°C, approximately 8 hours after pouring, the concrete is watered for the first time. Irrigation should be drip, not jet. To avoid damaging the surface with drops, you can lay burlap on it or sprinkle a layer of sawdust and cover it with film on top. The covering material is watered, and it maintains the moisture content of the concrete. In any case, watering is carried out only at temperatures above +5°C.
Polished surface
If there is a threat of frost, the slab and formwork are additionally insulated. You can use any heat-insulating materials, both those prepared for building a house, as well as sawdust, straw and other available materials.
When to remove formwork
For a monolithic slab, it is recommended to remove the formwork after the concrete has gained 70% of its design strength. This period depends on the temperature at which hardening occurs. This dependence is shown in the table.
Table of concrete strength gain depending on temperature
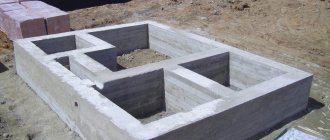
Features of pouring a columnar foundation for a house
A distinctive feature of a columnar foundation is that the foundation does not consist of a monolithic tape, but of pillars that are connected by a monolithic tape.
In this regard, after marking, the pillars are drilled using an auto drill or a hand drill; the pillars are reinforced with reinforcement with a diameter of 10-12 mm, with the reinforcement being released 15-20 cm above the level of the pillar.
After pouring the pillars, formwork for the grillage is constructed, connecting all the pillars, a reinforcement frame is created and concrete is poured into the formwork.
It should be recalled that a columnar foundation is constructed for light buildings and in “good” soil.
conclusions
The amount of 200 thousand rubles for a foundation is not large by construction standards. But we are talking, first of all, about a house from scratch. And a house that is already standing may have a different condition. If it is in good condition or at least habitable and well preserved, then our rough estimate indicates the benefits of updating the foundation. If the house is dilapidated, and you will have to invest a significant amount in its repair, even such an amount as 200 thousand rubles is better to invest in the purchase or construction of a new house, although this will certainly be much more expensive.
Features of pouring a slab foundation
A distinctive feature of a monolithic slab is that such a slab is located under the entire structure, and not just under the walls of the house.
In general, building a slab foundation with your own hands is not a difficult process, but it requires a responsible approach, and I believe that it can be moved to a separate article.
One type of monolithic slab is a slab foundation with stiffeners; the technology for pouring this type of foundation is not much different from a conventional one.
Markings are made along the perimeter of the house, then the soil is removed under the future house to the depth of the future slab + the thickness of the sand cushion.
Then it is necessary to build a sand or sand-gravel cushion, followed by compaction.
The reinforcement frame is knitted in two rows in the form of a mesh.
Pouring occurs in much the same way as with any other type of foundation.
The danger of an incorrectly made foundation
Frightened by reports of the consequences that errors in foundation construction can lead to, people are anxiously beginning to look for traces of them in their own homes. And sometimes they find it. Here are the risks of foundation problems:
1. Cracks appear in the external walls. This is caused by part of the house starting to settle and the house starting to split along stress lines.
Cracks in the foundation and walls are a dangerous phenomenon
2. The interior decoration also suffers. Pieces of plaster may fall off, and walls may come apart at the joints.
3. Communication pipes entering the house - gas and water pipes - can bend and deform, even to the point of rupture. In both cases, this can lead to an emergency.
4. Due to deformation of window openings, the window frames may not close. If the windows are constantly closed, the double-glazed windows may crack.
5. On floating soils, a house can slide if the type of foundation is chosen incorrectly or its implementation is disappointing.
6. If part of the foundation settles quickly and critically, a fragment of the house may collapse. This is perhaps the most serious consequence.
It is hardly worth waiting for minor cracks and other signs to lead to a catastrophic outcome. You need to think and calculate how much it costs to strengthen, re-lay or completely replace the foundation while completely preserving the structure of the house.
Video - Difficult house lifting option
Methods for pouring and methods for saving the foundation of a house
Depending on the use of your own labor, you can pour the foundation in three ways:
- Lay the foundation yourself, using only your own labor. This is, of course, a labor-intensive process, but not so much that it cannot be handled on your own. Ideally, 2-3 people will cope with all stages without much effort.
- Partially use someone else’s labor for some stages of pouring the foundation. This method is most common when building houses on your own; it involves the use of hired workers during particularly difficult stages of work. This will allow you to save on your own labor, but financially it will be a little more expensive.
- Entrust the pouring of the foundation for the house to professional workers. This is the most expensive method of pouring, but in this case you will not have to do anything except come to the site and control the process of laying the foundation, because even professionals sometimes do not adhere to strict technology for their own benefit.
Tips for saving on foundation
- If you hire workers to perform individual stages of pouring the foundation for a house, then you should take into account that the most expensive stage is digging the soil and pouring concrete. If we talk about digging, then it’s up to you to decide whether this is a labor-intensive process and whether it’s worth saving on it. Well, you can save a decent amount on pouring the foundation if you invite a friend to help. In fact, pouring concrete is a dirty, but not very complicated process, which two or three people can easily handle in half a day, saving about 500 rubles each. from a cube of concrete.
- With a strip foundation, you can save on deepening; if you have a not heavy and small house (wooden, for example), then instead of a deep one, you can make a shallow strip foundation.
- You can save money on a slab foundation by making it thinner, but with stiffeners. I talked about a slab foundation with stiffeners in my previous articles.
- When laying a columnar foundation, you can only save on labor, because it is already the least stable compared to its brothers.
- In some cases, fiberglass reinforcement and its use will allow you to save a little on the foundation.
Having decided on the layout and number of floors of the future building and choosing the type of foundation, it is worth calculating the cost of materials for its construction.
Let's consider all the calculations using the example of the foundation of an 8 by 10 house.
For calculations, we will choose the most common type of foundation - strip, according to the size of the house it will be recessed.
How to calculate everything correctly
The formula for calculating the base area is as follows: S>γn F/γc R0, where
- γn—reliability factor equal to 1.2.
- F is the load on the base, i.e. the total weight of the house, foundation, snow load, weight of property, people, etc., affecting the underlying soil layers.
- γc is the operating conditions coefficient. Depending on the type of soil, it ranges from 1 (clay) to 1.4 (sand).
- R0 is the conditional soil resistance. The tabular value is in the SNiP annexes for this type of soil.
As a result of this calculation, the total area of the tape will be obtained. To determine the base width (average), the resulting value S must be divided by the total length of the tape, including internal walls and other areas of the perimeter. The resulting value will show the estimated thickness of the tape base.
This value is the minimum. In practice, it is increased, sometimes several times.
It should be noted that the given formula is given only to familiarize yourself with the calculation methodology. In any case, this work must be performed by a competent and experienced specialist. Calculating the foundation is an important and responsible procedure, which has a large number of difficulties and specific issues.
An unprepared person cannot calculate such a project without making a number of gross mistakes, which could result in the destruction of the house. Alternatively, you can use an online calculator, which allows you to obtain the parameters of the tape using known data (soil type, calculated or tabulated resistance values, etc.).
To clarify the data obtained, you should double-check the results obtained on other similar resources.
Necessary materials
Before making calculations, you need to understand what building materials will be needed to construct such a foundation. If there is a project, then the numbers for the amount of reinforcement and concrete will be indicated in it. Additionally, you will need wooden boards for formwork. The essence of their calculation is not complicated; it is enough to understand the area of the base. At the same time, you can save money by renting formwork panels.
So, it is actually important to understand the quantity and size of rebar and concrete. Another way to save money is to prepare the solution yourself. In this case, you will have to calculate the amount of sand, crushed stone and cement.
Calculating exactly the amount of material for the foundation for an 8*10 house is a rather labor-intensive task. Therefore, we will calculate in aggregate, and the error coefficient will be no more than 10%, i.e. the level of material costs will become clear.
Reinforcement
To calculate the number of reinforcement bars, you must remember:
- in the corners there should be a whole rod with an equal overlap on the mating sides;
- when welding or knitting in one thread, the overlap of the ends of the rod must be at least 0.6 m.
It is important to correctly calculate the thickness of the rods and their number
Let's calculate one thread of reinforcement for a base 10*10 around the perimeter and with one load-bearing wall. Length of one thread: (10+8)*2= 36+8=44 m. 4 external corners and 2 internal ones - these are 6 rods of 12 m each.
We remove 1.2 m from each rod for welding or tying, we get the length of the corner rods 64.8, which exceeds the length of the perimeter. 64.8 m. Next, divide by the standard rod length of 12 m and get an integer of 5 rods. When building private cottages, this situation is quite common. But when calculating, it is better to use the maximum value. So, one longitudinal thread - five rods.
Let us conditionally take the number of threads to be 6 (depth of the strip foundation 1.6 m, width 0.5 meters). Vertical rods 1.6 m per quantity on one side 8 per number of sides 5 (including the internal wall). We get 1.6*8*5=64 m. 6 rods. Transverse rods 0.5 m per quantity on one side, 8 pcs per quantity of sides 5 = 20 m 2 rods.
Different rods are used for reinforcement, but for the enlarged calculation we will take large A500C reinforcement with a diameter of 12 mm and 12 m each.
An example of independent calculation of the width of a strip foundation
To better understand how to calculate the width of a monolithic tape, you need to consider this with an example. Initially, you need to systematize the initial data necessary for the calculation.
- size of the house in plan – 10 m x 10 m. Building area – 100 m 2;
- inside the house there is a load-bearing wall in the middle;
- the walls are brick, 1 brick thick - 250 mm and 2.7 m high. The specific gravity of the brickwork is 1600 kg/m 3;
- slate roofing – 40 kg/m2;
- flooring made of reinforced concrete slabs - 500 kg/m2;
- soil freezing depth – 700 mm;
- groundwater level – 2.2 m;
- soil base – dry loam of medium density with a design resistance of 2 kg/cm2;
- snow load – 50 kg/m2;
- payload – 20 kg/m2.
Determination of the total load from the house on a strip monolithic foundation
Based on the available initial data, the total load on the foundation is calculated. The dimensions of the monolithic tape are also determined. It is necessary for developers to make calculations in the following order:
Roof
The roof is made of slate and has a gable roof. Taking into account the slope of the roof and its overhangs, a coefficient of 1.1 is used. The load from the roof will be: 100 m 2 x 1.1 x 40 kg/m 2 = 4000 kg.
Brick walls
To determine the load from the walls, knowing their thickness, you need to calculate their length. The length of the walls along the perimeter will be: (10 x 4) – (0.25 x 4) = 39 m. The deduction of the double thickness of the brickwork is made because the axes of the house plan are drawn in the middle of the thickness of the walls. The length of the internal load-bearing wall will be 10 - 0.25 = 9.75 m. The total length of the load-bearing walls will be equal to 48.75 running meters.
The volume of brickwork will be: 48.75 x 0.25 x 2.7 = 32.9 m3. The total load from the brick walls is: 32.9 x 1600 = 52,670 kg.
Flooring made of reinforced concrete slabs
The one-story house has ceilings on two levels. This is the ceiling of the basement and the ceiling in the house. The floor area is: 100 x 2 = 200 m 2. Accordingly, the load from the floor slabs will be equal to: 200 m 2 x 500 kg/m 2 = 100,000 kg.
Snow load
To calculate the snow load, take the total roof area of the house - 100 x 1.1 = 110 m2. The snow load will be: 110 m 2 x 50 kg/m 2 = 5,500 kg.
Payload
The rate of this load is calculated based on the average weight of technical equipment, internal communications, room decoration, furniture and other things. The specific weight of the payload ranges from 18 to 22 kg/m2.
The payload is calculated on the basis of an average of 20 kg/m2. The weight will be: 100 m 2 x 20 kg/m 2 = 2000 kg.
In total, the total load on the foundation will be equal to: 4,000 + 52,670 + 100,000 +2,000 = 159,000 kg.
Calculation of the width of a monolithic tape
According to the above formula, the minimum area of the foundation base is determined:
(1.2 x 159,000 kg): 2 kg/cm 2 = 95,400 cm 2. That is, the minimum allowable area of the base of the house will be 10 m2.
The total supporting area of brick walls is determined by the product of the plan length of the load-bearing walls and their thickness: 48.75 m x 0.25 m = 12.18 m 2.
The result shows that the calculated support area is less than the minimum support area of the walls. Therefore, the width of the strip foundation should be equal to 250 mm + 100 mm = 350 mm.
Requirement for materials for the construction of a monolithic tape
Taking into account the thickness of soil freezing (0.7 m) and the depth of the groundwater level (2.2 m), the monolithic tape is made shallowly buried - 1 m.
To fill the formwork, concrete M 300 is used. The volume of need for concrete solution is equal to: 0.35 m x 1 m x 48.75 m = 17 m 3. . Taking into account unforeseen losses, the need for concrete will be 17.3 m 3.
The reinforcement frame consists of 4 longitudinal reinforcing bars of a periodic profile with a diameter of 12 mm. Since the transverse rods of the frame are made from the same rods, the total need for reinforcement will be: 50 m x 4 = 200 m.
From all of the above, we can conclude that it is quite possible for people who are more or less knowledgeable in the construction business to calculate the width, height and length of the strip foundation for their home.
Concrete
M400 cement is best suited for foundations
The volume of the solution is not difficult to calculate. We multiply the perimeter length of 44 m by the height of 1.6 m and the width of the tape by 0.5 m.
The volume of the required solution is 35.2. In the world there are concrete mixers with a volume of 9, 7, 6 and 5 m3.
Most often in Russia, machines with a volume of 7 m3 are used.
This means that we take 42 m3 into account, and for the calculations we increase everything upward.
If the concrete mixes on its own, then the proportions of sand, crushed stone, cement in 1 m3 for filling the trench with concrete grade M350:
- cement M400 - 428 kg;
- crushed stone - 1080 kg;
- sand - 660 kg;
- water - 220 l. (0.51).
Knowing the proportions and data, calculating the required volume is simple:
- cement 35.2*428=15,065 kg;
- crushed stone 35.2*1080=38,016 kg;
- sand 35.2*660=23,232 kg.
It is better to count the material as a multiple of bags or cars, taking into account delivery.
Using an online calculator
If material calculations seem too confusing, you can use an online calculator.
| foundation 4 by 8 | 95 000 | 107 000 |
| foundation 6 by 10 | 130 000 | 150 000 |
| foundation 8 by 10 | 150 000 | 180 000 |
| foundation 6 by 12 | 155 000 | 187 000 |
| foundation 11 by 12 | 197 000 | 237 000 |
* foundation depth 1.6 m, width - two bricks.
Screw bases
When calculating the price, we pay attention to:
- pile diameter,
- number of piles,
- the number of heads for tying (most often the same as the number of piles),
- type of strapping (wooden beam, wooden board, metal channel, monolithic reinforced concrete).
How much does a 10 x 10 foundation cost? If you take into account that you will need 25 piles with a diameter of 108 cm and a length of two and a half meters, it will cost approximately 85 thousand rubles.
Cost of screw piles:
| Barrel length | SVS-57 (180 mm) | SVS-76 (220 mm) | SVS-89 (250 mm) | SVS-108 (300 mm) | SVS-133 (400 mm) | SVS-159 (500 mm) | SVS-219 (600 mm) | SVS-325 (850 mm) |
| 1.5 meters | 805 rub. | 900 rub. | RUB 1,080 | 1,500 rub. | 1,800 rub. | 4,500 rub. | 7,500 rub. | - rub. |
| 1.6 meters | 800 rub. | 1,150 rub. | 1,250 rub. | RUB 1,550 | 2,000 rub. | 4,600 rub. | 7,600 rub. | - rub. |
| 1.8 meters | 840 rub. | 1,200 rub. | RUB 1,270 | RUB 1,570 | RUB 2,050 | 4,800 rub. | 8,000 rub. | - rub. |
| 2 meters | 890 rub. | RUB 1,240 | RUB 1,330 | 1,600 rub. | 2,300 rub. | 5,000 rub. | 8,500 rub. | - rub. |
| 2.5 meters | 980 rub. | 1,400 rub. | RUB 1,540 | 1,800 rub. | RUB 2,560 | RUB 5,650 | 9,500 rub. | - rub. |
| 3 meters | 1,100 rub. | RUB 1,590 | RUB 1,780 | 2,000 rub. | 2,800 rub. | 6,300 rub. | 10,500 rub. | 14,100 rub. |
| 3.5 meters | 1,250 rub. | 1,800 rub. | RUB 2,020 | RUB 2,340 | RUB 3,080 | 6,950 rub. | 11,600 rub. | RUB 15,900 |
| 4 meters | 1,300 rub. | RUB 1,860 | RUB 2,230 | 2,600 rub. | 3,500 rub. | 7,500 rub. | 12,700 rub. | 17,800 rub. |
| 4.5 meters | RUB 1,520 | RUB 2,040 | 2,400 rub. | RUB 2,850 | RUB 3,820 | 8,120 rub. | RUB 13,750 | 19,700 rub. |
| 5 meters | 1,600 rub. | RUB 2,220 | RUB 2,620 | RUB 3,090 | RUB 4,180 | RUB 8,750 | 14,800 rub. | RUB 21,700 |
| 5.5 meters | RUB 1,750 | 2,300 rub. | 2,800 rub. | RUB 3,350 | 4,400 rub. | RUB 9,380 | RUB 15,850 | - rub. |
| 6 meters | 1,850 rub. | RUB 2,580 | 3,000 rub. | 3,600 rub. | RUB 4,750 | 10,000 rub. | RUB 16,850 | - rub. |
| 6.5 meters | RUB 1,990 | 2,600 rub. | RUB 3,180 | RUB 3,840 | 5,100 rub. | 10,600 rub. | 18,000 rub. | - rub. |
| 7 meters | 2,200 rub. | RUB 2,650 | RUB 3,350 | 4,100 rub. | RUB 5,350 | 11,300 rub. | 20,000 rub. | - rub. |
| 7.5 meters | RUB 2,240 | RUB 2,780 | RUB 3,560 | RUB 4,350 | RUB 5,620 | 11,900 rub. | RUB 20,050 | - rub. |
| 8 meters | - rub. | - rub. | RUB 3,750 | RUB 4,580 | 6,160 rub. | 12,500 rub. | RUB 21,100 | - rub. |
| 8.5 meters | - rub. | - rub. | RUB 3,950 | RUB 4,860 | 6,500 rub. | 13,100 rub. | RUB 22,100 | - rub. |
| 9 meters | - rub. | - rub. | 4,100 rub. | 5,100 rub. | 6,750 rub. | RUB 13,650 | RUB 23,200 | - rub. |
| Heading | 220 rub. | 260 rub. | 290 rub. | 300 rub. | 440 rub. | 650 rub. | 800 rub. | 950 rub. |
Typical calculations
For a 6 by 4 house with a different type of foundation, the calculation scheme will be the same. The main rule is to calculate the length and number of rods and the volume of solution required for pouring. In this case, the 5*15 foundation will most likely be deeper.
If the sides are 11, 12 or more meters long, pay close attention to the calculation of the reinforcement threads, which depend on the depth of the base.
Lightweight small-sided buildings measuring 5 by 6 meters; 6 by 7; 8 by 9 or 7 by 9 meters do not require deep pouring and are sometimes performed without formwork. For more information about foundation construction, watch this video:
If you have a project on hand, you can order a calculation of the cost of work and materials from a professional estimator. The specialist will take into account all the necessary types of work and indicate the required amount of materials. In this case, it will be possible to calculate the need for financing in stages, and understand what work can be done independently, while saving money.
It is impossible to determine the exact cost of construction without reference to the object. It is necessary to take into account the features of the house and the parameters of the site on which construction will be carried out. It is important to find out the general principle of calculation and determine the factors influencing the amount of the estimate as accurately as possible, so that everyone can draw up a fairly accurate estimate before starting construction.
It is necessary to calculate the cost of construction with a reserve for unforeseen expenses.
The main costs are the construction of the foundation, installation of the roof and construction of walls. We will consider separately how many materials and tools are needed for each of these elements.
House support price
How much a support costs is determined by its type, which table will help you choose.
| Slab | Normal and peaty soils, massive buildings | Leveled area, concrete layer thickness for one-story houses - 200-300 mm, for two-story or attic houses - up to 500 mm. The thickness determines how many cubes of solution are required. | Sand for the foundation cushion, Sand, crushed stone - as fillers, cement | The thickness of the layer (concrete, sand cushion) multiplied by the surface area of the foundation. Add the cost of the reinforcing mesh, the cost of renting or purchasing formwork (you can build it yourself). | Required for quick construction of a pit, can be used for pouring concrete. |
| Tape | For houses with ground floors and basements, for strong stone and brick houses. | Stable ground | Sand, cement, reinforcement. How many cubes of mortar are needed for the foundation depends not only on the depth of the tape, but also on its cross-section (rectangular, trapezoidal). | The width of the tape multiplied by the depth (shallow or recessed tape version - determined by the type of soil and type of structure of the building) and the length of the foundation, including supports under the internal main walls). Reinforcement: 2x2 rods with a cross-section of 12 mm with jumpers with a total length of 2.1 m (section 10 mm), located every 0.5 m. | Not necessarily, lifting devices may be required if a belt-type support is being built from ready-made heavy blocks |
| Columnar | For medium weight houses | Mainly selected for stable soils. | Concrete pouring or ready-made FBS blocks | The depth of the foundation is determined by the level of soil freezing. The number of cubes of concrete for one support is multiplied by the number of pillars. | Required when using heavy FBS blocks, can be used for drilling support holes |
| Pile | Light frame houses and medium-heavy buildings (no higher than 1 floor), suitable for unstable soils. | No rocks | Piles, concrete pouring | Number of piles taking into account their load-bearing capacity. The height of the supports takes into account the freezing depth. How many cubes of concrete are needed to fill each support is indicated in the technical specifications. documentation for piles. | Necessary. |
Slab foundation.
Important: the consumption of reinforcing reinforcement is carried out taking into account the length of the 12 mm rod at sale and the length of the thinner wire in the reel. If possible, the length of the reinforcement of 12 mm is chosen so that less waste is generated when cutting.
Strip foundation.
When installing a prefabricated foundation of slab or strip type, 12 mm reinforcement is placed in the joints between the blocks.
prices for strip foundation
For buried foundations, it is practiced to lay 12 mm rods in the upper and lower parts. When the total load is large, due to the impossibility of installing strapping rings, similar reinforcement with a cross-section of 12 mm is used to reinforce the prefabricated strip foundation vertically.
Pile foundation
If it is planned to build a veranda, bay window or outbuilding, the length of the base can be increased to 12 m or more.
prices for pile foundation Columnar foundation.
Calculation of the foundation depth of a one-story house
Trench under the base
The foundation for a one-story house must be laid at a depth that is below the freezing level of the soil. The drawing must take into account this criterion and is made taking it into account.
The normalized freezing depth is determined based on data obtained over the last 10 years for a specific region. The observation results are compared with GOST 25100, and then the line of transition of plastic frozen soil into solid soil is determined.
If there is no access to such data or they are lost, then for regions with a freezing depth of up to 2.5 m it is permissible to perform the calculation using the formula:
where Mt is a dimensionless coefficient, which is determined by the sum of all absolute temperature values below zero, according to SNiP 23-01. If there is no information on temperatures in regulatory documents, then you must contact the hydrometeorological center to obtain them;
d0 is a value depending on the type of soil in the area. You can take it from SP 22.13330.2011.
If the freezing depth exceeds 2.5 m, then thermal calculations must be carried out in accordance with SP 25.13330. Calculation of seasonal soil freezing is carried out using the formula:
where kh is a dimensionless coefficient that takes into account the thermal regime for external and internal foundation structures based on information about the heating of the building. Determined according to Table 1 or taken equal to 1.1 for unheated premises (with the exception of the northern regions, where negative temperatures prevail throughout the year).
Table 1. The value of the kh coefficient depending on the design features of the building
The data in Table 1 is valid for those cases when the distance between the wall and the edge of the foundation is less than half a meter, and if it is exceeded, the coefficients should be increased by 0.1. If the temperature falls within the interval between the table values, then take the value with the lower value.
The depth of laying the external or internal foundation for heated rooms with cold basements or technical rooms should be determined based on Table 2.
Table 2. Foundation depth depending on the type of soil for houses with an unheated basement
Calculation of the foundation depth for a house made of blocks or bricks with a basement is carried out using the following formula:
where hs is the thickness of the soil above the base as viewed from the basement;
hcf – basement floor thickness;
γcf – value of the specific gravity of the basement floor structure.
Watch the video on how to make your own base scale.
Calculation and construction of walls
An important calculation parameter is the thickness of the walls. You can achieve different thicknesses by laying elements crosswise (with their ends outward and inside the house), lengthwise on a wide plane or along an edge. Professionals call these types of masonry accordingly - stone, half-stone, quarter-stone. Thick walls provide strength and thermal insulation. By saving on thickness, you will have to increase the cost of insulation.
Masonry "in stone".
There are 5 load-bearing walls in a 10x10 m house, each 10 m long, and the height is chosen arbitrarily (usually 2.8-3.0 m). Thus, calculating the area of each wall and their total area is not difficult. The resulting value must be divided by the area of that side of the block (brick, timber, etc.) that forms the plane of the wall. From the obtained values, it is necessary to subtract the area of the window and door openings of the house in terms of masonry elements.
It is necessary to include in the estimate the cost of glue or masonry mortar. For each wall, knowing the layout scheme and the wall area of the house is 10x10 m, you should calculate the number of vertical and horizontal seams. These values are multiplied by the corresponding areas of the contacting surfaces. The thickness of the layer is determined by the type of binding component, for example, glue for foam blocks is applied with a thickness of 5 mm.
Laying blocks with glue.
The total area of the seams, multiplied by this value, gives the required volume of the composition.
It is easy to calculate how much each type of material costs by multiplying the current price by the required quantity.
Roof calculation
- When designing yourself, it is important to consider:
- load-bearing capacity of elements (timbers, beams, etc.),
- load from the total mass of the structure,
- load from snow and ice lingering on the roof,
- wind loads.
The calculation of materials for the roofing “pie” and the top covering is carried out based on the total surface area of the roof, which is not difficult to calculate if you know the configuration and basic geometric parameters of a 10x10 m house. They also take into account:
- nuances of cutting (for accuracy, you can draw a sketch of the layout),
- the need for overlapping installation for maximum sealing.
The “pie” consists of layers:
- waterproofing,
- thermal insulation,
- vapor barriers.
An example of a roofing “pie” diagram.
Additional materials include fasteners, adhesive mastics for roll coverings, pressure strips, etc.
Important: With the same area, the cost of a roof of a house with a complex configuration will be higher due to the complexity of cutting with the formation of a larger amount of trim waste and the need to use additional fasteners (planks, hardware, etc.).
Simple roof configuration. Roof of complex geometry.
By applying the above calculation principles, you can find out how much construction costs in the future.
The strength and reliability of the entire building, be it a residential building, garage, barn or bathhouse, depends on the quality of the foundation. To build it, you need not only to dig a pit and pour concrete, but also to correctly calculate the dimensions of the base, correctly assemble the reinforcing frame, and select the appropriate brand of cement. Before pouring the foundation with your own hands, you need to study the technology, because even minor flaws can lead to uneven settlement and rapid destruction of the foundation of the house.
How to pour a foundation with your own hands
Foundations can be slab, columnar, pile and strip, as well as combined. Slab and pile foundations are not in great demand in private construction, since they require high costs and the availability of special equipment. Columnar foundations are the cheapest, but are not suitable for the construction of heavy buildings.
The most practical are strip foundations, which provide the necessary strength to houses, are not too difficult to construct and are relatively inexpensive.
Marking for the foundation
To indicate the boundaries of the foundation, you must know exactly the parameters of the building. The width of the strip base should exceed the thickness of the walls by 10-20 cm; the width of the foundation under the load-bearing internal partitions corresponds to their thickness. The bottom of the trenches is usually located 20 cm below the soil freezing level, but this does not apply to shallow foundations.
Scheme of step-by-step foundation marking
For marking you will need:
- thin cord, skein of twine or fishing line;
- wooden pegs;
- roulette;
- square;
- plumb line
Foundation markingFoundation marking
The area is cleared of tall vegetation, large stones and anything that might interfere with the work are removed. Then the location of one of the corners of the facade is determined and a peg is driven into the ground.
Proper marking of strip foundations
To determine the remaining angles, precise measurements will be required:
- the width of the facade is measured from the peg and a second beacon is installed;
- using a plumb line, set the vertical of the first corner and pull a line from it perpendicular to the line of the facade;
- Using a square, the last corner of the building is determined and the peg is driven in again;
- connect the pegs with a stretched fishing line;
- measure both diagonals of the resulting perimeter and compare; if the diagonals have different lengths, adjust the location of the beacons.
Checking the correctness of the foundation markingsFoundation marking
The outer perimeter of the marking is ready, now you need to make the inner one. To do this, on both sides of each peg, another peg is driven in at a distance of 40 cm. They must be located exactly on the marking line. Twine is pulled between opposite pegs to create an internal perimeter. Next, all internal load-bearing walls are marked and beacons are installed in the same way. After this, it remains to determine the lowest marking point from which the depth of the trench will be measured.
Calculation of the cost of a 10 by 10 pile foundation
We take into account such parameters as:
- number of piles,
- cost of immersion work,
- relief characteristics.
In total, for a 10 x 10 foundation you will pay about 135 thousand rubles. When choosing this base, there are no restrictions for use - on an area with any terrain. The advantages are high load-bearing capacity, speed of work, and the ability to immediately continue construction. You can find out the exact cost of a foundation on driven reinforced concrete piles using a unique technology using the online calculator on our website. Here is an approximate price for the work.
Cost of reinforced concrete piles:
| Pile type | 15-50 pcs. | 51-100 pcs. |
| From 30.15 (reinforced concrete pile L-3m, section 150x150 mm with installation) | 5,500 rub. | 5,200 rub. |
| C 40.15 (reinforced concrete pile L-4m, section 150x150 mm with installation) | 6,500 rub. | 6,200 rub. |
| C 50.15 (reinforced concrete pile L-5m, section 150x150 mm with installation) | 7,800 rub. | 7,500 rub. |
| C 30.20 (reinforced concrete pile L-3m, section 200x200 mm with installation) | 6,600 rub. | 6,300 rub. |
| C 40.20 (reinforced concrete pile L-4m, section 200x200 mm with installation) | 7,700 rub. | 7,400 rub. |
| C 50.20 (reinforced concrete pile L-5m, section 200x200 mm with installation) | 9,000 rub. | 8,600 rub. |
Excavation
Excavation
The easiest way to dig trenches is with an excavator, but if this is not possible, you will have to use shovels. During the digging process, you must not go beyond the markings, and the walls of the trench should be constantly leveled vertically.
It is very important that the depth is the same throughout the entire perimeter and that the bottom is as flat as possible.
If the soil is too dense and difficult to yield, it is enough to go deeper by 40-50 cm. After this, holes are drilled for support pillars in the corners of the trenches and every 2 m on straight sections.
Excavation
This method allows you to make a reliable, strong foundation at a lower cost, because drilling holes even in dense soil is much easier than digging a trench. In addition, less concrete and reinforcement for the frame will be required. The depth of the holes for the pillars should be 15-20 cm greater than the freezing level, which is approximately 1.2-1.5 taking into account the depth of the trench.
Assembly of formwork and frame
Strip foundation formwork
The foundation walls must rise above the ground surface, so it is necessary to make strong formwork and install it on both sides of the trenches. The reinforcing frame is also an important element of the foundation, because it ensures the strength of the foundation and extends its service life.
At this stage of work you will need:
- building level;
- sheets of plywood or durable boards;
- self-tapping screws;
- polyethylene film;
- stapler;
- bars for spacers;
- reinforcement with a cross section of 12 mm;
- knitting wire.
Step 1. Assembling the formwork
Formwork
The boards are knocked down into panels 35-40 cm wide, without gaps or cracks. At the joints, the shields are reinforced with vertical bars, which are placed on the outside. To connect boards, you can use both nails and self-tapping screws, but it is more convenient to dismantle formwork fastened with self-tapping screws.
Manufacturing of formwork for strip foundations
The screw heads should be located on the inside of the boards so that the side surface of the foundation is as level as possible. Separately, you need to cut holes in the boards for communication pipes, otherwise you will have to knock them out in the concrete. Before installation, the formwork is covered with plastic film so that the wood does not absorb water from the solution.
Step 2. Installation of a sand cushion
Compacting sand under a strip foundation
To reduce the load on the foundation and save building materials, the bottom of the trenches is covered with a layer of sand. The thickness of the sand cushion is 15-20 cm; its surface must be leveled, compacted and checked with a water level over the entire area. After this, the sand is spilled with water for better compaction, and then covered with a layer of coarse crushed stone or gravel.
Step 3. Installation of formwork
Stages of formwork installation
The next stage is the installation of formwork along the trenches. The panels are placed along the very edge of the perimeter and connected by timber jumpers that hold the formwork in a vertical position. The bottom edge of the boards should fit very tightly to the ground so that the solution does not leak out. From the outside, the shields are supported by spacers made of timber, boards or reinforcement, after making sure that the walls of the formwork are strictly vertical.
Manufacturing and installation of formwork for strip foundations
Step 4. Assembling the reinforcement cage
The frame is a three-dimensional lattice with square cells of 30x40 cm. The reinforcing bars should only be fastened with wire, since welding provokes corrosion at the joints. If the foundation is combined, first fill in the holes for the support pillars and insert 3-4 reinforcing bars connected to each other inside. The ends of the rods should protrude at least 30 cm above the bottom of the trench.
Assembling the reinforcement cage
If this is a regular strip foundation, 2 longitudinal rods are laid at the bottom of the trenches at a distance of 5 cm from the walls. Then vertical sections of reinforcement are screwed to them every 30 cm. The height of the vertical rods is equal to the depth of the trench + 25 cm. Next, the next horizontal level is attached, and so on until the top of the formwork.
Assembling the reinforcement cage
You can tie the frame fragments on the ground, and then carefully lower them into the trench and connect them together. Finally, the level of concrete pouring is determined and at this height a fishing line or rope is pulled inside the formwork, securing it with nails on the end side. The line should run around the entire perimeter at the same level, this is a very important point!
What's included in the price?
When drawing up an estimate, all technological stages of construction are taken into account, as well as a list of materials and equipment used. Below is a diagram for a slab foundation.
| Construction stages | What does it include | Expenditure |
| Preparatory work | cleaning the area; removal of construction waste; | depreciation of transport and equipment |
| Excavation | digging a pit; removal of waste soil. | rental of special equipment |
| Installation of sand and crushed stone cushion with waterproofing | sand cushion device; laying sand and crushed stone bedding, compacting it; | |
| Installation of formwork | installation of panels from boards; wetting the workpieces with water; installation of formwork around the perimeter of the pit; fastening elements with bolts; installation of supports. | boards, plywood, beams; depreciation of working tools. |
| Reinforcement frame structure | cutting rods into blanks; assembly of reinforcement frame; installation of a load-bearing structure inside the formwork on supports. | fittings, wire; depreciation of the welding machine. |
| Pouring concrete | preparation of inputs for utility networks; installation and installation of hoses for supplying concrete to the formwork; pouring the structure with concrete in layers of 15 cm; depreciation of working tools and equipment. | |
| Finishing work | dismantling of formwork; installation of a drainage system around the perimeter of the structure (if provided for by the project); removal of construction waste. | rental of working tools and equipment; material for the drainage system (if necessary). |
Pouring concrete solution
Pouring concrete solution
The foundation must be poured with concrete mixture at one time. If this process is extended, the solidity of the base will be broken, which will lead to the appearance of cracks and gradual erosion of the concrete. Now many people prefer to order ready-made concrete mortar directly from the factory, as this saves effort and time. If this is not possible, you will definitely need a concrete mixer, since it is very difficult to make such an amount of concrete by hand.
Pouring concrete solution
Before you start pouring, you need to calculate the consumption of concrete mixture for the foundation. Since the base consists of several strips, it is recommended to first find out the volume of each piece and then add everything together. To find out the volume, the width of the tape is multiplied by its length and height. The total volume of the foundation is equal to the volume of the concrete solution. It is not worth ordering with a reserve, because in the calculations each corner of the perimeter was taken into account twice, which is precisely the necessary reserve.
The strength of the base largely depends on the brand of cement, as well as on the proportions of the components in the solution. For the foundation of a residential building, it is optimal to use a mortar M300 or M400. To prepare it, you will need M500 cement, sand and fine crushed stone in a ratio of 1:3:4. The volume of water should be half that of all other components of the solution.
Pouring should be done in warm weather, since the cold reduces the strength of concrete and hardening occurs faster.
So, first prepare the solution:
- sift sand through a mesh;
- mix sand, crushed stone and cement;
- add water in small portions;
- mix the ingredients thoroughly.
Concrete production
The finished solution has a uniform color and structure, a thick consistency, and when the shovel is turned over, it slowly slides down as a total mass, without separating into pieces. When the concrete is ready, you can start pouring. The formwork must be filled in layers, distributing the solution around the perimeter with a thickness of about 20 cm. If you pour out the entire mixture at once, air voids will form inside, which sharply reduces the density of the foundation.
Pouring foundation formwork
After pouring the first layer, the solution is pierced in several places with a piece of reinforcement, and then compacted with a construction vibrator. If you don't have a vibrator, you can use a wooden tamper. When the surface of the concrete is compacted and leveled, the second layer can be poured. They pierce the solution again, releasing air bubbles, then compact and level the surface. The last layer should be at the level of the stretched fishing line; The walls of the formwork are tapped with a hammer, and the surface is leveled with a trowel.
Tamping concrete
The finished foundation is covered with plastic film on top and opened only in dry, cloudy weather. To avoid cracking, the top of the base is periodically moistened with water. The formwork can be dismantled 12-14 days after pouring, but it is recommended to carry out construction work no earlier than a month later. During this time, the foundation will become sufficiently strong and compacted, so the loads will not cause harm.
Video - How to pour a foundation with your own hands
Consumption of components per 1 cubic meter of solution
To pour a foundation slab, which has the largest volume of concrete compared to other structures, a ready-made mixture is usually ordered at the factory. Considering the need to form the mass in one work shift and the rather large area of the slab, it is hardly possible to do this in time, even if two concrete mixers are working. But for pouring the tape - and even more so for point supports, each of which requires only one or two concrete mixers, it is quite possible to make concrete yourself.
The same brand can be obtained by using different quantities of components, which depends on the brand of cement used. Proportions in mass and volume are presented in the tables:
| Class and grade of concrete | Proportions of fillers per 1 part of cement | |||||
| On cement M 400 | On cement M 500 | |||||
| Sand kg | Crushed stone kg | V/C | Sand kg | Crushed stone kg | V/C | |
| V7.5 M100 | 4,6 | 7,0 | 0,85 | 5,8 | 8,1 | 0,9 |
| B15 M200 | 2,7 | 4,9 | 0,63 | 3,5 | 5,5 | 0,71 |
| B20 M250 | 2,3 | 3,8 | 0,56 | 2,6 | 4,4 | 0,64 |
| B22.5 M300 | 2,0 | 3,5 | 0,5 | 2,4 | 4,4 | 0,6 |
| Class and grade of concrete | Proportions of fillers per 1 m³ of concrete | |||||||
| On cement M 400 | On cement M 500 | |||||||
| Cement (kg) | Sand (kg) | Crushed stone (kg) | Water (l) | Cement (kg) | Sand (kg) | Crushed stone (kg) | Water (l) | |
| V7.5 M100 | 195 | 730 | 1250 | 200 | 175 | 745 | 1260 | 200 |
| B15 M200 | 285 | 680 | 1225 | 200 | 250 | 700 | 1235 | 200 |
| B20 M250 | 350 | 640 | 1210 | 200 | 300 | 670 | 1225 | 200 |
| B22.5 M300 | 375 | 620 | 1205 | 200 | 320 | 655 | 1220 | 200 |