A concrete floor in a private house on the ground is the most optimal option, which has many advantages: ease and simplicity of installation, excellent strength, wear resistance, reliability, frost resistance, relatively low cost, the possibility of subsequent installation of any type of coating (warm floors included).
Modern materials and technologies make it possible to carry out work with the highest quality and efficiency; floorboards, linoleum or self-leveling flooring, laminate or tiles, and other types of flooring can be laid on top of concrete.
Before pouring a concrete floor onto the ground, it is necessary to carefully study all the requirements and standards, the sequence of work: first the soil is studied, then preparatory work is carried out, concrete is prepared, pouring is carried out, and proper maintenance is carried out. The performance characteristics of the coating will directly depend on the accuracy of adherence to the technology.
Rough floor screed on the ground: manufacturing features, procedure and step-by-step instructions
Author: Nikolay Strelkovsky
This screed is made in private houses, garages, outbuildings, industrial and warehouse premises, in large shopping areas, at bus stations, etc.
Rough floor screed on the ground
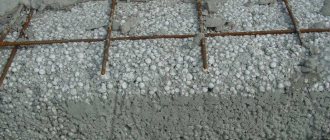
The method is considered universal and is used on all types of soils, regardless of the location of groundwater. For pouring, concrete of a grade not lower than M300 is used; if the loads on the floor are large and the physical characteristics of the soil are unsatisfactory, then the grade of concrete is increased and a reinforcing mesh is required.
Reinforced screed on the ground
All indicators for thickness and characteristics of materials are prescribed in the design and estimate documentation. If it is not there, then you need to do the calculations yourself, taking into account all the factors that influence the operating conditions of the floor coverings.
Application area
The most popular among rooms where concrete screed is laid on a slope is the bathroom. In addition, external territories cannot do without such a device. These include entrances to the garage, personal plots, and premises of economic importance. Screed in a bathhouse or when installing shower cabins, the floor is also actively installed with some slope.
Such a screed device is necessary in places of unorganized outflow of water in order to compensate for the difference between adjacent surfaces. If you have an idea about the process of installing a concrete floor, then no difficulties will arise during the work. There are no special features. But some recommendations are worth considering in order not to deviate from the technology itself.
Schemes of the rough screed device
Diagram of a concrete floor
An example of a floor installation on the ground
Option for ground screed with expanded clay
Building codes and regulations recommend using several options for rough screed depending on its location in relation to the foundation, ground level and proximity to groundwater.
Connection of the floor along the ground to the strip foundation
Floor on the ground on belt extension
The ground floor is adjacent to the wall of the strip foundation
The ground floor is located above the foundation strip
There are no universal recommendations for the location of the rough screed; it all depends on the operating conditions and architectural features of the house. The only requirement is that the position of the door frame must be planned even before the rough screed begins; the level of the finished floor must be located at the level of the threshold.
Concrete floor pie on the ground
Options for arranging a rough screed on the ground
The specific option is chosen by the builders, taking into account the maximum load on the structure and the proximity of groundwater. The classic solution is compacted soil, a layer of sand and crushed stone of varying thickness, plastic film and a rough screed with or without reinforcement.
Classic rough screed
This method is recommended for use in cases where groundwater is located closer than two meters to the surface. Groundwater is much lower - the construction scheme can be simplified. It is allowed to pour the rough screed directly over the ground, using only sand or crushed stone as bedding. In some cases, the subfloor can be poured directly onto the ground without using plastic film. For rough floor screed, the film is used not so much for waterproofing (concrete is not afraid of moisture; on the contrary, in conditions of high humidity it increases strength) but rather for retaining cement laitance in the mixture. Without the film, it will quickly leave the concrete, which will have a very negative impact on strength.
Common Mistakes
- Poor preparation of the soil or sand and gravel cushion - if the layers are not compacted well enough, the concrete floor will be weak and may even deform the finishing floor covering.
- Poor quality of fillers - if the gravel or sand is not washed, the floor will be weak even if high-quality cement is used in large volumes.
- Incorrect reinforcement - if the mesh or reinforcement is laid directly on the base, the frame will not fulfill its task. It increases the strength of the structure and ensures that the floor and the finishing layer of laminate or linoleum laid on it will not sag, only if it is completely filled with screed on all sides.
- Failure to comply with technology, saving on materials - all this leads to deterioration in performance characteristics and a decrease in the service life of the concrete floor.
What factors influence the construction technology of rough screed
Ground water level.
Ground water level
If they come closer than two meters to the surface, then be sure to add sand and gravel. The bedding serves to prevent the absorption of moisture by soil capillaries. If there is a bedding, then the use of a film to retain cement laitance is mandatory. If the rough screed is done directly on the ground, then the film does not need to be placed.
The photo shows crushed stone bedding
Important. The location of groundwater must be determined in the spring; it is during this period that it rises the most.
If the floor structure is intended to accommodate heat transfer fluids, then the rough screed must have a compensating gap between the foundation. Such designs eliminate the negative impact of thermal expansion and eliminate the possibility of cracking or swelling of the rough screed.
If the planned load on the floor can exceed 200 kg/m2, then reinforcement is required. The fittings parameters are selected individually for each case. The same approach is needed in cases where it is planned to install interior partitions on the floor. You should not rely only on the reinforcement of the finishing screed; its physical characteristics do not allow it to withstand heavy loads.
Several frequently asked questions about rough screed
Inexperienced builders often try, in order to save money or improve performance characteristics, to replace the recommended materials for backfilling the rough screed with others.
Filling with expanded clay instead of crushed stone
Don't use broken bricks
Example of floor waterproofing
In the photo, crushed stone is spilled with cement laitance
Expanded clay spilled with cement
Now that we have dealt with most of the questions regarding the features of the technology for constructing a rough screed, we can give step-by-step instructions for pouring it.
Instructions for making a rough floor screed on the ground
Let's consider the most complex and time-consuming option using all layers of bedding.
Step 1. Take measurements. First, you need to mark the level of the finished floor on the foundation tape.
Elevations in the project
To do this, you should use a laser or hydro level. The size is determined according to design and technical documentation or working drawings for the facility. Further down, you need to put marks on the thickness of the floor depending on its design, the thickness of the finishing screed, rough screed, layer of gravel and sand.
Step 2. Remove the soil to the calculated depth, clean the site, and prepare it for filling with sand. Compact the loose soil or carefully clean the base with a shovel.
Step 3. Add sand. As a rule, the thickness of the layer varies within ten centimeters. If you need a large amount of sand, you need to pour it in stages, compacting each layer separately. The quality of compaction will improve significantly if the work is performed using special mechanisms: vibrating rammers or vibrating compactors. During compaction, you need to ensure that the sand has a more or less flat and horizontal surface.
Compacting sand bedding
Compacting sand with a vibrating plate
Practical advice. During compaction, it is recommended to wet the surface; this significantly increases the degree of sand shrinkage. You can wet it with a hose or buckets.
Tamping is a very important stage in arranging a rough screed on the ground; there is no need to rush. All holes are filled up and compacted again, the tubercles are cut off.
Step 4. Pour a layer of crushed stone ≈ 5–10 cm thick and compact it thoroughly. It is better to take crushed stone in several fractions of sizes. Coarse sand is poured onto the sand, fine sand is poured under the rough screed. In this way, the load-bearing characteristics of the base are improved. Part of the utilities can be hidden in layers of bedding or directly in the rough screed. There is no need to try to install all the pipes and electrical networks there; in case of emergencies, it is very difficult to get to them to carry out repair work.
Step 5. Prepare the concrete mixture.
Making your own concrete mix
You can do it yourself using a concrete mixer or order a ready-made one from construction companies. You need to choose yourself; both options can be optimal under certain conditions. It is recommended to calculate the cost of materials in both cases, evaluate your material capabilities and physical strength, and the number of workers.
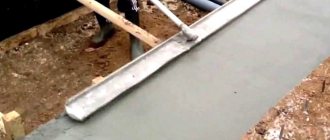
The concrete mixture should be below average in density. Such indicators allow concrete to independently spread over the floor area. One of the advantages of using liquid concrete is that there is no need to install beacons and perform time-consuming manual leveling work.
Prepare liquid concrete
Workers only need to slightly adjust the level where the material is poured. If reinforcement is required, a mesh is installed at the same time. Building regulations require that it be installed in such a way that the concrete thickness on all sides exceeds five centimeters. Otherwise, the structure will not work as a single whole, and the actual strength of the reinforced concrete will become much less than the calculated one. The consequences can be the most tragic.
Pouring the floor with concrete
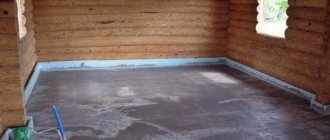
Step 6. To increase the strength of the rough screed the next day, it must be thoroughly moistened. If the weather is hot and dry, it is recommended to water it at night. These steps should be repeated for two to three days. It is recommended to carry out further work 10–14 days after pouring. During this time, concrete gains at least 50% of its maximum strength, which allows construction work to continue without fear.
The developer chooses what the finished floor will be like. Regardless of the chosen option, builders recommend making sure to provide reliable waterproofing on top and install insulation. On top of these structures, a finishing screed is made under the tiled floor or wooden logs are laid under other options for finishing floor coverings. Such schemes make the floors warm, which is very important given modern prices for coolants. At the same time, following the recommendations of professional builders significantly increases the service life of floor coverings.
Finishing screed for thermal insulation
Preparatory work
The soil inside the house needs to be leveled and compacted. If the height of the room decreases significantly after pouring and installing all the layers, you will need to dig a pit over the entire surface of the room for concrete floors in a private house. Its bottom is compacted and leveled.
- Pour 10-30 cm of sand onto the bottom and compact it.
- Fill in about 15 cm of crushed stone, and for thermal insulation you can make an additional pillow of expanded clay (10-15 cm).
- A rough screed that strengthens the bottom layer is prepared from lean concrete, mixing 1 part of cement with 6-7 parts of crushed stone.
Waterproofing works
Before making a concrete floor in a private house, it must be protected from moisture penetration from below (condensation from wet soil, etc.). Rolled materials (roofing felt, thick polyethylene film) are spread over the prepared base with an overlap on the walls (10-15 cm). Adjacent panels should overlap each other by 5-7 cm. At the joints, the seams are filled with bitumen or taped with adhesive tape.
A damper tape made of elastic materials is installed on top of the waterproofing layer extending onto the walls. It will serve to compensate for the expansion of the screed in a warm room or during heating if a heated floor system is installed.
Reinforcement and placement of beacons
To carry out reinforcement, a small layer of concrete (3-5 cm) is poured. A flat welded mesh with a mesh size of 10-15 cm is laid out on it. The thickness of the rod is at least 3 mm.
In order for the floor in the house to have a flat surface, beacons (slats on which the rule will slide) must be installed on the prepared base. The basic requirements for installing beacons are a small step between them and installation of all guides in a single plane. You can check the horizontality of the beacons using a building level, placing it both along and across the planks.
You can change the height of the beacon if necessary and fix it in the desired position using cement or gypsum mortar. A pile of composition is formed under the bar, raising or lowering the lighthouse to the desired level. You can continue working only after the composition has hardened.
Composition of the solution
Concrete for pouring is prepared according to the following recipe:
The components are most often measured out with a bucket, gradually pouring them into the rotating drum of a concrete mixer. When kneading by hand, dry ingredients are poured in layers and mixed dry. When the ingredients are mixed, add water and begin to knead the solution until the consistency of a thick, creamy dough is obtained. If there is not enough water, you can add it little by little, constantly monitoring the thickness of the solution. Don't pour too much water.
Is it profitable to make a rough concrete screed on the ground?
The issue worries all developers without exception; it should be considered more carefully. We will compare it with the option of using factory reinforced concrete slabs for these purposes.
Floor slabs create high loads
Installation of slabs using a truck crane
The simplest calculations taking into account the cost of slabs and additional work and materials and rough screeds on the ground show savings of up to 25%. And this is only based on the most approximate calculations. Payment for expensive loading/unloading equipment, delivery costs, etc. were not taken into account.
Video - Rough floor screed on the ground
Did you like the article? Save so you don't lose or share with friends!
Source
Moisture protection
Most experts, as the main condition for installing a floor on the ground, point to the need for groundwater to lie deeper than two meters from the level of the lower layer of its pie. Of course, at such a depth there are no aquifers, but we are talking about perched water, or sedimentary water, which, due to the characteristics of the soil, did not have time to seep through the filter layer to the water-resistant layers. It is possible (and necessary) to combat the effects of sedimentary waters and perched water using a set of measures:
But not only “external” sedimentary waters can affect the ground floor. Thanks to capillary rise, there is also the effect of moisture “from below”. This rise is partially prevented by compacting the top layer of the bottom of the “pie” trough. Compaction is especially effective for clay soils - to some extent, it is akin to creating a clay castle.
1. Drainage. 2. Blind area. 3. Foundation. 4. Wall. 5. Multi-layer cake of concrete floor on the ground
A clay castle will completely protect against the penetration of soil moisture to the base of the floor, that is, filling a layer of clay and compacting it to the state of a water-resistant layer, however, pouring a crushed stone-sand cushion at the bottom of the trough will interrupt the capillary rise of water.
Selection of insulation
Expanded clay floor insulation technology
In order not to think about this when it is necessary to pour a rough concrete floor, the issue is resolved before starting work. If you plan to pour it on the ground, then inexpensive expanded clay is most often used as a heat insulator. The thickness of the backfill layer is on average from 30 to 50 cm, depending on the climatic region of construction. You can use a more effective material - extruded polystyrene foam. Its thickness will be in the range of 100-150 mm. When pouring onto the ground, the use of polystyrene foam or mineral wool is highly discouraged due to their low strength and instability to moisture.
Preparing the base
In cross-section, the floor on the ground is a multi-layer “pie” with a finishing coating as the top layer. To determine the level of the base, take the threshold of the front door as a reference point. And the thickness of each layer is subtracted from it.
The zero calculation scheme looks like this:
The total thickness of the separating layer (geomembrane film between the sand and the concrete preparation) and the roll waterproofing under the screed is insignificant and does not affect the level of the base for the floor on the ground.
1. Floor covering. 2. Reinforced screed. 3. A layer of insulation. 4. Concrete preparation. 5. Sand cushion. 6. Crushed stone preparation. 7. Clay castle. 8. Mother soil
After the soil is selected to the calculated “zero”, the bottom is compacted and the level is checked. The clearance under a two-meter rail should be no more than 1.5 cm.
To improve the waterproofing of the base, you can make a clay castle at the bottom of the trough. If for adobe floors a thickness of 8–12 cm is recommended, here they are limited to a layer of compacted clay of 5–6 cm.
For soils with low design resistance (for example, subsidence and fill soils, silty sandy loams and light loams), it is necessary to backfill a crushed stone base with a thickness of 10–15 cm. This is done by sequentially pouring and compacting two layers of crushed stone of different fractions: first, medium (40–70 mm) , and then as a wedge - fine (5–10 mm).
You can replace gravel with bulk thermal insulation by combining two layers at the same time
The next layer, at least 10 cm thick, is required for any type of soil. This is a cushion made of sand, which is compacted when moistened. The surface of the sand must be leveled so that the clearance to the attached three-meter strip is no more than 10 mm.
A layer of polyethylene film with a thickness of 200 microns is laid on top of the sand. The film strips should overlap each other by 10–15 cm and overlap the walls, moreover, above the level of the finished floor. The main purpose of the film is to provide conditions for proper hydration of concrete (prevent water from the solution from escaping into the sand), therefore there are not many requirements for its strength and quality other than integrity.
Laminate, tile and other types of flooring
Flooring is the exterior finish of a floor. They are needed to give the room an attractive look and additional insulation of the premises. Applying a topcoat to a wooden surface makes it more durable. As you can see in the photo, there are many options for flooring, available in different colors and textures. The table provides a brief description of the most popular of them.
| Name | Description | pros | Minuses |
| Laminate | Coating that imitates wooden boards. Consists of several layers: paper impregnated with resin or paraffin, HDF, decorative and protective film. Thickness – from 6 to 12 mm. |
|
|
| Linoleum | Flexible fabric produced in the form of rolls. Made from natural materials or polymers. |
|
|
| Ceramic tile | Plates based on baked clay. |
|
|
| Cork | It is made from cork tree bark in the form of slabs. |
|
|
| Wooden parquet | It has the form of plates that fit into the canvas. |
|
|
| Carpet covering | Rolled material with a fleecy surface. |
|
|
| Stone | Stone slabs of various shapes and sizes. |
|
|
Pouring concrete preparation
The footing itself is not taken into account when calculating the load-bearing loads of the floor, so it is not reinforced and is made of lean concrete, in which the percentage of cement is less than usual due to a doubling of the proportion of one of the fillers (usually crushed stone). The thickness of the footing is in the range of 7–8 cm, and its main advantages are workability and the ability to create an even and durable base for the insulation.
After the rough screed has been poured and leveled, it is given time to reach 70% of its design strength (as for ordinary concrete). To prevent the surface from drying out, it is covered with burlap, which is periodically moistened.
Without the use of hardening accelerators, this takes a week, with the use - three days.
Then they begin to arrange the top layer - the screed.
Finish stage
If you have prepared the concrete floor according to what the builders advise, then you can immediately begin mixing the solution. You can make this composition yourself. A mixture of cement and sand is prepared in a ratio of 1:3, then stirred with a shovel or a construction mixer. Then water is added to the solution, but the composition should not be liquid. It is necessary to let the mixture sit for at least 5 minutes, then stir again. If this option seems difficult, you can use a ready-made product or a dry mixture.
Pouring a subfloor in a wooden house
Important! The subfloor should be poured within one day, as the cement hardens completely after an hour, and after that it cannot be smoothed out. Before pouring, moisten the base with water.
Reinforcement
A concrete floor on the ground can be considered as a screed on an unstable foundation. Therefore, its reinforcement is mandatory to prevent destruction as a result of movement or subsidence of the soil, as well as in the case of using bulk or sheet insulation.
On the other hand, this is not a slab foundation, which is subject to high loads. This means that for a floor on the ground, a concrete thickness of 20–25 cm and a double reinforced belt with a reinforcement diameter of 10 mm or more are not needed.
Comparison with a floor slab is also not very correct. For example, the most common Khrushchev project (series 464) uses a slab 4.33 m long, 10 cm thick with one layer of reinforcement with a diameter of 12 mm. And it rests on its edges, and the concrete floor of a private house lies on a prepared foundation and experiences much lower fracture loads. Therefore, these dimensions can be considered maximum for office spaces where there is heavy equipment, for example, a jacuzzi or a stove.
For residential premises, the load is less and to reinforce the floor on the ground, a road mesh with a cell of 100x100 mm and a rod diameter of no more than 5–6 mm is sufficient, and for such “heavy objects” as a fireplace or a large aquarium, you can make a separate foundation.
So, in cross-section, the ground floor itself is a sandwich, the lower part of which is a concrete preparation (concrete base or rough screed), in the middle there is a layer of waterproofing and insulation, and on top there is a reinforced screed.