- We act in stages
The speed of laying and the accuracy of the rows when constructing aerated block walls depend on the size and configuration of the tool used. The topic of this publication was a trowel for aerated concrete, as the main tool for applying and uniformly distributing the adhesive composition.
What is a trowel
A trowel (in other words, a trowel), by definition, is a device in the form of a spatula with a curved handle, designed for masonry, jointing, laying tiles, and more.
Construction technologies are developing, new materials are being created, tools for working with them are changing, but their name remains the same. Thus, the trowel has undergone significant modifications, and now this name can be found on devices that are completely different from each other. In relation to aerated concrete, a trowel is a bucket of a certain width, equipped with a comfortable handle for gripping and a row of teeth on the opposite side. Used for uniform application of adhesive solution on aerated concrete blocks.
Criterias of choice
The quality of the work done and the speed of its completion depend on the correctly selected tool.
To correctly select a trowel for an aerated concrete block, several factors must be taken into account:
- dimensions of the device;
- the size of the teeth;
- quality characteristics of the adhesive mass;
- quality and comfort of the handle.
The width of the bucket must fully correspond to the width of the block surface on which glue will need to be applied.
The height of the teeth is completely responsible for the amount of glue used and the thickness of the masonry layer.
An equally important point of choice is the quality of the product. It is advisable to give preference to metal trowels over plastic tools.
Pros and cons of trowels for aerated concrete
The trowel has undeniable advantages over a classic trowel or notched trowel. The peculiarity of aerated block masonry is that this material has precise geometry. In this case, the masonry mortar should be laid in a minimally thin, uniform layer to ensure the absence of cold bridges.
The thermal insulation properties of aerated concrete significantly exceed the same parameter of cement and all solutions prepared with it. Therefore, in order for the wall to freeze less during the cold season, it is necessary to minimize the width of the joints.
The advantages and disadvantages of the trowel are summarized in the following table:
Advantages and disadvantages
If you know how to work with a trowel, the master can control the thickness of the applied layer of glue with high precision. The number of places where the adhesive layer is thinned is minimized.
Material consumption can be reduced several times by controlling the thickness of the solution layer.
The speed of applying glue increases many times over. Mastering the technique of working with this tool is not difficult.
When working with a trowel, the walls become less dirty, which will simplify their processing before finishing. The absence of dirt also has a positive effect on the master’s mood. We'll talk about this in more detail when describing the structure of the instrument.
The main weak point of the aerated concrete trowel is the junction of the handle and the bucket. When pressed, this unit experiences bending loads and often fails, especially if we are talking about an inexpensive Chinese tool. This mostly applies to handles made of plastic and wood. If you use this trowel, consider strengthening the handle.
The trowel has a width for a certain standard size of the block and can only be used with it, so craftsmen need to purchase a whole set of these tools. This is unpleasant both from an economic and practical point of view - you need a lot of space to transport it in a car. Moreover, there are models with different tooth sizes, which need to be changed depending on the desired thickness of the adhesive solution.
Design Features
The tool for applying a special adhesive solution differs in its structure from a trowel for concrete and plaster. In appearance, this device is a rectangular bucket with a handle. At one end there is a row of teeth that set the height of the glue line. Their sizes vary from 4 to 10 mm.
Depending on the width of the gas silicate block, you can select a trowel.
The width of the implement ranges from 7 to 40 cm. These dimensions correspond to the standard width of the blocks.
The material used for manufacturing is stainless steel or black steel. Some products are coated with special paint. In addition, there is an improved model - a carriage. With its help, you can apply large volumes to wide surfaces, which is important for large-scale construction.
In addition to metal tools, there are plastic trowels on sale. Their advantage is low cost, while the quality is low. Such devices are used for one-time laying of blocks.
For convenient operation of the trowel, a handle with a rubber or plastic holder is provided. In shape it can be either flat and smooth, or corrugated.
All this allows you to work accurately and efficiently. Due to the original shape of the bucket, aerated concrete adhesive is used economically and strictly for its intended purpose.
How to make a trowel for aerated concrete with your own hands
Of course, working with a tool made at a factory is more convenient and enjoyable, but sometimes there is nowhere to get it. And then homemade devices come to the rescue.
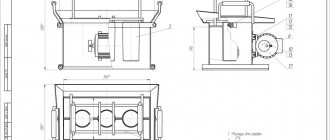
Drawing and dimensions
There will be no need to produce any works of engineering art, so the most primitive drawings will be required, indicating the main dimensions of the parts. There are much more options for homemade trowels than those presented in stores. Let's look at just a few of the most successful designs in our opinion.
The first option is similar to a regular metal dustpan, only it has teeth at the ends and a handle is attached on the reverse side. The design is extremely simple and for its manufacture you will need a galvanized sheet with a thickness of 0.6 mm or more. The product will have good spatial strength, provided that metal of sufficient rigidity is used.
The second option can be called a carriage with a dispenser. The main feature of this solution is that it can be made with replaceable tooth blades. The device is a box without a top, bottom and front panel. At the front, the ends of the box walls are cut at an angle - a toothed blade from a spatula or malt will be screwed to them.
There are two support guides installed inside that will prevent the structure from falling below a given level. A handle is attached to the back wall of the box, by which you can pull the carriage.
The dimensions of the tool parts will affect its operating parameters, namely:
- Depending on the angle of inclination of the working blade (cut of the front ends of the frame), the thickness of the applied layer of glue will change.
- The height of the walls and the length of the carriage determine the internal volume of the dispenser - the larger they are, the longer the strip of glue can be applied in one pass.
- The width between the walls is determined by the block under which you assemble the trowel.
The principle of constructing a drawing of a trowel-bucket is almost the same, only it does not have limiters and a dispenser.
Tool making process
Now let's look at the procedure for assembling and manufacturing parts of a homemade tool.
Let's start with the trowel-bucket:
- The first step is to cut blanks from a steel sheet. The main working part must exactly match the width of the block. Its length is set arbitrarily, but the longer it is, the greater the amount of solution that can be drawn. Please note that the back wall of the bucket will also be formed from this blank. The height of this wall should be at least 6-7 cm.
- The side walls are rectangular sections with the dimensions of the sides selected so that they exceed the main part of the bucket and the rear wall by 2-3 cm. This is done so that the edges can be bent to create attachment points.
- In your work you will need metal scissors, a rivet gun, rivets, needle files (round and triangular), a hammer or mallet for bending workpieces, a screwdriver and a metal drill for prepared rivets. An angle grinder can also be used to cut metal, but abrasive cutting has a bad effect on the zinc protective layer - over time, rust forms in areas of overheating.
- If desired, the bucket can be made multifaceted to increase its internal volume, but this is at your discretion. Corners need to be formed precisely, so use a base (such as the edge of a workbench) that can be molded to the same shape.
- The parts are connected to each other with rivets - their number is determined only by the need to achieve the rigidity of the tool, so look at the fact.
- On the working side you need to make teeth. There are two paths you can take. The first is to cut the teeth with metal scissors, then grind them and refine them to the desired shape with needle files. Quite a difficult task that requires diligence and time. The second is to rivet a blade cut from a notched trowel.
- The handle is attached last. Its shape, size and method of attachment can be very different. Make sure that the connection is reliable and that when working, the grip on the handle is as comfortable as possible.
The carriage is also easy to assemble. To do this, you will need two pieces of laminated plywood 16-20 mm thick, 10 cm wide, and one same piece for the back wall, but 8 cm wide and a length corresponding to the width of the block.
- The parts are twisted using self-tapping screws and galvanized corners, which are installed outside, otherwise over time these parts will become covered with a hardened layer of glue.
- You can cut plywood with an electric jigsaw, but it is better to use a circular saw so that the edges are smoother. The dimensions of the side walls must be identical, their front sides are cut at an angle, according to the drawing.
- Before connecting the box parts, it is necessary to screw on the guides, which can be made from strips of the same plywood, but it is better to use “g” or “z” shaped galvanized metal blanks. The metal will not get wet like plywood, and can withstand abrasive loads much better.
- A handle is screwed to the back wall of the box - you can use a regular door handle secured with self-tapping screws. The front handle is either made in the form of an upper jumper, or the handle of a notched trowel screwed in whole is used as it.
Vitaly Kudryashov
Builder Author of the portal full-houses.ru
Ask a Question
Before using the tool for the first time, it is recommended to treat all plywood sections with a moisture-proofing compound, such as paint. This will protect the material from getting wet and swelling.
As a working part, it is better to take a serrated tool and cut off the handle from it. The reason is the greater thickness of the metal compared to spatulas.
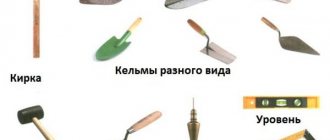
Work aids
In addition to the main ones, a number of auxiliary tools are also used. They are not required to be used, but they greatly simplify construction work, speeding up the process.
The selection of auxiliary tools is carried out according to the same criteria as the main ones - quality of material, certificate and warranty from the manufacturer, labeling and instructions. Frequently used devices in this series include a spatula, level, square, cord and 2 types of hammers - a rubber mallet and a regular construction hammer.
Putty knife
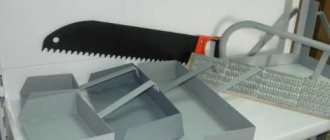
To work with gas blocks, use a wide spatula with a long base and handle, as well as a device with teeth . The first type is often used with a trowel, and the second type applies the adhesive layer independently.
With a straight spatula it is easy to process the horizontal or vertical surface of the material in those places where the main tool does not reach the block. A notched trowel easily glides over the surface, filling all the pores of the product with glue. In this case, too thick an adhesive composition is not required.
Notched trowel for laying aerated concrete:
Level
This type of auxiliary tool, with a length from 40 to 80 cm, is found in several types:
- Mechanical . It is called bubbly (water) because it contains bubbles in the liquid that is inside the ruler. It has small dimensions.
- Electronic . Operates using a battery. Has a scale and ruler.
- Laser . Charges from mains or batteries. Is portable. It is considered the clearest and most accurate, in comparison with the previous two types. The ruler coincides with the beam that is formed by the laser.
The level helps to ensure that the surface is laid correctly and horizontally. This is important when laying the very first layer and positioning the corners.
Many builders recommend using levels from the Cargo brand in their work.
Mechanical level for gas blocks:
Square
This tool, made of high-quality metal or wood, helps to accurately cut blocks at right angles. Squares have a base and a ruler with a metric scale. Among them there are models with an inch scale.
The construction cord allows you to check the evenness of not only horizontal, but also vertical masonry. The device of this row is secured with corner clamps or pegs. Using a cord, you can check that the walls being built are level, preventing distortions and asymmetry.
Pull the cord from the corners of the perimeter of the future building . This helps to carry out high-quality markings, which will need to be followed during the masonry line. The square is especially important for the first row of blocks with formed corners, from which the cord is pulled.
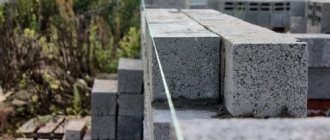
How to use a trowel
Working with a trowel on aerated concrete is a pleasure. The process is extremely clear and simplified due to the presence of side stops that prevent excess glue from being squeezed out and falling down the wall. The craftsman is required to stir the glue to the correct consistency and apply it to the edge of a row of blocks using a classic trowel or spatula. Next, install the trowel and pull it until the glue runs out.
It's even easier with a carriage. It is installed on top of the row, after which the adhesive mixture is placed in its container - you can pour it directly from the bucket, if the density and weight of the latter allows. The master takes hold of the upper and lower handles and pulls the tool along the row until the end of the solution.
After use, the instrument must be rinsed thoroughly. It is also recommended to do this with some frequency and during work (every 1-1.5 hours) - to avoid the formation of a coating of hardened glue on the surfaces.