The armored belt in a house made of aerated concrete is a closed ring structure, constructed of metal rods and concrete, completely repeating the perimeter of the building and the contours of the load-bearing walls. Armored belts are installed in places where walls adjoin the foundation, monolithic and slab floors between floors, under wooden floors, and roof mauerlat.
The main task of the reinforced belt is to increase the load-bearing capacity of aerated concrete walls, to eliminate the appearance of cracks and other types of deformations caused by uneven shrinkage of the structure, as well as wind, roofing, and other types of loads. An armored belt for aerated concrete holds blocks and individual structural elements together as firmly as possible, increases the rigidity of walls, and distributes loads.
Why do you need an armored belt in an aerated concrete house?
The foundation and wall structures are affected by a variety of negative factors - wind, precipitation, shrinkage of the structure, sudden changes in temperature, subsidence of the soil under the foundation, etc. All these impacts create uneven loads that can cause deformation and even destruction of an aerated concrete building. Therefore, strengthening of houses built from this type of blocks is mandatory.
A monolithic concrete belt takes on uneven loads that appear locally and partially distributes them throughout the structure, protecting it from destruction. Reinforced concrete is an ideal choice, as it combines the properties of two materials: concrete can withstand compressive loads well, and steel rods protect it from tensile effects.
The combination of these materials guarantees the structure’s ability to withstand much greater loads than those required for concrete or reinforcement separately.
Why an armored belt on aerated concrete is required:
- Compensation for emerging deformations in walls with different modulus of elasticity and uneven load during shrinkage, soil heaving, and earthquakes
- Compensation for point overstresses of aerated concrete during installation of the roof rafter system, during the process of fastening the Mauerlat to load-bearing walls with anchors and studs, which can provoke chips and cracks
- Acting as a spacer to distribute roof pressure over the entire structure when using a hanging rafter system
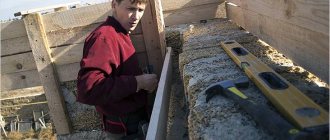
- Ability to align walls horizontally
- Increases the rigidity and strength of the entire aerated concrete structure - the load on the walls is partially transferred to the frame and partially distributed along the entire perimeter
- Ensuring the possibility of erecting a structure on an inclined soil surface
The main requirement for any reinforcing belt is continuity, which is ensured by the circular pouring of a firmly bonded annular structure of the reinforced belt for aerated concrete.
Characteristics of a monolithic belt
The main characteristics of an armored belt are its height, width and load-bearing capacity. In buildings made of aerated concrete blocks, the width of this structural element is taken equal to the width of the load-bearing wall or 20 cm wider if we are talking about a grillage. The greatest importance is the height, which depends on the location of the structure:
- Grillage is a belt between the foundation and the first level of a building. The height of the grillage is 30-50 cm.
- The basement belt is a monolithic strip separating the base and walls of the first floor. Height - 25-50 cm.
- Interfloor belt - reinforced concrete strip under the floor slabs between the floors of the house. Height - 20-30 cm.
- The belt under the roof mauerlat is an armored belt for aerated concrete under the beams of the rafter system. Height - 15-25 cm.
The bearing capacity is calculated according to the method described in SP 15.13330.2012. The result of the calculation is the dimensions and material (grade of concrete) that will be used for concreting. In the absence of these complex calculations, it is sufficient to use concrete grade M200 for the tape under the Mauerlat and M300 for other types of armored belts.
Height and width
Before making an armored belt for aerated concrete, you need to carefully calculate everything and determine such main parameters as height and width. The main parameter of the aromatic belt is its height, which should be at least 18 centimeters. A height of 30 centimeters is considered sufficient.
The standard width of the armored belt is equal to the width of the aerated concrete wall - 20-40 centimeters. But experts advise making the width slightly smaller than the wall in order to leave a gap needed when insulating with different materials. Typically, aerated concrete is insulated with extruded polystyrene foam, PSB-25 foam, mineral wool boards or other materials.
What building materials are used?
Since the basis of the armored belt is monolithic reinforced concrete or a brick structure, the same materials are used to insulate it as for stone wall structures : polystyrene foam, Penoplex, various types of mineral wool slabs and polyurethane foam.
Reference. Each modification of insulation has a variety of heat-protective, moisture-proof and cost indicators. Their choice will depend on the thickness of the load-bearing wall and the climatic characteristics of the construction area.
Recently, the installation of warm permanent formwork as a basis for an armored belt has gained wide popularity.
In this case, special tray blocks are installed along the entire perimeter of the object under construction , with an internal cavity for installing insulation, reinforcement cage and pouring concrete mortar.
Before pouring the concrete solution, a steel reinforcing frame and heat insulating sheets are placed in this form to strengthen the structure.
Popular insulation materials
The most budget-friendly option for thermal insulation of armored belts is polystyrene foam. The material is especially often used for thermal protection of stone buildings, since it has great advantages :
- Low price, the average cost of one sheet measuring 1000*1000*50 mm is no more than 100 rubles.
- Light weight, the density of the most popular brand PSB 35 is 35 kg/m3, which allows the developer to independently carry out loading and unloading operations and installation without involving auxiliary workers, in addition, installing such material on the walls will not increase the weight load on the foundation.
- High thermal protection characteristics for the PSB 35 brand, thermal conductivity at 25 C is 0.033 W/mK.
- Insignificant water absorption; for grade PSB 35, vapor permeability does not exceed 0.05, mg/Mh*Pa.
- High resistance to temperature changes and exposure to UV rays.
- No additional waterproofing required.
Unfortunately, the material has its drawbacks. which are associated mainly with its high flammability and ability to release harmful substances during combustion, and therefore its installation is allowed only outside the building. In addition, it is a very fragile material and is susceptible to exposure to any dyes.
Penoplex is an improved modification of polystyrene foam, which has more durable fire safety characteristics, but also a higher price; a 50 mm thick sheet will cost the developer 325 rubles/m2. Nevertheless, such an increase in the cost of insulation is justified by higher production indicators :
- Light weight with a density of 20 kg/m3, allows the performer to simply lay the material at any height.
- The highest heat-protective characteristics, for slabs with a thickness of 50 mm, the thermal conductivity coefficient is 0.032 W/(m*K).
- High strength due to the homogeneity of the material.
- Low moisture absorption coefficient of no more than 0.5% by volume.
- Low vapor permeability 0.005 mg/m*h*Pa.
- Flammability class G4.
- Wide range of applications, both indoors and outdoors, including for different designs and types of stone walls.
The disadvantages of this insulation include its high price and instability with respect to dyes and other chemicals.
Polyurethane foam is used in two versions: foam and slabs. For filling inside the armored belt, the first option is most often used. It is also divided into two variations - semi-rigid, which has open internal cells, and hard, which has closed cells.
Note! The solution can be prepared directly at the construction site and then treated with insulated surfaces using special equipment.
Users include the advantages of polyurethane foam:
- Universal protective characteristics for heat, steam and moisture protection.
- The complex building material does not require any consumables such as fasteners and glue for installation.
- Possibility of insulating surfaces with any configuration, including internal cavities;
- Integrity of the coating without seams or joints.
- Long service life over 40 years.
- High temperature range of use from - 60 to +150 C.
- Low thermal conductivity coefficient from 0.02 to 0.026 W/mK.
- High biological resistance to microbes, rotting and mold formation.
- High fire-resistant characteristics, it is difficult to ignite and does not support combustion.
- Low water absorption of 0.04% per day at a percentage humidity of 98%.
The disadvantages of polyurethane foam include the high price of the material: 1 m2 of a 6 mm thick foam-treated surface costs 800 rubles. and the need for special equipment, as well as experience in working with insulation, which ultimately also increases the cost of insulation.
Varieties of mineral wool are also very well used as insulation for brick and monolithic armored belts.
The main types of this class of heat insulator are: stone or basalt wool, glass wool, and slag wool.
The last two modifications can only be used for external insulation, due to low environmental safety.
The most popular of this range of insulation is: 1000x600x50 mm slabs "Isover Master Warm Walls" Russian. Advantages of this slab insulation :
- Low density of 45 kg/m3, which allows use on non-loaded structures, in the interstitial space.
- Low thermal conductivity coefficient, 0.039 W/(m*K).
- Restores its original volume with a compressive strength not exceeding 70 kPa.
- High noise protection.
- High fire resistance, material class NG.
- Relatively low price of 780 rubles/m2, with a slab thickness of 50 mm.
- High biological protection and environmental safety.
The disadvantages of the material include high water absorption of slabs of 1 kg/m2 during the day and a significant vapor permeability rate of 0.3 mg/m*h*Pa. When choosing such a material, it will be necessary to install additional protective layers in the form of vapor and moisture barrier membranes.
Warm permanent formwork
Recently, during the construction of armored belts, warm permanent formwork has become increasingly popular among developers. They increase the strength characteristics of wall structures, which arise during the natural movement of the soil and the impact of negative natural forces on the walls.
Reference. Such an armored belt not only evenly distributes all loads, transferring them through the walls to the foundation, but is also very warm, preventing the flow of heat from the room to the street.
It works well not only on aerated concrete walls, where its installation is required, but also in wooden structures, regardless of the type of floors used.
The assembly of permanent formwork begins with the lower lintel, on which reinforcement is laid, thereby creating the lower part of the reinforcement cage.
To create a vertical part, holes are drilled in the body , or pieces of reinforcement are simply installed in the corners.
And also in areas where walls intersect - 4 pins in a square and 2 pins along the walls in increments of 1 m.
Next, insert the upper lintel into the grooves, on which the reinforcement is laid, thereby creating the top of the reinforcement frame and tie it with the vertical elements, obtaining a rectangular frame section of 180x200 mm.
Plastic lintels strengthen the walls of the formwork and become its functional part. The general dimensions of such formwork can be made with a section of 200x250, 250x300 mm, which corresponds to the thickness of the wall of an aerated concrete block.
Selection rules
The most important indicator for choosing insulation is thermal resistance and the ability to work well with the reinforced belt material. For the developer, the price is considered an important factor.
Note! Foam insulation materials and their installation typically cost less than traditional rock wool insulation. However, foam insulation has higher R-values.
When building a new home, this type of insulation can also help reduce construction time and the number of specialized contractors, saving the customer money.
Before choosing an insulating material, consider the following factors:
- climatic conditions of the region;
- flammability of the material in case of fire;
- toxicity of insulation;
- ease of installation;
- market availability and price of the material;
- strength of the heat-protective structure.
Before choosing a material, you will need to calculate its thickness . It will depend on the construction area and the type of wall material.
For example, for an armored belt with a section of 300x250 mm made of concrete with an average density of 2000 kg/m3 for aerated concrete walls of a house with a plan of 10x10 m, a layer of thermal insulation will be required:
- Arkhangelsk, at an indoor temperature of 18 C, you need foam plastic with a thickness of 104 mm or mineral wool - 114 mm;
- Moscow, at an indoor temperature of 18 C, you need foam plastic 94 mm thick or mineral wool 104 mm thick;
- in general, developers accept insulation with a thickness of at least 100 mm for the central regions of Russia;
- the insulation area of the armored belt on the outside will be 40 m x 250 mm = 10 m2;
- volume of insulation, with a layer of 100 mm = 1 m3.
Options for manufacturing armored belts
When calculating a reinforced belt, it is necessary to correctly select the most suitable option, of which there are several. Depending on whether the foundation for the house, walls, and ceilings are reinforced, the ideal option is selected that provides the required strength, durability, and cost.
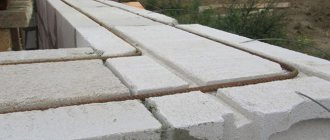
Using ready-made blocks
The simplest, but far from budget option, is to use ready-made U-shaped blocks in a tray format. The sizes of trays vary, and their price increases proportionally. In this way, the armored belt of the outer wall made of aerated concrete is strengthened, but inside the partitions you will still have to construct formwork.
Most often they do this: along the edge of the outer wall they install ready-made blocks with a thickness of 100 millimeters, then a layer of insulation of 50 millimeters, a frame made of reinforcement and formwork on the inside.
In this way, it is possible to create a durable structure: the size of the reinforced belt for aerated concrete is sufficient (the thickness of the reinforced belt is 150 millimeters greater than the thickness of the wall, the height is equal to the height of the block itself).
Using additional blocks
Additional blocks are also often used in the construction of reinforced belts for aerated concrete. They have special cutouts (recesses) into which the reinforcement is placed, and then the concrete solution is poured. Concrete blocks have uneven wall thicknesses, which is necessary to ensure structural strength. One wall has 10 millimeters, the second – 5.
The blocks are mounted in a standard way using glue, placing them strictly on one plane. This is the fastest and easiest way to make an armored belt for aerated concrete.
Option with one-sided additional block
The reinforced belt is constructed from one-sided additional blocks, which are similar to the previous ones in length and height, but they are less thick.
In this case, installation is carried out from block materials of different thicknesses from the inside and outside of the wall using ordinary glue. A groove appears between the blocks, and reinforcement is laid there, followed by pouring concrete.
Application of double-sided formwork
Before making formwork for an armored belt on aerated concrete, you need to decide whether it will be one-sided or two-sided. The one-sided method is also called combined, since along with the formwork they use additional 10-centimeter thick blocks, which are mounted along the outer edge in a standard manner, with insulation laid, and the formwork is fixed along the inside. The main advantage of this method is hidden installation, which is not visible from the outside, which facilitates external finishing.
Double-sided formwork for armored belts on aerated concrete does not require the use of additional blocks. Formwork panels are mounted along the internal and external parts of the structure. Extruded polystyrene foam is laid close to the formwork structure in a layer 50 millimeters thick. Next, the reinforcement is installed and the reinforced belt is poured.
Reinforcing belt under the Mauerlat
The installation of an armored belt in a house made of aerated concrete can be done under the Mauerlat.
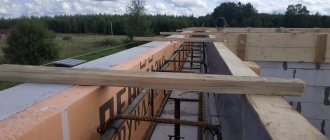
Mauerlat is a wooden log or beam that can be used as a support for rafters; it connects the load-bearing wall with the entire rafter system.
Before pouring concrete, lay a U-shaped wire with a cross-section of 6 millimeters and insert it under a layer of reinforcing bars in 1-meter increments.
The free ends are left of sufficient length for tying the Mauerlat, fasten it with threaded rods with a cross-section of 12-14 millimeters (for installation, holes are drilled along the top row of blocks with a step of fastening the studs). The washers are screwed onto the studs, then they are installed in the prepared holes. The thread located above the armored belt is wrapped with tape or paper so that it does not become clogged with mortar during the pouring process. It is desirable that the length of the studs be 50 millimeters greater than the thickness of the armored belt and Mauerlat.
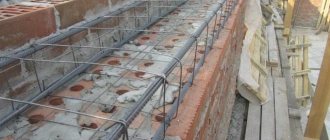
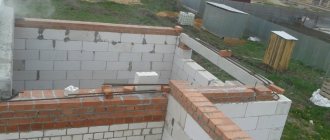
Armored belts are often made from bricks
on walls made of aerated concrete, which is ordinary masonry, additionally reinforced with reinforcing mesh. Typically used to strengthen outbuildings and one-story houses with a pitched roof. In this case, reinforcement is carried out between the rows of brickwork, using a masonry mesh with a cell size of 50x50 millimeters from a rod with a cross-section of 4-5 millimeters.
The mesh is laid in each row, solid backfill bricks of at least M100 grade are used. This type of armored belt is also relevant for gable roofs, since thanks to it it is possible to change the height of the wall, cover rafters, fillets and support boards.
When it is necessary to strengthen building structures with a reinforced belt
An armored belt may be needed to implement the following tasks: increasing the strength of load-bearing walls, creating a level base for installing interfloor panels, uniformly distributing different types of loads, preventing wall deformation, reducing the negative impact of external factors on the building, ensuring maximum structural stability, increasing the safety margin.
When it is necessary to create an armored belt:
- In multi-storey construction, where this is prescribed by building codes
- When constructing walls made of porous materials (aerated concrete, cinder block), which can wrinkle and collapse
- If construction is carried out on soft soils and there is a possibility of settlement, the monolithic belt will act as a screed and will not allow cracks to appear
- When the foundation is shallow or made of prefabricated blocks
- The house is being built in a seismically active zone
The need to install a reinforced concrete belt can be avoided in cases where the main walls are built from brick or block with good strength characteristics, and the foundation is poured below the freezing point of the soil. In other cases, the question of whether an armored belt is needed for a monolithic ceiling is not raised at all: the reinforcement contour becomes a mandatory element of the structure.
Frame: brief instructions
There are several rules when constructing a reinforcement frame. It is advisable to adhere to them so that the armored belt for aerated concrete turns out to be monolithic and sufficiently rigid.
Basic rules for arranging the frame of an armored belt for aerated concrete:
- Continuity of design
- Arrangement on all load-bearing walls
- Making an armored belt frame from two rows of reinforcement with a minimum thickness of 2 rods
- The overlap of the longitudinal reinforcement must be at least 8 centimeters
- The minimum diameter of longitudinal reinforcement is 10 millimeters, transverse – 6-8 millimeters
- The rods for the armored belt should be as long as possible (6-8 meters), trimmings can only be used when reinforcing corners.
- The pitch of transverse reinforcement should be 20-40 centimeters
- The reinforcement must be protected on all sides by a layer of at least 50 millimeters of concrete
- To bind transverse and longitudinal reinforcement, use a special knitting wire
- At the corners, the longitudinal reinforcement is bent, overlaps are made as far as possible from the corners
- The frame of the armored belt is arranged strictly horizontally, checking with a building level
- The distance between the rods is calculated in accordance with the height and thickness of the reinforced belt and the protective layer of concrete, which should be at least 5 centimeters on all sides
Preparing fittings for installation
Before knitting the frame, you must perform the following steps:
- Clean the surface of concrete or blocks from dust and dirt, saturate it with a primer for better adhesion to the subsequently poured concrete solution.
- Make sure that the rods have the correct geometry, there are no defects, and there is no damage from corrosion.
- The rods must be degreased.
- Non-metallic layers and deposits should be removed mechanically.
- If the metal was factory-applied with an epoxy coating, it should be left on to protect it from corrosion.
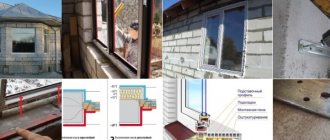
Insulated belt for aerated concrete
Regardless of what technologies and materials are used to create an armored belt for aerated concrete, it is advisable to provide insulation, since steel rods and concrete create cold bridges through which a lot of heat is lost and a layer of condensation appears on the inside of the belt.
Insulation is carried out on the outside of the armored belt using extruded polystyrene foam or polystyrene foam.
The space is left in advance by pouring the reinforced belt over aerated concrete with a corresponding indentation from the outer edge of the wall. Extruded polystyrene foam has high density, low thermal conductivity, the best option.
Foam plastic is used grade PSB-25, which has low thermal conductivity and a relatively affordable price. The main disadvantage of mineral wool slabs is the ability of the material to absorb moisture from the solution and loss of its properties when wet, which is unacceptable for aerated concrete.
The insulation is laid in a layer 50 millimeters thick, cut into strips according to the height of the reinforced belt, installed inside the formwork on the outside of the wall, ensuring a tight fit of the sheets to one another.
The insulation is not attached, since it is then pressed by pouring the solution.
Weld or knit reinforcement?
During welding, the metal may lose its basic properties due to interphase transition. The rods become more fragile and may burst under dynamic loads. Therefore, it is recommended to use tie wire and jumper clamps to assemble the frame.
An example of a frame assembled by welding.
Welding can be used provided that class A500C reinforcement with a diameter of more than 10 mm is used. It is important to select the electrodes correctly and follow the welding technology. For these purposes, the involvement of experienced specialists will be required, while knitting can be performed by any person who has not previously encountered such work.
We recommend viewing material on the topic: “Why is reinforcement knitted and not welded?”
Reinforcement
Regardless of whether an armored belt is made under floor beams or floor slabs in a house made of aerated concrete (it can be concrete slabs or wooden, expanded clay concrete floors), the reinforcement must be chosen to be reliable, of sufficient thickness, and of good quality.
Typically, for four or more rods located longitudinally, reinforcement with a cross-section of 10-14 millimeters is chosen; the transverse one can be 8-10 millimeters in diameter. The frame of the armored belt should be rectangular or square in cross section, the transverse reinforcement is secured with knitting wire with a cross-section of 6-8 millimeters, in increments of 40-50 millimeters.
The finished reinforcement frame is installed in the formwork and filled with concrete mortar. The fittings must be of high quality, free from rust and deformation, with a corrugated surface. It is best to purchase rolled metal from trusted bases and manufacturers, where companies that provide construction services purchase materials.
You should not skimp on the quality of the reinforced belt for aerated concrete, as this will then have a negative impact on the strength and resistance of the frame to various loads and influences.
For floors
The reinforced belt for the installation of interfloor floor slabs is made in a similar way to the roofing belt, but has some features.
A rigidity line between floors is arranged for reliable installation of overlapping structures. These can be reinforced concrete or lightweight slabs, wooden or other panels and flooring - a belt is necessary in any case.
Calculation of the reinforcement belt between floors is carried out depending on the type and weight of the floor. For heavy slabs, load calculation is required.
One of the main parameters of the belt design is the area of support of the floor slabs on the concrete strip of the belt - the larger it is, the more reliable.
The minimum width of a monolithic belt for floors is 20 cm, height is 15 cm.
Pouring concrete
To fill the armored belt, use a solution prepared on the basis of concrete of at least M200 grade. The mixture can be ordered from the factory or prepared independently. For concrete of a grade not lower than M200, the proportions are as follows: part M400 cement, three parts sand, 5 parts crushed stone. If concrete grade M250 is being prepared, the ratio is as follows: part M400 cement, two parts sand, 4 parts crushed stone.
It is advisable to add water to concrete in small quantities, since otherwise the structure of the armored belt in a house made of aerated concrete may not be strong enough. It is better to add a plasticizer. The water ratio should be approximately this: for 10 parts of cement, take 5-7 parts of water. When preparing the solution, it is advisable to vibrate it with a special vibrator or poke it with a bayonet made from a piece of reinforcement.
The armored belt is poured one time to ensure the solidity of the structure (we get a monolithic belt). While the concrete is setting, it must be periodically sprayed with water to prevent cracks from appearing as it shrinks.
After removing the armored belt formwork, wait for the concrete to fully gain strength (up to 28 days) and continue work: laying partitions, walls, roofing, etc.
An armored belt in a house made of aerated concrete is a mandatory structural element, which in the future will provide the building with sufficient rigidity, strength, and a long service life. Provided the work is carried out correctly using high-quality materials, it is possible to achieve the best result and protect the aerated concrete structure from any loads and external negative influences, including earthquakes.
Difficulties and errors
The technology for installing a Mauerlat on an armored belt is quite complex and responsible; even the slightest violations, for example, when setting the working surface of a protective belt horizontally, can destroy the entire roofing system.
The most common mistakes that developers make when installing armored belts on aerated concrete walls:
Pouring formwork in 2 times or even more times.- The filling was done in hot weather and the belt was not moistened with water.
- The installation of the Mauerlat was carried out when the concrete had not reached its working strength.
- Thermal protection of the armored belt has not been completed.
- The timber under the Mauerlat was not treated with antiseptic and fire retardant impregnations.
- The seismic belt has not been waterproofed.
- The anchor system is not installed correctly.
- The diameter of the reinforcement for the reinforced frame is incorrectly selected.
Permanent formwork made of aerated concrete
The option with completely permanent formwork is very convenient for an armored belt under the Mauerlat. You can use ready-made U-blocks as permanent formwork, or lay out thin blocks on both sides of the reinforced belt.
For more details about this formwork option, see the video.
Screeding formwork with studs
One of the options for removable formwork is OSB boards, reinforced with wooden blocks and studs. After leveling the formwork, holes are drilled in the OSB, plastic tubes are placed across the entire width of the formwork, and studs are inserted, which are then tightened with nuts and washers.
The studs should be located at the bottom of the formwork, because liquid concrete creates maximum pressure at the bottom, and the stud prevents the formwork from being squeezed out. After pouring concrete and hardening, the pin is pulled out, the tube is trimmed and filled with foam.
This formwork option is very reliable, but labor-intensive. For most cases, wooden supports will suffice.
Necessary tools and consumables
For work on thermal insulation of the armored belt, the developer must prepare, in addition to insulation, the necessary consumables and tools :
- electric grinder;
- standard hacksaw;
- electric drill-screwdriver;
- regular hammer;
- emery grater;
- construction stapler;
- perforator;
- cutting tools: knife and scissors;
- measuring instruments:
- putty knife;
- glue for insulation;
- dowel nails.