Leveling walls for subsequent finishing is an important construction operation. Typically, cement-sand plaster is used for this. Therefore, let’s figure out what this solution is, what brands it comes in, and how to properly plaster walls using this building material.
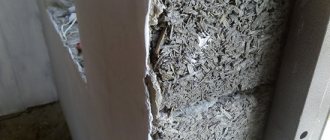
Leveling the facade with cement-sand plaster Source beton-house.com
Advantages of using the mixture
Plaster material has certain advantages:
- the surface is able to resist the effects of water, dries quickly after getting wet, without deteriorating its properties;
- excellent vapor permeability ensures a comfortable indoor microclimate;
- the material is environmentally safe and meets all hygienic and sanitary requirements;
- with the help of such a mixture it becomes possible to change the decor style;
- the composition fully complies with fire safety requirements;
- low cost and low expenses associated with organizing plastering work;
- provides additional protection from extraneous noise.
The plastered surface gets a presentable appearance, and it becomes possible to perform finishing with various materials - wallpaper, paint, etc.
In addition to the listed advantages, developers also note a number of disadvantages of the material:
- During the operational period, cracks may form on the surface of the plaster layer. This is associated with shrinkage of the structure or violations committed in the technology of making the mortar and carrying out plastering work;
- working with such a mixture is allowed only at positive temperatures;
- plastering walls with cement-sand mortar involves preliminary preparation of the walls - installing a reinforcing layer, applying notches, priming;
- the work is performed manually, which takes a lot of time;
- According to established construction standards, it is allowed to apply a layer of plaster of a certain thickness.
Purpose of the plaster mixture
The main purpose of cement and sand plaster is to level walls. At the same time, this solution can be used to level walls made of almost any building materials. But this type of plaster has many other advantages:
- protecting the walls of the house from moisture;
- it is a “breathable” material through which air passes, that is, optimal conditions are created inside the house to obtain a good microclimate;
- protection from noise and external temperatures;
- creating a layer with high adhesive properties on which the finishing can be laid;
- high maintainability of the leveling layer, which can be corrected with the same composition.
Necessary equipment
Before plastering the walls, it is recommended to prepare everything you need to complete the work. The kit looks like this:
- trowel or ladles;
- rule;
- grater and grater;
- construction level;
- lighthouses;
- a shovel and a container of a suitable size for making a batch (for large volumes of work, it is allowed to use a concrete mixer);
- buckets;
- spray bottle for moistening walls;
- fishing line or cord;
- hammer, chisel, brushes.
What plastering tools will you need?
To plaster walls you will need the following tool:
- Container for mixing the solution. This can be either a construction bucket or trough for small repair work, or a concrete mixer for large volumes of finishing work.
- The tool for mixing the solution is a shovel or a hammer drill with a mixing attachment.
- Trowel for applying plaster to the wall.
- Plumb line and building level for even application of plaster on the wall.
- Spatula and rule for leveling the surface of the plaster.
Preparing the walls
This stage is always performed, because the solution is applied in a thick layer, and poor adhesion to the surface leads to its peeling and collapse.
Preparatory work is carried out for all walls according to the same principle, but there are some aspects related to the type of building material.
Made of brick
If you plan to plaster brick walls with cement-sand mortar, carefully inspect the surface of the masonry and remove excess mortar. The thickness of the applied layer depends on the evenness of the wall, and if this value does not exceed three millimeters, then it is quite possible to do without a reinforcing mesh.
Dust is cleaned off, dirty stains are washed away, the dry wall is covered with a primer mixture that prevents the absorption of water from the applied solution.
Made from concrete
The preparatory process for such a surface is somewhat simpler. Protrusions are removed, dirt stains are washed away, priming can be omitted, because the concrete wall does not absorb moisture.
Immediately before plastering, the concrete is moistened.
Made of wood
Wood material is more susceptible to negative influences than others, so the wall will have to be prepared carefully.
To improve adhesion, a primer must be applied, and a mesh for reinforcement is fixed along the entire wall with self-tapping screws.
Preparatory stage
An important stage is the preparatory work. It includes several points that cannot be ignored. First of all, you need to check the availability of tools. Next comes surface preparation.
The walls need to be examined carefully. Loose bricks, if any, are fixed with cement or foam. Cracks and chips are covered, deformed areas are removed. If this is not done, the plastered surface may begin to deteriorate quite quickly. The old composition needs to be removed.
A plumb line will help identify imperfections and surface unevenness. The seams are cleaned, dirt and dust are removed. The rest of the surface is also cleaned, after which it should be primed. It is the primer that will help the materials adhere better. The next step is the installation of beacons.
To begin with, self-tapping screws are installed in the upper corners, protruding a couple of centimeters above the surface. Plumb lines are placed, and screws need to be secured to their cords. Next, a tourniquet is stretched, which forms straight lines horizontally, and beacons are placed under them, the distance between which is 2 meters. The fixation points should be located 20 centimeters from each other. As a result, the wall will have vertical dividing strips.
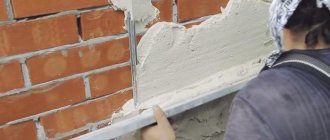
We display beacons
How to properly plaster a wall with cement mortar? Masters recommend setting up beacons. This is done as follows:
- the wall is checked for vertical evenness;
- guides of appropriate length are prepared;
- at a distance of twenty to thirty centimeters from the corner area, a line is drawn from the ceiling to the floor, and mortar slats are thrown along it in increments of fifty centimeters;
- According to the applied markings, the rail is installed.
The remaining beacons are placed in a similar way, the distance between which should be slightly less than the length of the rule. As a rule, the pitch varies from 150 to 160 cm.
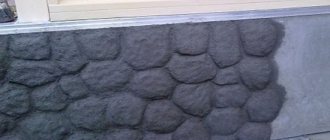
Decorative plaster on a brick wall
For decoration, first select the desired effect, then select a suitable mixture. For example, textured mixtures are not suitable for bark beetle, but “bark beetle” and “pebble” mixtures are not suitable for Venetian.
Popular finishing finishes include:
- for the facade - travertine, bark beetle, lamb, American, rain, fur coat, mosaic, sgraffito or pebble, or rusticate;
- for indoors - wet silk, Venetian, craquelure, imitation brickwork, wood, etc.
You can get acquainted with the types of effects and implementation technology in the “Decorative plaster” section.
Preparation of working solution
Having completed the preparatory activities, we begin to prepare the plaster solution. We recommend that you act in a certain sequence:
- we clarify the proportions for making the batch, measure out the components in the required proportions;
- add the required amount of sand to a portion of Portland cement and mix the ingredients thoroughly;
- Water is added portionwise, everything is kneaded to the required consistency.
You should understand which solution is best suited for plastering walls. The consistency of the mixture of sand, cement and water, reminiscent of thick sour cream, will facilitate the spreading process and prevent it from slipping if the solution is applied in a thick layer. Particular attention should be paid to ensuring that there are no lumps of sand or cement in the mortar mass.
If the mixing is completed in accordance with the requirements, the solution retains its original shape without spreading over the working surface of the trowel.
How to properly mix plaster mortar
It all depends on the volume in which the work with plaster will be done. On large projects a construction mixer is used. For small spaces, a screwdriver with an appropriate attachment and a construction plastic bucket will be sufficient.
The bucket is cleared of dust and debris, a little cement-sand mixture is poured into it, making sure that the mixture looks homogeneous in a loose state. If this is not the case, then mix it with a trowel even before adding water.
Cold, clean water is gradually added to the dry mixture so that it can be conveniently stirred with a tool. It is important not to overload the screwdriver with a mixture that is too thick in consistency, which will simply “screw” onto the attachment. Also, when mixing, you should be guided by two principles: the mixture should not be too liquid, so as not to drain under its own weight; and the mixture should not be too thick so that it is difficult to level.
Advice! Do not knead a large amount of the mixture at once. Its plasticity will change for the worse already 20 minutes after preparing the solution.
Before you start creating a new portion of the solution, you should thoroughly clean the plastic bucket from clots of the used mixture.
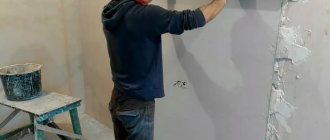
Applying plaster
Let's consider the technology of plastering walls with cement-sand mortar. Having mastered all the techniques, it is possible to level the walls yourself quickly and with good quality.
Considering the expected thickness of the plaster layer, you should choose a tool suitable for the job - a trowel or ladle. The second one is used in most cases when working with large volumes.
A distinctive feature of a mortar made from sand and cement is that it does not require rapid production, so during work there is always the opportunity to inspect the plastered area and make certain adjustments.
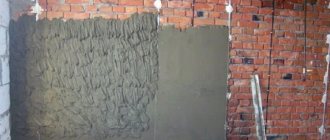
Before you start plastering the DSP with your own hands, the wall surface is sprayed with a liquid mortar mixture that improves the adhesion rate. This layer can be applied unevenly, the main thing is to cover the entire area. After two hours, you are allowed to begin finishing with a second, thicker solution. It is applied by throwing it on to improve adhesion. Work is carried out from the floor to the upper section of the wall, in areas whose boundaries are indicated by beacons.
The mortar layer is leveled by the rule, which is carried out in the same direction - from the floor covering to the ceiling, in a zigzag motion. If during the leveling process small defects are revealed on the surface of the wall, mortar is added to such places with a trowel, and everything is leveled again according to the rule.
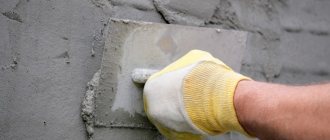
To achieve greater evenness, the final working stage is grouting.
The surface is carefully plastered if the work is carried out according to beacons. They move on to the next section when the previous one is completely completed.
What is included in cement-sand plaster?
The cement-sand mixture already contains both components, as you might guess from the name. All that remains is to add water and mix the required amount of solution mechanically.
Interesting! Different types of plaster contain different grades of cement. It could be M100 or M500, the information will be indicated on the packaging in any case.
The brand of cement affects the strength of the coating and its purpose. It all depends on the finish coat and the location of application. For facades, values in the range M250-M500 are recommended. For most interior work, a cement-based mixture M100-M250 is quite suitable. Exception: working with tiles.
Various types of sand are added to the cement-sand mixture. Sea sand is rarely used in the finished mixture, so usually the choice is between river sand and quarry sand. Professional builders prefer river and sea. Many parameters of the finished mixture will depend on the quality of the sand: color, reliability of adhesion, strength, shrinkage, tendency to crack and final wear resistance.
If you still manage to purchase a mixture based on sea sand, then you can expect it to be free of impurities that can reduce the adhesion of the solution to the surface. DSP based on sea sand, as a rule, is more expensive than samples from river or quarry sand.
Usually the following proportion of sand in relation to cement in the mixture is used: 3 to 1. However, the composition will also contain other components with different purposes. Here are some of them:
- plasticizers: make the solution more plastic, facilitate application and especially leveling with a rule and a spatula
- copolymers: including improving thermal insulation
- redispersible powders: hinder moisture absorption and increase adhesion to the substrate
How to get to hard-to-reach places?
A developer who plasters walls with cement mortar with his own hands should know that in the most difficult places it is better to work at the final stage of the process, when the main surface of the wall has dried. Such areas are the corners of walls, abutments to the ceiling, spaces surrounding the elements of the heating system.
When plastering corners, you must initially apply the solution in the usual way, then press down the thrown mass with a rule, the corner of which is cut off. In this case, the lighthouse installed first from the corner is taken as a landmark.
The mortar mixture is poured into the openings near the pipes with a spatula or trowel, and grouting is done with them. It is recommended to finish the areas near the ceiling on the second day after completion of the main work. When leveling the layer, they are usually placed vertically, and are oriented not towards the lighthouse, but towards the dried plaster layer.
To prevent the layer of cement-sand plaster from cracking in the future due to rapid drying, several techniques are used:
- eliminate strong heating of the room and the possibility of drafts;
- during plastering work, the wall surface and working tools are often moistened;
- grouting is carried out several times;
- the surface of the plaster layer is coated with a moisture-repellent composition.
Each method increases the drying time of the wall surface, while maintaining the evenness of the coating, which, after such finishing, can withstand any negative impact.
Peculiarities
Cement-based plaster is a heavy material. It can peel off the walls, crack under the influence of high temperatures or drafts.
To avoid such situations, it is worth following the entire work technology:
- Properly prepare the walls.
- Mix the solution in the required proportion.
- Apply everything carefully.
- During the first time after the treatment process, monitor the humidity and temperature in the room.
Now let's talk about the types.
Types of material
Materials for plastering can be divided into 2 categories?
- The main (binders), which include lime, cement, clay and gypsum.
- Fillers, i.e. gravel, sand, pumice and slag.
Depending on what binder material is used, the solutions can be as follows:
Cement, the most durable of all types.- Calcareous, which have antiseptic qualities.
- Gypsum, they set quite quickly.
- Clay, i.e. far from the most durable.
Sand became the main filler for cement-based plaster mixtures. Before mixing, sift through a fine-mesh mesh. A cement composition is used to plaster indoor walls. Portland cement is divided into the following grades. The higher the grade, the better and stronger the solution will be. A simple mixture for wall leveling for painting/wallpaper is made using cement grades M300 and M400. For decorative finishing, higher grades are used, for example, M600 and higher, as well as multi-colored cements. Work on the street is carried out with a solution based on M500 and M600. They perfectly withstand precipitation and temperature changes.
Please note that facades and basements of houses can be plastered with sulfate-resistant cements (they are frost-resistant). To obtain the best results for any plastering job, it is important to mix the solution correctly.
It is also worth remembering that the drying time for cement plaster differs from the drying time for gypsum material. For this reason, it is not worth carrying out these works at the same time in the same room.
How to correctly calculate consumption
To plaster walls with cement mortar, you need to prepare a composition and the volume of material required will depend on various factors:
- The amount of deviation from horizontal/vertical. If the curvature index tends to zero, then the cement consumption per square meter for such a wall will be less than for one where the curvature is 2-3 cm.
The qualities of the components in the solution. During long-term storage, cement will become lumpy and its astringent properties will decrease. It turns out that much more of this cement should be put into the batch.
- The type of material from which the surface is made. You need different amounts of mortar for working on concrete, brick, cinder blocks or wood. The highest consumption is for walls made of wood (1.5-2 times higher compared to masonry made of cinder blocks or bricks). A flat concrete surface will take even more.
- The area to be plastered. Less materials will be needed for a small room than for a large one.
- Install beacons in several places where the wall curvature is most noticeable.
- Change the maximum and minimum layer thickness for future plaster.
- Determine the average value of the raw material.
- Calculate how much solution is needed per square meter.
- Multiply the result by the size of the wall area.
- Knowing the mixing proportions, it is worth calculating the required volume of sand and cement
To calculate the rate of sand and cement for wall plastering, it is worth performing the following steps:
.
We propose to consider an example based on a wall area of 40 square meters. The thickness of the layer in different places will be 2 cm and 1 cm. The average value is 1.5 cm, or 0.015 m. The amount of composition per square meter will be 1 * 0.015 = 0.015 m3 (15 liters). To process 40 square meters of room, you need 40*15=600 liters, i.e. 0.6 cubic meters. If you mix in a ratio of 1 to 3, then per square of wall it will take 0.005 cubic meters of cement, and for 40 squares 0.2 cubic meters, and sand 0.015 and 0.6 cubic meters. If you use ready-made dry mixtures instead of cement-sand mortar, then it is easier to calculate the required volume. The packaging indicates the material consumption for different thicknesses of the treatment layer.
Finishing work
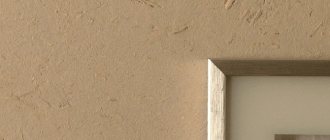
As soon as the walls covered with plaster mixture have completely dried, the final stage of repair begins - finishing. It is performed in several ways:
- using spraying, they form the original texture of the wall surface;
- the walls are painted with compositions of different color shades;
- The surface of the wall is made rough.
The required finishing option is determined taking into account the individual wishes of the developer.
Final grout
This step applies to both materials. Grouting is done on fresh plaster using a plastic or wooden trowel in a circular motion. At this stage, the surface becomes perfectly flat and ready for painting and wallpapering. If you plastered the walls for tiling, then you can completely skip this step.
Possible difficulties
Many people are trying to find out how to quickly complete plastering work without spending extra time and money on it. In a hurry, repairmen neglect some rules, and the consequences after this become very dire.
It would not be superfluous to talk about the mistakes made by beginners who do not have proper experience in plastering work. This mainly relates to the process of preparing the mixture, observing the ratios of the components used for this. If you add more cement than is required according to the norm, you will get a solution that does not have the necessary plasticity. This means that at the drying stage, during shrinkage or under the influence of unfavorable factors, cracks will appear on the surface of the layer and its partial collapse will begin.
If an inexperienced craftsman, in pursuit of the goal of saving money, adds more sand to the solution than is required according to the norm, the composition does not adhere well to the surface, and after drying a lot of dust will form in the room.
The problem can be determined visually using a spatula - a mixture with excessively added sand does not stay on the tool, and plaster with excess cement sticks to the working surface and is difficult to clean off.
It is recommended to carefully examine the previous covering layer of the surface. The cement mixture is applied boldly without preliminary cleaning if the coating was previously made of a similar material.
Please note that this plaster composition is not used on gypsum or lime coatings.
It is important to first apply a layer of spray to the wall surface if painting is planned in the future. If this condition is not met, the mortar mass dries unevenly, shrinks, and all defects become clearly visible after applying paintwork materials.
For what purposes is DSP with additives used?
DSP varies in purpose depending on the additives:
- rough leveling work, including installation of reinforcing mesh
- for filling depressions, cracks, chips, potholes
- special mixture with additives against the development of fungus and mold for wet rooms
A mixture of cement and sand: technology
DSP is available in several types, they differ in the number of additives. For simple work, a pure compound without impurities is suitable; for other purposes it is better to purchase universal compounds.
Universal cement-sand plaster is used for:
- facade work and interior creation in any premises;
- leveling the screed or blind area;
- improving the protection of the base from moisture.
Any plastering of walls always makes sense.
The work algorithm is always the same and is carried out in 3 stages:
- Rough layer.
- Primer covering.
- Covering, final stage
There is a special high-tech application method, but it will require special tools. The technology is used in a professional environment, as it is quite difficult to apply and is mostly used where there is high humidity. Cement-sand mixture for plastering using machines is applicable for facades or large volumes of work, but requires high costs. The mechanical method requires expensive equipment; it is cheaper to rent the installation.
What mixture is best to do the work: the better
Plaster compositions can be divided into cement, gypsum and lime, but in fact the choice is between gypsum and cement mixtures, since lime ones are used quite rarely.
| Lime is used as a plastic additive in cement mortars. Lime plaster in its pure form is not used in modern renovations. Once applied, the lime must react with carbon dioxide to become limestone. The main problem is that this type of plaster takes a long time to gain strength. In ancient buildings this process could take centuries. In addition, lime is washed off with water before it turns into limestone. |
- Gypsum solutions have recently become widespread, as they are easy to work with, flexible and dry quickly. After drying, the gypsum solution does not shrink, which reduces the likelihood of cracks. Gypsum plasters have a small fraction of filler, so they can be used to obtain a smooth surface for subsequent painting. Gypsum plasters also have problems: lower strength (M3 - M10) compared to cement compositions and poor resistance to moisture.
- Cement plasters used to completely dominate the market, but now they are increasingly being replaced by gypsum mixtures. Cement plasters have high compressive strength, which can reach grade M300; cement compositions also absorb less water and do not lose their strength from contact with moisture. The disadvantages of cement mixtures include the presence of shrinkage, low plasticity and a large filler fraction.
From this we can conclude that in rooms with normal humidity and normal temperature conditions it is easier to use gypsum plaster; for bathrooms, balconies, basements and facades it is better to give preference to cement mixtures.