There are methods based on which the beams are fastened together without the use of additional devices. The assembly of other structures using solid wood blanks involves the use of traditional fasteners or specialized hardware. Let us consider each of the approaches in detail with an overview of their features. Let's get acquainted with solutions that will allow you to correctly fix the bars on bases of different nature (concrete, brick, porous blocks and wood).
Profiled timber for the construction of a log house Source searchbiznes.ru
Methods for installing joists on a concrete floor
Installation work consists of laying wooden beams on prefabricated or monolithic reinforced concrete foundations.
An important condition for high-quality performance of work is the correct choice of fasteners and compliance with the technological scheme for placing logs on the base surface:
- The beam should be installed across the line of light from the windows, parallel to the window or doorway. It is necessary to leave a gap of 25-30 mm wide between the walls and the profile.
- If sound insulation is needed, then the substrate under the logs is laid in a continuous strip along the entire length, without breaks.
- Mounting holes and seams between prefabricated elements must be filled with cement-sand mortar of a grade not lower than M150.
- The joists must touch the surface of the floor slabs without gaps. It is recommended to fill the voids between the timber and the base with fine sand or fill them with polyurethane foam.
- The minimum length of the bars to be joined must be ≥ 2 m. Short profiles should be joined together with their ends facing each other anywhere in the room with the seams in parallel joists offset by 0.5 m.
- In the doorways of adjacent rooms, it is necessary to place a widened beam protruding beyond the partition by 50 mm on both sides. This is done so that the finishing coating in different rooms rests on the same base.
- The horizontal level of laying profiles is checked with a two-meter rack tool.
- Before installing the finishing flooring, the space under the floor is cleared of wood chips, shavings and debris.
Self-tapping screws
When fastening with self-tapping screws, it is recommended to use hardware with a nickel-plated surface complete with plastic plugs that have a protruding edge for the screw head. The diameter of the screw is 3.5 mm, the length is selected taking into account the height of the log - 50-150 mm.
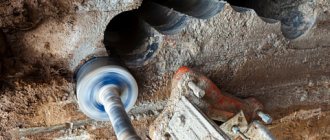
Through holes are drilled in the joists 0.5-1.5 mm smaller than the diameter of the screw. Holes for plugs are drilled in the floor slab using a hammer drill. Then a nylon dowel is inserted into the concrete floor and the profile is laid. Check the alignment of the holes and screw in the screw. The horizontal level of the logs is adjusted using fasteners and substrates, loosening or tightening the connection.
Fastening with anchors
Anchors provide a stronger connection than dowels or screws. The principle of installing devices is the same as for self-tapping screws, but instead of a nylon dowel, a metal spacer sleeve is inserted into the base. The optimal fastener diameter is 6-10 mm, length is 50-150 mm. Due to the high connection density, one anchor is enough per 1 m of timber.
Fastening the log to a metal corner
The profile is attached on either side to the base of the floor using a dowel or anchor. The lag is placed in the cavity of the corner and screwed in place. The distance between the fasteners depends on the length of the room and should be 35-50 mm.
The same procedure can be done using metal perforated brackets. In this case, the beam will be covered on both sides by the shelves of the device.
Adjustable joists
Adjustable fasteners for the subfloor can be of 4 types:
- plastic supports (posts);
- studs with nut and washer;
- polymer bolt-stand;
- threaded bushings.
The most convenient are factory-made designs with through threaded couplings, which can be of the following sizes:
- 0.45 x 0.45 x 2.0 m;
- 0.45 x 0.70 x 2.0 m;
- 0.45 x 120 x 2.0 m.
They are supplied with threaded posts for adjusting the profile rise level and dowels for attaching post bolts to the base.
Assembly order:
- Before installing the structure, plastic post bolts are screwed into the holes in the profile, on which the logs will rest.
- The bars must be placed parallel to each other in increments of 350-375 mm.
- Then holes are drilled in the concrete base for installation of vertical connections. A dowel-nail is placed in this place through the stand.
- Using a special key, turning the mounting post left and right, adjust the horizontal level of the log.
- Drive the dowel-nail all the way, check the reliability of the connection and move on to the next profile.
Attaching joists to concrete pillars
Under the logs installed on, 1-2 layers of waterproofing material (roofing material, etc.) are laid, the edges of which should extend beyond the boundaries of the base by 30-40 mm. A fiberboard substrate is placed on top of the insulation in one layer. The profiles are fastened using dowels or self-tapping screws.
The beam must be joined only in the center of the monolithic support. Leveling the log level is done by changing the thickness of the pads.
Technology for attaching timber to the base
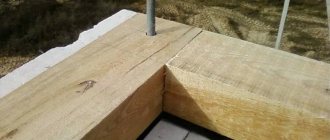
There are several methods for installing timber beams these days, but anchoring the timber to the foundation with anchor bolts remains the most common and reliable method. In this case, the wooden elements are laid on a grillage, which was previously covered with roofing felt sheets. They cannot be left open for a long time, since roofing material has a rather fragile structure, which can be damaged even by a slight mechanical impact. The timber must be laid strictly horizontally, so it should be regularly checked with a building level. If irregularities of more than one centimeter occur, they must be corrected with cement mortar; all other defects are quite acceptable. The lower beams are attached to each other by means of recesses in the corners of the base. It is preferable to use a paw or half-tree sample.
The beam is installed on the base of the future building using nuts and anchor pins, which should be installed in advance at the base of the building. Experts recommend installing wide washers for locknuts - this way you can significantly increase the contact area of the material with the fastener, thereby increasing the strength of the entire structure. If you plan to build fairly short walls, then you can use three fasteners per beam. Using a building level, all diagonals and corners of the base should be regularly checked.
When the fastening of the strapping beam to the foundation is completed, you should begin installing the main supporting structure.
It is important to know! Working with wet material is prohibited. You should wait until the timber dries before starting work.
Before starting work on installing racks and crowns, you should inspect the foundation and find out how horizontal its surface is
If the results are satisfactory, then you can begin impregnating the timber. For this purpose, special antiseptic compounds are used, which can be purchased at construction or hardware stores. The antiseptic packaging indicates the impregnation method, as well as the time required for the material to dry.
Before starting work on installing racks and crowns, you should inspect the foundation and find out how horizontal its surface is. If the results are satisfactory, then you can begin impregnating the timber. For this purpose, special antiseptic compounds are used, which can be purchased at construction or hardware stores. The antiseptic packaging indicates the impregnation method, as well as the time required for the material to dry.
After the preparatory work, installation can begin. The installation of the beam on the base of the building occurs in parallel with the cutting of anchor bolts into special holes that are drilled in the material. The diameter of these holes must exceed the diameter of the fasteners by at least two millimeters. After the timber is installed on the base of the building being erected, the installation of vertical elements, which will subsequently become the frame, should begin.
To prevent possible deformation of the material, it should be dried thoroughly. Diagonal strengthening of the supporting structure will significantly increase its strength and also increase its service life. For this purpose, special braces are used.
Building a house out of wood is quite expensive, but with the help of some tricks you can significantly reduce the cost. One such trick is to reuse waste materials. For example, the material that was used for the initial fixation of the supporting structure can be dismantled and cut into fragments that can serve as permanent jibs. Temporary spacers can easily be made from wooden parts of the formwork. If the reuse of wood products is planned before construction begins and included in the estimate, you can save significant money.
It is important to know! The material should be stored in a room with low humidity, and even minor contamination of the wood should not be allowed. You should not burn lumber waste that has been treated with antiseptic compounds, since such smoke is harmful to human health
Installation of beams
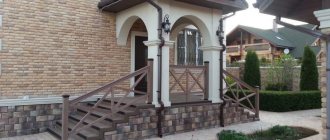
Separately, it should be said about how to support a wooden beam on a brick wall. This procedure is very important, since beams usually take on a large load or even serve as a ceiling. Therefore, embedding a beam into a wall (support) must meet certain strength and reliability requirements.
So, the installation of beams is usually carried out in special niches with a depth of at least 150 mm.
The process itself looks like this:
- The first step is to cut the ends of the beam at an angle of about 60 degrees.
- Then the ends of the part are impregnated with an antiseptic liquid, and after drying they are treated with resin.
- Next, the bottom of the niche is leveled and covered with several layers of roofing material.
- After this, the ends of the beam are wrapped with roofing felt and laid so that they do not reach the wall of the niche by about 40 millimeters.
- Then the remaining space in the niche is filled with concrete.
Sealing scheme using an anchor
The other end of the anchor should protrude 20 cm into the room. In order to mount the beam, a hole is made in it corresponding to the diameter of the pin. This installation method is used in cases where it is necessary to obtain a particularly strong fastening.
The traditional way to attach the end of a wooden beam to a wall is to embed it in the brickwork. This design of the junction unit can be used in cases where the thickness of the masonry is 2 bricks (250 mm) or more. The reason is that the end of the beam must enter a specially prepared niche to a depth of at least 12 cm (half a brick). If the thickness of the partition is not enough, then the niche will turn out to be through, which is unreliable and ugly.
The ideal option is to provide niches for the beams in advance when building the wall. If this is not done, then they can be carefully hollowed out. Of course, the second support for the beam in the form of an extension frame must be made before installing the wooden product in the design position.
Installation of the supporting beam is carried out as follows:
- Antiseptic treatment of wood is carried out. The end intended for embedding in the masonry is wrapped with roofing felt.
- The end of the beam is inserted into the niche, and the second rests on the finished structure. The distance from the end of the element to the rear wall of the niche is 40 mm.
- The position of the bar horizontally and vertically is verified, its second end is secured in the chosen way.
- The gaps between the surface of the brick and the wood are sealed with cement-sand mortar grade M50.
We invite you to familiarize yourself with: Do-it-yourself wood-burning sauna stove
The inconvenience of this method is that you need to spend time preparing the niches and waiting for the solution to harden well, otherwise during further assembly of the roof it will fall out in pieces. There is a more practical way: fasten a support beam of the same cross-section as the beams flat to the brickwork. It must be secured in such a way as to ensure the required angle of inclination of the beams when they rest on this base.
The support beam should be secured securely, using anchor bolts that extend into the thickness of the brick by at least 100 mm. The anchor installation step is 30 cm (3 fasteners per 1 linear meter). Afterwards, the beam rests on wooden structures at both ends and is secured with galvanized screws on steel corners.
Where is this type of connection used?
The scope of application of units where wooden beams are adjacent to a brick wall is extremely wide. Most often this type of connection is used for the following purposes:
When it is necessary to fix interior items on the wall, a wooden beam is applied flat to the surface and fixed with fasteners. So it is able to carry a significant load. The greater the magnitude of this load, the more attachment points to the brickwork must be provided. The same rule applies when installing a partition, only the starting beam is installed vertically.
The door frame is constantly experiencing dynamic loads, so it is secured to the brick with a particularly reliable type of fastening elements: anchors. They are also used when installing various canopies that experience snow and wind loads.
When insulating brick walls externally or internally, a sheathing (frame) is assembled from the bars, which is the basis for installing the cladding: vinyl siding, drywall, plastic panels and other materials. In this situation, the tree experiences minimal mechanical stress, which is why it can be fastened with dowels for quick installation.
To build an extension, a reliable structure is required that can support the roof with all the ensuing consequences.
In this case, the wooden beams act as load-bearing beams and are adjacent to the brickwork at an angle of 90°. There are several ways to successfully rest them on a brick and securely fix them.
Installation of beams
Separately, it should be said about how to support a wooden beam on a brick wall. This procedure is very important, since beams usually take on a large load or even serve as a ceiling. Therefore, embedding a beam into a wall (support) must meet certain strength and reliability requirements.
So, the installation of beams is usually carried out in special niches with a depth of at least 150 mm.
The process itself looks like this:
- The first step is to cut the ends of the beam at an angle of about 60 degrees.
- Then the ends of the part are impregnated with an antiseptic liquid, and after drying they are treated with resin.
- Next, the bottom of the niche is leveled and covered with several layers of roofing material.
- After this, the ends of the beam are wrapped with roofing felt and laid so that they do not reach the wall of the niche by about 40 millimeters.
- Then the remaining space in the niche is filled with concrete.
This completes the embedding process. It must be said that to add rigidity to the structure, additional fastening of the beam with an anchor is often performed. In this case, the anchor is installed during the process of laying the wall, and is located at a distance of about 12 cm from its outer surface.
Sealing scheme using an anchor
The other end of the anchor should protrude 20 cm into the room. In order to mount the beam, a hole is made in it corresponding to the diameter of the pin. This installation method is used in cases where it is necessary to obtain a particularly strong fastening.
It should be noted that there are a number of requirements for the wooden lintels themselves:
- The thickness should be twice the thickness of the brick.
- The wood must be of high quality, without cracks or knots.
- The moisture content of the wood should be no more than 8%, otherwise the lintel may fail.
Note! Before laying the beam, it must be impregnated with an antiseptic composition and fire retardant. This will prevent it from rotting and make it fire resistant.
In the photo there is a wooden lintel
The installation process looks like this:
- First, the platforms on which the lintel will rest are prepared. They are cleared of debris and covered with several layers of roofing felt. It should be taken into account that the lintel should extend 20-25 cm onto the wall.
- Then cement mortar is applied and the lintel itself is laid.
- Next, the position of the part is checked with a building level. If necessary, it must be adjusted.
- When constructing subsequent rows, the space between the end of the lintel and the bricks is also filled with cement mortar.
Advice! It is advisable to make the lintel from durable wood, especially if the structure is massive. For example, an excellent option is an oak beam, although the price of this wood is quite high.
This is, perhaps, all the basic information about attaching timber and other wooden parts to brick walls.
It is not difficult to secure a beam to a wooden wall or lay a beam on it. However, like any other construction operations, this work requires strict adherence to technology. The strength and reliability of the installation depends on this (see also the article “Attaching balusters to a wooden staircase: technical installation features. Safety recommendations”).
You can get acquainted with some additional information on the topic discussed above in this article.
“And I’m crazy, and I’m crazy!” (C)
alex-bs published a topic in Our work, August 17, topic
Hello, brothers in repair! I haven’t written anything here for a long time, and in general I rarely come in, it’s all a bit of a lack of time: first a drinking session, sometimes a party, and now a new “attack” has attacked me. But knowing that, despite everything, you stubbornly do not forget me, I decided not to be a pig and tell you about my new hobby. I’ll start from afar: I have worked almost my entire adult life as an electronics engineer, moreover, as an engineer developing electronic and electrical devices of the widest class and purpose, and at the same time purely in the defense industry. It is clear that the scope of my amateur radio interests was limited only by my laziness, there were simply no restrictions on radio components for me, I had EVERYTHING! Well, following the trends of the amateur radio fashion of that time, my main focus was on radio receivers and amplifiers, of course, on transistors and microcircuits. I haven’t worked in this field for a long time, and I threw everything into the landfill a long time ago, but all this time I had a dream in my soul - to make a tube power amplifier, and not a simple one, but one that would make everyone gasp. But I must say that at work I spent most of my time dealing with electric vacuum devices, radio tubes, to put it simply, so this topic was very familiar to me. And then there’s this fashion for “warm tube sound”, which people are literally going crazy about. In short, a year ago I decided to make my dream come true. I immediately decided: the mainstream, ordinary tube amplifiers with an output transformer, are not interesting to me, this is not a royal matter! Shouldn't I invent a TRANSFORMER-LESS tube amplifier? Well, I well imagined the difficulties along this path, and I had some of my own thoughts on this matter, but still I decided to consult with the radio amateurs. I found a suitable group on Facebook, started publishing in it myself, and once asked a question on the topic: could anyone tell me the circuit of such an amplifier. And they immediately give me a link: https://hifisound.com.ua. a-6s33s-otl/ (I hope I didn’t violate any Forum rules by providing a direct link here, especially since it’s from a completely different area?). I won’t talk about this scheme, if anyone is interested, I can later explain what’s what, I’ll just say that this scheme immediately interested me, both for its unusualness and for the potential opportunities that I saw in it. I decided to start. And where to start: there are 0 parts, there is a soldering iron, also a Soviet one, and a tester from Ketai. But, bad luck - the beginning: I got comfortable on Avito, on Ali Express, went to the Mitinsky radio market a couple of times, and began to acquire amateur radio junk.
Now I’ll go and take Tinka for a walk, and I’ll continue, if you’re interested, with photos. )))
Fixing the first row to the strip foundation
You can firmly fix the wooden beam to the strip base using anchor bolts. The advantage of this fastening method is the possibility of fastening directly at the construction site. This installation of timber is one of the simplest, but at the same time, reliable works. To perform such fixation, it is necessary to lay the timber on a previously prepared foundation covered with waterproofing. At the fastening points, you should make holes in the wood using a drill and a special bit, remove the wood and use a hammer drill to make a hole in the foundation. The last step is to install the anchor bolt into the finished hole and tighten it with a spanner.
Strong fastening of the beam to the foundation using anchor bolts provides not only proven fixation, but also allows, if necessary, to lift the entire structure above the foundation using jacks. The laying of the first crown should be done especially evenly. Therefore, it is recommended to level the foundation before attaching the wooden beam. Also, when laying the material, it is recommended to constantly monitor the evenness of the surface. The use of anchor bolts allows you to quickly, simply and very firmly fix a wooden beam on the base of a country house or outbuilding. You can attach the first row of wooden beams yourself, even without experience or special equipment. Fixing with anchor bolts will not take too much time, and the fixed material will be fixed especially securely.
Fixing wooden beams to screw piles
Attaching the timber to the piles is also not difficult. To attach a wooden beam to a screw foundation with your own hands, you need to:
- connect two wooden beams together. You can simply fasten them together using a special metal plate: one side of the product is attached to one beam, the other side to another beam;
- fix the wooden frame made of timber on the prepared site with your own screw. This can be done using ordinary self-tapping screws;
- check the fixation for strength. The installation of the wooden material is ready, and the construction itself is ready for a new stage of construction. Many people are interested in whether it is necessary to check the strength. The answer is clear - it is absolutely necessary, since in the future this part will be responsible for the strength of the entire structure.
Beam fastening methods
In addition to anchor bolts, wooden beams can be secured with your own hands using dowels. This installation is laid at the moment of pouring the foundation:
- Even when pouring the foundation, it is worth laying a vertical rod in a horizontal position, to which the wooden beam will be attached. The pre-prepared pin is cut to 2/3 of the thickness of the timber. The metal element should not pass through the beam;
- according to the markings and location of the metal pins, it is necessary to drill a hole in the wooden frame;
- put the wooden beam on the metal pins. The installed beam must be fixed very tightly, so it is recommended to first determine the diameter of the hole.
The laid material will not allow the product to move horizontally. With this fixation, you can perform the work firmly and reliably. Strapping material is an integral part of construction. And such work should be performed in the same way as others, observing the requirements of the construction industry.
How to attach timber to the foundation. Connection methods and their features
When building a house from timber, it is necessary to resolve the issue of attaching the first crown to the foundation. The further operation of the building mainly depends on this. For this operation, several technology options have been invented, which we will discuss below.
You will learn how to properly connect timber to a slab, strip, or pile foundation. We will tell you how this is done, and what materials and tools for them should be prepared in advance.
How to fix beams on brick
If the wall of the house is made of brick, you should use a slightly different installation technology. To do this, drill holes at a distance along the block with a wood drill, then change the drill to a pobedite one. Having attached the lath to the wall, we make markings through the drilled holes, drilling through the brick.
Then we remove the block and drill holes of the required depth and width in the brick wall. It is recommended to keep the drill straight and not loosen it, otherwise you may crumble the brick. You can attach the beam to a brick wall using dowels and self-tapping screws. You can also use anchors for a brick wall.
The scope of application, if there is a need to secure a wooden beam to a brick wall, is quite extensive. Such a connection is necessary to achieve the following purposes:
Such actions are necessary when constructing an extension that will be connected to the house.
- installation of a wooden partition;
- installation in the entrance doorway;
- insulation of walls, when the sheathing made of timber serves as a frame;
- fastening together elements of furniture and interior decor;
- installation, when a rail with a canopy is installed above the front door;
- construction of any additional premises adjacent to the house.
Return to contents
Installing joists on a concrete base: to fasten or not?
Typically, logs are placed on a concrete base for further laying of plywood or boards. Depending on the situation and the structure that will be assembled in the future, the beam may require rigid fastening or assume the absence of a rigid connection. A lot here also depends on what is located under the concrete base.
If there are neighbors below, it is better to exclude rigid fasteners, as this will negatively affect sound insulation. In multi-storey buildings, vibration-damping rubber pads are installed under the joists, which level the floor and allow the joists to be installed at a certain level. The same gaskets are mounted between the walls and the ends of the timber. This way you will be able to achieve maximum sound insulation, and your neighbors will not complain about loud stomping.
If there is no rigid fastening of the joist, the floor will still be reliable - fixing it with rubber gaskets is quite enough. And the material laid on top (plywood, boards, OSB and any other sheets) will qualitatively tighten the structure. Additional rigidity will be provided by the installation of furniture.
This design can last as long as a fixed timber, but provided that the material is laid dry and dried in a chamber (the timber will not be used in use). Otherwise, the logs may fail and the timber will begin to rise, undermining the layer.
If you want to eliminate such a risk, you can make the fastening of the wooden beam composite - take 2-3 boards, which in total will give the required cross-section, combine them into a beam with self-tapping screws or nails hammered in a checkerboard pattern on both sides. When laying out the boards, make sure that the annual rings of the tree are directed one towards the other. A spliced beam will not lead exactly, and the savings will be noticeable - three boards of 5x2.5 centimeters each will cost less than a beam with a cross-section of 5-7.5 centimeters.
It is necessary to attach the timber to a concrete wall in a private house where the floor is made in the form of a concrete screed. If this is a rough screed, then it is designed to cut off groundwater. If their level is normal, they do not make a screed on the ground as a base for the logs - in this case it is easier to lay down columns of brick or stone and support the logs on them.
It is possible for residents of the first floors - in their case it is not necessary to achieve a high level of sound insulation; here the main tasks are insulation and waterproofing. In addition, the timber must be attached to the walls (where it acts as a lath for installing various materials) and to the ceiling. In these cases, there are no exceptions, and the task here is to choose the optimal fastening method and perform all the work correctly.
https://youtube.com/watch?v=0PnvRtegqBg
Fastening timber to concrete without drilling or fastening
If simply installing the timber on supports does not seem too reliable to you, you can fix it with concrete. A semi-dry mortar of grade M250 or higher is mixed from cement and sand (2.5-3 parts sand for 1 part cement). It is laid out in piles along the walls in those places where it is planned to install logs.
You can set and secure the logs using mortar/concrete
The spacing of the “piles” depends on the thickness of the timber. The larger the cross-section, the less support is needed. For timber 50*50 mm the step is 40-50 cm, for 100*50 mm it can be placed in steps of 60 cm, under 150 mm narrower and 80 cm will be enough. The height of the cement should be higher than the level at which the lower edge of the beam should be located.
Then everything is simple: take the timber and place it on the cement. We press down, leveling it and pointing it to the horizon. Leave and wait for it to set. It cannot be said that the beam is fixed, but it is fixed and the logs will hold securely. This fixation is more than enough for any living space.
Design advantages
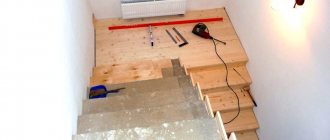
An example of installing an insulated interfloor floor in a wooden house.
Why is installing a subfloor with beams so popular? Despite the fact that the process of attaching wooden battens to the base is very difficult, it is still in demand. Why? The beam base provides the floor with the following technical advantages:
- Improves heat and sound insulation performance;
- Provides a more uniform distribution of the load on the floor, which ensures a long service life of the subfloor;
- The timber does not contain synthetic substances and therefore can be used for flooring in residential premises;
- When arranging a non-ground floor of a high-rise building, it is more advisable to use wooden elements to finish the floor base, which do not create a large static load on the interfloor floors;
- An air gap can be formed between the trim and the beams, which will create optimal conditions for underground ventilation;
- Using a wooden beam, you can not only install a warm floor, but also level it if necessary.