Technologies for the production of building materials give builders a choice. You can diversify raw materials and create practical combinations of consumables.
Each of them has specific properties and qualities. The walls are erected from expanded clay concrete, aerated concrete, brick, reinforced concrete structures and others. Each raw material option has its own recommendations for use and methods of connecting the incoming elements to each other. Taking into account the modern relevance of PVC building structures, you need to know how to properly install plastic windows in aerated concrete walls.
What is the installation depth
When determining the installation depth of windows in the opening, that is, the distance from the outer surface of the wall, you need to take into account several features:
- presence of façade cladding;
- the need for insulation;
- width of tides;
- desired width of window sills.
If the facades of the house will be covered with any decorative material without insulation, the windows can be installed directly along the line of the outer surface of the facade. Shifting them inward may only be necessary due to the design features of fastening the cladding.
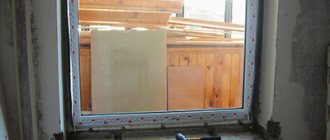
If it is necessary to insulate facades (when this is required in accordance with the climatic conditions of the area), window blocks must be installed inside the opening at some distance from the outer surface. This is due to the fact that high-quality insulation of aerated concrete at the junction of the window will be structurally difficult to perform if the window is installed along the line of the wall. The aerated block wall around the perimeter of the window may freeze, since its calculated thickness will not exceed the thickness of the frame. Usually this is no more than 120 mm.
Calculation of the size of the hole for the window block
When measuring window blocks and designing openings, it is necessary to understand that the glazing will be smaller than the opening itself.
For wooden windows, it is absolutely necessary to leave space for the casing and window sill. For them, the opening should be 14 centimeters larger than the frame.
Window opening in a house under construction.
When accurately forming a window opening, all factors are taken into account, including the foam seam and the installation of a window sill with ebb. For the latter, the frame is shifted 10-15 centimeters into the room. Otherwise, when precipitation falls, the ebb tide will make a lot of noise.
The large difference between the opening and the wooden frame is necessary to compensate for the wood warping that will occur after installation, as well as the settlement of the support beam.
From the inside, the window is placed at a height of about one meter. Then you can lean on the mounted window sill and use its area as an auxiliary one.
Installing windows in an aerated concrete house
When choosing to install plastic windows in a foam block, you should know:
- This can be done three months after the walls are built. This time interval is necessary for the openings to shrink and acquire their true size.
- The laying and pouring of the foundation must be of high quality to prevent soil movement.
- Technologies for fastening plastic structures must be selected depending on the individual design features, the size of window openings, and climatic conditions.
The installation of windows in an aerated concrete house will be of high quality if:
- ensure tightness of seams;
- protect joints from differences in external and internal temperatures, controlling heat loss;
- eliminate the possibility of mechanical breakdowns, damage to adjacent walls, their cladding and window elements.
How to ensure the tightness of installing windows in an aerated concrete house?
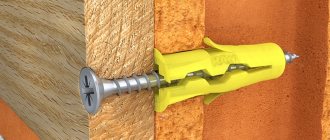
The structure of the block has a peculiarity: it has cut out protrusions. Their presence when applying sealant, polyurethane foam or tape ensures deep penetration of the connecting substance into the foam block wall. During its expansion stage, construction foam fills existing voids, guaranteeing optimal window tightness. Mechanical strength is achieved using specially selected plates and dowels.
How to fix the frame in the opening
Installation of windows in aerated concrete can be done using the following methods:
Having removed the double-glazed window, a hole is drilled in the window opening, the depth being equal to the size of the dowel. It is this that is the main fastening element. At the end of this action the glazing is returned.
You can make the fastening without removing the glass unit. In this case, you need to insert anchor plates, which are fastened with self-tapping screws. In this case, you need to fix the window in aerated concrete with nails. Many people consider this method dusty and labor-intensive. In addition, it requires additional work to mask visible fastening elements. Installing a PVC profile into an aerated concrete block in this way means being inferior in strength to the method using polyurethane foam. In addition, after final fixation, the position of the window will not be subject to correction. Therefore, it is immediately necessary to ensure that the fasteners fit accurately.
When choosing a method using polyurethane foam, it would be correct to first place the profile on special plates. This will give you the opportunity to change position if necessary.
Types of lintels for walls made of aerated concrete blocks
Depending on the tasks, the following types of lintels can be used in construction.
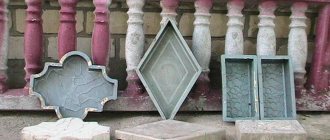
Made from reinforced aerated concrete
They are used in the construction of buildings made of cellular concrete blocks. They are often used to cover load-bearing walls of residential and public buildings up to four floors. Equipping box openings with aerated concrete lintels in load-bearing walls is advisable for houses whose height does not exceed 17 meters. The advantages of using aerated concrete beams are as follows:
- high speed of work;
- small weight;
- a clear and smooth surface that can be decorated with paint or thin-layer plaster;
- absence of “cold zones”.
The disadvantage of these products is the high price, but it is compensated by other advantages.
It is strictly forbidden to saw the product or subject it to other mechanical stress, as this significantly reduces the load-bearing capacity of the block.
Reinforced concrete
Made from steel rods and heavy concrete mortar. Such devices have a wide range of applications. They are used in construction for floors, and also as supporting structures. The main advantage is their availability and low price. The disadvantages of reinforced concrete lintels for aerated blocks include high thermal conductivity and significant mass.
Wooden
Such additional devices are used in the construction of houses made of brick, wood or cellular concrete material. The main requirements for buildings when installing wooden lintels is the presence of ceilings with wooden floors. The material used is first thoroughly dried and treated with an antiseptic. The advantage of wooden lintels over windows in a house made of aerated concrete is the ability to build them yourself. Also, one cannot fail to note their heat-retaining properties, low cost, and light weight. Under the influence of external factors, they, unfortunately, become deformed and rot. Exposure to external influences and short service life, in comparison with other types of crossbars, are their main disadvantages.
Metal profiles
They have excellent load-bearing characteristics, but their use is not always justified. The fact is that they are prone to metal corrosion. Yes, and the thermal conductivity of such products is very high, so there is a need for additional insulation. However, before making steel lintels over the windows in a house made of aerated concrete, you should take into account some nuances:
- Before laying, it is advisable to cover the corners with paint on all sides;
- for fixation, the profiles are fastened with a wire tie or welding;
- the corners do not protrude from the wall, they are mounted in aerated concrete;
- Before installation, the corners are wrapped with plaster mesh to ensure adhesion to the plaster.
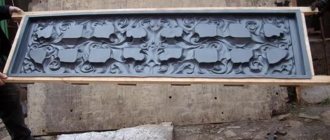
Made from monolithic concrete
This method of creating a concrete lintel on aerated concrete is the cheapest, but requires a lot of trouble. The result is a fairly strong structure that can withstand heavy loads. The disadvantages include the fact that after its installation, the uniformity of the wall surface is lost, which is revealed when a thin layer of plaster is applied. Before starting work on constructing a monolithic beam, it is necessary to construct removable formwork from plywood, boards or other similar material.
When choosing material for lintels, the following characteristics are taken into account: the height of the building, its area, the weight of the walls, roof, ceilings (attic or between floors). It is also advisable to pay attention to the cost of the material and the desired time frame for the construction of the building.
Installing the window sill and ebb, sealing the frame
We found out how to attach plastic windows to aerated concrete. Now let's look at the remaining activities.
For sealing gap areas, there is nothing better than simple foam for installation work. But there is one feature - you should not just fill all the voids with foam and remove its excess after hardening. There is one more mandatory condition - the foam needs protection from natural factors.
Instructions for installing the window sill, ebb and flow and sealing the frame are as follows:
the surface of the slopes of the aerated concrete window opening is slightly moistened, for which you can use a simple spray bottle;
- It is necessary to foam not only vertically located seams, but also the entire space of the external and internal sides of the installed profile. This measure is necessary for installing ebb and window sill boards;
- after the foam has completely dried, its excess is removed, while the window sill can be created with a slight slope, if necessary;
- from inside the room, a water vapor barrier tape is glued to the foam layer, which will reliably protect against moisture;
- When installing the flashing, first a waterproofing film material is glued onto the foam layer, bringing its edge one to two centimeters onto the wall surface. After this, the ebb is installed in the groove of the stand profile and fixed with self-tapping screws;
- The window sill is attached using the same principle.
At the end of all work, it is necessary to remove the protective film from the frame. Its main purpose is to protect the plastic from accidental scratches during transportation and installation. During operation of the window unit, the film does not carry any meaning. If this is not done in a timely manner, after a certain period of time the film will stick tightly to the frame; it will have to be preheated or wet before it can be removed.
Arrangement of lintels in permanent formwork
The use of U-shaped elements greatly simplifies the closing of openings. The dimensions of U-blocks coincide with the dimensions of ordinary wall blocks. Their installation is carried out without the use of lifting mechanisms.
When installing prefabricated elements, a standard adhesive solution for aerated concrete is used. The thickened outer wall provides protection against heat loss. Additionally, mineral wool or foam insulation is laid along this wall.
U-blocks are prefabricated products, the standard sizes of which allow you to select the required length. There is a tray inside for reinforcement and concrete.
Installation technology
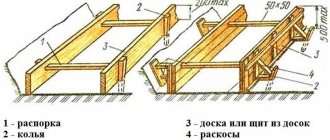
- To assemble U-shaped products, a rigid platform is prepared at the level of the last wall opening. To avoid sagging during pouring, it is supported in several places. The racks can be bars or metal pipes.
- They are laid on a platform with a launch on the walls of 250 millimeters. The supporting walls must be intact.
- The thickened wall should be placed on the street side. A layer of insulation is placed on it. The ends of the trays are glued together with an aerated concrete adhesive solution. Instructions for preparing the solution are located on the packaging.
- A three-dimensional reinforcement frame is placed in the trays. Four reinforcing bars with a diameter of 12 - 16 millimeters (2 at the bottom, 2 at the top) are fastened with wire with a diameter of 6 millimeters. The pitch of the transverse fastening is 40 - 50 centimeters.
- To fill the trays, fine-grained concrete M 200 of soft consistency is used.
- When pouring, it is necessary to achieve uniform filling of the cavity and enveloping the reinforcement. To do this, the solution is laid in layers and leveled with a trowel.
- The platform can be dismantled after 21 days.
How to choose a cutting method?
The cutting method is selected depending on whether the wall is monolithic, made of slabs or panels:
- In order to make a window or doorway in a concrete wall or expand an existing one, diamond cutting devices are used, which are fixed in different types of equipment.
- The walls of the building are made of monolithic concrete and are supported by reinforced concrete, so the load on them is minimal. You can make a new opening for a door or window using diamond tools.
- If the house is panel, then a very large load is placed on the walls of the lower floors, so additional openings in such houses are allowed only on the upper floors. For cutting, equipment that operates without vibration is used, with diamond blades, saws and drills.
Factory solutions
The technology for using lintels in private housing construction has several fundamental differences from the installation adopted in modern and mass construction using cellular aerated concrete. Currently, several types of jumpers are used, which differ in design features and rules of application .
Ready-made version of reinforced gas silicate lintel according to GOST
Ready-made factory aerated silicate (aerated concrete) lintels are ordinary aerated concrete beams with a rectangular cross-section and an internal frame in the form of reinforcement coated with a special anti-corrosion compound.
Arrows on the element indicate the correct direction of installation.
Reference
This option is considered to be the simplest and does not require special knowledge for installation. At the same time, this solution is the most expensive.
The main advantages are:
- properly reinforced aerated concrete does not crack , does not “float” and does not collapse during long-term use;
- aerated concrete lintels are high-strength, lightweight structures that do not place additional load on the constructed walls and foundation;
- the cellular structure of the aerated concrete lintel is identical to the structure of the building blocks, therefore it does not cause a decrease in thermal efficiency , and as a result there is no need for additional insulation.
Main dimensions of gas silicate jumpers:
- Height - 124 mm;
- Width - 115 mm, 150 mm, 175 mm;
- Length - 1300-3000 mm.
Check on the manufacturers website.
U-block construction
The most popular option is to install precast lintels over windows in walls made of cellular aerated concrete with permanent formwork based on U-shaped elements.
The article provided by the link provides information about the manufactured sizes of these elements and the method of self-production.
U-shaped lintels are
prefabricated elements .
They are easily sawed to the required length using a hacksaw for aerated concrete. A welded reinforcement frame structure is laid in the furrows of the products, after which installation is carried out over a window or doorway using wooden formwork. Reinforced concrete elements are made using heavy mixtures based on concrete and reinforcing rods. Important!
If you do not plan to insulate the walls of the house, do not forget to place an insert made of polystyrene foam or other insulation inside the structure.
Reinforced concrete lintels
These factory products are concrete beams with reinforcement inside.
In terms of thermal conductivity, concrete is noticeably inferior to gas silicate.
If you plan to insulate the walls of the house with mineral wool, then these beams can be used.
But for walls without insulation, reinforced concrete will act as a cold bridge.
In this case, the aerated concrete lintels proposed in the first option look better.
Reinforcement technology
How to properly reinforce aerated concrete depends on the type of reinforcement used. It is laid either in the thickness of the mortar joints, or concrete mini-belts are installed parallel to them in grooves with a cross-section of 2.5 * 2.5 cm. The second method is more often used, which can be considered classic, so we will mainly talk about it.
You can cut grooves in different ways:
- Manual wall chaser. There is almost no dust, but it is quite labor-intensive.
- Angle grinder (grinder). Quite quick and easy, but a cloud of dust rises.
- Electric wall chaser. It is easy to work, cutting grooves is done quickly and practically without dust, but such equipment is expensive if you purchase it only for one-time use.
Reinforcement of the first row
On walls less than 200 mm thick, the reinforcement is laid in one row, on thicker walls - in two rows. The reinforcement is placed either in the center of the masonry, or, if there are two rows, at a distance of 60 mm from the edges of the blocks.
After cutting the grooves, it is necessary to remove dust from it, after which the grooves are moistened and half filled with solution. The reinforcement is recessed into it, then they begin to apply a mortar bed for the blocks. On blind sections of walls, the row of reinforcement is continuous - if the length of the rods is not enough, they are connected with an overlap of at least 60 cm.
Reinforcement of window openings
In walls with openings, reinforcement under and above them is carried out regardless of the order of the row, and only in certain areas: along the lower border of the opening and above it. The depth of installation of reinforcement beyond the boundaries of the opening can be calculated by dividing the width of the opening by 3 - for example, 250/3 = 84 cm on each side.
Some European manufacturers (for example H+H) recommend installing fittings everywhere at least 90 cm from the boundaries of the opening. In the same way, different sources voice unequal amounts of insertion of reinforcement into the masonry in the places where the lintels support - some have a minimum of 20 cm, others 25. But the main thing is that the ends of such rods, since they are not united by a common strapping contour, are bent at right angles and included in fines of the appropriate form. Similarly, reinforcement is laid above the opening that is closed without a lintel.
Vertical wall reinforcement
Domestic standards do not say anything about vertical reinforcement, but European standards provide for this option without fail. This is a device of vertical belts that should connect the upper monolithic belt with the foundation. At a minimum, such reinforcement is provided in the corners of buildings and at the junction of internal walls.
Unlike horizontal reinforcement, such reinforcement can increase the load-bearing capacity of aerated block walls in situations where:
- the house is being built on a slope;
- there is a danger of avalanches;
- significant impact of lateral loads (wind);
- aerated concrete of low density and low strength is used;
- it is necessary to strengthen the places where heavy elements support;
- it is necessary to strengthen the too small partitions between the windows;
- columns are reinforced.
It is most convenient to carry out vertical reinforcement using perforated blocks (O-blocks), designed to form ventilation ducts. They are laid one above the other, rod reinforcement is installed in the channel with anchoring in the foundation (for which, when pouring it, mortgages are installed), and sealed with concrete.
If such blocks are not at hand, a vertical groove is cut from the inside of the masonry, into which one rod with a diameter of 14 mm is placed. Then the open part of the hole is covered with a board as formwork, after which it is filled with B15 concrete. Vertical reinforcement can be either one floor high or pass through all floors.
For the reinforcement to work effectively, it must be anchored in horizontal monolithic belts. To do this, when pouring the foundation, in the places where the vertical reinforcement passes, L-shaped rods with a branch of 20 cm are laid, buried into the monolith by at least 15 cm.
Vertical rods are then welded to them and placed in the grooves. The overlap during welding is made at least 40 times the diameter of the reinforcement (but not less than 610 mm). Long extensions of reinforcement are left on top, which are also bent and welded to the frame and embedded in a horizontal belt under the ceiling.
What else should you consider when calculating window sizes?
When choosing the size of a future window, you need to take into account the comfort of opening/closing the sash, namely the location of the handle.
As a standard, the handle is placed in the center of the sash. On high doors it may end up in a place that is inconvenient for constant use.
Photo: in Roto windows it is possible to move the handle down to a height of 500 mm or place it on the bottom of the sash*
An alternative option is automatic door opening with the Roto E-Tec Drive option.
Buy Roto windows in different sizes* |
What is needed for construction?
For high-quality masonry, you need to have not only good skills and abilities, but also good consumables and tools. They can make a mason's job much easier.
Materials for masonry:
- gas blocks of the required thickness, strength and density;
- cement-sand mortar (cement, sand, water, plasticizers, additives);
- adhesive mixture - a special glue that reduces the thickness of the layer between the elements and makes the connection between them stronger;
- reinforcement or reinforcing mesh - to strengthen the wall and increase its strength.
Tools for work:
- A hacksaw or saw with hard teeth - for cutting blocks and giving them the required or non-standard sizes. You can use a wood saw to cut products. Although the quality of the cutting will not be very even, this will not affect the performance of the material and its durability.
- Mallet or rubber hammer - designed for leveling elements and fitting them along one straight line.
- Drill or mixer with an attachment - for mixing cement-sand mortar or mixing the adhesive mixture with water.
- Notched trowel and ladle - for applying the solution to the products and leveling the mixture over the surface of the blocks.
- Grater – for combing out protrusions and bumps on individual elements in order to perfectly fit the products.
- Wall chaser - for cutting special holes or grooves in elements for laying reinforcing bars.
- Building levels - for aligning elements vertically and horizontally. You can use both regular and water levels.
- Tape measure and pencil - for marking blocks with their subsequent trimming.
Panoramic glazing
An excellent type of glazing that came to us from France. Thanks to the large glass area, the entire room is filled with sunlight. The size of a panoramic window in a private house can be up to 80% of the wall.
See the link for house projects with panoramic windows.
Panoramic glazing is divided into 2 types: cold and warm.
The first is frameless glazing, when solid glass panels are attached to the base, but the seams are not sealed with anything. This type is suitable for an attic or loggia, but not for a living room.
For your home, you need to choose a warm glazing option. Then panoramic windows will become reliable protection from winds and precipitation outside.
Advantages of panoramic glazing:
- Increasing daylight hours.
- Maximum filling of the room with natural light.
- Decoration of rooms and landscape.
- A wide range of products allows you to choose products according to your budget and wishes.
Tips and tricks
It is important to remember that if the length of the opening does not exceed 1.2 meters, and the height is less than two-thirds of the width, then the most convenient option for the device will be a lintel made of standard blocks without the use of additional fasteners. Blocks must be laid using removable temporary formwork and special glue for cellular aerated concrete
In this case, the side elements are recessed into the wall by at least 115 mm.
Additional reinforcement can be the reinforcement of the rows located above the opening. The optimal cross-section of the reinforcement used is approximately 6-8 mm. The end part extends beyond the boundaries of the opening by 0.5 m on both sides of the masonry. The ends need to be given an L-shape and anchored into the masonry of aerated concrete blocks.
Tools and Supplies
Under construction
- Mallet.
- Spatula or trowel.
- Hacksaw.
- Planer for gas blocks.
- Container for solution.
- Construction mixer.
- Corner.
- Mooring beacons and thread.
- Hand tool for creating grooves.
Consumables:
- adhesive-based solution;
- fittings;
- concrete.
Lintels are of primary importance in creating a window opening. Options that can be used :
- Ready-made factory solutions . The use of jumpers created specifically for gas blocks at the factory significantly speeds up the construction process. They are suitable for window openings up to 2.5 m wide.
Physically, they represent an aerated concrete block (D500-D700 strength) inside which a reinforcement cage is mounted.
They do not create cold bridges and are lightweight. The result is a homogeneous structure with the wall, convenient for finishing. You need to buy ready-made blocks that correspond in size to the gas blocks that make up the wall, so that there are no gaps during installation. For load-bearing walls, the elements can be heavy, up to 200 kg, which requires equipment to lift.
Jumper prices
The cost of aerated concrete, reinforced lintels depends on their size and manufacturer. They are manufactured by factories specializing in the production of aerated concrete blocks.
As an example, here is the price list of one of the leading Russian manufacturers represented on the markets of Moscow and the Moscow region:
| Length x width, mm. | Wholesale price, rub./1 pc. | Retail from the factory, rub./1 pc. |
| 1 200 x 100 | 435 | 465 |
| 1,500 x 100 | 541 | 571 |
| 1 200 x 150 | 648 | 694 |
| 2,000 x 100 | 710 | 765 |
| 1,500 x 100 | 801 | 856 |
| 1 200 x 200 | 854 | 915 |
| 2,000 x 150 | 1 066 | 1 145 |
| 1,500 x 200 | 1 069 | 1 148 |
| 2 500 x 150 | 1 432 | 1 498 |
| 2,000 x 200 | 1 425 | 1 501 |
| 3,000 x 150 | 1 602 | 1 720 |
| 1,500 x 300 | 1 602 | 1 720 |
| 3,000 x 200 | 2 135 | 2 298 |
| 2,000 x 300 | 2 125 | 2 289 |
| 2 500 x 300 | 2 658 | 2 852 |
| 3,000 x 300 | 3 189 | 3 422 |
Reinforced beams are an integral element in the construction technology of cellular concrete. Designed to distribute the load from the rows located above, armored belts and other elements pressing on the base. The absence of cracks in the walls is guaranteed only if technological features and building codes are observed during their installation.
Video description
You should listen to their advice and recommendations so as not to get the same result as in this video:
Today, the most popular are PVC or metal-plastic windows. They have many advantages over wooden ones:
- the dimensions of plastic windows and the area of solid glazing can be much larger due to the high strength of metal-plastic profiles that can bear a significant load;
- they are quickly manufactured and easy to install;
- the configuration of the plastic window can be any, including with radius elements;
- the variety of fittings makes such windows very functional, and the presence of air chambers in the profile makes them warm;
- their cost is lower than wooden analogues with similar parameters.
But the frames and bindings in such structures are quite powerful and eat up a significant part of the usable area of the opening. In this regard, windows with aluminum profiles are more effective - it allows you to increase the glazing area due to the smaller width with comparable strength.
Window profiles made of different materials Source partner-74.ru
Possible difficulties and errors
Errors or difficulties in construction may arise in the following cases:
Purchase of low-quality materials (blocks, glue, foam, fittings)
It is necessary to pay attention to certified material and guarantees from trusted manufacturers. Here, saving and purchasing fakes is not appropriate.
Errors in designs and calculations, especially in load distribution
Cracks may appear, which will then need to be eliminated with the help of additional investments and the expenditure of your own time. To create a project and the correct drawings, it is better to contact specialists.
Refusal of reinforcement. Supporting the gable wall with steel rods will strengthen the wall many times over and distribute the load evenly. So the structure with reinforcement will last for many years and will never collapse.
Failure to comply with technological standards that relate to the selection of consumables, installation of walls and the sequence of construction stages. To prevent this from happening, it is necessary to comply with the requirements of a number of GOSTs regarding the quality of gas blocks and construction with them: GOST R 57334-2016/EN 771-4:2011;
SP 339.1325800.2017;
STO 501-52-01-2007.
Failure to comply with the temperature conditions for masonry and work. Most experts believe that it is more advisable to carry out construction work in dry weather, with atmospheric temperatures starting from +5 °C.
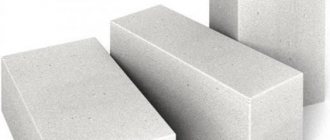
Firstly, the color of the material matters. It should not be yellowish - only light gray.
Yellowness indicates that the material was manufactured with violations, and its composition contains a huge amount of sand, which is unacceptable for the composition according to GOST, and indicates a fake, and not high-quality work from the manufacturer.
The appearance of the gas block is also of great importance. If it has large cells, then it has low density, and for fronts D should be as dense as possible. The higher the indicators, the stronger and more durable the wall will be - this is the main requirement for the structural type of cellular material.
Functional Features
- Sash tilting modes. Thanks to the option of stepwise opening of the window sash, achieving the most optimal microclimate in the room during ventilation has become much easier.
- Number of chambers in double-glazed windows. For private country houses and for premises that will be used only in the summer, you can install a regular single-chamber double-glazed window. But in winter, such a package will clearly not be enough. You will have to buy double-glazed windows with air layers. They will protect the house from freezing, although the price will be much higher than single-layer bags.
- Number of chambers in a plastic profile. The more chambers, the better the profile retains heat, since air is the best heat insulator. For a capital object, choose a three or four-chamber double-glazed window.
- Seal. Little attention is paid to the choice of this material, but due to the sealant all drafts and cracks are eliminated. Rubber and cheap material will become “tanned”, ceasing to fulfill its key options. Some of the manufacturing companies offer transparent elastomer seals: their price is higher, but the protection from the cold is much better and better.
- Accessories. The main rule is that you cannot save on it.
Regulatory requirements for the installation of window openings
The requirements for making openings in brick houses for wooden or metal-plastic double-glazed windows are, in principle, the same. Creation begins with the completion of a house project. It should indicate the location of window portals, their dimensions and the technology for laying brick rows.
Basic requirements when making window openings in a brick household:
- Height from the floor: living rooms from 0.700 to 0.900 m; kitchen from 0.800 to 1.200 m; bath, toilet, outbuildings up to 1,600 m; warm veranda and balcony from 0.700 to 1.000 m.
- Underneath it is a base of 10 rows of ordinary brickwork. The final plane is made of blocks laid perpendicular to the wall axis, protruding outward.
- The width of the portal is wider than the dimensions of the frame.
- The window unit is installed from inside the room.
- The frame must rest against the slope with its front part.
- After laying the side walls of the opening, a ceiling is laid on top of them, taking on the entire load of the upper brick rows and ceiling beams.
- A concrete beam from 250 to 300 mm or a metal profile 120x120 mm is used as a lintel.
- Before facing walls with an installed frame, reinforcement mesh is used along the edge of the portal.
How to determine the size of a window opening
The size of the window determines the amount of light entering the home. Naturally, the required level of illumination in auxiliary and living rooms is different.
There is no point in installing wide glazing in the pantry. And in bedrooms and living rooms it is better to install two- or three-hung windows.
A properly lit room
The area of the window unit is usually selected in proportion to the size of the room. Except for cases when the facade of the house should reflect a special author's idea.
The standards specified in GOST 23166-99 are used in the design of standard buildings. There are no such requirements for private construction. A person has the right to independently decide what type of glazing to use.
Common Mistakes
The most common mistakes that inexperienced builders make:
- Non-coordination of upcoming work with supervisory authorities. For many years, changes may go unnoticed, but when the apartment is sold, all alterations will be obvious to the housing inspection staff. As a result, they will have to be eliminated and a fine paid.
- Using a percussion tool to work with monolithic walls. This threatens the appearance of cracks and even the collapse of part of the structure.
- No temporary bridge when working with a load-bearing wall. It must not be weakened, otherwise deformation will not be avoided.
- Carrying out massive work on a dry wall. This leads to the formation of dust and dirt, followed by lengthy cleaning.
- An attempt to knock down unnecessary material using a hammer drill. This is what inexperienced craftsmen most often do. To remove an unnecessary section of the wall, use a hammer drill to only make holes, placing them close to each other. After this, armed with a chisel and hammer, the opening is calmly expanded.
- Removing material from bottom to top. You need to start dismantling from the ceiling.
Tips for window decoration
For construction, select construction, how to choose window size? Window decoration is one of the main points in creating an interior design, which, as a rule, becomes the final component in a project for decorating a private home.
When choosing a specific window decoration option, you should take into account the type of room, dimensions and style of the window. The most basic principle that should be used when choosing is a harmonious combination of the surrounding interior and window design.
If the room is decorated using many original details, then the best solution would be to leave emphasis on the most unusual and striking interior details. In this regard, it is advisable to choose a simple design and fabric for curtains, without bright patterns and decorations. Here the main task is to choose the required texture, color of the fabric, and its quality. If any specific style in the design of the room is not visible, or its furnishings are standard, then such an atmosphere must be enlivened with spectacular curtains.
The most affordable and currently in demand method of window decoration is curtains made of thick material, which hang freely from the eaves to the floor, and under them there is a curtain - a transparent and light curtain made of tulle, mesh or lace.
Cutting methods
In order to make a passage in the main wall, you will need special cutting tools. You cannot use a percussion tool, such as a hammer drill, for such work, because strong vibration will lead to cracks and chipping of the material.
Work on cutting openings is carried out by several types of cutting:
- diamond;
- cold cutting (water jet method);
- laser cutting (oxygen-lance drilling);
- hammer drill and grinder.
Diamond cutting
Diamond cutting is one of the most popular methods of forming a window or door opening. In this way you can make an opening for both a door and a window. To work, you will need a diamond-coated disk attachment and a container of water to immerse the tool in it for cooling and reduce the amount of dust.
The method has the following advantages:
- due to low vibration, cracks in the walls are excluded;
- the most accurate cutting along pre-designated lines;
- low noise level;
- a small amount of dust and debris.
Despite the large number of advantages, this method has some disadvantages:
- high price of working material (diamond blades);
- regular cooling with water;
- high energy consumption.
Waterjet method
This method is less popular compared to the previous one, because the work uses sand and a jet of water under pressure. The speed of the water jet is 1000 m/s.
Water enters a special tank, where it is mixed with sand, from there the mixture under high pressure through a nozzle with a hole diameter of 0.4 mm is sent to the cutting site. To reduce the residual force of the jet, a water trap is used.
Cutting with water has the following advantages:
- the cut location comes out precise and even;
- concrete does not become hot during cutting, so there are no harmful fumes;
- there is no strong noise or vibration during operation;
- cutting can be done at any angle;
- formation of openings of various shapes.
Disadvantages of water cutting:
- not applicable for apartments due to the large size of the fixture and water use;
- high cost of abrasive material.
Oxygen lance drilling or laser cutting
This type of work is carried out using a thick spear made in the shape of a pipe through which oxygen flows. The spear heats up to 1400°, at the end of which the temperature reaches 2000°.
The advantage of this type of cutting is as follows:
- accuracy and high efficiency of the method;
- minimum cutting width;
- maximum smoothness of edges and narrow heating zone;
- no edge deformation;
- Possibility of cutting concrete into different shapes.
Punching with a hammer drill and grinder
If you need to make an opening in a thin concrete wall, you can use a hammer drill and a good grinder. The discs are selected taking into account the thickness of the wall.
The advantages of this method include accessibility and low cost, but the disadvantages are that making an opening in a load-bearing concrete wall will require a lot of effort and time.
Non-standard windows
A feature of modern private house projects is the use of window openings of different shapes, sizes and geometries. Thus, it is necessary to install windows of non-standard shapes for them. And today this is not a problem at all.
- Triangular windows. In the production of non-standard triangular windows, more material is used than in the production of standard rectangular ones, which, of course, is reflected in the price of the special window design. What style should you choose for your home for such windows? Designers recommend installing triangular-shaped windows in houses that are designed in both high-tech and classic styles.
- Arched windows. Non-standard arched windows are a window design in which the upper part is made in the form of a round vaulted arc with a set radius.
- The windows are round in shape. Round windows will not only bring life to life, they will make both the house and the city apartment sparkle with completely new colors. Making round windows is very simple, so there will be no additional costs. These windows are an excellent solution for rooms that are located under the very roof of the house.
- Trapezoidal windows. Trapezoid-shaped windows will easily fit into any room. It will go perfectly with the interior of the room, which is decorated decoratively. For example, in retro style with a little bit of romance.
- Bay windows. Bay windows are concave window structures consisting of several frames in the form of a rectangle, and connected to each other at the desired angle (usually 90-180 degrees) by means of bay pipes. A bay window will visually increase the size of the openings of the house. Designers recommend installing these windows to add originality to the interior. They look even better with built-in blinds.
Thickness of aerated concrete partitions
For the construction of partitions indoors, special gas silicate blocks are produced that have a smaller thickness. The standard thickness of partition blocks is 100-150 mm. You can find non-standard ones in 75 mm and 175 mm. The width and height remain standard:
- width 600 mm and 625 mm;
- height 200 mm, 250 mm, 300 mm.
The grade of aerated concrete blocks must be at least D 400. This is the minimum density that can be used for the construction of partitions up to 3 meters high. Optimal - D500. You can also take denser ones - grade D 600, but their cost will be higher, but they have better load-bearing capacity: you can hang objects on the wall using special anchors.
Without experience, it is almost impossible to determine the brand of aerated concrete. You can “by eye” see the difference in density between the thermal insulation blocks. D300 and wall D600, but between 500 and 600 it’s difficult to catch.
The lower the density, the larger the “bubbles”
The only available control method is weighing. Data on the dimensions, volume and weight of partition blocks made of aerated concrete are given in the table.
Parameters of aerated concrete blocks for partitions
The thickness of aerated concrete partitions is selected based on several factors. The first is whether it is a load-bearing wall or not. If the wall is load-bearing, in an amicable way, a load-bearing capacity calculation is required. In reality, they are made the same width as the external load-bearing walls. Basically - from wall blocks 200 mm wide with reinforcement in 3-4 rows, like external walls. If the partition is not load-bearing, use the second parameter: height.
- For a height of up to 3 meters, blocks 100 mm wide are used;
- from 3 m to 5 m - the block thickness is already taken to be 200 mm.
You can more accurately select the thickness of the block using the table. It takes into account such factors as the presence of a connection with the upper floor and the length of the partition.
Choosing the thickness of a partition made of aerated concrete blocks