All brick walls can become unusable. This material cannot be considered unreliable; it can last for decades. But over time, the brick begins to lose its characteristics. And the main one is strength. The brick begins to crumble and fall apart, but before this process cracks appear in it. To avoid complete unsuitability of the material, it must be restored in a timely manner.
Repairing cracks in brick walls is a rather labor-intensive but simple process. Even someone who has never done it can do it. You don't have to be a professional to seal small cracks and stop the deterioration of brickwork. If the problem is serious, you need to use the services of a construction expert.
Causes of cracks
Repairing cracks begins with finding the cause of the defects. This is an important part of the process, it helps to determine the extent of the troubles that have arisen.
Finding cracks in the wall
To detect the maximum number of cracks in a brick, you need to inspect all the masonry throughout the house. You need to look for splits and move along the cracks to the epicenter, from which the “web” begins.
In addition to the age of the masonry itself, a common cause of cracks is a large load on the walls. This is a problem for designers who made a mistake even before the construction of the house or structure itself. The cracks differ in direction:
- Vertical load creates cracks directed towards the floor.
Vertical crack - If the problem is in the foundation, which has begun to sag, then the cracks, on the contrary, stretch towards the ceiling.
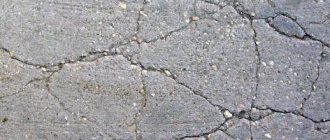
Crack due to foundation - If the reason is the wear and tear of the brickwork, then all the cracks appear on the surface.
Wear of brickwork
These are the three main reasons why brickwork can lose its visual characteristics. To start sealing cracks, you need to understand their types:
- Constructive. These are cracks that appear due to an error during calculations of the depth of the foundation in the house. If the load on each wall is incorrectly calculated, the material simply cannot withstand it. The cause of this type of crack can be considered to be incorrect construction technology, poor masonry mortar, or unreinforced walls.
- Temperature. The main reason concerns the presence of a house or building in an environment that is too aggressive. If the foundation is frozen, cracks appear. The same applies to strong temperature changes.
- Shrinkage. If there is a pit nearby, this may be one of the reasons for cracks in the brickwork. It is also worth highlighting bulk soils. Not a very favorable material for building a structure.
- Deformation. It concerns low-quality and “weak” bricks, which easily fall apart even from minor loads or mechanical damage.
- Wear. If the house or building is very old. Such defects are the most difficult to correct. Bricks can simply crumble during any interaction.
Let's outline the scope of application
Construction supermarkets sell many sealing pastes used in heating, plumbing and sewerage systems. You must understand that ordinary food and plumbing sealants are not high-temperature, although they are used for installing some elements of chimney pipes.
Deep cracks can be sealed with mortar, but it is better to fill them with heat-resistant sealing paste
Water- and heat-resistant sealants are used for steel stoves, masonry, and fireplace repairs. Application options:
- Sealing cracks and holes in the walls of a combustion chamber built of brick or welded metal.
- Sealing chimney pipes during repair or installation.
- Exterior finishing of brick fireplaces and stoves.
- Bonding heat-resistant gaskets (asbestos and graphite-asbestos cords) to metal fittings - doors, valves, iron ovens and cast iron stoves.
- Waterproofing of roof junctions with chimneys made of metal and brick.
Note. Some repair compounds are even used to restore refractory masonry made of fireclay bricks. One condition: the maximum temperature in the firebox is 1500 °C.
A crack in the stove masonry or welded joint of a steel firebox leads to smoke in the heated room and the formation of soot in the defect area. The traditional way to eliminate it is to move the stove or cover the through gap with clay. Modern high-temperature sealant allows you to solve the problem much faster and more efficiently.
A cracked brick chimney often needs to be rebuilt
The suction of street air into the chimney pipe is a very unpleasant phenomenon. More condensation and soot fall on the walls, which can ignite at any time due to the high temperature of the flue gases. Hence the need arises to seal the connections between the chimney elements. We will discuss other methods of application in detail during the review of repair compositions.
Visual differences
It is important to understand the depth of the defects. The cracks may be at the very top of the brick, almost scratches. There are very deep defects that go through the entire masonry. The last option is the worst possible. Visually, cracks can be:
- Vertical;
Vertical cracks - Horizontal;
Horizontal crack - Sloping;
Oblique crack - Straight;
Straight crack - Curvilinear;
Curvilinear crack - Closed;
Closed crack - Through;
Through crack - Superficial.
Surface cracks
Repairing cracks also begins with determining their size. And it could be:
- Wide if the gap is wider than a centimeter.
- Medium dimensions, parameters from 5 to 10 millimeters.
- Small, such cracks measure up to five millimeters and are considered the most harmless for the general condition of the brickwork.
It is also worth checking each crack for the level of stabilization and the possibility of expansion in the future. This is done using special tear tests. For the examination, you will need several plaster beacons, as well as plate elements with a special scale. Stabilization is determined by simply gluing paper to the defect or applying a cement strip to the crack.
Regulatory beacon on a crack
Repairs to cracked walls should only be done if they do not continue to expand. First, the process must be stopped and only then all the resulting defects must be corrected.
When the reasons are identified, the shrinkage process is completed, and the cracks no longer widen, the final repair process begins. After applying a strip of paper or a little cement to the defect, you should wait a while. If the item remains intact, then you can begin work. If the deformation continues, then we do not recommend starting any action; it is necessary to resolve the issue with a construction expert.
Fixation methods
This applies to cases where large vertical cracks of large sizes, more than a centimeter, appear on the masonry. Cement alone is not enough; a strong metal screed is needed. Fixation and repair options:
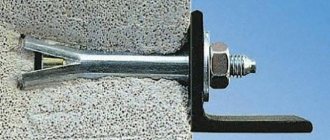
- Special anchors. The method involves driving anchors into metal dowels, which must be installed in advance along the edges of each crack.
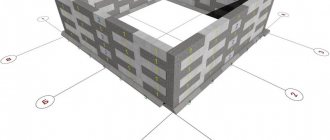
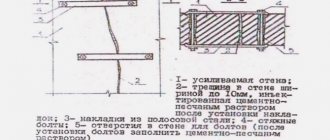
- Longitudinal metal brackets are mounted and bent at the edges. Before the process itself, you need to create several holes in each wall (When the work is finished, all the holes will be filled with cement mortar). The method is reliable, it is possible to fix even through cracks in thick walls.
Fixation method - You can strengthen the masonry with special elements. This is done from the inside; for this you need to install several fasteners on the surface itself. Next, they are inserted to a sufficient depth, usually at least half of the wall itself. Each fastener can be alternated.
- Reinforcing mesh is an option for rationally strengthening brickwork of any size. It is possible to strengthen not only a certain part of the wall, but the entire surface. The option with reinforcing mesh is suitable for deep crevices and cracks.
Reinforcement mesh
How to seal cracks and cracks
The material for sealing cracks must be selected depending on the size and types of the defects themselves. It is necessary to select moisture-resistant compounds for future sealing.
What is the best way to seal cracks:
- If these are minor defects up to 5 millimeters in size, then a simple cement mortar is used. In the case where the cracks are completely microscopic, 1-2 millimeters in size, use epoxy resin. Apply to a spatula and rub into the crack.
Sealing cracks with mortar - Provided that the defects are of medium size, up to a centimeter, cement compounds and sand can be used. There should be two or three times more sand when mixing. It is worth adding water to make the consistency more plastic.
- Polyurethane foam – for large cracks. The material does not like the sun very much, so it is worth making sure that there is no direct contact with the sun's rays.
- Cement grade M400 with special polymer compositions. It creates maximum protection and fixation for cracks of any size. But the price is high. More often they cover cracks in large private buildings or src=»https://otremontirovat25.ru/wp-content/uploads/2019/12/marki-tsementa.jpg» class=»aligncenter» width=»650″ height=»350 ″[/img] Cement brands
- Sealants with silicone - for finishing any problem area on brickwork. Very plastic material, has a long shelf life. It is easy to cope with temperature changes and humidity. Apply with a mounting gun. The only negative is the high price.
Using sealant - If the defects touch the outer parts of the wall, then you can use solutions with the addition of brick chips.
Caulking compounds
An available material for eliminating cracking is a sealing mortar based on a cement-sand mixture. Proportions of the basic composition: 3 volumes of sand to 1 part of cement. To eliminate large through splits, you will need to add crushed stone. To improve adhesion, add liquid soap in the amount of 1 tbsp to a bucket of the composition. l., PVA glue - 100 g, purchased ready-made plasticizers. You also need to buy silicone sealant for small cracks; polyurethane foam is suitable for gas and foam concrete.
Regardless of the type of solution, work on its application is permitted only after clearing, caulking cracks, tightening them with metal, removing contaminants and priming. After completing work on the inside, it is necessary to monitor the condition of the walls for at least 2 months.
How to repair
Container with mortar and spatula
Required tools:
- A small spatula for applying and mixing the solution.
- A container that will contain a solution for sealing cracks.
- Construction trowel.
- Hammer.
- Brush.
- Scarpel for stone processing.
Boaster - Putty knife.
- Polyurethane foam.
- Cement.
- River sand.
- Rolled metal.
- Fittings.
Armature - Dowels.
Dowels - Anchor bolts.
The list varies depending on the type of crack. First, the surface is cleaned of all unnecessary debris, dirt, dust, etc. Next, moisten all cavities with liquid and wait until they dry.
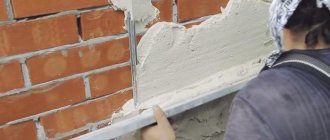
Each crack is initially treated with putty or cement plaster.
Next you need to lay the reinforced tape. An additional layer of cement is applied on top, or putty can be applied.
Very small cracks can simply be rubbed, others need to be treated with cement mortar. When the thickness of the crack does not exceed one centimeter, you need to:
- Dismantle all areas of brick that have cracks or other defects.
- Clean from dirt or dust.
- Prime the surface.
- A step with a width of 25-50 centimeters is created, holes are drilled, and dowels are inserted.
- A metal mesh is placed, the cell size is 5x5 millimeters. Attached on top with screws.
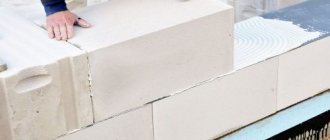
- A strong and reliable plaster solution is prepared; it is better to mix it with sand. Apply on top in a dense, thick layer, evenly and smoothly.
- Finishing materials are applied.
When the cracks are very wide, more than one centimeter in diameter, you need to:
- Inspect the entire exterior wall for cracked bricks and then remove them.
- Using a specially constructed scalpel, any dirt or dust is removed from the treatment site.
- Cement mortar is created and new masonry is laid.
- A metal anchor is a plate on which there are two pins, a kind of anchor. For this method, it is better to order services from construction expertise companies.
Cracks larger than one centimeter are no longer just a defect, they are a critical problem. It must be eliminated using instrumental methods, and not by simply sealing it with putty or cement mortar.
Required Tools
During the work, the following items and materials are needed:
- putty knife;
- spatula for thoroughly mixing the solution;
- rolled metal;
- container for preparing construction mixture;
- dowels;
- Master OK;
- anchor bolts;
- metal brush;
- scarpel and hammer;
- cement with sand;
- polyurethane foam.
What to do if the cracks are very large
To do this you need:
- The area with defects is cleared of dirt and dust.
- Fill the cracks with foam.
- Drying.
- An incision is made in the foam, approximately two centimeters deep.
- A special solution must be poured into the created hole. More often, it is created on the basis of cement and sand, sometimes with polymer additives.
- Finishing materials of any type can be applied on top.
Sometimes it turns out that the brickwork cannot be disassembled. To do this you need:
- Clear the area of trash
- Seal all cracks with a large layer of construction cement mortar.
- Drive a T-shaped anchor into the wall. The dowels will be the main fasteners, which are located on both sides of the wall.
T-shaped anchor
General information about sealants for joints in concrete
The high-quality sealants on the market are produced using the latest innovative developments. The action of construction sealants is aimed at water- and air-tightness of expansion joints in concrete floors. They are made on the basis of modified polymers, synthetic, natural rubber, and other compounds that give the material increased elasticity. This is the main requirement for construction raw materials. But different types of acryplast have elasticity, with different properties.
The bulk is represented by types, which differ according to the formula, area of use, shrinkage properties, adhesion, strength, main components, etc.
According to operating conditions, concrete sealant is divided: for civilian objects, apartment buildings; industrial construction; works under water; hydraulic concrete structures; sewerage and treatment facilities.
Acriplasts for concrete joints are also classified according to design features:
View this post on Instagram Posted by svitfarb.com.ua (@svitfarb) Aug 30, 2022 at 12:32 PDT
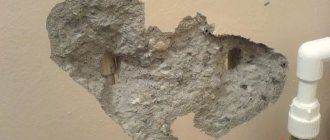
What to do if the crack is through
Through cracks
Even in such an unpleasant case, there is a way out, you need to:
- Clean the entire surface of all excess (also old coating).
- Each crack is treated with water, then the entire structure dries.
- Each crack is filled with a cement-based mortar.
- Anchors and dowels are only for critical, most serious cases.
- If sections of the walls are badly damaged, finishing work is needed.
- Each through gap must be secured with metal brackets. The two pads are secured with small bolts. The elements must be passed through the wall. Before direct fixation, the hole will be filled with cement mortar. If the defect is large, then you need to use several staples at once. Cracks are sealed with cement mortar.
Staples are good fasteners in critical cases; they need to be hammered in on both sides. Then they will open and fix the crack, preventing it from expanding.
Application technique
You need to start finishing by preparing the base.
Clean the walls from all dirt and peeling. Fill holes, potholes, sheet joints and other irregularities. Prime the walls with a deep penetration primer.
The basis
The basis for craquelure can be ordinary gypsum plaster or putty, painted in the desired color.
Expert opinion Alexander Guryanov Plasterer and master of decorative finishing The color of the base will appear in the cracked top layer of decorative finishing. The cracks will look natural if they are darker than the base coat. For Venetian plaster, the base can be painted with bronze or gold enamel.
After applying the base, wait until it dries completely (at least 24 hours).
A layer of varnish
Next, a thin layer of craquelure varnish is applied to the base, avoiding smudges. There are three ways:
- brush;
- roller;
- spray gun.
Material consumption - 50 g/m2 per layer.
The varnish is applied in two layers with intermediate drying for at least 1 hour. During this time, the first layer will become transparent.
Dried varnish is difficult to wash off the tool, so after finishing varnishing, rinse your brushes or spray gun thoroughly. The roller attachment can be discarded.
It is better to store leftover varnish in its original packaging. To prevent dirt from getting into it, pour the varnish into a paint tray and dip the tool into it.
Complete drying of craquelure varnish takes 4 hours.
Decorative plaster must be applied no later than a week, otherwise cracks will not appear.
Finish coating
Decorative plaster can be embossed or smooth - Venetian. It is also possible to apply textured paint. Each case has its own methods and techniques of decoration, but there are basic rules for craquelure:
- The thickness of the finish should not be more than 2 - 3 mm when plastering, and 1 mm for water-dispersion paint, otherwise there will be smudges.
- Since the main finishing elements will be cracks, you should not create another pronounced texture. You can leave small layers or shagreen.
- You need to work quickly and join sections “in the wet.” Leveling the plaster and creating the texture should take no more than 10 minutes. If the wall is being painted, then the time between passes is no more than 1 minute, otherwise the paint will pull off behind the tool.
Drying of the finishing coating: decorative plasters - 48 hours, paints - 24 hours. Application of protective varnish is possible only after the finish has completely dried.
Formation of cracks
Expert opinion Alexander Guryanov Plasterer and master of decorative finishing
- The direction of movement of the tool determines which direction the cracks will go.
- The thinner the layer of plaster, the smaller and more uniform the cracking. Torn and sparse craquelure is obtained with a layer of 2 mm.
- Also, the shape of the cracks depends on the thickness of the intermediate varnish layer and the type of plaster (paint). Materials from different manufacturers will give different effects.
- If you apply paint with a spray gun, you will get the most even network of cracks.
The appearance of cracking begins:
On plaster - after 10-15 minutes, completed after 5-6 hours.
On paint - after 5-10 minutes, completed after 1-2 hours.