Why do you need a foundation?
The term "foundation" comes from Latin. "Fundamentum" means "foundation".
Foundation is an underground or underwater part of a structure that transfers to its soil foundation the static load created by the weight of the structure, and additional dynamic loads created by wind or the movement of water, people, equipment or vehicles. A properly designed foundation transfers all loads to the ground in such a way that the possibility of unacceptable settlement and destruction of the structure is eliminated.
Collier's Encyclopedia
https://dic.academic.ru
Foundations save the house from manifestations of the “bad character” of complex soils and not only from groundwater, but also from ordinary, “regular” precipitation. The foundation must support the weight of the building. You can build a luxurious and very expensive house, but if the design, depth and material of the foundation were chosen incorrectly, even on the most favorable soil the building will settle and crack. Before building a foundation from blocks, you need to make sure that it is suitable for the given structure.
Cinder blocks
From the name itself it becomes clear that the filler here is slag, that is, solid waste from various industries.
The cinder blocks themselves are divided into solid and hollow. In this case, the volume of voids can vary between 28-40%.
And the fewer voids, the stronger the product. But the foundation of cinder blocks must be constructed from a solid modification; hollow ones will not withstand the heavy weight of the building. It is necessary to note that there are certain standards regarding the strength of such a foundation. It is prohibited to lay it under a house weighing more than 100 tons.
Dependence of the choice of block foundation on the characteristics of the site
Before designing a house, it is necessary to order a geodetic report on the features of the site.
You can, of course, get it from your neighbors, but it won’t be entirely reliable. Sometimes even neighboring areas differ greatly in soil, water, and other characteristics.
Priming
Textbook “Soils. Foundations. Choosing the optimal foundation" classifies soils as follows:
- Rocky soils are, rather, crystalline rock, rock rather than earth, and sedimentary rock (dolomite, compressed sandstone, shale, shell rock, limestone). Any foundation is acceptable except a pile foundation (it is difficult to drill into rock).
- Conglomerates are fragments of varieties of rocky soils; do not erode or change in volume when freezing; Any foundation is acceptable.
- Non-rocky soils:
- bound - clayey and loamy; freeze deeply; capable of “floating” and moving, only heavy types of foundations are suitable;
- unbound - sandy and sandy loam soils; when wet they tend to move and freeze shallowly; Any type of foundation is suitable.
Soil type may vary even in adjacent areas
If your site is a mass of rock, untouched sandstone or sedimentary rocks, then you can easily install a block foundation. It is also good if the soil of the site consists of sand or dense loamy soils.
Table: minimum foundation depth in sand and clay
| The soil | Minimum depth (m) | |
| 1 | Sand | 0,5 |
| 2 | Clay | 0,7 |
To get an approximate understanding of what soils are available on your site, there is an old-fashioned method: drill a hole with a garden drill and examine soil samples from different depths. The sample is moistened with water, and if it can be kneaded like dough, then it is loam. If the earth dissolves in water, it contains a large percentage of loamy component. If sediment falls, there is clay at the bottom and sand above it.
To test the soil, you need to place a sample in a glass of water.
Groundwater
The groundwater level is the most important characteristic of soils. If the level is small, then a shallow strip foundation made of blocks is perfect for us. If it is quite high, then the tape should be buried to a greater depth.
The structure of groundwater in your area has a huge impact on the choice of foundation type
Freezing depth
The freezing depth in our area is on average up to one meter, but deviations are possible. If you are making a deep foundation from blocks, then its lowest point should be below the freezing point of the soil.
The base of the foundation should be below the maximum freezing depth of the soil to prevent swelling of the soil when freezing. The safe depth depends on annual temperature variations, the type and range of local soil variations, and the normal groundwater level. In addition, seasonal changes in the volume of clay soils are sometimes observed, which should not be allowed under a foundation laid on a natural foundation.
Collier's Encyclopedia
https://dic.academic.ru
Freezing depth is a factor influencing the foundation depth
The most dangerous factor is directly related to the level of soil water and soil classification.
Water "lenses"
Where permeable sand or sandy loam lies on a layer of clay, precipitation penetrates through the upper soil and remains under it in the form of so-called “lenses” that lie on an impermeable base and can severely damage the foundation. You need to be sure that there will be no “lenses” on the way to laying the block foundation.
If there are “lenses” in the soil, only a pile-strip foundation is used
Choosing a foundation
The choice of the shape of the foundation made of blocks depends on all of the above factors - soil, water balance, the presence of lenses, freezing depth, combined into one geodetic conclusion. But it depends on your preferences, and on the blocks that you may already have, and even on the time of year. Therefore, you need to understand the main advantages, milestones and dangers of constructing each block foundation.
As we already know, there are two types of block foundations: columnar and strip.
- Strip foundations made of blocks can be shallow, non- and deeply buried.
It is built from expanded clay, foam and cinder blocks, concrete blocks, concrete panels laid on a bed of drainage mixture. Not very suitable for unreliable soils, but the problem is usually solved by deepening and widening the “ribbon”, laying a widened concrete or block base from cushion blocks and creating a permanent reinforced concrete grillage. The strip foundation, depending on the soil, can be shallow, deep or shallow - A columnar block foundation is perhaps the simplest and most inexpensive to construct.
It can also be shallow, non- and deeply buried and is also made from expanded clay, foam and cinder blocks, concrete blocks, concrete panels (non-monolithic pillars), laid in pits (if the pillar is buried) or simply on the ground (if not buried) on a bed of drainage mixtures. Suitable for light buildings such as frame houses, gazebos and greenhouses and any soil except swampy ones. When constructing a shallow columnar foundation from blocks, a wooden grillage is used
Soil preparation
In order to properly build a foundation for a block house, you must first properly prepare the soil, and it all starts with draining rainwater: in order to do such an event, you will have to work with a shovel and dig a well into which rain and melt water will flow.
Of course, you need to dig not under the very place for the future foundation, but at the lowest possible point on the entire site - and this well can reach only some 0.5 m in depth - you certainly won’t need more. And don’t forget about the lid on top so that no animal or person is accidentally injured. The next step will be to pipe the pipes directly to the newly formed hole - and the pipes should be inclined towards the well itself, and for convenience they should be covered on top with paving slabs or something similar - this doesn’t really matter. It is worth remembering that from time to time you will need to disassemble this entire structure in order to clean it, so it is better not to fill everything with concrete. For convenience, drain pipes should be chosen from plastic and other polymeric materials - and certainly not from metal:
- cheaper;
- no chemical reactions occur;
- easier to install;
- no development of microorganisms;
- no corrosion;
- no response to temperature changes;
And this is not a complete list of all the advantages of this model.
After installing the pipes, you should start making calculations and transferring the proposed model directly to the soil - that is, mark it.
Blocks
Block is a structural prefabricated element or product, usually factory-made, used in modern industrial construction (for example, a volumetric block, wall block, window block).
Wikipedia
https://ru.wikipedia.org/wiki/%D0%91%D0%BB%D0%BE%D0%BA_(%D1%81%D1%82%D1%80%D0%BE%D0%B8% D1%82%D0%B5%D0%BB%D1%8C%D1%81%D1%82%D0%B2%D0%BE)
Let's look at this wonderful material: why it is good and why it is difficult for building a foundation.
Pros:
- standardization of blocks: as a rule, if a block is produced in official production, its exact dimensions are strictly regulated (for concrete blocks this is GOST 13579–78);
- speed of construction (for a concrete strip, construction time is dictated by the month the concrete hardens);
- relative cheapness;
- in difficult soils, a reinforced block structure better resists deformation;
- ease of assembly, which does not require special skills (moreover, if something goes wrong, you can disassemble the foundation and put it back together);
- a huge size range and variety of blocks allow you to lay a foundation of any complexity, size and design;
- the blocks are structurally provided with voids, grooves, reinforcement liners and even recesses for the thickness of the mortar, which incredibly simplifies assembly.
Minuses:
- for some types of blocks, as well as for concrete panels, you will need equipment - a crane or winch;
- interblock seams do not provide tightness - thus, the foundation needs vertical waterproofing;
- Block foundations are still not recommended for buildings with high mass.
Types of blocks for foundation construction
Blocks are parallelepipeds made of solid or foamed concrete with or without various fillers. The type of block dictates the size and weight, thermal insulation and foundation design.
Concrete blocks can have different fillers
Concrete blocks
Concrete blocks are monolithic and devoid of air bubbles. They are classified according to several criteria:
- For their production by casting or pressing, different concrete is used - heavy, lightweight, lightweight;
- according to their purpose they are divided into wall, basement, and foundation;
- to increase the thermal insulation properties they are made slotted, hollow or with holes, but there are also solid blocks;
- blocks can be reinforced or without reinforcement.
Wall concrete blocks are also used for foundations that do not bear a large load.
Wall concrete blocks come in all colors and sizes
But if the foundation must be solid, then solid concrete foundation blocks (FBS) are used. They can be reinforced (heavy large variety) or not.
Concrete foundation blocks with reinforcement are used for heavy buildings
There are also foundation blocks, which are called “FL blocks” - from the words “strip foundation”, made of heavy concrete. In everyday life they are humorously called “pillows”. They are always reinforced.
The purpose of the foundation pads of a strip foundation is to increase the base area
They are laid down first. Due to the larger area, they distribute the weight of the overlying foundation blocks and the building.
Due to their larger area, FL blocks distribute the weight of the overlying foundation blocks and the building
The unified sizes of FBS and FL blocks are quite large. Their weight can reach up to two tons, and their density can reach 2500 kg/m3. It is these blocks that require the use of a truck crane and for this purpose they have reinforcement loops on the top edge.
The standardized sizes of FBS and FL blocks are quite large
Foam concrete blocks
Foam concrete was invented to increase thermal insulation and reduce the weight of the blocks, which they did brilliantly. This is cellular concrete with pores created by adding special foam and processing in a mixer, without hardening in an autoclave. Foam blocks have an interesting quality: at first the blocks are quite soft (there is a term - “fresh foam blocks”), and then they can be cut with a regular saw and special devices; but they gain greater strength over time. Foam blocks are also used for foundations - but for very light varieties.
Foam concrete blocks - a step forward in construction
Gas silicate blocks
The pores in these blocks are not created by foam, but, as in yeast dough, by a chemical reaction of lime and aluminum powder, releasing a gas that creates bubbles. From lime, these blocks are white and elegant. But the same lime causes greater hygroscopicity, so gas silicate blocks require serious waterproofing. They are autoclaved, so they have a high degree of unification. In terms of strength and hardness, gas silicate is much better than foam concrete; accordingly, it is suitable for more solid foundations.
Gas silicate blocks - white and elegant
Cinder blocks
They were once very common. Slag is simply mixed into a regular solution and dried in a mold, so they are “prickly” and quite fragile. They are very inexpensive, but do not require complex equipment for production, so they are often made by small handicraft producers, and the cinder blocks turn out to be uneven in size and shape. They are quite heavy, although the size is smaller than that of foam concrete: 40x20x20 cm (and semi-blocks - 40x12x20 cm). They are rarely used for walls, as they emit harmful gases, but are widely used for any foundations due to their low cost.
Full-size cinder block - once a very common material
Expanded clay concrete blocks
When making them, not slag is added to the solution, but expanded clay (burnt foamed clay). These blocks are the least hygroscopic of all (except concrete), and one of the lightest. They are also often made hollow. Expanded clay blocks are the same size as cinder blocks, and they are almost as cheap. They are also often made in a handicraft way, so the range of sizes is large.
Full-size expanded clay blocks are better in quality than cinder blocks
Arbolite blocks
They are otherwise called “wood concrete”. The filler is sawdust of large fractions. Such blocks are even close to wood in some properties: they are light, elastic and have good thermal insulation qualities, but are more hygroscopic; therefore they also require careful waterproofing. Arbolite is very popular as a building material, but is rarely used for foundations. Their sizes are: 50x25x30 cm and 50x25x20 cm.
Arbolite blocks are closer in properties to wood
Porous ceramic blocks
These beautiful, warm, waterproof and durable blocks measuring 51x25x21.9 cm and 38x25x21.9 cm, of course, can also be used on the foundation. But they are very expensive, so they are rarely used even in the construction of walls. Although theoretically everything is possible. What if there is some left over from building a house, and you don’t know what to use it for?
Porous ceramic blocks of different sizes are an expensive pleasure for the foundation
Material selection
Let's summarize all the information:
- expanded clay and cinder blocks are dense, with better thermal insulation, but have a wide range in size due to handicraft production, are not very durable, suitable for medium strip and column foundations;
- foam concrete and gas silicate blocks are inexpensive, they are all the same, smooth and light, but due to their hygroscopicity, great efforts will be required to waterproof the foundation; nevertheless they are widely used for these purposes;
- arbolite blocks are subject to deformation and are very hygroscopic;
- ceramic blocks are very expensive;
- concrete blocks are the strongest, suitable for heavy foundations, but also poorly insulating and the heaviest; nevertheless, their use in a strip foundation is the maximum guarantee of the quality of your foundation in any condition of your soil.
Columnar recessed and non-recessed block foundation
The simplest columnar foundation, regardless of depth, is easiest to build from blocks.
This foundation is made of blocks (concrete wall, expanded clay, foam concrete) or brick. We will look at a shallow foundation that is installed directly on the ground; shallow and deep ones differ only in that a different number of blocks are placed on the mortar in a conical-section pit on a sand-crushed stone cushion, and the deep pit is then filled with previously dug earth.
Columnar foundation (drawing in two positions, shallow and deep) shows the principles of its construction
Required Tools
To build the foundation you will need:
- construction mixer for mixing concrete (or a trough for mixing by hand);
- bayonet shovel;
- shovel;
- hand wheelbarrow;
- tamper (manual or vibration);
- rubber hammer;
- hydraulic level (or laser level);
- roulette.
Step-by-step creation of a columnar foundation
- We choose a place for construction.
- We prepare the site: mow the grass, uproot the trees, level the horizontal.
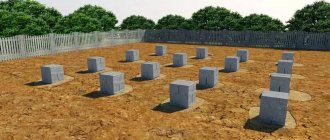
First of all, the soil surface is cleared of debris, trees, shrubs and their root systems are removed. - Using string and stakes, we mark the area (half a meter on each side more than the foundation) and the places where the “pillars” will stand.
You will need so many pillars that they are located a maximum of one and a half meters from each other. Then the building will be strong. The construction of the foundation begins with markings - We deepen the ground within the boundaries of the site by 0.3 meters (this can only be done at the locations of the pillars, then less crushed stone will be needed).
- We fill it with crushed stone, fill it with water, and compact it.
- We place two or four blocks on the crushed stone (in the first case - one above the other, in the second - layers in a perpendicular orientation) blocks on a self-prepared (M400 cement, sand and crushed stone in a ratio of 1, 2 and 5 parts, respectively) solution.
Let the solution harden. The same principle applies to bricks, only it will take more of them. It is not worth buying ready-made concrete, since the consumption is small. We place four blocks (in a perpendicular orientation) in a pit on crushed stone. - For waterproofing, coat the top of the pillars with molten bitumen and place pieces of roofing felt.
- We construct a grillage from wooden beams.
- We connect it with plank stiffening ribs.
The grillage should be at a distance of more than 10 cm from the ground level
Video: construction of a columnar foundation from blocks
Strip foundation made of blocks
If you have started building a foundation, then you have a geodetic report on the soil, groundwater level, freezing depth on the site and a house design. For example, you are planning to build a one-story house from logs.
To calculate the foundation, you will need a design for the entire house.
Let's assume that our geodetic conclusion is favorable, so the foundation should not be particularly deep.
We must remember: even with the permitted minimum depth of a strip foundation made of blocks, there must be at least two blocks in height.
There are two ways, and their choice depends on the weight of the future house: install a foundation of large (for example, 2380x500x580 mm) FBS and FL blocks (for example, 2400x800x300 mm) according to all the rules. The “tape” will have much fewer seams, it will be stronger and its qualities will be close to a monolith. But this will require the use of a truck crane and an excavator to dig a huge trench. And for a future house, such a foundation is redundant and incredibly expensive, even though we can put a solid foundation only around the perimeter of the house, and at the intersections of the internal walls, pillars made of wall blocks will be sufficient.
Online calculator of FBS blocks for a foundation 44 meters long
An online calculator and a simple calculation based on approximate prices for central Russia show that FBS blocks alone will cost in our case more than 250 thousand rubles.
You will also need FL blocks (which are even more expensive), mortar and a sand-crushed stone mixture.
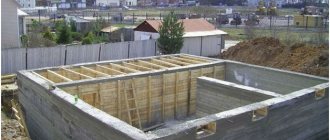
An example of using large FBS and FL blocks
The main difference between this type of work is the width of the trench.
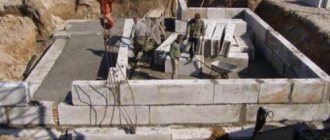
- “Pillows” are placed downwards - on a concrete reinforcing belt or simply on sand.
Typically, foundation pads are laid using a crane. - Next, blocks are laid on the solution.
- Bunches of reinforcing bars are laid between their rows.
A foundation made from FBS and FL blocks is incredibly solid, incredibly durable and very rarely needed
For less heavy structures, the so-called intermittent foundation is suitable - when FL blocks are not placed close to each other, the permissible distance between them is no more than 0.7 meters; this allows you to save at least a little.
“Discontinuous foundation” - FL blocks are not close together
Video: building a massive foundation from FBS and FL blocks
But it is better to use small wall blocks (for example, 200x200x400 mm), the so-called “manual” ones - which a person can lift with his hands, and without “pillows”. In addition, such a foundation will be quite sufficient for a lightweight timber house.
Strip foundation made of small concrete blocks
First, you need to draw the layout of the blocks on the foundation in order to understand how many and which ones will be needed. If a whole number of blocks do not fit between the corners of the foundation, you can order “additional” blocks of the required size for laying the corners. In the same way, blocks with openings for communications (water supply, sewerage) and vents will be needed. They can also be ordered. Or you can lay standard blocks with openings, which are then partially filled with mortar.
There are many online foundation calculators available. But all of them are designed for large FBS blocks. You can use the wall calculator by entering the data of our blocks and foundation dimensions into it.
- We obtain results for the required amount of reinforcement and the cross-section of reinforcing bars.
Reinforcement in the reinforcing belt: section, location, quantity - We enter the necessary numbers - the thickness of the tape is 0.3 meters, the length, width and height of the tape, the grade of concrete and click on the “calculate” button.
- But there are many online calculators for concrete strip foundations, and they will help you calculate the consumption of concrete for the reinforcing strip.
Calculations are usually made in accordance with SNiP 52–01–2003 “Concrete and reinforced concrete structures”, SNiP 3.03.01–87 and GOST R 52086–2003. The amount of mortar we need for masonry - We get the results: the length of the tape, the total area of the masonry, the thickness of the wall, the required number of blocks, their volume and cost, the approximate weight of the mortar and other data.
Filling out the forms with data for our foundation - We fill in the data for our foundation: the dimensions of the block, the total length of the walls (perimeter), the height of the tape in the corners, its thickness, the thickness of the mortar in the masonry, the use of masonry mesh (and how often we will use it), the average price of such a block in central Russia , block weight.
Click on the “calculate” button. We get the calculated result - In addition, the required amount of solution becomes clear.
Enter the parameters of the reinforcing belt for the block foundation - You will need about 5 m3 of concrete per strip, and taking into account the solution that will be used for laying the blocks and the top reinforcing layer, you need to take it with a reserve of 6 or 7 m3.
The final result of calculating the quantity and cross-section of reinforcement
The calculations also show a drawing for the best location of reinforcement in the reinforcing belt.
The location of the reinforcement in the reinforcing belt is shown in the calculations
Table: solution proportions for Portland cement grade M400
| Position | Concrete grade | Mass composition - cement, sand, crushed stone (kg) | Volumetric composition per 1 liter of cement - sand, crushed stone (liter) | Amount of concrete from 10 liters of cement (liter) |
| 1 | 200 | 1:2,8:4,8 | 24:43 | 55 |
| 2 | 250 | 1: 2,2:3,8 | 18:35 | 44 |
| 3 | 300 | 1:2:3,6 | 16:33 | 42 |
| 4 | 400 | 1:1,3:2,6 | 15:25 | 32 |
| 5 | 500 | 1:1,2:2,4 | 11:23 | 30 |
We must not forget about the proportions of preparing the solution depending on the brand of cement. We were counting on M400 Portland cement, but there can be many options.
Table: solution proportions for Portland cement grade M500
| Position | Concrete grade | Mass composition - cement, sand, crushed stone (kg) | Volumetric composition per 1 liter of cement - sand, crushed stone (liter) | Amount of concrete from 10 liters of cement (liter) |
| 1 | 200 | 1:3,4:5,7 | 31:50 | 63 |
| 2 | 250 | 1:2,5:4,6 | 23:40 | 51 |
| 3 | 300 | 1:2,3:4,4 | 21:38 | 48 |
| 4 | 400 | 1:1,5:3,3 | 13:29 | 37 |
| 5 | 450 | 1:1,3:3 | 11:26 | 33 |
Required Tools
To build such a foundation you will need:
- Construction mixer for mixing concrete (or a trough for mixing by hand).
- Bayonet shovel.
- Shovel
- Hand wheelbarrow.
- Tamping (manual or vibrating).
- Welding machine (if you need to weld reinforcement).
- Hammers of different weights.
- Pliers.
- Grinder for cutting reinforcing bars.
- Nail puller, crowbar.
- Hydro level (or laser level).
- Roulette.
- Circular saw (or hand saw, for cutting lumber for formwork construction).
- Electric drill (for installation of formwork).
- Screwdriver (for installation of formwork).
- Goats (for installation of formwork).
Step by step implementation
- We prepare the site, as in the previous case.
- We make markings for digging trenches for the “tape”.
The pegs are driven not into the supposed corners of the foundation, but so that these corners are formed by the intersection of the cord. The pegs are driven in to the height of the future plinth. The pegs are driven in to the height of the plinth - We dig trenches according to the plan, the intended width and depth.
Digging trenches - don’t forget about trenches for water supply and sewerage - Sand and crushed stone are poured into the bottom of the trenches for a drainage cushion to a height of approximately 0.3 meters.
- The pillow is lightly filled with water and tamped down - manually or using a mechanism called a “vibrating tamper”.
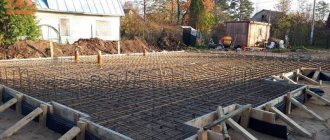
The drainage mixture is processed with a vibrating plate or vibrating rammer - For formwork, use a circular saw to cut the board into the required pieces according to preliminary calculations.
- We knock together or fix low formwork for the reinforcing concrete belt using stops in the trench.
- We lay reinforcement on the sand in the formwork in the calculated number of layers and with the calculated frequency of installation of vertical columns.
- We mix the concrete solution from cement, sand and crushed stone.
If you have a construction mixer, then the process is very easy. The cement mortar can be mixed by hand or using a construction mixer - Pour the solution into the trench to a height of 30 centimeters. Such a support base will help to evenly distribute the mass of the foundation blocks and walls of the house. To ensure that there are no voids or bubbles in the hardened concrete, you need to stir it with a stick. The pouring must be done in one day, otherwise the foundation will be divided into segments that are poorly connected to each other due to the difference in the “setting” time.
- Using a trowel, smooth out the filling flush with the formwork;
it is very important that it is perfectly level for laying the blocks. Cover the filling with film and leave it to gain strength for two weeks. Concrete pouring must be perfectly level - In two weeks, we begin laying the blocks from the beacon corners.
Laying blocks (diagram): starts from the corners along the cord - We leave gaps for vents and water supply and sewerage pipes or use “additional” blocks with holes.
“Additional” blocks with holes are used for vents and water supply pipes - The “bandaging”, that is, the overlap of the blocks, should be equal to half the length of the block.
Installation of blocks must be carried out with all necessary dressings - Between the rows, thin reinforcing belts are made from mortar with reinforcement.
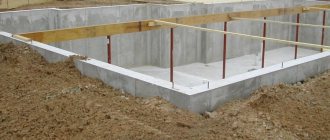
A belt about 30 centimeters thick is made above the foundation. Armopoyas prevent foundation subsidence - When the solution has set, you can strengthen the roofing material for waterproofing.
You can get by with roofing felt alone, or you can also coat the surface of the foundation with hot bitumen by placing roofing felt on it. The joints are overlapped. The edges are trimmed. To create waterproofness, roofing felt is most often wetted with petroleum bitumen - Now you can do general waterproofing of the foundation.
Stage-by-stage construction of the foundation. First stage
At the first stage, it is worth preparing for the construction of a block foundation. A detailed construction project is created, in which all dimensions are indicated.
Based on the selected dimensions, you should calculate the number of blocks. To do this, you will need to know what dimensions the foundation blocks have.
You should familiarize yourself with the assortment of construction stores that carry blocks. Then a detailed quantity calculation is made.
So, after calculating the number of blocks and drawing up a plan, you can begin purchasing the blocks themselves. First, find out what types of foundation blocks there are.
Many retail outlets provide additional services for the delivery and installation of structures. This is very convenient for home craftsmen.
Waterproofing
For high-quality waterproofing of a building, it is necessary to have a proper drainage system around the foundation.
Waterproofing the foundation itself is needed for two purposes: preventing moisture from penetrating into the structure of the house from the foundation (done on the horizontal surface of the foundation) and preventing moisture from penetrating into the foundation from the soil and the environment, so that the concrete does not collapse when this moisture freezes. Let's talk about the second one.
It is done in many ways:
- coating - bitumen, polymer and epoxy mastics are used for this;
During coating waterproofing, molten bitumen is applied with a brush to concrete foundation elements - spraying liquid plastic mass (polyurethane) is the most expensive, but also very effective method;
Spraying polyurethane is the most expensive, but also very effective method. - plastering - special plaster mixtures with plasticizing additives are used for this;
Plastering the foundation is the most labor-intensive method - pasting - films (with polymer glue) and membranes and glass insulation (they are self-adhesive).
The foundation is covered with waterproofing in an overlapping manner
Pasting, as a rule, is combined with coating with mastic before and after pasting. If the pasting is multilayer, a mesh is laid between its layers, which is used for conventional plastering.
The placement of layers when pasting should only be vertical; the vertical overlap should not be less than 10 centimeters, the horizontal overlap should not be less than 30, and pasting should be done from below.
Stage two
At the second stage, you need to prepare the construction site. A place to install the crane is selected, a place for the foundation is cleared and work begins.
The site is marked starting from the corners. Pegs are installed at the corners of the future foundation. Next, a pit is dug for the foundation. An excavator is most often used for this.
- Six tips to make your home more eco-friendly
Toilets. What types are there?
Which mosaic for the bathroom should you choose?
Thermal insulation
If there is a subfloor, it is important to have a thermally insulated foundation. Spray waterproofing also has thermal insulation properties. But sheets of expanded polystyrene are often used, gluing them to the outside of the blocks even before filling the foundation strip with earth. This is not done from the inside: double thermal insulation will cause condensation.
Expanded polystyrene sheets are glued to the outside of the blocks
Often such insulation is also placed under the foundation blind area.
They insulate not only the foundation, but also the blind area
Video: building a foundation from blocks
From concrete blocks you can build a strong, reliable and almost eternal foundation. For a large house, heavy FBS concrete blocks are suitable; for a small building, it is worth choosing small, lightweight blocks made of foam or aerated concrete. During the construction of the foundation, you need to carefully consider its waterproofing, then the structure will be used for a long time and will maintain its integrity, regardless of external influences.
- Author: Maria Ya.
Rate this article:
- 5
- 4
- 3
- 2
- 1
(11 votes, average: 4.7 out of 5)
Share with your friends!