It becomes unprofitable for modern private developers to use traditionally used wood for the construction of structures for various purposes. In search of a way out of the situation, a modern building material – cellular concrete – comes to the rescue. Let's look at how a bathhouse made of an aerated block differs in operational characteristics from its analogue made of timber, what are the main properties, pros and cons of this building material, what are the design features and what are the main stages of the construction procedure.
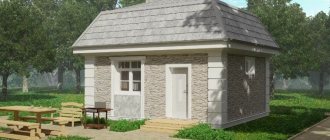
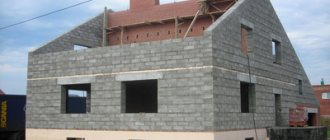
Classic bathhouse made of gas silicate brick Source ytimg.com
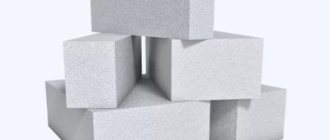
Aerated concrete - properties, pros and cons
When it comes to searching for material for building a private bathhouse on a local property, in most cases the choice stops at wood - timber, logs or boards. However, prices for traditional materials are only increasing every year, therefore, taking into account the fact that the structure will be erected for personal use and not for sale, the implementation of the project becomes quite financially difficult.
In this situation, alternative modern materials come to the rescue - cellular concrete, the cost of which is at least 2 times less than lumber. With the right approach and compliance with special requirements in construction, a bathhouse made of gas silicate blocks is in no way inferior in its performance characteristics to its analogue made of timber. In addition, it may even be warmer and more durable.
A bathhouse made of aerated concrete blocks has good thermal insulation and durability Source dds63.ru
The only important problem that arises when implementing this type of project is the high degree of saturation of the porous structure of cellular concrete with water. It can be solved by proper waterproofing - both from the foundation and roof from external factors (precipitation and soil dampness), and from the inside through proper finishing.
Therefore, from the point of view of operation in such specific conditions, a material with the following set of characteristics will be optimal:
- Resistance to freezing – at least level F 35.
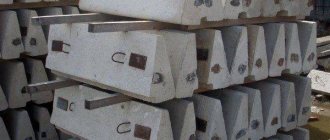
- Rectangular shape of standard blocks, or in a U-shaped modification for lintels of door and window openings.
- The cellular structure of the material with gas cavities ensures minimal weight and thermal insulation properties of the structure.
- Sufficient thickness. For main walls the parameter must be at least 20 cm, for partitions from 15 cm.
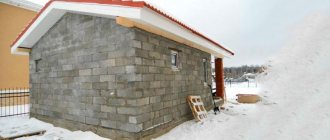
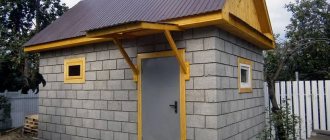
Subject to building codes, a gas block is well suited for building a bathhouse Source ytimg.com
On a note! Aerated concrete has sufficient thermal insulation properties, and therefore, if the masonry technology is followed, it does not require subsequent additional insulation. However, the thickness of the walls must correspond to the climate in the region. In the middle zone it is 20-40 cm, and in the north at least 60 cm.
Advantages and disadvantages
The use of aerated concrete blocks as a building material for a bathhouse has the following advantages:
- Lightweight and fast laying speed. At the same time, installation skills can be mastered without special professional training in the shortest possible time.
- Lower price than the material classically used in construction - wood.
- The degree of strength of a structure, characteristic of stone buildings.
- Long service life.
- Non-flammability of the material.
- Immune to the development of fungus, as well as destruction by rodents and insects, and rotting processes.
- The lightness of porous blocks, which significantly reduces the load on the foundation.
- Environmental Safety.
- Minimal wall shrinkage.
- Easy susceptibility of the block material to processing during construction.
The porous structure makes it possible to easily cut blocks in any direction Source blog-potolok.ru
- High heat saving rates.
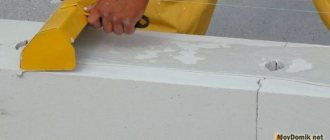
- Smooth, neat masonry - due to the use of special masonry glue.
However, despite the large list of advantages, the material also has specific disadvantages:
- Easy saturation with water and long drying.
- Increased air humidity in the room.
- Interior decoration with wood, for example, clapboard, is associated with unnecessary financial expenses.
- Blowing out the masonry - in case of non-compliance with the technology or poor-quality masonry composition.
- The need for waterproofing from the inside.
- Possibility of freezing of dressing bricks and lintels.
Important! It is highly not recommended to plaster or paint the outside walls of aerated concrete bathhouses. Since this will lead to clogging of the material and the impossibility of evaporation of accumulated moisture from its pores. This will create an accumulation of dampness inside the blocks and the formation of microcracks, which over time will develop into large cracks and breaks.
An aerated concrete bathhouse can be used without external wall decoration Source banya-expert.com
See also: Catalog of companies that specialize in the design and construction of bathhouses of any complexity
Reviews
Alexander Nikolaevich Used gas silicate to build a bathhouse at the dacha. Construction went quickly. There were no problems with the construction of the walls. The glue holds the blocks together perfectly. A year has passed, the whole family is happy.
Sergey Buzazhi built a sauna from gas silicate 4 years ago. At first everything was fine, but over time, cracks and defects began to appear in the wall near the foundation (even though I used expensive waterproofing). I tried to cover them with solution. But they constantly appear in new places. Then I noticed that the same cracks began to appear higher up. We are thinking about raising money and building a new bathhouse.
Anatoly Grigorchuk In the summer, my son-in-law and I built a bathhouse. A neighbor advised us to buy gas silicate blocks for the walls. I was very pleased. The two of us erected the walls in literally a week, although the bathhouse was a decent size. In winter we steamed and didn’t feel that it was almost -25 outside. I recommend it to anyone who decides to build a bathhouse.
Design Features
In order for an aerated concrete bathhouse to differ only in its advantages during operation and exclude the disadvantages characteristic of this material, it will be necessary to draw up a professional project for its construction. It can be done by a qualified construction organization that deals with this type of problem. In this case, the design documentation should take into account the following series of issues:
- A plan for the placement of the building on the site, as well as its external dimensions, a diagram of all internal premises (steam room, shower room, rest room, etc.) and their dimensions.
- Type of foundation, its characteristics.
- Type and quantity of required building materials.
- Plan of the supplied communications (water supply, gas pipeline, heating pipeline, sewerage, electricity, etc.).
- Type of heating equipment for the steam room.
- Pool layout and dimensions.
- Recommendations for hydro- and thermal insulation inside and outside.
Regardless of what the design of an aerated concrete bathhouse will be, there are strict construction norms SNiP, according to which the following is allowed:
- Locate the structure no closer than 20-30 m from the nearest body of water.
The location of the bathhouse on the site must comply with SNiP standards Source na-dache.pro
- Plant trees and bushes next to the paths to the bathhouse.
- Organize gravity drainage of wastewater by placing the structure on a hillock.
- Plan the building so that the exit is to the south and the windows are to the west.
However, it is prohibited to build it in such a way that:
- Sewage flowed into a nearby reservoir.
- There was no view of her from the windows of the house.
- The border or fence with the neighbor's property was less than 3 meters away.
- The distance to housing was less than 8 m.
Projects for aerated block baths can be both standard and individual - at the discretion of the future owner. A traditional Russian bathhouse has a small area and, as a rule, includes a steam room and an entrance hall or dressing room. More modern versions include more themed areas. An example is a typical project with the following premises:
- Dressing room – 1.8 m².
- Shower – 8 m².
- Steam room – 5 m².
- Recreation area – 12 m².
- Bathroom – 1.5 m².
Often, modern baths are built with an attic floor, which houses a fairly spacious recreation area.
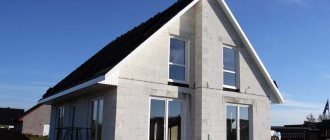
Option for a modern aerated concrete bath with an attic floor Source stroy-podskazka.ru
Note! When choosing aerated concrete blocks, it is necessary to pay attention not only to external characteristics - size matching, evenness of edges, matching color parameters, uniformity of material, but also to the degree of frost resistance. For walls without external decoration, its value should be greater than for baths with facade decoration.
Construction stages
Only at first glance it may seem that building a bathhouse from aerated concrete is an easy process that does not take much time and effort. In reality, this is a complex procedure consisting of the following important sequential steps:
- Construction of the foundation.
The most critical stage of construction, on which the condition of the structure will depend during the entire operational period. The parameters of the foundation directly depend on the characteristics of the soil and climate in the region. However, in most cases, a shallow reinforced foundation is sufficient for aerated concrete masonry.
For an aerated concrete bath, a shallow strip foundation is best suited Source profibrus.ru
The technology for its construction boils down to the following algorithm:
- Site preparation – cleaning, leveling.
- Marking according to plan.
- Digging a trench - about 0.6-0.7 m deep and about 30 cm wide.
- Creating a sand-crushed stone cushion at the bottom with a layer of about 20 cm.
- Formation and installation of formwork based on boards or slab material.
- Assembly of a frame inside the formwork from reinforcing sections and wire.
- Inserting pipe sections for laying communications.
- Filling with concrete grade not lower than 300M.
- Dismantling the formwork, 7-9 days after pouring.
In most cases, for a one-story bathhouse made of sibit, a foundation with a height of about 0.7-0.8 m is sufficient. Immediately before starting masonry, when the concrete has dried and gained sufficient strength, waterproofing is performed by applying a layer of mastic and lining horizontal surfaces with a special material.
- Formation of the first rows of masonry and laying partitions.
The formation of the 1st row of masonry is important for laying subsequent ones. The performance characteristics of the walls will depend on the evenness of its installation.
It is important to install the corner masonry blocks of the 1st row as accurately as possible Source ytimg.com
Therefore, during installation, the blocks must be checked with a building level along the horizontal and vertical planes. In addition to this rule, the following series of requirements are observed:
- The installation of the first row is carried out on cement mortar, which, if necessary, allows you to align the block along the desired plane.
- The second and subsequent rows begin to be laid on the glue with a layer of about 7 mm, when the mortar has already dried and hardened - that is, after 2 hours.
- Every 4th row of masonry must be reinforced with a special reinforcing mesh.
- To create partitions in the main masonry blocks, cuts 15-20 cm deep are made through the row.
Installation of a “pie” of insulation in a steam room
I would like to see the interior surfaces of the bathhouse finished in wood. For almost nothing, I managed to buy a machine for cutting aspen boards 20 mm thick and 125 mm wide. I used it for finishing, having previously smoothed the surfaces with a plane and sander. It turned out to be a good lining!
Despite the good thermal insulation qualities of gas silicate, additional insulation will never hurt. Especially in a steam room, where there are temperature changes and high humidity. Without insulation, streams of condensate will flow through the gas silicate. This is not very good for blocks, but generally disastrous for lining. First it will twist, then it will rot.
Therefore, I decided to equip the steam room with the traditional insulation “pie”: insulation - vapor barrier - lining.
The plan was carried out according to the following scheme.
Stage #1 - stuffing slats on the walls and laying insulation
Paroc mineral wool must be laid over gas silicate, inserting mats between the padded slats.
I attached 50x50 mm slats to the walls vertically using wood screws. It turned out that they are easily screwed into gas silicate and are firmly held in it. A 50 mm thick insulation was laid between the slats. I tried to lay it tightly, squeezing the cotton a little before installing it in the slatted “window”
It is important here to prevent gaps, otherwise cold bridges will negate all thermal insulation
Laying insulation between slats packed on the wall
Stage #2 - installation of a vapor barrier layer
For vapor barrier, two materials were used - Metaspan film and foil. First, I shot Metaspan onto the slats with an overlap of about 15-20 cm. Then - foil, with the same overlap. The joints of both layers were taped with foil tape. Such a vapor barrier will not only prevent moisture and steam from accessing the Paroc insulation, but will also serve as a kind of continuation of the insulating layer. The foil vapor barrier Metaspan + aluminum foil will serve as a reflective mirror for thermal infrared rays coming from the steam room. The rays will be sent back, and accordingly the quality of thermal insulation will increase.
Fastening the Metaspan foil vapor barrier on top of the insulation
Stage #3 - making lathing for clapboard cladding
To ensure that condensate flows freely over the foil and is not absorbed into the lining, a ventilation gap was made. To do this, the sheathing had to be “pushed away” from the foil using small, 2cm thick bars nailed in advance.
Bar between foil and sheathing
Thus, first I nailed the bars through the foil (to the slats), and then horizontally fixed the sheathing of boards onto them.
The horizontal lathing for fastening the lining is made of boards
Stage #4 - paneling
The clapboard sheathing on the sheathing was done vertically using small nails.
Internal wall cladding with paired aspen lining
At first I thought that I wouldn’t treat the lining in the steam room with anything. But then I decided to play it safe against all kinds of rot and covered the boards with one layer of oil from Tikkurilla “Supi Saunasuoja”. The oil is colorless, but forms a matte film on the wood.
At this point, the design of the walls of the steam room was completed.
Video description
Video review of the characteristics of an aerated concrete bath:
- Reinforcement of openings.
Even if the walls were laid without reinforcement, strengthening the walls under the openings is mandatory in any case. For each opening, take 2 rods with a thickness of at least 8 mm and a length greater than the size of the opening by 25 cm on each side.
Preparation of grooves, laying and filling them with cement mortar or glue is carried out using standard reinforcement technology. After they are cemented, a series of blocks are laid on top.
- Arrangement of jumpers.
To form lintels on top of the openings, U-shaped blocks are used. Before starting masonry, a T-shaped support is installed in the door or window. Then they begin to lay blocks on top of it with their cavities facing up. After fixing them with glue, a pre-fabricated reinforcement frame of suitable dimensions is mounted inside.
After this, it is filled with mortar. At least 2 more rows of ordinary blocks are laid on top of the lintels to complete the laying of the walls. Continuation of the masonry is available the very next day after pouring the reinforcing frame. The T-shaped support, as a rule, is dismantled at the stage of interior finishing of the bathhouse, when the aerated concrete masonry has already acquired sufficient strength.
Block laying technology
Aerated blocks can be laid in several ways:
- Masonry “in one block” is performed for one- and two-story buildings. Blocks with a density of D500 are used, they retain heat well. You should start from the corners. After installing the corner blocks, you need to draw a string and check the evenness with a level or level. After laying the first row, you need to wait a couple of hours for it to harden, and then continue working. It is recommended to sand the surface of the previous one before laying the next row to increase adhesion.
- Laying in two blocks simplifies the work of builders. If according to the project the wall width is 40 mm, you can use two types of blocks - 15 mm and 25 mm. They will be much lighter and cheaper than one block, 400 mm wide. To prevent deformation, the blocks are laid in a checkerboard pattern. There are flat gas blocks and “groove-ridge” - this is a type of end surface that allows you to assemble a reliable structure. When laying in two blocks, it is better to use them.
Video description
Video instructions for laying aerated concrete blocks:
- Roofing system installation.
The assembly of the roofing system is preceded by the formation of an armored belt. The simplest way to make it is to complete the last row using U-shaped blocks and then install a frame and pins in them to fix the Mauerlat. The latter is formed from timber along all 4 walls. The subsequent process of forming the roof comes down to the following steps:
- Crossbars and rafters and beams for the attic floor are attached to the Mauerlat.
- The attic floor is being installed.
- The sheathing is laid on top of the rafter system.
- In accordance with the technology, insulation is laid on top of the slats, as well as the necessary vapor and waterproofing materials.
- The roof deck is being installed.
At the final stage, the walls of the bathhouse are finished. In this case, the inside of the surface must be covered with a waterproofing layer, for example, putty. Only after this is it allowed to decorate it, for example, with alder paneling.
What is needed for the job?
To do the work yourself, prepare the following materials and tools:
- ingredients for preparing concrete mortar (cement, crushed stone, sand, water) necessary for the foundation;
- gas silicate blocks, the number of which is determined at the design stage;
- concrete mixer necessary for preparing the solution;
- shovels and buckets used in the construction process;
- reinforcing bars to strengthen the concrete base;
- pegs and cord for marking the site.
After marking the site, removing vegetation, planning the surface, proceed to further work.
Briefly about the main thing
It is more profitable to build a bathhouse from aerated concrete than from wood - due to its lower cost. However, the material has the ability to absorb moisture. Therefore, the walls must be well waterproofed, and the blocks for construction must be selected based on the specific operating conditions. They must be frost-resistant, of the correct shape, of sufficient thickness and have a cellular structure that lightens the weight of the building.
Construction includes several stages:
- Creating a foundation.
- Formation of the initial rows of walls and lintels.
- Construction of reinforced frame.
- Reinforcement of openings.
- Construction of jumpers.
- Roof installation.
- Finishing.
The main advantages of building a bathhouse from aerated concrete are ease of installation, low price, durability, non-flammability, and thermal insulation. Disadvantages - moisture saturation, maintenance of humid air in the room, additional finishing costs. Construction must be carried out according to a well-designed project, taking into account all the features of the material, as well as SNiP standards.
Material composition
Among the building materials suitable for building a bathhouse, blocks made from gas silicate stand out. The material is a type of cellular concrete, hardening in special containers - autoclaves. Gas silicate is made based on a mixture including:
- Portland cement
- Quartz sand.
- Aluminum powder.
- Lime.
- Water.
The quality of gas silicate is determined by the peculiarities of manufacturing products in production conditions, where manufactured products are controlled by laboratory methods.