- How thick are the blocks needed to build a bathhouse?
- Laying the foundation and organizing drainage
Due to the fact that, compared to other materials, cellular concrete is characterized by increased water absorption, there is ongoing debate on the Internet about the appropriateness of such a choice for private construction. Users ask questions not only about residential buildings - many are interested in whether such an object as a bathhouse made of aerated concrete has the right to exist. Let's look into this issue thoroughly.
Advantages of aerated concrete baths
- Aerated concrete is easily processed by mechanical means: working with brick is allowed with improvised tools. No special equipment is required.
- High service life of aerated blocks (not lower than that of wood). The building will stand for decades.
- Construction will cost much less than bathhouses made of wooden beams.
- Concrete blocks are not afraid of fire, which is important when building a bathhouse complex. The frame of the building will survive even after a fire.
- Aerated concrete is resistant to mold formation. Fungus does not grow in bricks, which makes foam blocks stand out against the background of wood, which must be treated with special solutions for protection.
- Aerated concrete is not chewed by animals, and insects do not live inside.
- The blocks do not shrink, so the bathhouse can be used immediately after construction.
- The masonry is stable and reliable.
- Aerated blocks are made from natural minerals, so the material is considered environmentally friendly.
- Baths up to 2 floors high are recognized as seismically safe structures.
Features of the choice of building materials
An aerated block is a porous material that retains heat well.
To decide which block is best for a bathhouse, it is necessary to study the operational parameters of the materials and analyze their positive and negative aspects. It is recommended to focus on the degree of thermal conductivity.
Gas block
The product is produced through a chemical reaction that releases gas. The gas-filled material is characterized by a uniform distribution of cells. The density of the twin block is 500-1000 kg/cm³. The thickness of the constructed wall reaches 20 cm, providing a comfortable microclimate in the building.
Expanded clay concrete
Expanded clay concrete is not hygroscopic, and therefore lasts longer.
The base of expanded clay blocks are granules made from baked clay. The material has low hygroscopicity and low weight. Expanded clay concrete has superior characteristics to aerated concrete. The dimensions of the product in comparison with foam block and cinder block are 40x20x20 cm.
Foam concrete
Foam concrete products are a subtype of aerated concrete products. Production is based on the introduction of a foaming agent, which forms a cellular structure. Thanks to simple technology, products can be manufactured privately. However, such material should be carefully checked for quality.
To build a bathhouse, it is recommended to use foam concrete measuring 60x20x30 cm.
Gas silicate blocks
Gas silicate products are manufactured using autoclave processing. The composition contains lime. In terms of external features, the products differ from other types of concrete products in their white color and regular shape.
Due to the intense absorption of moisture, the material quickly loses its integrity and strength. Its properties are worse than aerated concrete. When building a gas silicate bathhouse, additional hydro- and vapor barrier is required.
Purchase materials for the construction of a bathhouse with quality certificates. Otherwise, there is a risk of building a steam room that does not meet safety requirements.
Cinder blocks
The product contains construction slag, i.e. industrial waste. Budget material has an uneven surface with significant deviations in size on one block. It is not recommended to use it immediately after manufacturing, because when heated, harmful impurities are released. To build a bathhouse, the cinder block needs to sit for 12 months.
Construction of a foundation for a bathhouse made of aerated concrete
For light construction from foam blocks, a simple foundation that does not lie deep is sufficient.
That is why the calculations should not take into account the depth of soil freezing. The area under the foundation is cleared and leveled.
A trench must be dug approximately 30 cm wide and 80 cm deep. Sand is poured inside the area. Formwork is placed inside the trench, and the foundation is reinforced using reinforcement and aluminum wire.
- At this stage, it is logical to insert pipes. Concrete is poured into the formwork and dries for about a month.
- Craftsmen who don’t want to wait that long use old power poles or bricks for strip foundations.
- For waterproofing, roofing felt is most often used. In seismically active regions, a pile-screw foundation is recommended.
What should be the minimum amount in a steam room?
We have already practically answered this question. If we take into account the options where the steam room is designed for 1-2 people, and it is also a sauna, then the very minimum is 40-60 cm on the shelves for sitting (60 is 40 + 20 cm of space), plus the standard 110 cm from ceiling to shelf height. The total is 150-170 cm, but this conflicts with the height of an ordinary person and the need to have at least 20 cm of free space above the head.
So in the described case with a sauna, we would say that the minimum height of the ceiling in the steam room should be the height of the tallest owner plus 20 cm .
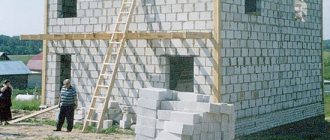
Construction of bath walls
The construction of the first row of the wall begins from the corners. The bricks are placed, coated with a thick layer of mortar (7-8 mm). To coordinate the work, craftsmen use a laser level or plumb line.
After laying out the first row, the foam blocks must dry completely. Only this technology will avoid further deformation of the bathhouse.
- Every fourth row of foam blocks must be laid with reinforcement.
- Grooves are drilled inside the bricks into which the reinforcement is placed.
- Rods laid through gas blocks and filled with mortar will give the bathhouse stability and reliability.
- Inside the structure, partitions are made of thin bricks according to the project plan.
How is a vapor barrier done on walls?
Even before you make a bathhouse from foam blocks, you need to think carefully about how and with what its walls will be insulated from destructive steam. Judging by world experience, it is most expedient to do this using polymer vapor-tight membranes, which are integrated into the gap between the cladding and the wall. And in order for air circulation to be maintained, the cladding itself must be placed at least 5 cm from the walls.
By the way, the fastening elements that are usually used with other walls (nails, moths, screws and deadbolts) are not used for foam blocks. No, just for foam block walls you need conventional fasteners, because the porous structure of this material to some extent complicates the process of assembling profiles for all frame types of cladding. Therefore, it is necessary to purchase in advance for this purpose special umbrella-type dowels, called “fungi”.
But hidden electrical wiring in foam concrete walls is much easier to do than in concrete or brick, and additional insulation, like in wood, is not needed. As for the doors, covering and breaking through windows, it is no different from other buildings.
Interior decoration of a bathhouse made of sibit
The basic principle of interior finishing of a bathhouse made of aerated blocks is to protect the bricks from prolonged exposure to moisture. A small through hole is enough for moisture to accumulate inside the gas blocks, destroying the base.
The optimal solution is to decorate the premises with plaster. The material allows excess moisture to be removed outside, blocking its accumulation inside the sibit.
- Before applying the plaster, sibit is treated with sandpaper to eradicate irregularities and potholes.
- The walls are leveled with sibit masonry mortar. After the third layer of primer, the wall is reinforced with a mesh, placing beacons.
- The plaster is applied in 2 layers (rough and finishing). To insulate walls, craftsmen recommend using liquid glass.
The inside of the steam room is covered with foil with the effect of reflecting light so that the heat remains as much as possible inside the bath. For decorative finishing in aerated concrete baths, it is permissible to use either ceramic tiles or natural wood. All other materials are unsuitable for finishing sibit.
Bathhouse 3x3 Made of Blocks with Your Hands – Bathhouse 3x3 Made of Foam Blocks Made by Your Hands
They begin to build a 3 by 3 bathhouse from foam blocks with their own hands by laying the foundation. The next stage is the organization of drainage, forcing out walls, and building a roof. The final touch is the interior and exterior finishing of the bathhouse.
Bathhouses 3 n 3 made of foam blocks are placed on a strip foundation. On this basis it is convenient to remove walls from foam blocks. On dense, stable soil, you can get by with a shallow concrete strip. On loose soil, the project calls for deepening the foundation for a bathhouse made of foam blocks with your own hands below the freezing point.
The foundation for a 3 x 3 bathhouse made of foam block can be made of two types:
- pour a monolithic concrete strip;
- lay out from ready-made concrete blocks.
In the second option, construction is simplified, but it is necessary to organize access for lifting equipment for laying blocks.
The thickness of the tape is made taking into account the width of the foam blocks. The edges of the foundation should protrude beyond the walls of the bathhouse. For a concrete strip thickness of 30 cm, a trench 50 cm wide is dug. The total height of the base is about 80 cm, of which 20 cm protrudes above ground level.
Next steps are:
- The area is leveled and cleared of vegetation and debris. Markings are made from pegs and cord.
- The trench is dug to the required depth. If we take the average rate of soil freezing in most regions, then the hole is deepened to 80 cm.
- A cushion of sand and crushed stone or gravel is poured onto the bottom of the trench. The total thickness of the two components does not exceed 20 cm. The pillow is watered from a hose with water, and after the liquid is absorbed, it is compacted.
- Formwork is placed along the perimeter of the trench. The shields must protrude at least 20 cm above ground level.
- Inside the trench, a box-shaped reinforced frame is knitted from rods. Reinforcement is used with a thickness of 12 mm. The optimal size of the frame cells is 15x15 cm.
- Concrete with gravel or crushed stone is poured at a time with breaks of a maximum of 3 hours. The mixture is compacted with a vibrator or pierced with a rod to allow air to escape.
- The foundation of the bathhouse is covered with film and moistened daily. After three days, the formwork is removed, and the tape is given at least a month to completely harden.
After the foundation hardens, construction of the sewer system begins. Remove all the fertile soil inside the tape, where the floor of the bathhouse will be. The pipe is placed outside the concrete strip at a slope of 2 cm/1 linear. m. From above, the pipeline and the entire area inside the tape are covered with a layer of sand 10 cm and gravel - 15 cm. After compaction, an armored mesh is laid on the cushion and filled with a concrete screed 15 cm thick. When it hardens, a monolithic base for the furnace is poured. Outside, along the perimeter of the tape, a similar screed is installed - a blind area, 50 cm wide.
In a month, the foundation of the bathhouse will stand, you can begin building walls from foam blocks. To prevent the porous material from drawing moisture from the ground, 2 layers of roofing felt are laid on the base along the width of the tape. Using a level, the entire foundation plane is measured again. If shrinkage occurs within a month and differences appear, they are leveled with a screed.
The construction of walls begins from the corners. The first row is laid on cement mortar. Each foam block of the next row is coated with glue 5 mm thick and connected to each other. Leveling is done with a rubber mallet and level. To ensure even laying of the entire row, pull the cord. If halves are needed, the foam block is cut with a hacksaw.
Each row is laid with a shift in half of the foam block, forming a bundle. After every third row, reinforcement is made. A groove is cut along the perimeter of the end of the wall using a wall cutter or grinder, rods are laid, and filled with mortar.
When building walls, following the design, provide window and door openings for the bathhouse. A lintel made of concrete, thick board or metal is placed above them. A new row of foam blocks is laid along the lintel.
If your 3 by 3 bathhouse made of foam blocks is not an extension to the house, it is optimal to build a gable roof. Work begins with overlapping, which comes in 3 types:
- Monolithic. Construction begins with the installation of formwork. Along the perimeter it rests on the walls, and the middle is supported by racks. A strong reinforced mesh is laid on the formwork and poured with concrete.
- Made from hollow concrete slabs. The bathhouse ceiling elements are laid with a crane.
- Prefabricated structure. For ceilings, beams are laid on the walls. They are hemmed from below with boards or plywood. Mineral wool is placed in the cells, protecting the thermal insulation with vapor and waterproofing.
The third option for constructing a floor is the simplest and most cost-effective. It is better to make the sheathing and install the insulation after the roof has been erected.
Construction begins by covering the end of the walls with roofing felt. The mauerlat is assembled from the timber. The frame is secured to the foam block walls with anchor pins. Beams are attached to the mauerlat, and rafter legs are attached to them. The optimal angle of the roof slopes of the bathhouse is 60°. The installed rafters are connected with boards, the sheathing is stuffed, roll waterproofing is rolled out, and the roofing is laid. If the attic is made warm, the bathhouse roof pie is assembled from waterproofing, insulation and vapor barrier. The gables are covered with any sheet material, for example, OSB boards.
We won’t talk about the exterior decoration here, but we are considering an economical option. Therefore, the interior decoration of a 3 x 3 foam block bath is as follows:
When the construction of the building is completed, the interior decoration of the foam block bathhouse with your own hands begins, and first of all, windows and doors are inserted into the openings. The next stage is the construction of the furnace. The stove is made of red brick. You can simplify the task by installing a metal stove. In any design, there is a place on top for stones and containers for heating water. The chimney is led out through the roof of the bathhouse, where a non-combustible frame is installed in the hole.
Only wood is used for the interior lining of the steam room. The dressing room and other rooms can even be covered with PVC clapboard. Before installing the cladding, the walls and ceiling must be waterproofed.
Construction of the floor begins with waterproofing the screed. In the steam room, logs are laid and boards are laid. In other rooms, the floor covering works well with tiles laid on the subfloor with a layer of insulation filled with concrete screed. According to the design, the ceiling in all rooms of the bathhouse is insulated with enhanced waterproofing. The heat is always at the top. If contact with cold occurs, condensation will appear. The ceiling of the bathhouse is covered with lathing. A vapor barrier and mineral wool are placed in the cells, and everything is covered with construction foil. In the steam room, the ceiling is covered with wooden clapboard. For other rooms of the bath, especially the shower compartment, it is allowed to use plastic.
At the finishing stage, according to the project, the bathhouse is insulated from the foam blocks from the inside using mineral wool slabs. A sheathing of 40 mm thick timber is nailed onto the walls and ceiling. Thermal insulation is placed in the cells and covered with construction foil. The joints are securely taped with aluminum tape to prevent moisture from leaking out. The thermal insulation is covered with finishing cladding.
The floor of the bathhouse is insulated with polystyrene foam, pouring the slabs into a concrete screed. In the dressing room, electric mats of the “warm floor” system are laid under the tiles.
External insulation is mandatory, since foam blocks tend to absorb dampness from the street. For a ventilated facade of a bathhouse, lathing is attached to the walls, mineral wool is placed inside the cells, covered with windproof film, a counter-batten is stuffed, and the lining is fixed onto it.
A bathhouse made of foam blocks will last as long as the work was done correctly and the project was drawn up. If moisture does not reach the reliably protected walls, the building will last longer than the expected 15-20 years.
Bathhouse 3 by 3 (3x3) How many Blocks are needed
Everything is of course individual, what project for approximately a 3 by 3 bathhouse requires from 130 to 150 foam blocks. This is from 4.82 cu. up to 5.2 cu.
External finishing of the sauna from sibit
A bathhouse made of gas blocks must be insulated. It is impossible to insulate the room inside, so a layer of insulating material is built up on the outside of the building. It is not advisable to paint and plaster aerated concrete from the street side.
Panels made of brick, plastic or wood are recommended. When forming a ventilation facade, siding is used, and mineral wool is used as insulation, the layer of which must be at least 5 cm.
Paint for sibit (if you choose a budget finishing method) must have high vapor permeability. The specified criteria meet:
- Silicone paint.
- Mineral paint.
- Compositions for painting silicates.
However, the walls must be sanded and primed before painting.
About foam blocks
First you need to select foam blocks for your intended bath.
Foam block is a very popular and budget material. It is formed from foam concrete. And foam concrete is listed in the group of cellular concrete. Its components are: cement composition, sand, water and foam former. The foam block contains no elements harmful to humans. And the advantages of this material are as follows:
1. Low weight, this greatly facilitates the laying of the foundation for the structure; 2. Ease of processing, drilling, sawing, driving nails into them are ordinary processes for him; 3. Durability, it excludes the appearance of rust (like metals), fungi and other bacteria (like wood); 4. Frost resistance, its cellular configuration guarantees powerful resistance to extreme low temperatures; 5. Powerful thermal insulation, it is possible thanks to the same configuration; 6. Completely non-flammable; 7. A wide range of species available for sale.
In addition, the construction process from foam blocks is much faster than from other materials, for example, the same bricks. These blocks are much lighter in size compared to wood or brick. It is much easier to lay out walls from them. You can do this on your own without hiring help. Before erecting a bathhouse, it must be designed and the amount of materials required must be calculated. Knowing the strengths of foam blocks, they choose those types that are most optimal for the tasks at hand. The most suitable type has the following parameters:
1. Weight – 12 kg; 2. Strength value – M25; 3. Density – D700; 4. Dimensional data: 600 by 300 by 200.
Many baths are created from these types.
Roof masonry
The roofing material must be fire resistant, safe and lightweight. A rafter system is created for the roof, which is covered with polymer materials.
Effective waterproofing and a layer of insulation will not hurt.
- According to expert estimates, 1 sq. m of aerated concrete bathhouse in the Moscow region will cost up to 15 thousand rubles.
- Turnkey interior finishing, taking into account materials and plumbing, will cost approximately 30 thousand rubles. for every square meter.
- The final cost depends on many factors, including the complexity of the project.
However, aerated concrete baths remain the most budget option for a suburban area.
Gas blocks: dimensions and characteristics
Foam concrete is a rectangular product with an internal porous structure. This effect is achieved by adding a vulcanizer to the cement mortar, which has the property of foaming it, forming many bubbles. After hardening, the material is characterized by sufficient strength and low specific gravity. To build a bathhouse from aerated concrete blocks, you need to choose the material wisely.
It has the following characteristics:
- Density. Depending on the brand, it varies between 350-750 kg/m³. Based on this indicator, the strength and load-bearing capacity of the material is determined.
- Form. For the construction of walls, monolithic products of rectangular shape are used. Window and door openings are formed with U-shaped lintels followed by reinforcement.
- Dimensions. The length of the stones is 500-625 mm, height - 200-500 mm, thickness - 200-400 mm.
Depending on climatic conditions, the thickness of external walls can range from 20 to 60 cm. The most popular bathhouse projects in Moscow involve the construction of buildings with a wall thickness of 30-40 cm. This is enough for good thermal insulation even in harsh winters.
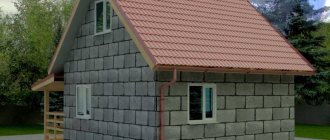
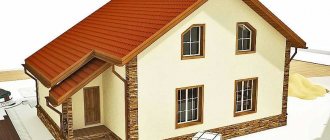
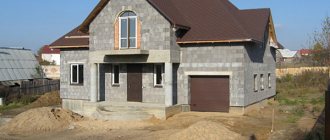
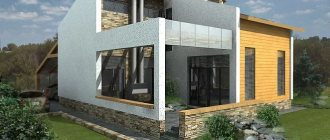
Photos of the best aerated concrete bath projects
Development of a standard project
The working design of a bathhouse made of aerated concrete is the first stage of construction of a structure, which takes into account all the main technical and operational characteristics of aerated concrete blocks.
Design involves the preparation of the necessary documentation for work related to waterproofing, vapor barrier of the bathhouse, as well as the arrangement of a dry steam room.
Various projects of aerated concrete baths include basic data:
- General dimensions of the construction site.
- Type of foundation.
- Dimensions and layout of the main premises: steam room, dressing room, rest room, sanitary unit and others.
- Type of heating equipment - location and installation method, operational characteristics.
- Arrangement of utilities - ventilation ducts, chimneys, cold and hot water supply, drainage and sewerage.
- Dimensions of openings for doors and windows.
A finished bathhouse made of aerated concrete, the design of which was developed at a professional level taking into account the main characteristics, will last for many years without the need for major repairs.
The construction of an aerated concrete bath is carried out in stages and includes:
- Laying the foundation. The best solution for buildings made of aerated concrete is a shallow strip foundation.
- Construction of wall structures with the installation of a reinforcing frame every 4 rows.
- Installation of roof truss system, covering of roofing material.
The photo shows similar projects.
Thickness and layering of walls
The bathhouse is not a living space and is heated only periodically, so there is no need to build massive walls in it. Excessive thickness only increases warm-up time, forcing you to waste more fuel. It’s not for nothing that standard designs provide for a wall thickness of 300 mm - it is the most optimal.
Taking blocks of greater width (375 mm) or laying a wall one and a half blocks long makes sense only in the northern regions. In a relatively warm climate zone, walls can be made no more than 200 mm, for which the same block with dimensions 60*20*30 cm can simply be laid on its edge.
A lot here also depends on the size of the building - a small bathhouse definitely doesn’t need thick walls. Moreover, the facade is also insulated.
A little about masonry
Work begins with preparing the foundation surface, which is most often uneven. When installing gas blocks, manufacturers recommend using special adhesive mixtures. This is more profitable, since glue, although more expensive, is consumed much more economically.
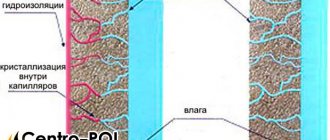
However, the first row of blocks is placed on a regular solution of cement and sand, and the foundation is also leveled with it. A screed is made, waterproofing is laid on top of it with mastic (to cut off the possibility of capillary suction of moisture), and then the bed for the first row of masonry is laid out.
Laying the first row of waterproofing
- All other rows are mounted with glue - with it the thickness of the seams is thinner, and accordingly, there are practically no cold bridges. Like any building mixture, dry glue is mixed with water, mixed, and swells for 5-10 minutes. Then it is mixed again and goes to work.
- Laying begins from the highest point of the foundation, determined by the water level. In the corners of the wall, ordering slats are placed, a mooring cord is pulled between them, which will make it possible to control the position of the blocks and the thickness of the seams.
- There should be no differences between the upper planes of neighboring blocks, as this can cause cracks to appear. They are sanded - like the block halves, which need to be sawn to complete the laying of the row. The next row begins to be laid on the side where the extension is installed - this will ensure the necessary displacement of the vertical seams.
About reinforcement
If the length of the bathhouse walls does not exceed 6 meters, there is no need to reinforce them in every 4th row.
It is enough that you provide reinforcement:
- On the sides of the openings on top, where the lintels will rest.
- In the penultimate row of masonry in front of the window opening.
- Make an armored belt in the area of the ceiling or support of the roof rafters.
Reinforcement of a number of gas blocks with rods
The masonry can be reinforced either with rod reinforcement: on walls with a thickness of 250 mm or more - in two rows with a diameter of 8-10 mm (on thinner ones, one rod with a diameter of 12 mm is taken). The reinforcement is placed in pre-cut grooves and embedded in glue. You can also use punched tape, steel or basalt mesh to strengthen the masonry.
Interior decoration
After laying the walls, they arrange the ceiling and try to quickly install the roof - to protect the construction site from precipitation. Then they begin to form the floor and only then begin to line the walls. First from the inside.
Traditionally, the walls of the washing compartment of the bathhouse are covered with wooden lining - a profiled board with a tongue and groove on one side and a groove on the other. It is mounted on a wooden sheathing, between the belts of which they lay, for example, foam plastic, covered with sheet foil on top.
Cladding made of clapboard in the steam room
- We have already mentioned the ease of use of materials such as Penofol and Tepofol. They have a great advantage over all known insulation materials, since with the same thermal conductivity they have a vapor permeability coefficient of only 0.001 mg/m*h*Pa. We can say the figure is zero.
- That is, such a material best protects against the penetration of vapors into the wall, while at the same time being a thermal insulator. Thanks to the foil layer, which must face the inside of the room during installation, it perfectly reflects heat.
- A vapor-waterproofing membrane is first installed under the polyethylene foam, making overlaps between the sheets, leading them to the foundation and to the ceiling, and fastening them with double-sided tape. Next, Penofol sheets are mounted end-to-end, gluing the seams with aluminum tape.
- Mechanical fastenings are made with dowels only along the top line, since the sheathing bars installed at the next stage will perfectly fix the rolled insulation. If the lining is mounted vertically, the bars are placed in a horizontal position - and vice versa.
Comparison of insulation materials
The choice of insulators for insulating bathhouse walls made of expanded clay concrete blocks is based on the following criteria:
- ease of installation, quick assembly;
- functionality;
- heat resistance;
- heat saving;
- hygroscopicity.
The most popular thermal fiber is its safety and versatility - it can be used both inside and outside. Before installation, preliminary preparation of the walls is necessary - cleaning them from dust, dirt, plastering. The latter measure also serves as additional insulation.
Natural jute felt is easy to install and does not impose specific requirements on conditions. This is an effective, environmentally friendly option. Polystyrene foam and mineral wool have good insulating characteristics and are attractive due to their low cost, low dead weight, and ease of installation. Mineral wool is more preferable here, since it does not arouse interest among rodents.
Expanded clay insulation is used to insulate block baths
Expanded clay insulation is still relevant, since it is free-flowing and can only be used to strengthen the ceiling and floor. Basalt wool is fireproof, mold and fungi do not grow in it, it is durable and environmentally friendly. Foamed polypropylene is used in tandem with foil; this combination can withstand heating up to 150°C.
Installation of roof truss system
The next stage is the arrangement of the rafter system for the gable roof. The work package includes the following:
- Installation of the base, rafter and transom for the finished structure. For the rafter system, an edged board is used (dimensions 100 × 40 mm).
- Installation of triangles for gables.
- Installation of wooden sheathing from beams with a step width from 60 to 100 cm.
- Arrangement of the attic floor base in compliance with technological gaps for ventilation.
- Gable trim.
- Installation of waterproofing material on wooden sheathing.
- Laying roofing material.