Often, owners of private houses strive in various ways to improve, make their properties more attractive and comfortable. One of the most desirable home solutions is adding a porch to the house. This is much simpler than constructing the building itself, but it also requires a reasonable approach. And the first thing you need to pay attention to is the foundation for the porch. Without a base, the porch will turn out to be fragile and will become an extra load on the main structure.
Types of foundations
Planting depth, material used, width and area of filling, abutment to the main structure, stability in the ground - the features by which the foundation for the porch and its type are determined.
The traditional bases for homestead porches are:
- monolithic slab foundation (monolithic or prefabricated);
- columnar;
- pile structure;
- strip foundation.
You need to know the main differences and advantages of each in order to choose the most advantageous porch support.
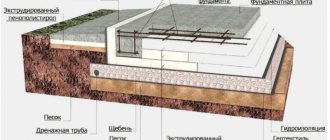
There is also the concept of a “floating” foundation. This is an additional but important strengthening of the soil before laying the foundation of the porch. It is used mainly on loose, watery soils, as well as when laying a monolithic slab. The technology for constructing a floating foundation consists of separating the soil and the main foundation with a special layer.
This layer is made of crushed stone and sand. The first is crushed stone (coarse gravel can be used instead) 15-25 cm thick. Next comes a layer of geotextile, on top of which coarse sand is poured, also 15-25 cm deep. The work is completed by laying roofing material or a thick layer of dense polyethylene film as waterproofing. Each layer must be thoroughly compacted, pouring water for better adhesion.
Location and connection
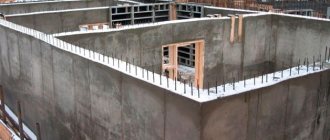
If the porch is attached to an already used building, it is very important to connect the foundations correctly. Let us remind you that the foundations must be autonomous, but at the same time, both foundations must be connected, they must “dance” in pairs.
The connection of the porch foundation to the foundation of the house can be done in various ways:
| Rigid coupling | Suitable for connecting a porch to a building that has already sagged. The foundations are connected to each other using reinforcing bars. Several holes are drilled in the foundation of the house, with a diameter slightly larger than the reinforcing rod. Then, reinforcement is inserted into the holes, which is also part of the porch reinforcing belt. |
The entire structure is poured with concrete and becomes completely monolithic.
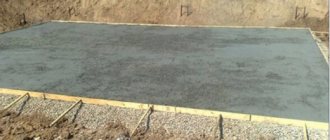
Slab
Such a monolithic foundation for a porch looks like a flat, solid reinforced concrete slab. It will completely cover the area for the future building. Pour directly into a solid structure. It is enough to erect a simple version of it under the porch.
A prefabricated foundation consists of several slabs.
The area of the foundation for the porch and the depth of its laying depend on the size of the porch itself and the freezing of the soil. Based on these indicators, foundation calculations are made.
Calculation of slab foundation
Before starting work on pouring the slab, it will be necessary not only to dig a recess under it, but also to level and strengthen the soil. This is done using a “floating foundation”. Therefore, the depth must be calculated for it as well. On average, it will take 40-50 cm for compaction, and 20-30 cm for pouring the foundation itself. For a porch, even a concrete one of this thickness will be enough.
When building a large, massive porch with your own hands, such as an open veranda, large area, you should invite a specialist for calculations. Especially if the house is on difficult soil, determining the exact dimensions of the foundation and its components will be a decisive factor.
Recessed
This technology is applicable for attaching a porch to a basement, below ground level. In this case, choosing a monolithic foundation will be the only right decision. Moreover, support will be needed not only at the base, but also along the lower perimeter of the porch.
The recess for it increases by the distance to the bottom of the front door, plus 5-10 cm and another 10-20 cm if flooring is planned. Such a foundation will definitely be adjacent to the house itself, so it is worth taking care of the expansion joint between them; it can be laid with tow.
Shallow
This type of slab foundation planting is mainly used. The installation of a shallow slab begins with determining the area of the future extension and marking it, after which the earthen layer of 60-80 cm is removed. It will take time for the reinforcing layer to compact it. This layer will prevent the foundation slab from collapsing due to temperature changes, which will help preserve the porch itself for a long time.
There must be a waterproofing layer between the shallow floating support and the slab fill. Next, formwork is installed along the perimeter of the pit and a reinforcement frame is laid. It is important that it is not on the ground itself, but rises 3-5 cm above it; for this, stones or small pieces of brick are placed. For formwork, a dense material is chosen, often wooden boards. If the soil walls have good strength, you can do without the use of formwork.
Concrete is poured into the frame in several layers, each of which is necessarily compacted with a metal rod. This will release the air, and the slab will be solid, without flaws. To prevent the ripening concrete from drying out, it must be watered several times. This will prevent cracks from forming. At night, the construction site is covered with a tarpaulin or durable film.
A few days after pouring, the formwork is removed, and the foundation is left to mature for at least another 3 weeks. Only after this can the construction of the main structure begin.
Floating slab - ideal for problem soils
We recommend installing this type of foundation for a porch in situations where the soil on the site is characterized by increased instability. You can make a floating slab with your own hands like this:
- Carry out markings - mark the corner points of the future structure with wooden stakes and stretch a nylon rope between them.
- Remove 0.4–0.5 m of soil from the area allocated for construction. The depth of the base should be greater, the more moist and heaving the soil you are processing.
- Compact the walls of the pit, spill water on the soil, level it and tamp it.
- Place a geotextile fabric at the bottom of the hole.
- Fill the pit with construction sand. Perform the procedure gradually, pour 4–5 cm layers of material onto the bottom of the pit, pour water over them and tamp them down. It is optimal to compact sand layers using a vibrating plate. If one is not available, tamping should be done with a large-section block (the end of such a product). The total height of the sand cushion is up to 30 cm (minimum 15 cm).
- A reinforcing mesh is placed on the sand.
Porch foundation on a floating slab
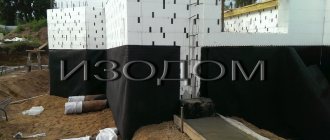
Now proceed directly to pouring the foundation for the porch with a concrete mixture. This procedure must be done immediately; no interruptions are allowed in the work. Then you are guaranteed to receive a reliable foundation for the porch of the house, built with your own hands. After the concrete mixture has hardened, it is advisable to apply waterproofing to the surface of the slab. Typically, such an event is carried out in situations where the porch is built as a separate structure from the house. The waterproofing agent is not used if you subsequently plan to pour steps along the slab.
Columnar foundation
This type is a frequently built foundation for a porch. In its simple form, it requires much less money and time than the others. In addition, installation of pillars is good in heaving soils. Ready-made factory products, piles, and channel supports are used as pillars.
After clearing the working area of debris and plants, markings and recesses are made. The holes are dug independently or using any drill. They install pillars or formwork for pouring concrete. Conventional formwork is performed using a rolled roofing felt sheet. All this is fixed with spacers. Reinforcement with a cross-section of 12-14 mm is placed in the formwork. Next, they begin to fill the hole layer by layer with crushed stone and sand, compacting and spilling. It is necessary to ensure that the pillars or formwork are vertical. After strengthening, concrete solution is poured inside.
Calculation of pillars for the foundation
As a rule, the base of pillars is made for compact or light porches, so installing four supports in the corners is enough. For a large area, the supports are distributed at a distance of 1.5 meters from each other. The calculation of the foundation begins with the quantity, then the depth of soil freezing is taken into account, holes for supports are drilled below this level.
Driving a pile foundation
Instead of installing pillars, piles are also used. They are hammered into the drilled hole with a sledgehammer. Then stage-by-stage strengthening work is carried out using crushed stone and sand and fixed with concrete. The solution must be poured inside the pile itself. Otherwise, it will quickly collapse; 10 years will be enough for this.
The pile is considered a more durable and efficient material to use, which, if properly installed, will last for many years.
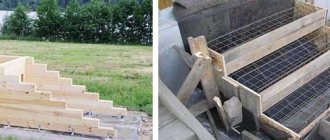
Formwork for concrete porch
You can make formwork from any boards. For an oval-shaped porch, you can use plywood or tin. It should be noted that the material for the formwork must be perfectly flat and completely follow the shape of the steps. Otherwise, the design will turn out lopsided.
Narrow boards are assembled into panels. In this case, the height of each of them should be 7-10 cm higher than the required size. The side panels are hammered into the edges of the pit, leveled using a building level and supported with timber stakes. After installation, you should measure the height of each shield again.
Construction of formwork
To strengthen it, reinforcement must be installed inside the formwork - rods of 10-15 mm in increments of 20-25 cm. The reinforcement belt for each level must be double. Its knitting is carried out simultaneously with the assembly of the formwork. That is, we assemble the first level, then we knit the reinforcement, etc.
Reinforcement tying scheme
Laying reinforcement
Strengthening the formwork with transverse bars
On screw piles
A type of columnar foundation also includes a structure on screw piles. This technology is much more efficient and allows you to complete the foundation as quickly as possible. Finished products are mounted using a manual or mechanical pile driver. The distance between the screw piles directly depends on the weight of the future porch. For light wooden ones, placing the supports in the corners is sufficient; for heavy metal ones, it is advisable to take the distance of the pillars every 0.5 - 1 meter.
Making screw piles with your own hands
The technology for manufacturing screw piles is complicated in that the spiral blade must have a certain inclination, as well as correctly position it on the tip cone.
The screw pile consists of several parts:
- The body is in the form of a tube with a diameter of 8 - 35 cm and a wall of 0.4 cm.
- A cast tip in the form of a lance can be made separately or be a continuation of the main body.
- Spiral blades, double-threaded or single-threaded.
- A plate-shaped cap connecting the pile cylinder to the grillage.
It is best to make such a pile yourself correctly and without wasted costs, focusing on the drawings of one of the manufacturers.
First, a pipe of the required quality, 2-3 meters long, is selected. Experts recommend St20 (GOST 8732) or 09G2S (GOST 19281), they are easy to cut and bend. Next, the tip is made. When making a peak from an extension of the pipe, it will need to be increased by two of its diameters. A template is made from cardboard in the shape of a triangle, marked into several sectors, and the pipe is cut using this template. Then the petals are cut out in the form of triangles, which are then connected and welded to each other. It turns out to be a peak, its top should coincide with the axis of the pipe. For a pipe with a diameter of 10-20 cm, it is better to make 5 petals, for 7-9 cm, 4 will do. If it was decided to make the tip separately from the pipe, then all measurements will be the same, and the tip itself is welded to the main body at the end.
The easiest way to twist piles is the screw of which starts from the lower third of the tip, the pitch of the blade is 5-7 cm. They are made from a sheet of steel from 0.5 cm. First, it is cut out, then either the entire wiring is done with a crowbar or a pry bar to the desired pitch size and attached to the pipe, or divided into parts and welded separately to the body.
The blade is cut in the following way:
- two circles are drawn on the selected steel, outer and inner;
- outer diameter 15-30 cm, inner diameter equal to the outer size of the pipe circumference;
- cut with a plasma cutter, welding or gas cutting machine.
Beautiful examples
A simple wooden spiral staircase of economy class, entirely created by the hands of the owner. Classic rectangular design with one bay. Used to go down to the basement.
Another simple, inexpensive design that has a spiral shape. The main materials used in the production of components: wood and metal. The spiral staircase rests on a central axis made in the form of a curled pipe and has metal railings. This design is very safe and easy to install.
The interfloor spiral staircase is made of S-shaped wood, has no railings, but is equipped with a high plinth along its entire length. The lower and upper steps differ in their shape from the rest. They are slightly wider and more stable. Not safe for use by small children.
Spiral spiral staircase made of metal for small openings. Painted in bright red color, the style matches the interior of the room. The main support is a metal pole and corner walls. Also one of the economy class variations.
Compact screw structures made of wood and metal are suitable for use not only in small multi-level apartments. This model is also an ideal option for a summer residence, for premises where there is not a large and constant flow of people.
An original cosmic spiral staircase with petal steps made of metal. The support is only the central pipe on which the steps are strung. Not recommended for use by small children and the elderly.
Classic modular screw design. Consists of wooden steps and a metal base. And also very convenient for use in narrow ceiling openings. Only suitable for moving a person up or down.
Openwork spiral staircase made using forging. The vintage design will become not only functional, but also a very beautiful acquisition. It will add its own charm to the decoration of a room in a classic or retro style.
Cast iron spiral staircases are quite rare. They are usually used in loft-style interiors. This original black design with train-like steps creates a pleasant atmosphere when everything is in its place. Despite its bulky design, the cast iron staircase looks quite light and relaxed.
Another original option for small openings in the loft style. The fence has a monolithic structure and is made in the form of perforated steel.
The designs of the new underground style trend are made not only from metal. There are also variations with dark-colored wooden steps, as well as with stone components.
Weightless futuristic models in high-tech style will not leave indifferent lovers of original and practical interiors. Often such structures have a fairly large diameter and are adjacent to panoramic windows and spacious rooms.
The main materials used to make high-tech spiral staircases are metal, glass and plastic. All those basic raw material combinations that are so firmly rooted in the modern construction world.
Simple concrete structures today can also be found everywhere in loft, high-tech and modern interiors. They are very bulky and heavy, but a spiral staircase made of this material will last as long as the landings in standard entrances of apartment buildings.
Delicate spiral staircase in Japanese style. The method of fastening is on bowstrings. Material of manufacture: plastic and wood. High monolithic railings allow you to confidently stand on it. The white color and original Japanese design will not leave you indifferent.
Spiral staircase as a central piece of interior design. Massive wooden marches laid in a spiral. Transparent glass handrails. And the lower steps are like a pedestal for a pedestal. Everything points to the breadth of scope and modernist slant of the room.
Another design comes from the future. Floating glass steps, framed by an almost invisible support made of the same material, rest against the perimeter walls of the room. Despite the apparent fragility of the entire structure, this spiral staircase is very durable and resistant to mechanical damage. One of the nuances is the possibility of the foot sliding along the steps, which can be easily eliminated with the help of special silicone or rubber pads.
You will learn more about spiral staircases in the following video.
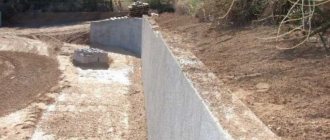
Strip foundation
Pouring a strip foundation is also often used for porches. This base is in the form of concrete strips - tapes. This kind of foundation for a porch can be easily done with your own hands.
The recess is made in the same way as for a monolithic slab and is dug along the axial cord along the perimeter of the future extension. The width of the trench is 25-30 cm, but you also need to take into account the insertion of formwork and increase the width of the pit for this. A frame made of reinforcement with a diameter of 8-12 mm is installed inside the formwork. Then the concrete solution is poured. The strip base is durable and is quite suitable for a standard porch.
In this case, the entire base is filled in one step, otherwise there may be cracks. Also, in case of watery soil, strengthening is done with a layer of crushed stone, then with a layer of sand.
Belt technology is also used to make stairs. The formwork for the porch steps is installed above the main foundation. The bottom tier will be equal to the distance of the base of the stairs from the edge of the first step to the back wall of the stairs. The upper tier is the width of one step. Of course, other options are possible, depending on the owner’s imagination.
Porch marking
First, you need to determine the boundaries of the future structure: calculate its width and length and determine how the steps will be located (from the front or to the left, to the right of the door, on its two sides, etc.). Before marking, the soil around the house must be leveled, and only then measure the distance from the door threshold to the ground. The resulting figure will be the height of the porch
.
Porch dimensions
Now you need to determine the number of steps
. Let's say the height of our porch is 75 cm. The optimal height of one step is 15 cm (lower or higher ones will be too inconvenient). The number of steps will be equal to:
If we get an even number, this figure must be adjusted. In order for people entering to be able to start and finish entering with one foot, the number of steps must be odd. This can be done by changing the angle of the porch (the minimum angle of inclination is 25°, and the permissible maximum is 45°). In this case, the height of all steps must be the same.
Both too narrow and too wide steps are inconvenient - their optimal width is 30 cm. We determine the length of the porch in the place where the steps go:
Let's add to this figure the size of the upper platform
.
If you make it small, you will have to open the entrance doors while on one of the steps, which is not good. The optimal size of the upper platform is 120 cm. Thus, the total length of the porch
will be equal to:
Porch width
should be 1-1.2 m so that 2 people can easily pass on it.
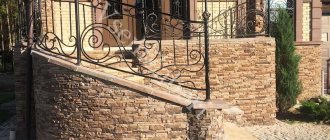
Railings
are installed only if the number of steps is more than 3. Usually their height is 80-100 cm. For children, additional handrails should be equipped, which will be located on the main railing.
Height of fences
Independent or connected to the wall of the house foundation
When connecting the foundation of the porch to the wall of the house, you need to take into account a large number of nuances. Even the different weight of the house and the porch matters, since because of this, the heaving forces of the soil do not act equally on their foundations. And the movements of one structure affect another and the formation of cracks is possible. But despite all this, experts still insist on connecting the foundation of the extension with the base of the house so that there are no gaps between them.
To avoid problems, it is necessary to study all the intricacies of constructing the foundation of the main building; the methods for the porch must comply with them. Also, the wall of the house should be separated by formwork for the porch; this is a kind of firmware that can be filled with tow.
Laminate as a finishing for stairs
Step by step the most unusual stairs from around the world
It is best to lay laminate flooring on concrete stairs. It needs a smooth and rigid base. Concrete provides both. Therefore, for concrete stairs located inside a private house, laminate is the best solution. By itself, this coating does not have sufficient strength. It is impossible to use it outside due to its ability to absorb moisture, and in an apartment building or, for example, in an administrative building it simply will not withstand the load. In a private home, it will significantly improve the appearance of a massive concrete structure, playing an exclusively decorative role. Since stairs are often made to suit different designs, they often have different tread widths. Often, even for the same staircase, steps with different widths at the base and at the top are designed. To determine the size of the laminate panels, the widest step of the span is taken as a basis. Interlocking joints of panels and their scraps will be inappropriate both on the horizontal planes of steps and when cladding risers, and the highest quality and easiest to perform cladding will be from solid laminate panels. Different manufacturers produce different types of laminate, which differ not only in appearance, but also in the joining method.
tiling
To cover the steps with laminate, you will need a commercial grade laminate with a thickened protective top layer, as well as special glue, screws and an edge profile. If the surface of the steps is not level enough, all imperfections are filled with a self-leveling mixture and covered with plywood to provide additional moisture insulation. On the modern building materials market, you can easily find laminate of the required width and desired color, as well as corner fastenings and even fasteners that will fit perfectly into any home interior. Cladding concrete stairs with laminate is one of the most popular and economical finishing options. In addition, laminate creates the illusion of cladding with natural wood.
Conclusion: for which cases which foundation is most suitable?
The most common choice is a strip porch base. This type of foundation is quite simple to implement, durable and does not require large financial expenditures. Next to it there is also a simple columnar foundation, although it is more difficult to implement. They are suitable for any medium-heavy porch.
Pile supports require much more skill and knowledge. However, for difficult soils this option will be preferable, and it is also well suited for frozen soils. This variety will provide a reliable support for compact but heavy structures.
Slab foundations are usually used for porches made of concrete, brick or some other rocky material. Also suitable for massive log buildings.
For the same porch, not a single foundation option is possible. It’s worth weighing everything carefully and making your choice.
General information
So, the foundation for the stated goals can be done in several ways. Moreover, the choice depends on the porch itself, its size, the materials from which it is made and the design features.
Conventionally, all options for constructing a porch can be divided into three types:
| Regular porch | It is a no-frills platform with steps. |
| With vertical posts | In addition to the steps, the structure has a canopy that is connected to the load-bearing wall of the building. |
| Independent porch | The canopy is completely located on the posts, so it does not come into contact with the wall of the building. |
Each of these options requires a special approach to the construction of the base.
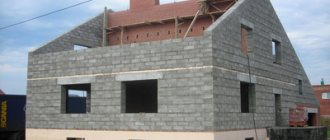
Massive porch
Risk assessment
To decide whether or not to build a second floor, you only need to first assess all the risks:
- A preliminary assessment by experts will help determine whether a wooden house is ready for additional loads.
- The examination will show the technical condition of the foundation, floors, and wall panels.
- The conclusion will determine the need and method of strengthening the entire structure.
Experienced experts always give practical advice on the savings and feasibility of building a second floor on an old house.
Pouring concrete
Concrete grade of at least M200 is used to fill the porch. To prevent the solution from being too mobile, crushed stone can be added to it. To ensure a strong base, it is advisable to carry out concreting in one step.
Concrete laying begins from the lowest step, gradually moving up. In this case, the solution should be properly compacted to avoid the occurrence of voids.
Pouring concrete
In order for the concrete to dry evenly and not crack when drying, its top is covered with any material (film, cardboard, bags, etc.). It should dry for at least a week. After complete drying, the formwork is removed and the porch is again left for final strengthening for another couple of weeks.
What you need to know when building a second floor with your own hands
When building a new house, where the second floor is already included in the project, you don’t have to worry about the foundation and walls - they are designed for the given loads. If you need to increase the living space of a habitable house, it is better not to save money and order an examination. From its results you can find out:
- technical condition of the foundation and walls;
- recommended measures to strengthen load-bearing structures;
- the most suitable methods of superstructure in a particular situation;
- calculations of the future superstructure.
If it is not possible to order an examination, it is better to build the second floor using load-bearing supports on your own foundation.
What to choose – a full floor or an attic?
Most often, the choice is based on financial capabilities. The attic floor turns out to be cheaper - there is no need to build walls, and all costs go towards insulating the roofing pie. The load on the building is also less, which makes it possible to make the walls and foundation less strong, and, as a result, cheaper.
But in rooms with sloping walls you will have to think carefully about the interior design - it will most likely not be possible to install wardrobes, showers or bunk beds. For these purposes, it is better to build a full floor with an unheated attic. Construction costs will increase significantly, but in the long run such a house is much more convenient for a large family.
Where to put the ladder?
When thinking about adding a floor to a residential building, they rarely think about how they will have to get up there every day. But you will have to install a ladder, and the convenience and safety of use depends on its shape and size.
If the house is small, then a straight flight of stairs is absolutely not suitable. So, with a step size of 30x15 cm and a staircase inclination of 35 degrees, the length of its span will be 5 m, and the length of the base will be 4 m. Of course, if it is possible to sacrifice part of the first floor, then you can conveniently organize a wardrobe under such a staircase. In its highest part there will be hangers for outerwear, and in the low part there will be drawers for shoes.
Marching rotary stairs allow you to reduce the length of the platform by half, but increase its width. It will no longer be possible to use the space under it with maximum benefit - depending on the design, you can install a sofa, a couple of armchairs or a rack with plants under it.
Spiral staircases are the most compact and most inconvenient. Just imagine how you will have to lift or lower furniture or other bulky objects along it. But if there is no alternative, it is better to choose the maximum possible spiral diameter.
Construction technologies
In order to build a second floor above a used old house with your own hands, it is permissible to use several technologies:
- Masonry;
- Application of reinforced concrete structures;
- Lumber (timber);
- Panel or frame-panel structures;
- Prefabricated structures.
The use of heavy piece materials such as brick or stone requires strengthening of the foundation and wall panels. It is also possible to use unique “piles” located around the perimeter of the entire area of the house; in this case, the second floor is erected without resting on the main walls. The construction of an additional floor in wooden houses is allowed from dry timber, but you will have to wait a year before starting the final finishing.
Advice! Strengthening wall panels and the load-bearing foundation is a very expensive job, so if there is no finance, it is easier to complete the upper floor from lightweight panels or prefabricated structures.