The choice of foundation and its proper arrangement are treated with special care, therefore, for its high-quality production, it is necessary to have complete information about the construction technology and, in particular, how to display zero on the foundation. The foundation plays a decisive role in the operation of any home. This structural element evenly distributes all possible loads created by the structure and is a kind of intermediate layer between the soil and the structure.
What to do and what not to do
Before giving advice on correcting other people’s mistakes, let’s say a few words on how to prevent them in general and bring out zero on the foundation with your own hands. It may be hard to believe, but you need to take care of the quality of the foundation even at the stage.
Pay attention to the location of the lacing.
They are initially set at the level of the upper edge of the plinth and serve as guides in the manufacture of formwork.
But why, with such a simple technology, the question: “How to level the zero of the foundation?” - sounds day after day both on construction forums and in queries to search engines? Mystic? No, just basic construction errors. Here are just a few of them:
- A solution with a high percentage of water. This most often happens when stirring by hand. More water accumulates in one of the corners and after it dries, a depression forms there. Sometimes, in this simple way you can earn a difference of 2-3 cm.
- Broken mark. It often happens that during the installation of formwork, the lacings move and builders, focusing on them, cast a deliberately crooked foundation.
- Frost heaving. And even experienced concrete workers fall for this rake. There is an opinion that it is for the winter so that it is established by spring. But the frost heave lifts the unloaded belt, even acting on it tangentially, and by April it is useless to look for the level there.
Purpose
The mentioned concept means leveling the surface of the base to a strictly horizontal position. In this case, its level should be located in the same plane. Since the foundation bears the entire mass of the building, its leveling is necessary in order to distribute it evenly, as well as to avoid a negative impact on the strength parameters.
The need for leveling arises at the stage of pouring the mortar and laying the brick base. However, an uneven earthen surface and uneven distribution of concrete can cause the entire building to become distorted during its future operation. For this reason, it makes sense to constantly check the hydraulic level.
Leveling with concrete
If you are asked what is the easiest way to lay out a zero on the foundation, feel free to answer: “With concrete.” The whole procedure goes as follows:
Markers should be installed at the corners of the foundation. These can be ordinary wooden slats or pieces of reinforcement.
Then, using a water level, or even better, a laser level on markers, mark a horizontal level and take measurements from it to the foundation, thus determining the highest and lowest point of the foundation.
When the minimum and maximum are found, the formwork can be placed. Only this is done in such a way that at least a four-centimeter layer of mortar is placed above the top point - you can’t do less, it will crack.
Before, it is useful to add a plaster mesh to the base, and add a plasticizer to the mixture itself. Of course, the seam between the old and new concreting will be noticeable, but this defect will easily be hidden during subsequent finishing.
How to display zero on a foundation with a brick
Another solution to the problem is leveling with bricks. This task is not too complicated and even the most inexperienced mason can handle it effortlessly.
The essence of the idea is simple: in places that need to be raised, the seam is made a little thicker, and in those that need to be lowered, a little thinner. Three or four rows and the foundation is ready.
Of course, only small flaws can be eliminated in this way, otherwise it will turn out to be too high, but significant differences are rare for the foundation.
Well, that's all the wisdom. Goodbye, we will definitely meet again on the pages of the site about the dacha.
In any construction process, it is important to strictly adhere to the dimensions provided for in the project or sketch. This is necessary to ensure the reliability of the structure, to avoid distortions and strong deviations. One of the control and measuring instruments used by workers is the hydraulic level.
The device is designed for horizontal marking and detection of deviations from the horizon. It can be either homemade or factory-made. The principle of operation is simple, so to use the device you do not need to have deep knowledge in the field of construction.
- a device that works on the principle of communicating vessels. The second name of the device is a water level. It is a long thin hose. If you lift the ends of this hose, then no matter how far apart they are located, after a certain time the liquid in them will align at the same mark.
Thanks to the law of physics, the accuracy of the device is quite high, which allows it to be used when constructing a foundation. An important factor is the simplicity of the design and affordable price. The simplest version of the hydraulic level is a transparent long hose. You can also purchase a more complex device in the store, equipped with two containers with a measuring scale and mounting hardware. Both options, simple and advanced, work the same.
How to level to zero when concreting?
The first step is to set the zero point correctly. To do this, a mark is made from the inner area of the formwork, preferably in one of the corners, which will be the alignment boundary. Next, we use the hydraulic level to determine the remaining three points. If such a tool is not available, an ordinary transparent hose will do as an alternative. To mark the corresponding boundaries, the latter is stretched from the marked area to opposite corners, after which water is released. The zero level is fixed at the primary point; in the process of balancing the liquid, a second point is selected and a mark is placed in this place. The remaining points are located according to a similar principle; no difficulties arise at these stages:
- In the finished formwork, it is necessary to make holes for the hose in the middle section of the planned walls.
- A cord or twine is threaded through the holes, after which the structure is fixed until tension appears.
- The zero level is measured and the concrete solution is poured.
- The construction rule is to level the mixture; it is important to distribute it evenly over all areas of the surface.
The level foundation is ready for the construction of the basement.
After the concrete solution has completely hardened, the ideally flat area of the foundation is completely ready for further construction of a basement or possible basement. In this case, do not forget about regularly checking the compliance of the horizontal and vertical levels of each brick row or building block.
Leveling the foundation horizontally
To check the evenness of an already poured foundation with your own hands, you need to use a water level in the following order:
It is important to use the difference method, because when the tube moves along the ground, the level of liquid in it changes, the tube bends, contracts - this changes the internal volume. If you return the device to the original point, the water in the hydraulic level will be at the same mark, but it will not coincide with the base mark. To prevent errors, it is necessary to use relative changes.
After the measurements have been taken, it is necessary to check the design's compliance with the standards. During construction, it is important to align the edge of the foundation horizontally. Maximum deviations are specified in the manual for SNIP “Regulatory requirements for the quality of construction and installation work” and SP “Load-bearing and enclosing structures”.
All deviations are indicated for height marks. If the measured values do not fit within the required framework, the quality of work is considered unsatisfactory and the surface must be leveled. For private housing construction, leveling can be carried out at.
Calculation of brick requirements for laying a plinth: technical nuances, construction calculator
From a technological point of view, it is more expedient to calculate red brick for the basement of a building at the stage of designing a house in order to include the financial costs of purchasing the material in the estimate. But in practice, quite often this is done already when planning the construction of the base.
Technical aspects of calculation
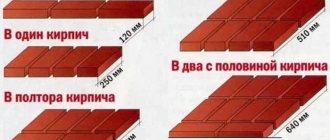
To calculate ordinary bricks (regardless of whether this will be done on a calculator or independently), we need to know the thickness of the future base and its height. These parameters are multiples of the dimensions of the masonry material used, taking into account the thickness of the joints, which are usually 10-12 mm.
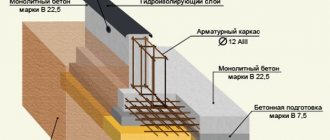
Possible masonry thickness options are shown in Fig. 1:
Figure 1. Types of masonry of different thicknesses
As a rule, the basement of the house is laid out with a thickness of 380 or 510 mm. Laying a base with 1 brick (see photo 6) is used mainly in the construction of wooden buildings, seasonal country houses, bathhouses and other small buildings.
Photo 6. An example of laying out a base part 250 mm thick
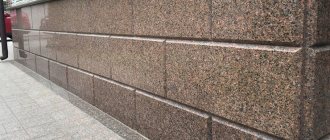
Laying ½ brick is used only for cladding the base (see photo 7).
Photo 7. Basement lined with brick
The height is calculated after you decide what type of brick goes to the base - 1NF or 1.4NF. When calculating, horizontal seams must be taken into account.
The average consumption of masonry elements depending on the thickness of the structure is presented in the table below. But the specific amount of material is calculated individually for a specific building. At the same time, it is recommended to buy with a small margin (within 5-7%) in order to avoid downtime due to lack of material.
Table 1. Average brick consumption per 1 m 2 of masonry
Number of bricks in the masonry (including mortar joints), pcs.
Foundation marking
Removing the axes and boundaries of the house onto the terrain is done using wooden posts and crossbars, a cord, a tape measure and a hydraulic level. In some cases, instead of a hydraulic level, an eye gauge is used, but this is an extremely inaccurate method.
The crossbars of the cast-off should be located at the same vertical height. You can hit all the marks with a hydraulic level. To do this, perform the steps in the following order:
- Nail the first crossbar (rail) at the required height.
- Attach one end of the measuring device to it.
- Before nailing the second cast-off element, check its vertical position using a regular building level. To set the correct mark, the second end of the tube is attached to the mounted crossbar.
- It is necessary to bring the location of water in communicating vessels to one level; the upper edge of the first rack can be taken as the base level; the second rack is positioned so that its upper edge coincides with the water level. It is necessary to achieve a position in which the water level coincides with the upper edge of both slats.
- After this, the second rail is nailed to the castoff posts or screwed with self-tapping screws. Move to the next element.
Important! Make sure that the hose does not bend when working with the level, otherwise the measurements will not be correct.
Methods for leveling the finished base
Often builders need to reach zero on an already formed base of a brick surface. The algorithm of actions looks different than in the first case and consists of the following steps:
- The initial location must be marked with a hydraulic level or a special hose. The corners should be marked so that the location of all is obvious in relation to each other.
- After this, the wooden formwork is installed. It is important to take into account the moment that the design parameters coincide with the thickness of the base.
- Zero marks are measured in the corners, which in the future are transferred to the inside of the foundation.
- The reinforcing mesh is being installed in the formwork. The wooden frame is first sawn.
- A solution is prepared if the consistency of the correct mixture is poured into pre-moistened reinforcement rods.
A hose is used in the process of searching for the location of zero marks. However, it is important to remember the point that the water inside the latter moves by inertia. After the solution is poured into the formwork, it is necessary to ensure that the hose does not dry out from cracking. To avoid such problems, you should regularly moisturize the necessary areas.
Laying out formwork and pouring the foundation
To ensure a level base for the house, the formwork must be accurately installed. The work is carried out as in the previous case. First, vertical pegs are driven into the ground to which the shields will be attached. Start work from the top board of the shield. The first one is nailed at the required level, and the rest, as if worn out, checking the height with a hydraulic level.
Next, mark the top edge of the fill on the inside of the formwork. To ensure evenness along the entire length, they are copied to other corners of the formwork using a tube. The location of the water in one tube is aligned with the mark on the formwork. The second end of the hose is moved to the desired point and the liquid level is checked there. This is done with all angles. To increase control, you can make marks along the length of the tape.
Leveling at the concreting stage
To successfully carry out the activity under study with your own hands, you should prepare the necessary tools and consumables:
- cement (not lower than M200);
- sand;
- reinforcement with a cross section of 10 mm;
- wooden slabs or boards for constructing formwork;
- ax and hammer;
- bayonet and shovel shovels;
- wide trowel and rule;
- hydraulic level;
- cord or rope.
Work order:
- Set the zero point. On the inside of the formwork, in one of the corners, we make a mark, which is the alignment boundary. Using a hydraulic level, we measure the remaining three points in the remaining corners.
If the above-mentioned measuring device is not available, you can use a conventional flexible transparent hose. To establish the desired boundaries, it should be stretched from the marked mark to the opposite corner and filled with water. Having set the level of the future location of the zero plane at the initial point, by finding the fluid balance we find the second point and make a mark. The remaining limit values are found using a similar principle.
- We make two vertical cuts in the formwork along the middle section of the future walls.
- We thread the cords or rope into the prepared cuts and fix them with the necessary tension.
- We pour concrete to the measured zero level and, using the rule, level the composition, evenly distributing it over all corners of the base.
Wall masonry
To begin the construction of enclosing structures, it is necessary to determine the highest angle of support for the masonry. If you have checked the previous point, you can use the previous measurements and, after analyzing them, select the highest point.
Starting work on laying bricks or gas blocks from a high angle will allow you to bring the wall to one horizontal level. To level the edge of the enclosing structure at the same level, a thicker layer of masonry mortar is laid at the lower points.
To determine the required point, you must use a hydraulic level in the same way as in the previous paragraph. Calculate the elevations of the entire surface of the structure relative to the base one and determine the required area to begin masonry work.
What is “zero” and why do we display it?
In the construction of houses, the zero level is most often taken to be the level at which the plane of the finished floor of the first floor is located. It is necessary for design, as it serves as a single guideline when calculating the location of horizontal surfaces of other structures.
Section of a house with vertical marks
However, when talking about zero foundation, we mean something completely different. In this case, 0 is a relative concept; it is the mark of the upper edge of the foundation strip along its entire length. It must be unchanged at any point. This applies to foundations of any type. For example, at a pile foundation, the heads of all supports buried in the ground must also be located in the same plane, and this plane must be horizontal.
If you do not think in time about how to display zero on the foundation, this can lead to serious problems during the construction of the building and its operation. And warped walls are not the worst thing. It’s worse if they put an uneven load on the foundation, which will certainly cause stress to arise in it, leading to rapid destruction of the foundation.
One of the reasons for the destruction of the foundation is the uneven distribution of the load on it
Therefore, the upper plane of the foundation on which the walls will stand must be leveled horizontally. This is done immediately upon installation. But often you have to re-display zero on a ready-made basis.
Pouring water into the device
Before starting measurement work, it is necessary to properly prepare the instrument. To do this, it is recommended to perform these steps in this order:
- Take a bucket of water or any other large container with an open surface. The bucket is placed at some elevation relative to the ground.
- One end of the device is placed in a container of water, and the other is lowered below the location of the bucket. Usually placed on the ground. In this case, due to the property of communicating vessels, the liquid begins to move through the tube, filling it.
- When filling, it is important to monitor the presence of air bubbles in the device. Wait until all the gas comes out of the tube. After this, one end is clamped with a finger or bent.
- The second horse is taken out of the container. Check the movement of water and again the presence of air.
- Both ends are closed or clamped and the device is transferred to the workplace.
After completing these steps, you can begin measurements.
Some tips
- To simplify the process, you can color the water poured into the device in a bright color. This will allow you to quickly determine the water mark in the tube without straining your eyes.
- The larger the diameter of the hose, the faster the liquid will level out in it. It is recommended to purchase products with a diameter of 10-12 mm.
- The leveling speed also depends on the length of the tube. Don't choose items that are too long.
Advice! If you need contractors, there is a very convenient service for selecting them. Just send in the form below a detailed description of the work that needs to be performed and you will receive proposals with prices from construction teams and companies by email. You can see reviews about each of them and photographs with examples of work. It's FREE and there's no obligation.
Foundations are the supporting part of any building; they are intended to be transferred from structures located above to the main ones. Many people ask the question: how to display zero on the foundation? This means that work must be performed in such a way that all points of its surface are located in one horizontal plane. Thus, you will quickly receive a reliable and durable foundation.
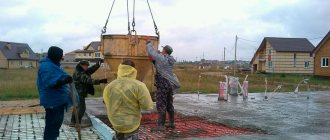
The secret - how easy it is to fill a concrete strip to zero
Hi all! We'll tell you how to fill your strip foundation to zero, or rather one of our most experienced will do it.
It is no secret that the foundation plays a decisive role in the operation of any building, so due attention must be paid to its proper creation and arrangement.
“Bringing the foundation to zero” means leveling its surface in the horizontal plane so that all deviations from it have minimal values (ideally zero). This is done to ensure that the foundation evenly absorbs the load from the entire building.
The foundation can be brought to zero after it has set and gained strength using brickwork (this is the most common method in this case) or immediately when pouring concrete, which is faster and more reliable. I chose the second method. In order to immediately install the lower frame of your future home on the foundation through waterproofing.
At first I thought of setting the formwork with the top edge to zero and, after filling the formwork with concrete, leveling its surface along the edges of the formwork - it seemed simple. Only when I started assembling the formwork did I realize this was not for me. It is certainly possible to bring the top edge of the entire formwork into an ideal plane, but how much effort and time it will require... I abandoned the idea.
I completely laid out the formwork (description here). She does not move left or right, or down or up (anchored). The shields were tied together with pins through a polypropylene pipe, so the distance between the shields was approximately 25 cm everywhere (allowed a couple of millimeters back and forth). The upper edge of the formwork was slightly higher than the required height of the future foundation.
From the inside of the shields, I chose the first point of the upper surface of the foundation, using a hydraulic level in each corner, I marked points in the same horizontal plane relative to the first. I screwed self-tapping screws into these points and connected them with nylon thread. As a result, the top edge of the thread will be the top edge of the foundation.
I decided to stop using a laser level. Firstly, there is an error in the device, albeit a small one, and secondly, on a summer day a laser from 10m cannot be seen even with special glasses. There was no level, so I used the old, proven hydraulic level.
I attached 20x20 mm slats to the panels using threads.
I removed the threads, now the slats become an indicator of the upper edge of the foundation.
Next came the filling of the formwork with concrete, pouring approximately to the upper edges of the filled slats. He took in his hands an even piece of an inch board 24.5 cm long (slightly narrower than the internal width of the formwork) and ran it along the guide rails.
The excess concrete was removed, followed by a friend with a trowel and smoothed the surface.
After stripping, a small recess remained in place of the bars on both sides of the foundation. It does not affect the quality of the tape.
In the end, we managed to accomplish our plans. The surface of the tape was filled to almost zero.
How to display zero on the foundation with your own hands
This is one of the most difficult tasks that a builder faces. In order to carry out all the work in accordance with the rules, zero should be displayed on the foundation at the pouring stage. In some cases, it is necessary to correct construction errors after the building material has set. In this case, this problem can be solved using special tools and tools. Different methods and means will be used depending on when exactly the foundation will be removed - during pouring or after it.
To bring the foundation to zero in the first case, you will need a marker and a hydraulic level, with the help of which you need to put zero marks on the formwork in all corners. This means determining the height to which the concrete should be poured. If there is no special level, then in this case it can be successfully replaced with a regular garden hose. It is necessary to pour water into it, then place the ends of the “devices” in two corners, which should be aligned. At the same time, do not forget to ensure that no air pockets form. Then one end of the hose must be set at the zero mark so that the liquid matches its edges. “Zero” should be marked on the formwork.
Next, it is necessary to cut vertical “windows” in each of the corners of the foundation, which with their lowest point reach the zero mark. To clearly show to what height the concrete needs to be poured, just use cords to connect the corners through the holes. In this case, a hydraulic level is not required; you can get by with the usual means at hand. At the next stage, you should prepare the required amount of concrete mixture, which must be poured into the formwork to the mark limited by the stretched cords. As a result of this, you will receive a high-quality ready-made foundation, which will immediately be brought to zero.
If you need to adjust the foundation of the house that has already been poured, then in this case you will have to use other technologies. To do this, you will need a level or hose to determine the “zero” of the foundation. To simplify the task, one of the angles should be taken as a standard, and the rest should be set according to it. But first, you need to make preliminary marks on them - how much higher or lower they are located relative to the zero level. The foundation must be supplemented, which will consist of only two boards connected by attachments and repeating its shape, exactly corresponding to the thickness of the concrete strip.
Now you can begin marking points on the formwork that correspond to the zero level in accordance with the actual location of the corners, which was identified earlier. To achieve the best results, the minimum additional cement poured should be set to 3-4 cm, otherwise the resulting layer of concrete will be too weak. To bring the concrete base to zero, it is enough to pull the cords through the cuts, which must be prepared in the same way as in the case of pouring cement to zero. In order for the mixture to set well, it is recommended to moisten the previous foundation with water. When setting the zero point using a hose, do not forget about inertia - the water does not immediately take the desired position inside this “device”.
Methods for leveling the finished base
Often builders need to reach zero on an already formed base of a brick surface. The algorithm of actions looks different than in the first case and consists of the following steps:
- The initial location must be marked with a hydraulic level or a special hose. The corners should be marked so that the location of all is obvious in relation to each other.
- After this, the wooden formwork is installed. It is important to take into account the moment that the design parameters coincide with the thickness of the base.
- Zero marks are measured in the corners, which in the future are transferred to the inside of the foundation.
- The reinforcing mesh is being installed in the formwork. The wooden frame is first sawn.
- A solution is prepared if the consistency of the correct mixture is poured into pre-moistened reinforcement rods.
A hose is used in the process of searching for the location of zero marks. However, it is important to remember the point that the water inside the latter moves by inertia. After the solution is poured into the formwork, it is necessary to ensure that the hose does not dry out from cracking. To avoid such problems, you should regularly moisturize the necessary areas.
Drawing out the foundation level with a watering hose
The foundation is the foundation of any home, and if you draw the foundation of any building by eye, it will most likely lead to the Leaning Tower of Pisa in your backyard. To prevent such an architectural misunderstanding from happening, the foundation should be laid out horizontally. This procedure is much easier to perform than it might seem at first glance. And the tool for this work can be found on any personal plot. At the first stage of manufacturing the foundation strip for the future structure, it is necessary to dig a trench. The depth of this trench, first of all, must correspond to the “monumentality” of the structure and the type of soil. However, you should not focus on small differences in the depth of the dug trench.
The next step is to determine control points and their locations. They should be placed in the corners, but if the length of the foundation is too long, then it is possible between the corners. Sufficiently strong pegs of the required height should be driven into these places. After this, with the help of an assistant, you need to pour water into the watering hose, which should be transparent, then remove all air bubbles. The result should be a system of communicating vessels, familiar to everyone from physics lessons, thanks to which you can easily set the surfaces of the liquid in the elbows at the same level horizontally. Use a hose. This liquid-filled hose is called a water level. Without this tool it is almost impossible to build a house or even a barn. As soon as the liquid stops moving, you can make marks opposite the liquid boundary on all pegs, moving sequentially from those already marked. Then you need to decide to what level you are going to pour the stone-concrete mixture. To do this, you should lower the resulting marks to the same length in advance without losing accuracy. The fill level will help determine the twine that is stretched between the new marks. After pouring concrete, all pegs must be removed. As soon as the concrete has hardened, you can begin laying the foundation with bricks, checking at every 2nd and 3rd level. Interim checks are recommended to be carried out as often as possible.
Before construction, it is necessary to think in advance about what and how to raise the base of the house, because its durability and comfort depend on this element. The most common and optimal option is to pour a reinforced concrete base.
Check before work
Checking horizontality is necessary to identify defects in the base of the structure.
Before starting any construction activities, it is necessary to check the horizontal level of the surface. To do this you will have to use a construction hydraulic level. The check is carried out from the corners and gradually moves to areas of the base of the structure. If there are differences in the horizon, the necessary notes are taken and the orientation cord is pulled. After this, they move on to the main initial work processes.
Return to contents
Pouring the foundation
, which raises the ceiling of the first floor above the ground
. The concrete plinth is poured along with the foundation and is a solid monolithic slab, on which the ceiling is subsequently laid. This design is durable and reliable, thanks to which the walls of the building can be erected from any building material.
Tools
Before you start pouring the foundation, you need to prepare the following set of tools:
- Shovel;
- Hammer;
- Electric drill;
- Building level;
- Master OK;
- A large container in which the solution will be mixed;
- Rule.
Materials
In addition, you will need building materials:
- Cement;
- Reinforcing bars;
- Soft wire;
- Sackcloth;
- Any herbicide;
- Bitumen.
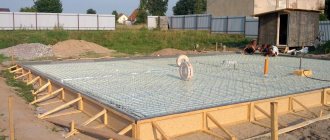
In the photo - formwork
Preparatory work
Before starting construction, it is necessary to perform some preparatory work, as during the construction of any building:
- First, the future foundation is marked at the construction site.
- Then trenches are dug to the required depth, which depends on the characteristics of the soil and the project.
- Next, you need to prepare the base - fill the trench with a layer of crushed stone about 10 cm thick, compact it well and pour a layer of sand of the same thickness on top.
- After this, waterproofing material is laid on the bottom. Typically, roofing felt is used for these purposes.
- Then the formwork is erected. Its height should be slightly higher than the expected height of the foundation. The upper part of the formwork must be reinforced with beams, which are fastened with self-tapping screws.
- The final stage of preparation is reinforcement. To do this, you should use reinforcement bars that are installed both vertically and horizontally. If the rods are short, then they can be overlapped.
Preparation of the solution
The next step is to prepare the solution. It must be said that this stage is very important, since the quality of the foundation of the structure, and therefore the durability of the entire house, will depend on the quality of the solution.
Instructions for preparing the solution are as follows:
- One part of cement is poured into the container and filled with water. The solution should be mixed using a mixer or electric drill with an attachment.
- Then three parts of dry sand are added to the container, after which the solution is thoroughly mixed again.
- Before you start pouring, you need to make sure that there are no lumps of unmixed sand or cement in the solution.
Setting the level
Before you start pouring, you need to figure out how to bring the base to zero, i.e. make its end even and horizontal.
You need to take care of this before you start pouring:
- In one of the corners of the formwork it is necessary to o, i.e. height of the future level.
- Then, using a hydraulic level, you should mark these points in the remaining corners of the structure.
- Next, you need to make cuts at the corners of the formwork to the zero point so that they are located in the middle of the future walls. After this, threads are pulled through the cuts, which will indicate the zero level.
Fill
Having figured out how to level the base with your own hands, you can start pouring it.
It should be said that this procedure includes not only filling the formwork with concrete, but also other operations:
- Filling is carried out evenly along the entire perimeter of the foundation.
- After filling the formwork with concrete to 20-30 cm, it is necessary to pierce the mixture with a probe around the perimeter, which will prevent the accumulation of air and compact the solution.
- Next, the next batch of solution is poured in and the procedure is repeated.
- Thus, the foundation is poured to the tension of the threads.
- After pouring, the structure should be protected from sunlight by covering it with wet burlap.
- Two days after pouring, the concrete surface should be watered several times a day.
- The formwork must be removed before the solution has completely hardened, approximately 3-4 days after pouring.
Advice! It is advisable to carry out pouring work at above-zero temperatures, otherwise you will have to take care of heating the structure during the first two weeks.
We achieve results
In order to obtain a completed foundation, the work must be carried out in strict sequence:
- The starting point is determined, for which a mark is applied in one of the foundation corners, the purpose of which is to indicate the surface level. Subsequently, using a hydraulic level, the remaining points are located at the remaining corners.
- In the absence of a hydraulic level, in order to determine points, it is possible to use a hose that has the property of bending. It stretches from corner to corner, after which it is filled with water. It is important to ensure that there are no air bubbles inside the hose. One end of the hose is brought to the marked point, and the location of the other is changed until the water reaches the edge level. After this, the hose is fixed and a mark is made on the formwork structure, which is the second starting point.
- Marks in the remaining corners are found and marked in the same way.
- The formwork is sawn vertically. The cuts are made in the amount of a couple of pieces in each corner and are located in the center of the foundation walls, and their direction should be made downwards until the fill is reached.
- The taken cord is pulled through the sawn places. This is how the fundamental zero is designated.
- The pre-prepared solution is poured to a height marked by cords pulled through the sawn holes.
All inaccuracies and small deviations when pouring the foundation are leveled out when laying the base
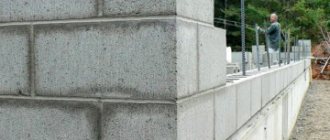
Laying the plinth
Often, during construction, they are erected only 20 cm above the ground, after which the brick is laid. Thus, it is possible to lay an additional layer of waterproofing, thereby reducing the cost of the structure.
The work is performed in the following order:
- Before laying the base, it is necessary to waterproof it with several layers of roofing material.
- Then wooden pegs should be driven into the corners of the building so that they are located slightly higher than the expected height of the base.
- Then a thread is stretched between the pegs and leveled horizontally using a building level. This will allow the laying to be done smoothly.
- In the same way, the thread is stretched around the entire perimeter of the base. After laying each row, it must be raised and leveled.
- Next, the corner is laid and further masonry is carried out from it. The bricks are held together using cement mortar.
- After erecting the wall to the required height, it must be covered with several layers of waterproofing material.
This work is not difficult, the main thing is to understand the principle of how to lay the base and not violate the technology.
Which brick to choose for the plinth?
The most important question that interests many developers is which brick is best for the plinth on the foundation. Since the basement part of the building is located in the most vulnerable place from the external environment, the material for its masonry must have not only increased strength to withstand the load-bearing loads from the building’s structures above, but also high resistance to various adverse factors, primarily high humidity.
In this regard, sand-lime brick, which has a fairly high tendency to absorb moisture, which, as a result of cyclic freezing and thawing, leads to the gradual destruction of its structure, can be immediately excluded from the list of materials used.
Backfill
If the foundation was built not in trenches, but in a pit, then backfilling must be done. Moreover, this work also has its own nuances, so next we will look at how to properly fill the base.
This procedure is performed only after construction and the concrete must be completely hardened. It is very important to choose the soil for backfilling - it should not contain stones that could damage the waterproofing.
In addition, an important indicator when backfilling is soil moisture, it should be as follows:
- For heavy soils - 16-23 percent;
- For light and heavy loams – 12-17 percent;
- For light and dusty sandy loams - 9-12 percent;
- For silty sands – 8-12 percent.
After backfilling, the soil must be thoroughly compacted, after which the blind area can be performed.
Advice! After all the work on building the house has been completed, the base can be covered with siding or other facing material.
Conclusion
Pouring a concrete plinth is a rather complex and at the same time very responsible job, which consists of a number of stages. Moreover, failure to comply with the technology on any of them can affect the quality of the entire structure. Therefore, from the beginning of work to the end, it is necessary to follow the recommendations given above.
For more information on this topic, watch the video in this article. And you can find out how to remove the base from the cartridge in other articles on our website.
Base made of brick or concrete: which is better?
We often hear the question of which plinth is better - concrete or brick. There is no definite answer, and it all depends on the design features of both the house and the floors in it, as well as the basement itself. But we are more inclined to the second option, despite its higher cost. There is a rational explanation for this.
- less cold underground (even without additional insulation);
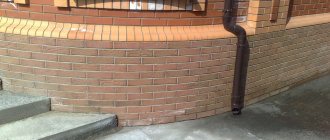
- better waterproofing, which is especially important when subsequently laying aerated concrete or foam block on a brick plinth (see photo 1).
Photo 1. An example of a laid-out aerated block wall on a brick plinth
Building a house is a complex task for which there can be no universal solutions, so the final decision is up to you.