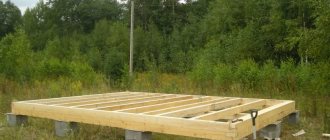
Scheme of construction of a reinforced frame
Reinforcing basement walls is a rather complex construction process. In this case, the entire building or its individual structures are given increased strength from pressure, torsion and bending moment.
In this case, the service life of the structure increases and its performance characteristics increase. Reinforcement of monolithic cellar walls is carried out using a strength set; it is selected taking into account the thickness of the walls of the structure and the expected load on it.
Base made of brick or concrete: which is better?
We often hear the question of which plinth is better - concrete or brick. There is no definite answer, and it all depends on the design features of both the house and the floors in it, as well as the basement itself. But we are more inclined to the second option, despite its higher cost. There is a rational explanation for this.
- less cold underground (even without additional insulation);
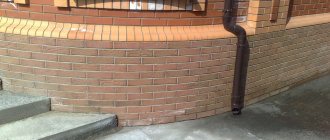
- better waterproofing, which is especially important when subsequently laying aerated concrete or foam block on a brick plinth (see photo 1).
Photo 1. An example of a laid-out aerated block wall on a brick plinth
Building a house is a complex task for which there can be no universal solutions, so the final decision is up to you.
What are the features when reinforcing basement walls?
There are different basement reinforcement schemes. For walls made in a monolithic manner, a box-shaped design is most often used. In this case, the assembly of reinforcement is carried out by constructing two power rows and connecting them horizontally, made of thin reinforcing elements.
Advice: When building walls from any material, at least the simplest reinforcement should be done.
Typically during the process:
- Horizontal connecting elements are installed. This is especially important for corners; here you can take parts with cross-shaped elements that will not allow them to separate.
- Often, a mesh is used to reinforce basement walls, which helps reduce the destruction of the upper layers from the harmful effects of temperature changes and various vibrations.
- When erecting brick walls, you will need special reinforcement.
- Retaining walls must be reinforced with metal elements up to 50 millimeters thick.
- When constructing load-bearing walls, precise calculations are performed to determine the pressure per square centimeter in the cross section.
Before reinforcing the basement walls you must:
- Find out the level to which groundwater can rise in this place (see How to find out the groundwater level at a dacha).
- Develop a detailed design for the basement.
- If necessary, drain the area.
- Work should be carried out using only high-quality materials and proven technology.
- Construct thermal insulation and waterproofing of the basement walls.
- Make a blind area.
Advice: Particular attention should be paid to the quality of reinforcement in places with maximum load.
Option for an insulated base flush with the wall
According to their design, all plinths are divided into 3 types:
- Speaker. The most common design, as a rule, characterizes the base-wall structural units and the corresponding “pies” of the systems that are not fully developed by the design. The plinth protrudes relative to the plane of the facade - therefore it needs to be additionally waterproofed in the upper part and covered with ceramic or metal drips, which worsens the appearance of the facade and increases the material consumption of the structure, and therefore the estimated cost. This is how non-professionals build.
- Level with the wall. This “flush” option is more complicated in terms of designing the unit design and requires professional concreting of the foundation and monolithic grillage, because any deviations of the foundation plane make this design of the unit impossible! Therefore, only professionals build this way. In addition, this requires an accurate thermal engineering calculation of the “pie” of the basement part of the foundation and the load-bearing wall and the correct choice of insulation so that there are no cold bridges. This version does not require additional installation of droppers. The wall facade looks more aesthetically pleasing!
- Sunken. This is the highest level of design for a structural plinth-wall assembly. Plus, it requires precise (to mm) execution of all concrete work. It is necessary to select insulation in such a way that it is thinner (usually PIR boards), but at the same time corresponds to the thermal engineering calculations. With this design, the plane of the aerated concrete façade can overhang by about 5 cm relative to the plane of the base (made of a monolith), without taking into account the insulation on the aerated concrete. Only selected builders can make such a plinth (at Full House, this is the only way they build).
Subtleties of masonry
Initially, it is recommended to wet the brick so that it does not grab so quickly and defects can be corrected.
The preparation of the solution is carried out only if the proportions are correct: the sand must be sifted, it is better to take M500 grade cement in a proportion of 1:4, if the M400 grade cement, then 1:3. Add water gradually and bring the solution to the required softness.
When building a basement floor with brick, every 2-3 tiers it is necessary to make reinforcement using reinforcing mesh.
If the base is low, then reinforcement is not required.
Figure 2. For tying, tie and spoon rows are alternated.
Construction work is carried out from diametrical corners, which are laid at the same height. Then we stretch the cord from these corners to achieve the goal when laying each tier. A brick plinth can also be pre-made from the corners: the bricks are laid without mortar and adjusted to the level (Fig. 2).
It is correct to lay out a layer of mortar up to 20 mm under the base tier, since after pressing the required 12 mm will remain. The size of the seam is checked using a stencil by applying it along the length of the tier. The laying of bricks is controlled by a level from all sides. The first tier must be laid according to the necessary conditions for waterproofing (not only under the plinth itself, but also under the base of the walls).
Then the corners are built, on which the construction of the wall itself significantly depends. It is always necessary to take control of the vertical with the help of a plumb line. Beginners will first need a plank on which the location of the seams and 12 mm bricks is outlined.
We attach a mooring cord to the order in order to lay the brick horizontally.
Using nails and staples, you can simply fix the cord along the length of the tier.
The tier is laid horizontally with offset vertical seams on each row. Acceptable deviation is ½ of the length of the brick itself, the minimum is ¼. Vertically, the role of dressing will be played by tiers with transverse (bonded) masonry. Usually, when such a brick wall is selected, there is one transverse one for 2-3 longitudinal tiers. To lay the base, you need to alternate tiers: one longitudinal tier, then one transverse tier.
Gradually, tier by tier, the base is built with your own hands. Such construction will significantly help protect the budget from unnecessary expenses. You don't have to resort to the services of builders.
Base thickness for aerated concrete
Another rather important issue concerns the thickness of the base and its insulation. The thickness of the base can be:
- Less than the thickness of the main wall.
- Greater than the thickness of the main wall.
- Same thickness as the wall.
It is important to remember here that for a shallow foundation it is necessary to insulate the base and blind area so that frost along the foundation tape does not reach under the heel of the foundation. If you do not plan to insulate aerated concrete walls, it is better to make the base 5 cm thinner so that the EPS boards with which you need to insulate the base are just below the level of the wall
If you do not plan to insulate aerated concrete walls, it is better to make the base 5 cm thinner so that the EPS boards with which you need to insulate the base are just below the level of the wall.
If you plan to insulate aerated concrete walls, then also take into account the thickness of the insulation.
It looks more beautiful if the main wall is level with the foundation, without any steps. But if this is not critical for you, then you can choose any option for the base: protruding, flowing, according to level. The main thing is to ensure proper drainage of water from the wall and provide the necessary insulation of the basement.
Methods for lining walls with bricks
There are two ways to cover an aerated block house with facing bricks:
The cladding is laid close to the wall
This option is less popular. It is used for unheated rooms. If we apply this method to a heated room, we get the following problem. Warm air from the room will tend to escape outside the house. Since it will not find a way out, moisture will accumulate in the outer part of the aerated concrete wall and its gradual destruction.
It is strictly unacceptable to rigidly connect the cladding to the main wall, since the materials have different coefficients of thermal expansion. In cold or hot weather, they will expand to varying degrees, which will lead to disruption of the masonry.
Facing aerated concrete with bricks with an air gap without ventilation
The thermal insulation properties of the wall are improved and its durability increases. But, since there is no ventilation with such finishing, the condensation formed between the gas blocks and the brick can drain and accumulate from below the wall, above the foundation. Therefore, the method is good for unheated rooms.
A layer of insulation can be laid in this gap.
Three-layer wall with ventilated space
Consists of aerated blocks, brickwork and ventilated space between them. This is the most profitable solution, although it is quite difficult to do everything correctly. An air gap of 6–15 cm is left between the wall and the cladding.
Through holes are made in the brickwork for ventilation. The total area of these holes is calculated by the formula: for 10 squares of wall there are 35 square cm of holes. That is, if the diameter of each hole is 1 cm, then it is necessary to make 35 holes in 10 squares in random order. It is better to do them in the joint space between the bricks. The lower holes are drilled with an outward slope for better drainage of condensate.
There is also a technology for using ventilation ducts. The vertical seams between adjacent bricks are not filled with mortar, but plastic boxes with holes are installed in them. Air circulates freely between them, and condensation drains through the lower holes.
If you want to lay insulation in between, you should choose one that allows air to pass through and is resistant to moisture absorption. A good option is basalt wool.
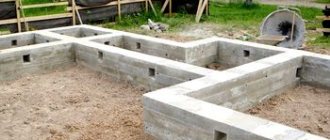
Sectional strip foundation
Sectional view of a strip foundation.
On a strip you can build a small outbuilding, a wooden, stone or brick house. In the second case, the base is created on a layer of sand and gravel, covered with waterproofing material, so that the embankment is not washed away by groundwater). If you are building a barn or bathhouse, you don’t need to use a pillow. You need to prepare drawings with descriptions in advance.
The section of the foundation is determined by its structure. Contains reinforced concrete sections covered with a waterproofing layer. Above the ground level there is a blind area designed to protect the tape from moisture. The expanded part located on the bulk cushion is the sole of the base.
Each foundation node carries an important functional load. Neglecting certain components will negatively affect performance.
The cross-sectional appearance of the strip foundation is also affected by the depth level. If it is small (0.5-0.7 m), the base can only support light construction. It is not suitable for building a brick house. In this case, the depth should be 0.3 m below the freezing point of the soil.
If it is decided to make the base monolithic, the reinforcement frame is knitted directly on the site and then filled with concrete mixture. This design is durable, but hardens for a long time. This type is easiest to do on your own.
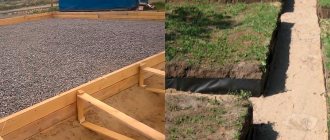
Excavation stage
This stage is started after calculations. Excavation works include:
- preparation of the territory;
- development and excavation of a pit;
- trench laying;
- soil removal;
- landscaping of the site.
The foundation is poured into a hole prepared in the ground. It can be of different configurations depending on the type of base:
Any of the recesses must consist of a bottom, side surfaces, vertical walls or inclined slopes. Excavations, trenches and pits should be slightly larger than the size of the foundation. The depth depends on the level of ground freezing and must exceed it.
Before starting work you must:
- remove debris, trees, stumps, bushes;
- dismantle old buildings;
- provide access for equipment.
There are two ways to develop soil:
- Manual. It is used in cases where the volume of work is small or there are no access roads for special equipment. The soil is developed with shovels and spades. You can speed up work using electric and pneumatic shovels, jackhammers, and crowbars.
- Mechanized. The work is carried out using excavators, rippers, drilling machines, bulldozers, and auxiliary machines for transporting soil.
After the pits, trenches or pits have been dug, it is necessary to sort the selected soil. The plant part is cut off at the beginning of work. It doesn't compact well, so they don't fill it back up. Sand is used to form the bottom. After the foundation is poured, you will need to fill in the voids around it and compact the area well. When performing excavation work, it is necessary to observe safety precautions:
- use safe methods of loading soil into a vehicle;
- do not drive through a place prone to collapse;
- strengthen the soil;
- correctly disassemble the fastenings;
- prevent rocks and soil from falling down slopes onto people in the recess.
Waterproofing
An indispensable step after laying the basement walls is waterproofing. This is done in 2 stages:
- vertical;
- horizontal.
Today the market offers a large number of materials for waterproofing:
- coating;
- impregnating;
- coloring, etc.
However, the best solution is roll waterproofing; it is highly reliable and durable. It is laid on both horizontal and vertical surfaces. This type of waterproofing is glued to a special type of mastic or fused using a gas torch. In addition, there are materials on a self-adhesive basis.
Features of foundation blocks
Each plinth block is a rectangle made of concrete mixture. Moreover, for the production of products, not ordinary concrete is used, but heavy concrete - M200 or M100. In the labeling, these materials are marked with the letter “T”. The material for the manufacture of block structures can also be silicate concrete or expanded clay concrete, which are designated by the letters “S” and “P”, respectively. For the construction of particularly large objects, blocks are reinforced using mounting reinforcement.
To connect individual elements into a continuous structure, each product has connecting grooves at the end. The upper surface is provided with two mounting loops - they are needed to move products for transportation or installation.
According to GOST requirements, several types of similar products are manufactured:
- UDB. This is the name for universal products whose ends are open or closed.
- FBP is an open, hollow base block at the bottom.
- FSB. This abbreviation means that the product is a foundation block for walls. It has no holes or voids. The products are intended for installation during the construction of basements, basements and walls.
How to do it yourself?
The procedure for self-construction of brick foundation columns involves performing several successive procedures. They start with calculations and end with collection. Let's take a closer look at each stage of work.
Calculations
When starting to calculate the cross-section of brick supports, they are guided by empirical formulas to obtain the area of the sole suitable for holding the load from the structure.
The support area is affected by the dimensions of the design surface of the foundation base. It is usually customary to construct pillars with a square or rectangular cross-section.
When constructing a one-story building, it is more practical to build a square with sides of 0.38 m, or a rectangle whose dimensions are 0.38 * 0.25 m.
If a two-story building is planned, the cross-section of the pillars cannot be less than 0.5 * 0.5 m.
Marking
After preliminary cleaning of the building site, it is necessary to begin scrupulous cleaning of vegetation from the entire area. To prevent uneven terrain, it is necessary to immediately backfill all existing depressions with soil.
When the construction area is cleared and planned, marking begins. It is provided with metal pins installed at the points where the support posts are placed. Next, they begin excavation work, starting to dig along the pit marks.
Excavation
The work starts with the construction of recesses in which cushions will be placed for laying bricks on them. The excavation is carried out taking into account the dimensions of the calculated supports, and also provides an area for easy laying in a recess reaching 0.7 m.
Preparing the base
When the recesses are dug, a ten-centimeter layer of sand and crushed stone is poured onto their bottom. They definitely need to be compacted. After this, waterproofing is laid on such a cushion to protect the brick from ground moisture.
The base can be strengthened by pouring a 15 cm layer of concrete on top of the roofing material and placing reinforcement inside it. After a couple of days, it will be possible to begin laying bricks using the maximum strength cement mortar.
Masonry
In order for the bricks to reliably adhere into a strong support, it is necessary to use good cement (M-400 or M-500).
When laying, be sure to cover every three rows with reinforcing mesh. When carrying out masonry, we must not forget to check the rows for horizontal and verticality, using a building level.
The height of the supports must rise above the ground level by at least 20 cm. If the horizon has a slope, then this value refers to its highest point.
The masonry technology involves placing 4 bricks in each row, then the column will be square and have a void inside. It is filled with reinforcement, after which it is poured with concrete to significantly strengthen the structure being built.
Waterproofing of pillars
After completing the masonry process, it is necessary to additionally protect the columns from moisture. This activity is carried out using bitumen mastic vertically, as well as membranes to stop the rise of water upward.
Filling free space
To ensure that the mortar between the bricks dries slowly, so that it gains maximum strength, you need to wait 7 days.
Then all the space remaining inside the recesses must be filled with gravel or crushed stone. This technology makes it possible to neutralize the effect of seasonal ground movements on the support.
Waterproofing the top of the supports and backing
It is necessary to lay a layer of roofing felt on top of the brick supports, and then mount the Mauerlat on it. It is advisable to erect a fence between the pillars - filling the space with soil that can prevent cold air from penetrating under the lower surface of the building.
Brickwork on the foundation
Necessity of a plinth
A brick base is a part that connects the foundation to the supporting structures of the house itself. And if recently in some projects this detail may be missing (the foundation itself rises above ground level), then previously there was practically no alternative to brickwork in capital construction.
The main functions of the base part are:
- Firstly, it ensures uniform distribution and transfer of loads from the above-ground part to the foundation . The plinth, designed taking into account all the features of the building, helps to significantly increase its service life.
- Secondly, it is the base that is the element that protects the foundation from destructive atmospheric influences . Its effective waterproofing allows you to protect the capital foundation from both soil moisture and precipitation.
- Also, do not forget about the thermal insulation function . In most cases, plinth bricks have higher heat transfer resistance, which means that the building will lose less energy in the lower part, and about 15% can be saved on heating.
Requirements put forward
So, we figured out why this element is needed. Now you need to understand what it should be.
The following requirements are put forward for a base made of building blocks:
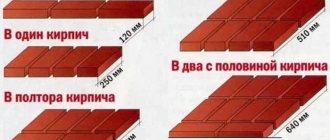
- The minimum width for a house made of brickwork is 510 mm, for a house made of timber – 250 -270 mm.
- The width of the brick plinth should be selected so that the overhang of the outer blocks beyond the foundation is at least 25 mm. This protrusion will protect the waterproofing of the base from precipitation.
- It is also possible to create a sinking structure, in which the overhang of the brick over the base is about 40-50 mm. In the future, this gap will be hidden due to the cladding.
- For the solution, it is necessary to use cement of a grade not lower than M200. The optimal consistency is 1 part cement, 6.7 parts sand, 6.7 parts lime.
- The minimum height is 250-300 mm from the top edge of the base. As a rule, in most cases a base of 50 cm is installed, and when arranging a basement - from 1.5 m.
- Basement waterproofing must be installed in two places: between the foundation and the first row of brickwork, and between the last row of brickwork and the walls. This dual-circuit arrangement provides the maximum level of protection against vertical movement of moisture.
Material selection
One of the most important parameters is the selection of the optimal material.
The brand of brick for the plinth should be selected in accordance with the construction conditions and the planned load on the supporting structures:
- Silicate blocks are of little use for the construction of the basement of a building. The thing is that the silicate mass is highly (by the standards of building materials, of course) hygroscopic. When moisture enters, the block begins to swell and its strength gradually decreases.
Note! A plinth made of sand-lime brick is allowed only in very dry climates with the obligatory installation of multi-layer waterproofing.
- From a technological point of view, red brick, in the production of which there is a sintering stage, is much more suitable for this task. However, its hygroscopicity is still somewhat higher than necessary in this case, therefore it cannot be done without waterproofing.
- As for the brand of the product, on which its strength directly depends, experts disagree here. Some argue that M100 will be enough, while others insist that bricks can be used no worse than M150 (and for large volumes the cost difference is quite significant). It’s not worth taking risks in this case, since the M150 can nominally withstand 50 moisture cycles - and this is exactly the minimum that you need to focus on.
- If you are building a house on a site with high humidity, or your climate zone is characterized by heavy rainfall, then you need to choose M250 blocks. Yes, their price is steep, but the foundation will have a sufficient margin of reliability.
- Clinker and ceramic bricks have not only good load-bearing capacity, but also reliable protection from moisture. If from a financial point of view you can afford to use this material, feel free to purchase it. The base will be much more durable than one made of ordinary red brick.
Also, when choosing a material, you should dwell on such an issue as the features of the blocks themselves. A base made of hollow bricks is considered by many “old school” craftsmen as something awkward - only a solid one and no options!
In fact, modern technologies make it possible to produce hollow blocks that are in no way inferior in strength to solid bricks. Naturally, it is necessary to choose quality products, which by definition cannot be cheap.
Requirements for basement floors during construction
The basement floor is a room with a floor level below the zero level, but not more than 50% of the height of the room. In project buildings, the ground floor is placed for the purpose of the most economical use of building and earthen volumes. The ground floor can be built under part of the building, such premises are explained by the terrain. Underground premises can occupy the entire area of the structure. The design of the underground floor is similar to that of the building.
According to SNiP 3.03.01-87 “Load-bearing and enclosing structures” and 2.02.01-8 “Foundations of buildings and structures”, the following requirements are imposed on the ground floor:
- The basement floor is the premises of the building, which must be below the zero level and above the ground level of no more than 50% of the height of the basement floor. The height of the room must be at least 1.80 m.
- The width of the flights of stairs in the basement must be at least 0.9 m.
- The basement room must be provided with a separate exit to the outside.
- To ensure ventilation flows, it is necessary to equip vents, which should be located at a height of 20-25 cm from the zero mark.
- Construction of pits (window openings in basements or ground floors), regulated by sanitary standards and rules SNiP 2.2.1/2.1.1.1278-03 “Hygienic requirements for natural, artificial and combined lighting of residential and public buildings.”
Installation of monolithic walls
Formwork for the construction of the basement walls can begin to be created 4 - 5 days after pouring the floor. It is formed by permanent panels of polypropylene foam (insulation) and reinforced with temporary supports. It immediately provides, if necessary, window and door openings and technical openings. Formwork is carried out to the full height between floors or several levels.
Pouring is preferably done at a time, but it can also be done in belts (in stages) with breaks of 3 to 4 days for the concrete to set. The latter will protect the concrete of the lower layer (which has not gained strength) from destruction under the pressure of the mass of subsequent portions of pouring. It is preferable to use heavy concrete grades from M300 and higher. For strength, it is better to tighten the shape of the sheathing with threaded rods, so it is easy to remove the non-functional formwork after the concrete has hardened.
The design of the outer perimeter of the monolithic base is strengthened by the rational arrangement of the internal partitions that adjoin it. Reinforcement is performed horizontally and vertically in increments of up to 300 mm. To connect with the reinforcement of the walls, rods are used that extend vertically from the floor.
To provide elasticity to the surfaces, the reinforcement is not welded, but knitted. At a base height of 2.5 m, up to 2 reinforcing belts (upper and lower parts) are installed, and more are allowed. The mixture continues to gain brand strength for an average of 28 days, after which the base is covered with slabs from above. Waterproofing of the outer perimeter of the structure is carried out with a continuous layer of mastic and polyurethane foam boards.
The part of the base surface that will be on the ground surface is insulated with slabs attached to umbrella dowels. The underground part of the floor is covered with excavated soil. However, its fractions should not damage external thermal and waterproofing. Therefore, it is preferable to use sand.
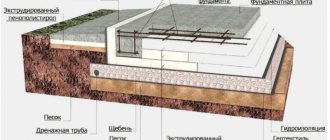
Foundation preparation
A feature of aerated concrete is not only maximum lightness, but also high hygroscopicity. Any noticeable increase in the level of humidity provokes the loss of the building material’s heat-insulating properties, so houses made of aerated concrete are necessarily built on a base, usually made of concrete or brick.
HelpThe main purpose of the plinth is to protect the walls from precipitation, such as snow and rain, as well as from moisture that comes from the ground through capillary suction.
The height of the base for a house made of aerated concrete is determined based on the depth of groundwater, the average amount and nature of precipitation. It should be above the average snow cover for the area.
So for the Moscow region, the average snow depth reaches its maximum in February and averages 25-35 cm in open areas and 40-45 cm in protected areas. Protection can include fences, neighboring structures and vegetation. Based on this, a 40 cm base will be enough. The height of the plinth is also influenced by the aesthetic appearance of the building, the number and height of steps, and the design of the vents. As well as the presence or absence of basements and semi-basements, the location of communications underground.
Attention! Do not forget to perform cut-off waterproofing using any bitumen-based roll material. When using less durable roofing material, I recommend laying it in 2 layers. A guarantee of high-quality masonry will be the use of cut-off waterproofing, which will complement the standard waterproofing of the foundation base
A guarantee of high-quality masonry will be the use of cut-off waterproofing, which will complement the standard waterproofing of the foundation base.
Basement waterproofing
The base of the house requires mandatory waterproofing, which serves as protection against moisture from the soil and precipitation. The following materials can be used to waterproof the structure:
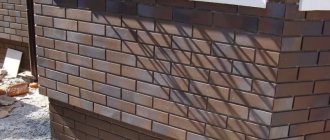
Waterproofing a brick plinth
- Coating waterproofing, which includes polymer or bitumen mastic, cement-based mixtures. It is applied to the surface using a brush with even distribution.
- Roll waterproofing is represented by roofing felt, hydroglass insulation, and euroroofing felt. The material is fastened by gluing preheated rolls or by fusing. You can glue roofing felt onto bitumen mastic. This will make the waterproofing more effective. In all cases, it is necessary to ensure that the sheets of waterproofing material overlap each other up to 15 cm.
- Penetrating waterproofing, when applied, penetrates into the smallest pores of the material and clogs them. The material is applied only to a damp surface, and upon completion of work it is necessary to moisten the insulation for 10-14 days.
Features of leveling columnar foundations
A column foundation is much more economical than a strip foundation and that is why it is preferred when choosing the supporting structure of a building. It is made in the form of separate pillars made of concrete or brick, to which the load from the load-bearing structures of the building is subsequently transferred and therefore increased accuracy is required when constructing this type of foundation. Most often, a columnar foundation is made of brick or cinder block. The following recommendations will help you to display zero on the foundation and how to correct inaccuracies in the horizontal level:
- Columnar foundations, made of brick, are located at a certain pitch on the site of the future construction. To lay out the top of brick foundation pillars on one level, you can resort to using a hydraulic level and sequentially transfer the zero mark to each separate foundation. When determining the deviation from a single design zero level, it is necessary to continue bricklaying to the required height.
- If the deviation value is less than the height of the brick and it is not possible to deduce zero using a brick, then you can lay out high-grade cement mortar on the surface of the foundation pillars using pre-set formwork.
A video example of leveling foundations can be seen at: It is quite possible to correct defects and level the foundation, although this will require a lot of effort and time. Correcting deficiencies in construction is always difficult and costly. It is best to carefully familiarize yourself with the technology of work before starting construction work, consistently carry out all stages of construction, and then there will be no annoying shortcomings during the construction of foundations.
kakfundament.ru
How to display zero on a foundation with a brick
Necessary building materials, tools
The arrangement of the basement structure of a permanent structure can be carried out in 1 or 2 bricks. An identical set of tools and materials will be required, but in different volumes.
- construction reinforcing mesh;
- red solid brick;
- cement;
- lime;
- waterproofing, heat-insulating material;
- sand.
If the foundation is laid in winter, an additional plasticizer is purchased.
- building level, plumb line to control the horizontality and verticality of brickwork;
- construction cord for marking;
- ordering that allows you to create a beautiful facade;
- hammer with pickaxe;
- trowel;
- shovel;
- container for mixing the solution.
Foundation and expansion of existing foundations
So how can you line a house with facing bricks if there is no space on the foundation? If it is advisable to entrust the facing work to highly qualified masons, then the work to expand the foundation can be carried out independently. Of course, before starting work, it would be useful to clarify what the foundation itself is, how to expand the foundation and outline the main stages of the work. The foundation can be:
- columnar/pile with reinforced concrete grillage;
- tape monolithic.
It is assumed that the existing foundation is not wide enough and needs to be expanded; for this, an additional foundation is “attached” to the existing foundation of the building.
Making a columnar foundation as an additional foundation is rarely practiced, since carrying out the work is associated with certain difficulties. If you plan to use a reinforced concrete beam as a grillage, you will need to use a crane. When pouring a monolithic grillage, a significant amount of work will be required to produce formwork.
The work on making a strip foundation is much simpler, therefore, as a rule, it is used. In addition, a monolithic strip foundation (made according to the rules) will subsequently become an additional foundation for the entire building.
What kind of brick is needed for the base?
An important stage of construction is the selection of a suitable type of brick, it must have:
- high strength;
- durability;
- resistance to negative atmospheric influences;
- decorative qualities. After construction, the design of a summer cottage or garden should only improve;
- frost resistance, withstanding numerous cycles of freezing and thawing;
- low moisture absorption capacity;
- ecological purity of raw materials;
- high-quality adhesion with cement to eliminate cracks and formation of defects.
Deformation of the material after the construction of the structure or increase in load is unacceptable, so it is important to pay attention to determining the stability and strength of the brick. Solid brick should be used for construction
Solid brick should be used for construction
The following types of brick correspond to the listed characteristics:
- silicate. However, it is not advisable to lay a brick base on a strip foundation made of silicate type, since it has low resistance to high humidity. Prolonged exposure to moisture will lead to swelling of the material, loss of strength and gradual destruction. It is allowed to make a foundation of sand-lime brick, be sure to first determine the level of humidity in the region. If the humidity is high, waterproofing of the foundation is necessary, but the base will need to be finished;
- red. Made from compressed clay with heat treatment. It gives the base the necessary strength and is more, but not completely, protected from moisture. When choosing, it is better to give preference to M150 brick; it can withstand up to 60 freezing cycles. In climates with high humidity, it is recommended to use M250;
- ceramic. It has the greatest durability. Clinker bricks are a type of ceramic; they are the most reliable for building a basement. The base uses a special type of clay, which is baked at elevated temperatures. Clinker bricks are resistant to moisture, frost-resistant and have optimal load-bearing capacity. Often used during the construction of wells and boreholes.
Finishing the outside of the base is an optional procedure, but when using silicate, red brick it helps to increase the durability of the base and prevents deformation.
It is better to purchase the material with a small reserve
Reinforcement of brickwork: technology and subtleties of the process
- Peculiarities
- Kinds
- Useful tips
Currently, reinforcement of brickwork is not mandatory, since the building material is produced using modern technologies, using various components and additives that improve the structure of the brick, ensuring a reliable connection between the elements.
The strength of concrete also increases, which eliminates the need to use mesh to reinforce rows of bricks. But to ensure improved stability for certain types of structures, according to SNiPs, the use of reinforcing mesh is still recommended.
Possible mistakes and tips on how to avoid them
Mistakes made during foundation construction can be costly for the developer. An incorrectly made foundation of a house can lead to destructive phenomena in all structures of the building.
Experts recommend avoiding the following mistakes during construction:
- An incorrect calculation of the bearing capacity of the foundation will cause deformation of the monolithic tape with its subsequent destruction. If you have doubts about your own capabilities, then you should turn to experienced builders for a quote.
- The use of low-grade cement and non-compliance with the technology for preparing the solution can lead to a weak and fragile foundation. To avoid this, you need to order delivery of ready-made liquid concrete from trusted suppliers.
- Incomplete removal of the heaving layer of soil is fraught with subsequent fracture of the MZLF. Care must be taken to remove the heaving layer of soil.
- You cannot skimp on waterproofing. It is necessary to purchase high-quality bitumen mastic and carry out waterproofing work in full.
Excavation stage
This stage is started after calculations. Excavation works include:
- preparation of the territory;
- development and excavation of a pit;
- trench laying;
- soil removal;
- landscaping of the site.
The foundation is poured into a hole prepared in the ground. It can be of different configurations depending on the type of base:
Any of the recesses must consist of a bottom, side surfaces, vertical walls or inclined slopes. Excavations, trenches and pits should be slightly larger than the size of the foundation. The depth depends on the level of ground freezing and must exceed it.
Before starting work you must:
- remove debris, trees, stumps, bushes;
- dismantle old buildings;
- provide access for equipment.
There are two ways to develop soil:
- Manual. It is used in cases where the volume of work is small or there are no access roads for special equipment. The soil is developed with shovels and spades. You can speed up work using electric and pneumatic shovels, jackhammers, and crowbars.
- Mechanized. The work is carried out using excavators, rippers, drilling machines, bulldozers, and auxiliary machines for transporting soil.
After the pits, trenches or pits have been dug, it is necessary to sort the selected soil. The plant part is cut off at the beginning of work. It doesn't compact well, so they don't fill it back up. Sand is used to form the bottom. After the foundation is poured, you will need to fill in the voids around it and compact the area well. When performing excavation work, it is necessary to observe safety precautions:
- use safe methods of loading soil into a vehicle;
- do not drive through a place prone to collapse;
- strengthen the soil;
- correctly disassemble the fastenings;
- prevent rocks and soil from falling down slopes onto people in the recess.
General construction scheme
Procedure for laying a brick plinth:
- Preparation of the surface of the tape, waterproofing, installation of the mooring cord.
- Laying the first row of bricks.
- Raising corner areas.
- Filling gaps between corners.
- Laying the top row, waterproofing the surface of the plinth.
Depending on the design features of the house, some additional actions may be required, for example, laying out curved sections of the base, etc.
Such work is carried out according to a special technique adopted for similar elements.
Preparing the solution
First of all, you need to choose a brand of solution. It should be 2 times lower than the grade of brick, this will prevent the appearance of cracks .
If solid ceramic bricks of the M200 brand are used, then the mortar needs to be of the M100 brand.
If it is manufactured independently on site, then it is necessary to maintain the proportions:
- 1 part cement.
- 4-5 parts of sand.
The proportions are indicated for cement grades M400-500. If the solution is purchased ready-made, then it is necessary to organize delivery and prepare everything by the time the solution appears, since its viability period is limited and does not tolerate long delays .
Preparing the base
The surface of the tape must be carefully prepared for laying bricks. If there are unevenness, differences or other flaws, a leveling layer of cement mortar is applied to it .
It is necessary to ensure that it forms as level and horizontal a platform as possible.
This will create smooth and durable brickwork with seams of equal thickness, which is important for evenly distributing loads and obtaining maximum load-bearing capacity of the base .
Waterproofing
The surface of the tape, prepared and leveled, is subject to high-quality waterproofing .
This procedure is designed to eliminate the possibility of moisture being absorbed from the concrete into the brick, which is dangerous and threatens the rapid destruction of the base.
A double layer of high-quality roofing felt is traditionally used as waterproofing , with an intermediate application of bitumen mastic.