Despite the apparent simplicity of working with aerated concrete, laying walls from this material must be conducted in accordance with certain requirements, some of which are regulated by SNiP.
First of all, this applies to the mortar used for this; it is not recommended to use ordinary cement , but only factory-produced glue or one made according to a special recipe directly on the site.
According to GOST requirements, the construction of buildings with load-bearing walls made of aerated concrete, up to 20 m high, is allowed, but only from material made by autoclave, characterized by higher strength characteristics, in contrast to hydration.
But in general, construction from aerated concrete is rarely carried out with more than three floors . Over the last decade, this material has become a real hit with private developers, who, moreover, often carry out the work themselves.
Types of aerated concrete masonry
Both load-bearing walls and internal partitions can be erected from aerated concrete . Load-bearing masonry can be either single-row or multi-row, and interior walls, with rare exceptions, are always made in one row. Most often, single-row masonry of both load-bearing and internal walls is performed using the method of serial chain ligation . When performing dressings, you must adhere to the following rules:
- the displacement of the blocks of the subsequent row must be at least 2/5 of the height of the block itself, provided that their height is within 250 mm;
- if the blocks have a height of more than 250 mm , then the offset must be at least 1/5 of this value.
For double or multi-row masonry, a technique with vertical dressing is used , the value of which is 1/5 of the width (thickness) of the wall.
the method of tying masonry with bonded rows can also be used , for example, according to the following scheme: two spoon rows are tied with one bonded row, or three spooned rows are tied with one bonded row.
And if you plan to bandage masonry in which blocks of different widths , then you should take into account the thickness of the masonry itself to determine the depth of the bandage - it should be 1/5 of this value. Double masonry may not have vertical ligation . But this option, as a rule, involves installing internal thermal insulation between the rows.
The connecting fixing elements of such masonry are reinforcement, which is made of metal rods with anti-corrosion treatment, most often hot-dip galvanizing , which provides a reliable protective layer of at least 0.2 mm.
You can also use stainless steel , but this leads to higher construction costs, or fiberglass, which have sufficient strength properties for operation under conditions of constant compression-tension loads on the material.
Before you get started
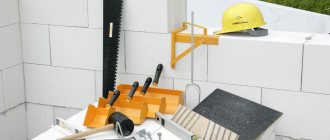
Tools
As for electrical tools, you may need a hammer drill, a grinder (to cut off reinforcement or corners to create jumpers). To mix the solution, it would be nice to have a concrete mixer on hand, as well as a barrel of water (can be made of metal or plastic). To create jumpers from corners you will need a welding machine. If you plan to lay two or more floors, then it is better to carry pallets with blocks along the floor not by hand, but to use a cargo trolley, which you don’t have to buy, but rent at a tool rental point.
Materials
Directly for installation you will need low-cement blocks, cement mortar, water and sand. The lintels that will be located above the door and windows require metal - reinforcement, angle or channel. As a rule, a lintel made of reinforcement is used over the doors, the diameter of which is from 1 to 1.4 cm in several rods, and for windows it is better to use corners. For garage doors, the best option would be to make a lintel from channels - much will depend on the weight of the door and the width of the opening. Beacons may require a wooden batten, as well as dowels; For scaffolding, use boards and pallets, and you can fasten it all with nails. If you have a construction goat, then that's even better. If you live in seismic regions, then you will need a masonry mesh, or A240 0.6 cm reinforcement. But it will be much easier to find the mesh and use it, and it is better not to use fiberglass reinforcement as wall reinforcement. if you plan to cover the entire house with facing bricks, you will need a notch for the outlets that will be embedded in the seam. This is where you can use fiberglass reinforcement.
Masonry reinforcement
When building houses from aerated concrete, it is necessary to ensure the stability of the foundation , and, if possible, to eliminate the occurrence of shrinkage processes that contribute to cracking of the blocks. But it is impossible to completely eliminate shrinkage , especially if construction is carried out on moving soils or the groundwater level is located quite close to the surface. Therefore, there is a need to reinforce the masonry, and monolithic reinforced concrete belts .
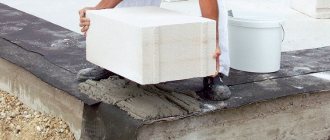
First row of masonry
Before laying the first row of aerated concrete blocks, the following operations must be performed:
- arrange reliable horizontal waterproofing , which is the dividing element between the foundation and the wall;
- as a waterproofing agent, you can use both sheet materials - roofing felt or other bitumen products, as well as various mastics and solutions;
- check the levels of all corners of the building, taking into account that the maximum permissible height difference between them should be no more than the thickness of the seam, that is, 2-3 mm, otherwise, it is necessary to level the levels mechanically - by cutting off the top layer of the foundation;
- the first block should be installed at the highest angle , and the levels of the rest should be adjusted according to it using cement mortar, which experts recommend using for laying the first row;
- Next, you should pull the orientation cords for each side of the building and lay the entire row along them, and then, moving them upward, lay all subsequent rows, observing the dressing rules.
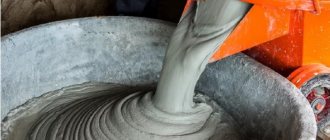
Preparation of the solution
The cement-sand mortar should have the most uniform consistency, so to prepare it, it is advisable to use a concrete mixer, into which you need to pour a bucket of water, fill a bucket of M500 cement and add three buckets of sifted sand .
Manual mixing of the solution is also acceptable.
During the mixing process, you need to add water in small portions, which will bring the mixture to the required consistency. It is recommended to add a water-retaining additive to the solution to prevent rapid absorption of moisture into aerated concrete.
Important!
Cement mortars prepared for aerated concrete masonry should be used within a couple of hours from the moment of mixing.
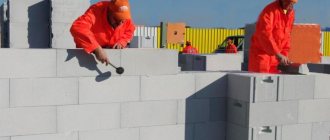
Construction of a box at home
Then you can begin to carry out the main masonry of the house, strictly following the sequence of operations and controlling the levels of the building:
- after laying the next row , its horizontal and vertical levels are checked;
- to control the vertical level, special plumb lines are installed at the corners of the masonry;
- Before starting to lay the next row , the surface of the previous one is leveled horizontally, thoroughly cleaned of any remaining glue and construction dust that has fallen on it; it should be taken into account that the glue should not be rubbed, but must be waited for it to set and removed by trimming.
Composition of the building mixture
There are two options for laying gas silicate walls. The main requirement for the material is the ability to form as thin a layer as possible. The mixtures are prepared by hand and almost identically.
- Cement-sand – traditional composition. Suitable for any kind of walls. In winter, the usual mixture cannot be used, since at temperatures below zero it does not gain strength.
- The adhesive composition is based on Portland cement with mineral and polymer additives. Its layer is very thin, and therefore does not form cold bridges. However, the first row of stone is fixed to the foundation only with a cement mixture.
For the construction of walls in winter, the usual adhesive composition is also not applicable. But there are some additives, for example “Antifrost will win”, thanks to which the glue hardens much faster. However, the price of the building increases.
Some nuances and rules for working with aerated concrete blocks
Working with aerated concrete blocks requires following certain rules , which ultimately make working with this material much easier. First of all you need to:
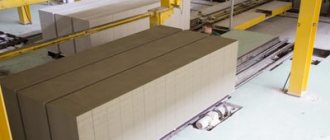
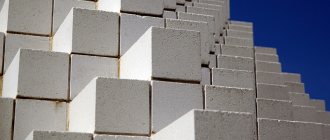
- prepare a place for storing blocks at the construction site ;
- control the process of transportation and unloading of products packed in shrink film and stacked on pallets and prevent their damage;
- to unload blocks, it is better to rent a forklift than to use soft slings;
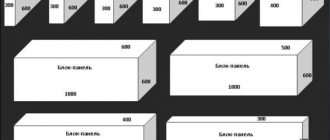
- when choosing standard sizes of blocks, you should naturally focus on climatic standards , but you can use the following hint: for load-bearing walls it is recommended to use blocks with a width of 400 mm, for internal partitions 200-400 mm, and for decorative ones - 100 mm;
- It is recommended to lay walls made of aerated concrete blocks at temperatures from 5 to 25°C , but it is allowed, provided that frost-resistant glue is used, to reduce the temperature level to -5°C or even -10°C, but provided that the material or wall is not has signs of freezing;
- rainy weather is a reason to suspend work , and the masonry itself should be covered with plastic film;
- if for some reason it was necessary to freeze construction , then before resuming it it is necessary to check the masonry of the wall for the presence of cracks in the blocks or other damage; if they are detected, they should first be eliminated, and then begin work;
- any lintels can be used: wood, reinforced concrete or metal, they can also be made directly on site, using U-shaped blocks into which concrete is poured;
- internal partitions can be either isolated from load-bearing walls, or tied with them , in the first case it is possible to get rid of noise and vibrations, the source of which are external walls;
- if the blocks are connected to existing walls, it is necessary to install special diaphragms;
- the vertical seam between the blocks is not in all cases filled with adhesive mortar, but to prevent blowing through the masonry it should be at least partially processed, and at high design loads it is filled completely, in the same way as the horizontal one.
What is necessary when installing aerated concrete blocks
Waterproofing of aerated concrete protects the blocks from moisture, so its presence is mandatory between the walls and the foundation. Waterproofing can be rolled or coated.
Aerated concrete confidently holds various types of fasteners. Self-tapping screws, plastic dowels and anchors of various designs fit perfectly into walls. Dowel cores can be either metal or plastic. Hammered nails in blocks hold up a little worse, but if you hang something on them, you don’t have to worry about the reliability of this fastening .
To make grooves in aerated concrete, electric and manual wall chasers . Features of hand tools are their low cost and the need for significant physical effort to operate. Electric models are faster and more comfortable to work with, but they also cost more.
For masonry, a special solution , which is purchased dry and diluted with water. You can, of course, lay aerated blocks using ordinary cement mortar. However, the quality of such masonry will be very questionable due to the possible appearance of cold bridges.
The video will tell you about the basic principles of working with gas blocks and mistakes that should be avoided:
Calculation of the cost of masonry
So, how much does it cost to lay aerated concrete blocks? Of course, construction from large-sized blocks is much faster, and the absence of the need to use specialized equipment allows you to reduce costs.
Before you start building a house, you should make a full and detailed calculation of all expenses , the lion's share of which is the cost of building materials. You will also need funds to purchase glue, fittings, tools, etc. But before that, care should be taken to build a reliable foundation and waterproof it.
Next, the consumable part is replenished: transportation of blocks, their loading/unloading . To carry out the actual masonry of the box at home, you can hire professional specialists or, if you have at least minimal construction experience and the necessary tools, take a risk and do it yourself. In the first case, it is necessary to take into account labor costs , which are calculated based on the cubic volume of construction; on average, the cost of 1 m³ of masonry ranges from 1,200 to 2,500 rubles.
It is sometimes possible to optimize costs if the blocks are purchased from a company that provides free transportation to the construction site, and sometimes even unloading. In some cases, you can agree with the workers themselves to include unloading of aerated concrete blocks in the list of their work for a small additional payment.
You can save a lot if you do the construction yourself, but in this case you need to be completely confident in your abilities, otherwise the illusory benefit will result in quite tangible additional costs.
After a full cost estimate for the construction of an aerated concrete box has been drawn up, 15 to 25% of this amount should be provided for unforeseen expenses. And then you can safely begin construction.
Necessary equipment
The lightness of the material and simplicity of construction allows you to do without serious equipment and only with your own hands. To lay gas silicate blocks you need the following tool:
- An electric drill or jigsaw is a tool for adjusting the sizes of individual modules.
- Construction level - for assessing the verticality and horizontality of the rows.
- Trowels.
- Spatula - a tool must be chosen with teeth.
- Mallet hammer - needed for tightly joining stones.
- Container for solution.
In addition to gas silicate blocks, the required materials include roofing felt or other rolled waterproofing material, as well as masonry mesh as reinforcing wire with a wire diameter of 3–4 mm.
Reviews
Eduard Ivanovich, Omsk I myself have been professionally building houses for almost 25 years and have managed to work with different materials. Therefore, I know well all the strengths and weaknesses of materials and ways to reduce their influence. For example, very often when working with aerated concrete, complaints arise about cracks in both the blocks themselves and the seams. And the problem can be solved simply - there is no need to skimp on the foundation; lightweight does not mean unreliable. For aerated concrete, it is very important to ensure maximum stability of the base, so either a strip version or a monolithic slab is recommended, but do not forget to take into account the level of soil freezing. In addition, do not forget about the reinforcement of load-bearing walls.
Ivan Dolgikh, Ryazan I built a house from aerated concrete blocks, but after some time I began to notice that I did not fit into the calculated heating cost standards. I tried to figure it out on my own, but couldn’t cope and turned to professionals. And it turned out that when doing the masonry I managed to make a bunch of mistakes, the worst of which was that I used ordinary cement mortar instead of glue. And this ultimately led to the formation of cold bridges, which are responsible for the coolness in the house in winter. So my savings turned into additional expenses that I will need in the summer to correct mistakes.
Grigory Mostovshchikov, Stavropol Territory I live in the Stavropol Territory in a house built from aerated concrete six years ago. And I have no negative complaints about this material. The house is large and bright, I forgot what dampness was like since the housewarming party. During this time, I have not had to do any cosmetic repairs yet, not a single crack on the walls. The house was built by a professional team and I remember they especially focused my attention on the construction of the foundation. After much hesitation, I agreed to a monolithic slab, and now I couldn’t be happier that I was able to protect myself from the problems typical of aerated concrete.
What characteristics should a ceramic brick have: GOST 530 2012, main indicators. You can find out the cost of equipment for making Lego bricks from this article.
And here you can read reviews about Lego bricks.
Pros and cons of foam blocks
Foam concrete blocks have a number of advantages and some disadvantages.
pros
Among the advantages of the material is its environmental friendliness. Foam concrete is made from sand and cement with the addition of foaming additives.
The blocks can withstand significant temperature fluctuations. They are not damaged by fire and chemicals. The porous structure provides good vapor permeability and low thermal conductivity.
The result is comfortable conditions in the premises of the house. Significantly lower heating and cooling costs are required. Thanks to these characteristics, walls can be made from one row of blocks, which significantly reduces construction costs.
The weight of foam blocks is much less than that of brick, so the buildings themselves are lighter. They have less load on the foundation. Foam blocks are easy to process and quickly laid, which makes construction easier.
Minuses
The disadvantages of the material include its fragility. This is especially noticeable if the manufacturing technology has been violated. Walls made of foam blocks can crack and become saturated with moisture, which leads to rapid destruction. Disadvantages are eliminated by the correct choice of material and its external cladding.