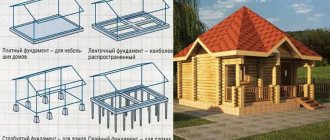
A bathhouse on a private property is a building for taking water procedures in accordance with the best Russian traditions. There are a large number of its variants, in the construction of which various materials are used. If a light building is being erected, in many cases it is more advisable to make a columnar foundation for the bathhouse. Therefore, let's consider what it is. Read to the end and you will understand its main advantages and disadvantages. You will become familiar with existing types and features of construction.
Pillar foundation Source remontik.org
Definition of the concept - columnar foundation
When the construction of a bathhouse is carried out using frame or panel technology, it can be a lightweight structure. This group of objects includes buildings made of wood and even other materials, if the total weight of a single structure is no more than 1000 kg/m3.
A columnar foundation is the best option not only for light baths, but also for utility blocks, sheds, summer houses in garden plots, gazebos, terraces and other similar buildings without basements. It represents the estimated number of support pillars, which are made of blocks, bricks, reinforced concrete, wood, stones and pipes. With correct calculations, a bathhouse can be built even from foam concrete on a columnar foundation.
When designing support pillars, all building materials used during the construction of the bathhouse are taken into account. This kind of work needs to be entrusted to specialists. After all, only they are able to accurately calculate the load on the foundation, taking into account the weight of the walls, ceilings, roof, and so on. As a result of the design, the cross-section of the supports and the bearing capacity of the entire foundation are determined.
Only a specialist should calculate the support pillars for a bathhouse Source fastpic.ru
Mistakes during construction
Non-professionals in the field of construction make mistakes when constructing the base of a bathhouse. An obvious defect of the columnar base is the unevenness of its subsidence. This can occur if the foundation depth calculations are carried out incorrectly. The base also sags when the load on the platform supports is unequal.
Experts do not recommend making a foundation different from the foundation of the common object. The foundation supports must have the same depth of depth.
Amateurs may not take into account the terrain features when working, however, the depth of freezing and the height of groundwater is very important.
Important! A columnar foundation is not intended for heavy buildings. If this rule is neglected, the foundation will require repairs or even replacement.
Advantages and disadvantages of a foundation on pillars
Columnar foundations are popular due to an impressive number of advantages:
- designed by specialists in a minimum time period;
- are created without the use of special equipment;
- are installed on any soil;
- carried out in areas with uneven terrain without the cost of preliminary leveling and even on slopes;
- are built in a maximum of 14 days;
- do not require complex and expensive waterproofing;
- low cost compared to many other similar support structures for buildings;
- long service life with professional design and construction in compliance with technology.
Despite its significant advantages, a pillar foundation is not created for brick or concrete buildings. Its disadvantage is also its low resistance to lateral loads. To prevent destruction and displacement of supports under such influence, their cross-section is increased. As a result, construction costs increase.
Foundation support pillars do not withstand lateral loads well Source 9ban.ru
Wooden log bathhouse: pros and cons
A log bathhouse is a classic Russian version; such buildings are being built in all regions of our vast country. The popularity of wooden baths partly depends on the fairly economical material, which is not in short supply throughout Russia.
The advantages of wooden baths include environmental safety, quick heating of the washing and steam compartments; efficiency and speed of construction (a log bathhouse is easy to build with your own hands).
There are also plenty of disadvantages to wooden baths: the log house has significant weight, there is a high risk of fire and the occurrence of foci of biological damage (rot, mold and fungus can render a wooden building (log bathhouse) unusable in a very short time).
In order for a bathhouse built from logs with your own hands to serve for many years, it is necessary to carefully construct a support base that can withstand the loads from the weight of the bathhouse, the water boiler, the weight of human bodies, snow loads in winter and other factors affecting the foundation.
Main design features of a foundation on pillars
The installation of a columnar foundation is carried out in compliance with the requirements of SNiP 3.02.01-87 and 2.02.01-83, as well as GOST 20522-75. In accordance with them, when constructing a supporting structure for a bathhouse, the following design features are taken into account:
- The pillars are buried 1500 mm into the soil. The average depth can be 500-700 mm. In this case, the structures are placed upward from the ground at a distance of 200-500 mm.
- Supports are installed at the outer corners of the building, all walls and in places where they intersect.
- The pillars are placed from each other at a distance of 1500-3000 mm. It depends on the soil and the mass of the bath.
- Supports up to 3600 mm long are installed if the building is being erected on a construction site with a slope.
The foundation with pillars can be made with a grillage. Its design contains strapping supports and rand beams. The last elements are foundation beams that carry loads from the walls. Rand beams rest on pillars and form a belt belt. Thanks to its presence, the mechanical load is evenly distributed over all supports.
One of the foundation options with pillars and grillage Source algoritm-stroi.ru
It is recommended to begin construction only after the bathhouse on a columnar foundation has been completely designed by specialists. After all, when calculating structures, they will take into account the climatic conditions of the region, the characteristics of the terrain and the operation of the building.
Stages of work execution
The DIY construction procedure is divided into four stages. Each of them must take into account all the nuances and requirements. Otherwise, the builder will not be able to obtain a high-quality columnar foundation for a bathhouse.
Preparatory stage
Step-by-step instructions for a columnar bathhouse foundation begin with preparation procedures. The main attention is paid to drawing up the project and preparing the site for the construction of the building. The design of the bathhouse is not a complex structure, so any person can carry out the design work independently. Otherwise, you can find standard designs on the Internet or in print that are suitable for most builders.
The first thing you need to do when preparing the site is to clear it of vegetation. The resulting tree stumps must be uprooted. Afterwards you can proceed to marking the site. For this purpose, linear dimensions are used from the project to the ground in accordance with the specified scale. The starting point for the calculation is one of the corners.
It is important to correctly position the bathhouse relative to other objects on the territory. To correctly draw the corners, it is important to use a theodolite, which will allow you to build a rectangular building without uneven lines. If the building turns out to be curved, then problems will arise during the interior decoration of the room.
If the builder does not have a theodolite or does not have enough professional skills to work with the tool, then you can use an alternative method - using a tape measure and twine. To do this, you need to measure two diagonals, which must be equal in a regular rectangle (as indicated by the laws of geometry), as when using the rule for a 4x6 bath and other sizes. If the resulting diagonals differ from each other, then the bathhouse does not have a rectangular shape, and to eliminate irregularities it is necessary to adjust the markings.
The resulting perimeter is marked using cast-offs with twine stretched between them. Cast-offs are boards that are fixed on pegs at the corners of the future building.
The cord stretched between the cast-offs is the visual boundary of the bathhouse. Next, mark the holes where the supports will be installed. The distance between the supports and their number depend on the pressure that will come from the building standing on them.
Land works
Earthwork is an indispensable stage in the construction of any type of foundation, regardless of the type of soil; only the volume of work performed changes. In the case of a columnar foundation, the number of actions is reduced due to the small volume of soil that needs to be moved. Due to this difference, the stage takes much less time compared to the foundation where strips or slabs are used.
There is also no need to level the construction site, since the house will stand on poles. This makes it possible to create the necessary angle of inclination of the soil so that water from the washing area goes to the drainage collector. In this case, the bathhouse itself will stand level without slopes.
It will be necessary to remove the top layer of soil. It is here that most of the humus is contained, which can cause soil settlement after its complete decomposition. Also, the absence of humus will reduce the importance of soil. After the hole, they increase to a diameter 10-15 cm larger than the diameter of the pillars.
Installation of supports
The method of installing the supports will depend on their type. If monolithic reinforced concrete pillars are used, then formwork with internal reinforcement is required. To create formwork, boards are used, which are knocked together, and the inside is lined with any smooth material that is required to avoid sticking.
Often, special lubricants are used to enhance the effect, which can be found in any hardware store. If there is no lubricant, then machine oil or mixtures based on it can be used as a replacement. Both new oil and used oil are suitable. If there is not enough time to create wooden formwork, then sheets of roofing felt are used, which form a roll. The joints are stitched with self-tapping screws or a construction stapler.
Inside, the formwork is equipped with a reinforcing frame, for which 4 rods driven into the ground are used. The rods touch each other to connect in 3 places. For fastening, wire jumpers are used, which are necessary to add volume. The reinforced frame is constructed using corrugated steel or fiberglass reinforcement. The diameter of the rod should be 6-10 mm, which will be enough to hold the bath. Before pouring the bud (a mixture of sand, crushed stone, cement and water), a cushion is created at the bottom of the hole from sand or gravel.
To get rid of air in the formwork, it is necessary to remove it using a vibrator or similar tools. Otherwise, the voids may cause the pile to collapse.
Concrete pouring is used if the pillars are made of brick or cinder blocks. Creating a concrete base is a necessary procedure due to the porosity of these materials. If you do not fill, then over time the brick will begin to collapse due to moisture absorbed from the soil. The pillars are erected after the concrete has completely dried. A layer of roofing felt is created between the fill and the material for waterproofing.
To facilitate the process of installing pillars, pipes with a diameter of 10-20 cm made of asbestos cement, cast iron or steel are used as the material. After installation, all works are cut to the same height to eliminate the tilt of the bath. The pipes are reinforced with concrete mortar poured into the hollow space.
If wooden poles are used as support, then care must be taken to waterproof the material. For this, filling with crushed stone or gravel and treating the material itself with moisture-repellent impregnation is suitable.
For a frame bath, a non-recessed structure is sufficient. In this way, concrete blocks filled with concrete or covered with crushed stone can be laid on the site, after which they must be tied together. A monolithic grillage is used for the connection. If the pillars are metal, then they are connected by welding. Wooden pillars are the lower crowns of the building. The strapping is necessary to enhance the rigidity of the structure.
Columnar foundation options
The columnar foundation is classified according to the depth of the supports:
- Non-buried - pillars are placed exclusively on the surface of the ground without recess. In the places where they are installed, the top layer of soil is removed and sand and gravel are backfilled.
- Shallow - supports that go deep into the ground by a minimum of 500 mm and a maximum of 700 mm.
- Recessed - the pillars are laid below the freezing point of the soil.
Recessed foundation with columnar supports Source stroy-okey.ru
The classification of a bathhouse foundation is also influenced by the technology of its construction when using certain materials. Create a monolithic or prefabricated structure.
See also: Catalog of companies that specialize in repairing foundations of any complexity
How they are structured and work
There are several ways to classify foundations used in modern construction
Each of them concerns an important aspect: material, design and purpose.
But first you need to understand why there is a need to build a bathhouse foundation at all - after all, this is an easy construction. That's right - for light construction (or for any weight on rocky ground) it may be absent or purely symbolic. But is a bath always easy?
To begin with, let's imagine this: no matter how unshakable the earth may seem to us, it is more like the sea than the builders would like. It's just a very slow sea. Instead of water in this sea there are soils. And human buildings are drowning in it. Depending on the composition of the soil, the sea can be very unsteady and fluid, and in cold weather it can try to squeeze out the foundation.
The building will not crack or collapse only if a reliable foundation becomes an intermediary between it and the ground. It redistributes and transmits the load from the walls and roof along the ground. It settles under pressure - this is one process. And at other times it expands and raises the building - this is the opposite process.
IMPORTANT! You need to know the geology of the site in order to make the right decision about the material and construction of the foundation for the bathhouse.
At temperatures below zero, water in the ground turns to ice. And the volume of ice is greater than that of liquid. Therefore, the ice expands, crushing everything that gets in its way. The depth of the freezing soil layer depends not only on the strength and duration of the frost, but also on the composition of the soil - clay soils heave especially strongly, but large sands do not suffer from this. But the finer the sand, the closer its properties are to clay!
The table shows recommendations for choosing a foundation design depending on the type of soil. Let us clarify that on coarse, gravelly sand you can place any type, and on fine sand you can place the types indicated in the table.
But here’s what’s not in the table: based on the depth of laying, foundations are divided into shallow and deep. The difference between them is how they relate to freezing depth. Shallow ones ignore this value, and deep ones are made lower in order to transfer the load to the less mobile (in winter) soil.
The required height of the foundation and calculation of its depth are discussed here.
As for the material, the traditional materials are stone and mortar. But nowadays, concrete has replaced natural stone in most cases. Concrete types are divided into monolithic and prefabricated. The former are poured on site, the latter are manufactured at the factory in the form of standard blocks. The structure can be made of concrete using a slab or strip foundation.
If you do not use concrete as the main material, then you are left with varieties of columnar and pile foundations, which we will talk about a little later.
ATTENTION! The disadvantages of the soil are not a reason not to build, it will simply be more expensive, especially if you replace the poor soil with coarse sand. In addition to replacement, you can strengthen a weak foundation, for example, with weak cement mortar. Groundwater is a separate topic
They significantly affect the bearing capacity of the soil and can slowly or quickly destroy the foundation. Ideally, the laying depth should be below the freezing level and above the groundwater level. But this is not always feasible
Groundwater is a separate issue. They significantly affect the bearing capacity of the soil and can slowly or quickly destroy the foundation. Ideally, the laying depth should be below the freezing level and above the groundwater level. But this is not always feasible.
The main means of combating groundwater is drainage. However, its construction is expensive, so it is always better to build not in the lowlands.
Read a large article about all the stages of constructing various types of foundations here.
Bathhouse on a columnar foundation
The load can be transferred from the building to the ground either by planes or pointwise. If calculated correctly, point transmission is no worse, and for some types of soil it is even better.
Point transmission is carried out either using posts or piles. The latter will be discussed below. The fundamental difference between columns and piles is their length, and not just the material. The piles are much longer than the posts.
The ability to use simple and affordable materials makes columns an attractive option for budget construction of a bathhouse. Especially when it comes to frame construction.
The material for the column can be:
- stone;
- brick;
- concrete blocks;
- asbestos-cement pipes with concrete filling;
- non-standard materials: sleepers, rubber tires, etc.
Frame building on concrete pillars
Types and procedure for creating a foundation with pillars made of different materials
For calculations and calculations of foundations on columnar supports, the following data is used:
- soil type;
- depth of groundwater and soil freezing;
- loads from snow and wind;
- bath weight;
- the depth of the foundation pillars in the ground.
The characteristics of the terrain are also taken into account. After all the necessary calculations, the prefabricated or monolithic columnar foundation is installed by specialists in stages.
Only phased installation guarantees high-quality execution of the columnar foundation Source kromvel.net
Preparatory work
At this stage, the site is cleared and the site for the bathhouse is laid out. During the work, the fertile layer of soil is removed. Its depth is approximately 300 mm. All vegetation is removed along with it. If necessary, fill up the holes. If the site has clay soil, then a layer of sand and gravel is created at the construction site.
Then the specialists transfer the plan of the bathhouse to the ground and mark the axis of the building using construction thread. If there are significant differences in height on the site, then a level is additionally used. It is used to determine the distance from the ground to the top of the support pillars. The use of this tool allows professionals to guarantee a strictly horizontal location of the building.
Marking a bath foundation with pillar supports Source grounde.ru
Excavation
The installation of all foundation supports for a bathhouse is carried out according to a similar principle, regardless of the type of material used for their manufacture. The only exception is a columnar foundation with a grillage. Therefore, excavation work is carried out in the same way for all variants of the bathhouse base.
The depth of the supports depends on the location of groundwater, the type of soil and the depth of freezing of the ground. To determine these parameters, experts use reference materials. If necessary, they can test the groundwater level and soil type of the area by creating a hole. It is dug to a depth of 1000 to 1200 mm. If in this case no water is found and the soil is not heaving, then the supports will be installed at such a depth.
The pit is dripped down to a layer with a dense structure, which does not undergo compression if the groundwater in the area is located close to the surface of the earth. At the same time, experts take into account the reference depth of soil freezing. They add 400 mm to this value.
Map of the CIS with ground freezing depths Source konspekta.net
On a note! Heaving soils are soils with clay. As its quantity increases, the freezing of the ground increases.
Experts determine the dimensions of the pits taking into account the material used for the pillars. They are made 70-100 mm larger than the dimensions of the supports from the following materials:
- brick and stone – 500x500 mm;
- asbestos cement pipes – diameter 200 mm;
- rubble stone – 600x600 mm;
- reinforced concrete – from 300 to 350 mm;
- intermediate supports made of various materials – maximum 300 mm.
After preparing the holes for a columnar monolithic reinforced concrete or prefabricated foundation, the craftsmen pour sand into the recesses. The thickness of this layer is usually 200 mm. The sand is compacted while using water, which compacts the created cushion.
Installation of a pipe foundation
The use of metal or asbestos cement pipes to create a foundation for a bathhouse is one of the best options. Specialists can easily cut them on a construction site using a grinder, producing pieces of the required length.
Non-pressure pipes made of asbestos cement Source glotr.uz
Basic principles of construction
Depending on the height of the pillars immersion into the ground, the foundation can be:
- shallow;
- recessed;
- not buried.
In most cases, the first two types of bases are suitable for a bath.
Shallow base
In this case, all platform components are formed into a single strong structure, sensitive to any soil distortion. The structure evenly directs the load over the entire surface of the base. The supports are connected by a solid grillage made of reinforced concrete or metal brackets.
A shallow foundation may have a slight rise in the base , while deformation in level is not allowed above the permissible calculations that are used in the construction business, and on which the structure of the building directly depends.
All calculations for a shallow foundation are carried out in the same way as in the case of other types of foundation.
Attention! The calculations are based on the quality of the soil and the expected load on the base of the bathhouse. In this case, special attention is paid to calculating the dimensions of the foundation to ensure bending stability.
Recessed base
This type of sole differs in the depth of the pillars and directly depends on the amount of soil freezing. Basically this depth exceeds 0.4 meters. The stages themselves are the same as for the foundation of a small foundation.
You can dig holes with a mechanical or gasoline drill, or with a specialized machine. In the latter case, you will have to turn to construction companies for help.
Despite the small volume of the structure and relatively low weight, on heaving soils it is better to install supports below the freezing point of the ground. Otherwise, when the temperature changes, the foundation may “walk”.
Video description
You can clearly see how the foundation is constructed when using asbestos-cement pipes from the following video:
Installation of a brick columnar foundation
After preparing the pits and forming sand cushions in them, specialists pour concrete. This base is created with a thickness of 200 mm. It is reinforced with steel mesh. It is made of metal rods with a diameter of 12-14 mm. The places where they intersect are fixed with wire. In this case, the dimensions of the mesh correspond to the dimensions of the pit where it is laid.
Further work continues after two days. During this time, M400 concrete will gain strength. When making masonry, ceramic bricks are used. To increase the strength of the supports, a mesh of reinforcement is additionally used. It is laid every 3-4 rows.
Typically, brick pillars rise above the ground by 150-200 mm. All supports are protected with roofing felt. Mastic is also used. The pillars are covered with earth only a week after laying. The filled soil is thoroughly compacted.
How to insulate the foundation of a bathhouse
It’s easy to do the work of insulating the foundation of a bathhouse with your own hands. Along the perimeter of the building, soil 50 cm wide is removed to the depth of the base. Sand 20 cm high is poured onto the bottom of the trench. Expanded polystyrene sheets are laid on the compacted sand cushion. The slabs are glued with bitumen mastic or another bitumen-containing adhesive. After installing the polystyrene foam boards around the perimeter of the bathhouse, the sheets are sprinkled with sand and the gravel layer is restored.
Insulation of the foundation with polystyrene foam slabs
Attention! The joints between the plates are filled with foam to prevent condensation. Polystyrene foam cuts off cold air well and is the cheapest heat-insulating material
It has a porous structure. Sheets of foam plastic are glued to the base with a bitumen adhesive solution in a pre-prepared trench
Polystyrene foam cuts off cold air well and is the cheapest heat-insulating material. It has a porous structure. Sheets of foam plastic are glued to the base with a bitumen adhesive solution in a previously prepared trench.
Foundation insulation with foam sheets
Polyurethane foam is ideal for insulating the foundation of bathhouses and basements. It is durable, safe, hydro- and heat-insulating material. Polyurethane foam can be sprayed onto a concrete base, due to which it does not leave gaps.
Insulation of the bathhouse foundation with polyurethane foam
Video description
The general process of building a foundation from brick pillars is shown in the video:
Installation of a columnar block foundation
This type of columnar foundation is made using solid concrete blocks measuring 200x200x400 mm. They are durable masonry building materials. The installation of pillars from it is similar to the installation of brick supports. The following features are taken into account:
- Blocks weigh more than bricks. Therefore, reinforcement of the foundation for a column is carried out by laying a mesh of metal rods into a thicker concrete base created on sand. The average thickness of concrete under the blocks is 500-700 mm.
- It is possible to replace the sand cushion with crushed stone.
- There must be at least two blocks in one row. The laying of subsequent block materials is carried out perpendicular to the previous ones. All rows are fastened together using cement masonry mortar.
Block base for a bath
The use of ready-made concrete or reinforced concrete blocks allows you to form a solid foundation in a limited time by installing elements in pre-made pits buried 50–70 cm into the soil.
It is necessary to select the material from which the foundation will be built at the design stage
Quite often, developers use solid blocks with dimensions of 0.2x0.2x0.4 m or products of similar sizes with internal cavities. Having increased strength, the block material is able to withstand significant forces.
The installation algorithm for a block structure includes the following steps:
- Preparation of pits located according to the diagram.
- Formation of a sand or gravel cushion with a layer of 0.15–0.2 m.
- Moistening the mass with water and compacting.
- Laying blocks on cement mortar.
- Checking the correctness of the masonry.
- Grouting joints at joints.
- Waterproofing the supporting element with bitumen or roofing felt.
- Filling the space between the supports with soil previously removed from the pits.
When installing block columns in sloping terrain, it is important to control the horizontality of the supporting surfaces to ensure that the bathhouse does not distort.
Video description
One of the options for installing a columnar block foundation is shown in the video:
The height of block supports above the ground is usually from 200 to 300 mm. The last row is protected with waterproofing material. Its use helps prevent the destruction of seams and the blocks themselves due to exposure to low temperatures and water.
The masonry is carried out with constant monitoring of its location relative to the axes of the building. The empty space between the blocks and the walls of the pit is filled with previously removed earth. It must be compacted.
If a concrete pier foundation is installed on a sloping site, the piers are never installed at the same depth. Otherwise, there is a possibility that in the future the bath will become distorted and even the supporting structures will be destroyed.
Installation of a columnar concrete foundation
This bath base is highly durable. It is made using reinforcement with a diameter of 12-14 mm. It is used to connect rings or squares from a rod with a diameter of 6 to 8 mm. The result is a reinforcement frame for the pillars. It is taken into account that the vertical reinforcement of a columnar foundation under a steel column, panel or other light walls is carried out 150-200 mm above the supports.
Reinforcement of a columnar concrete foundation Source stroikraft.ru
Waterproofing protection and backfill
To protect the foundation (ground and underground parts) from the effects of precipitation and groundwater, installing a waterproofing layer will help. For this, modern moisture-resistant mastics, rolled roofing felt and thin membranes are used.
After completing the waterproofing work, the cavities between the walls of the earth holes and support beams are filled. For this, regular soil or a mixture based on gravel and sand is used.
Backfilling is carried out in stages, with each previous layer being carefully compacted. The depth of one layer does not exceed 30 cm.
Video description
You can clearly see how the reinforced frame and formwork of a concrete columnar foundation are installed in the following video:
Installation of a foundation with pillars and grillage
If it is necessary to build a more reliable foundation, a foundation with a grillage on pillars is installed - a strip belt of reinforced concrete. This is an additional element that connects all the supports. Its installation is carried out by installing formwork, reinforcement and using concrete grade M200 or higher.
The grillage is made with a height of at least 300 mm and a width of 100 mm greater than the corresponding size of the pillars. The formwork for it looks like a box. In its lower part, holes are prepared for foundation supports. The posts should extend slightly into the wooden box.
The grillage reinforcement is a frame made of steel rod. This design has transverse elements in the form of squares. They are usually bent from wire with a diameter of 6-8 mm. They are designed to increase the strength of the entire structure.
Square reinforcing elements are placed every 300 mm. They are connected by knitting wire to steel rods. The reinforcing frame must fit freely into the formwork. The distance between it and the wooden walls must be from 50 to 70 mm.
Option for grillage reinforcement Source ispovednik.ru
The lower part of the grillage reinforcement frame must be connected to the reinforcement of the vertical foundation supports. Upon completion of pouring, the solution must be compacted to remove air bubbles. Typically, specialists fill the grillage at one time. Then the formwork is covered with polyethylene and they wait for the concrete to gain strength.
Foundation with grillage Source winterhouse.ru
How to make a pile around a bathhouse
In ancient times in Rus', the zavalinka was used as a bench. Relatives and friends gathered at the ruin. They sang songs and danced. In modern construction, the blockage is more of a decorative character.
Materials for production:
- corrugated sheets or wooden boards 4*10 cm;
- nails;
- metal profile or wooden beam 5*5 cm;
- sawdust.
Installation steps:
A metal profile is attached along the perimeter of the bathhouse, giving it the shape of a pile. Installation of a frame made of a metal profile for the construction of a heap Attention! If the top is tilted too far, it will become impossible to sit on. If you plan to use the pile as a bench, you should use wooden materials or bricks.
Blanks are cut to size from corrugated sheets and attached to the frame
The voids are filled with sawdust. Installation of corrugated sheets on the frame
The top part of the pile is sheathed and the corners are decorated. Covering the frame of the pile with corrugated sheets
Briefly about the main thing
A bathhouse foundation on pillars is a supporting structure made by pouring concrete into asbestos-cement pipes or formwork with reinforcement. Foundation supports are also made from bricks and prefabricated blocks. The foundation of the building can be shallow, shallow, or damaged below the level to which the soil freezes.
A columnar bath foundation can be made with a grillage. This is a more reliable option. Any type of foundation structure with support pillars is quickly designed, installed, and created even in areas with uneven terrain. The installation of a columnar base is carried out only for light baths.
Where should you start working?
So, first of all, we draw up the general outline of the perimeter of the building. Next, we make markings for the waiting room, steam room and main washing room. Most often, a steam room and a washing area are combined in order to save usable space. Such a plan already gives an exact idea of how the foundation will be located. For further calculations, you need a drawing and specification of the material from which the future bath building will be built. Based on this, taking into account the height of the walls, it is easy to calculate the type of foundation required. Today, bathhouses are built not only with logs. Timber, foam block, gas block, framed walls, expanded clay block, brick and even cinder block are perfect for these purposes. Frame and brick walls will need additional insulation.
In this article, calculations are given for a traditional log bathhouse. Other materials are used less frequently. In the traditional sense, we imagine just this type of bathhouse. The calculations are similar for timber buildings.
The next step is to prepare the site for construction. If there is large vegetation in the area in the form of trees and shrubs, then they should be cut down, stumps uprooted, roots cut out. Large and medium-sized stones must be removed from the building area and the grass must be mowed. Remove the top layer of the sand - turf - with a shovel and put it away from the line so as not to get in the way. It can be useful in the future in the garden, as it is fertile soil.
Now you need to mark for digging a trench to fill the base. For these purposes, ordinary wooden pegs or rods of ordinary reinforcement are often used, which are placed in the corners and at the joints of foundations
At this stage it is very important to maintain the right angle of the lines and the diagonal at the corners. Any rope can serve as a zero level
It is pulled onto pegs and the horizontal is adjusted using a regular building level. The straightness of the corners is verified with a square or by simply checking the diagonals of the rectangle. The diagonals must be equal to each other.
Tape
It is a line of concrete closed around the perimeter.
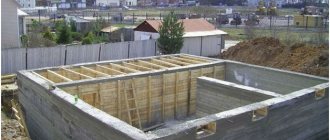
For the most common option - a log house measuring from 4x6 to 6x6 m - the optimal solution would be a shallow strip foundation.
Soil with high humidity requires the use of this type.
Device
You should first draw up a plan for placing the foundation on paper or on a computer. At the selected location, remove debris and remove the plant layer. Use a level to level the area. Using pegs and strings, transfer the dimensions of the plan to the surface of the earth. The markings are checked by measuring the diagonals. The difference between them should not exceed 20 mm.
With the tape version, it is necessary to make two contours - external and internal. Metal rods are installed in the corners and two rows of string are pulled over them at a distance equal to the width of the future foundation with an allowance of 5 cm. The width of the trench is at least 30 cm.
A trench is laid with a shovel along the marked contour lines below the freezing level in the area. To prevent rain and melt water from washing away the bath too much, you should make a slight slope of a couple of degrees. The slope can be made in any direction except north.
The bottom of the trench must be horizontal, this is checked using a level. A sealing pad is placed on the bottom. It consists of sand and crushed stone. First, sand is poured onto the bottom, moistened with water and compacted. Gravel is poured on top and compacted too. Layers alternate until the trench is half filled. To strengthen it, you can put bricks or stones on top.
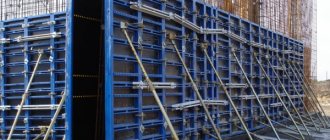
Formwork is installed on the sides of the dug trench. It can be made from different materials, but the most commonly used for baths are boards and sheet plywood. Wooden formwork is inexpensive and easy to assemble. They make formwork of a removable structure, which is removed after pouring concrete, but you can leave it as additional thermal insulation for a bathhouse. There should be no gaps between the parts. It is necessary to provide holes in the formwork panels for water drainage so as not to drill into hardened concrete.
The formwork is supported from the outside with supports. To provide stability, transverse struts are made between the walls so that they do not move apart under the weight of concrete. Ruberoid or polyethylene is laid on the internal surfaces to protect them from moisture.
Before pouring concrete, reinforcement is made to impart strength and ductility.
It is better to assemble the reinforcement cage separately on the ground and then install it in the formwork.
Aluminum or steel wire is used for knitting.
Welding cannot be used for fastening, as high temperature will reduce ductility. At the corners, the frame is reinforced with reinforcement at an angle of 45˚ relative to the horizontal rods.
The knitting technology is as follows:
Cut a piece of wire 30 cm long. Fold it in half. Wrap the wire diagonally around the joint of the rods. Insert a crochet hook into the loop. Insert the free ends of the wire into the hook. Carefully turn the hook clockwise.
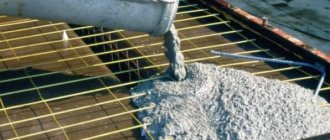
The trench with reinforcement is filled with concrete mixture. You can purchase it ready-made grade M 200 or M 400 or make it yourself from high quality cement, fine-grained sand and gravel. When preparing it yourself, add water to give the concrete mass a medium consistency.
The concrete is laid out in layers, leveling each layer with a trowel. The resulting air bubbles are removed with a bayonet shovel or a rod of reinforcement, otherwise this will lead to destruction of the structure. The outer walls of the formwork are tapped with a hammer. After pouring, the foundation is covered with plastic film.
After a couple of weeks, the formwork is removed, and the surface of the foundation is sanded. It is recommended to begin construction of the bathhouse a month after pouring. During this time, the foundation is isolated from water with two layers of roofing felt.
Strengthening the foundation
Over time, the owner of the house construction may notice signs of subsidence of the columnar foundation. This can manifest itself in the form of cracks in the walls, subsidence of floors inside the house and other violations of the integrity of building structures.
To prevent the destruction of the building, it is necessary to carry out work to strengthen the pillars. There are two ways to increase the bearing capacity of the foundation.
Option 1
Identify a sagging pole. Place a jack under the heel and support it. A certain volume of soil is removed from under it. The resulting voids are filled with concrete. After 30 days the jack is removed.
Option 2
The sagging supports are supported with jacks, and additional pillars are installed between them. After the concrete has hardened and the formwork has been dismantled, the jacks are removed. To monitor foundation subsidence, beacons are installed on the supports.
If, as a result of the above measures, subsidence of the foundation of the house continues, then you need to contact a specialized service for a professional examination of the condition of the foundation and identify the causes of these negative phenomena.
Grillage arrangement
A bathhouse on a columnar foundation can have a raised (raised above the ground by at least 15 cm) and low (underground, level with the ground) grillage.
In a wooden bathhouse, the grillage is usually the lower crown; in a frame building, the frame is made of wooden beams. For heavy structures, reinforced concrete is recommended. For heavy construction, a reinforced concrete grillage with a height of at least 20 cm is made. The width is equal to the thickness of the walls. If the site has a large slope, the grillage is stepped. Reinforcing mesh is placed in the steps. The height and width are made such that when laying blocks (bricks) a whole number of rows (units) are placed on the steps. The reinforcing rods from the pillars must enter the concrete at least 20 cm, the pillars themselves - at least 4 centimeters.
If the slope is small, the grillage tape is made with uneven thickness: the bottom side is sloped, the top side is horizontal.
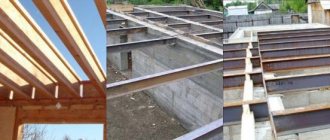
The height of the reinforced concrete grillage for a panel or log bathhouse is 0.4-0.6 meters. If the ceiling will be supported by additional pillars, the grillage is made as wide as the width of the walls. If the floor beams are placed directly on the grillage, it is deepened into the house at a distance sufficient to support the beams.
Procedure for installing a reinforced concrete grillage:
- Apply bitumen mastic to the top edge of the posts.
- Mount removable wooden formwork on the pillars. If the grillage is low, a cushion of sand and crushed stone is poured onto the bottom. If it is hanging, the bottom of the formwork is a boardwalk, which is supported from below with bars installed on the edge. Another option: pour soil or sand under the flooring and remove it after the grillage has hardened.
- Cover the inside of the formwork with waterproofing material (for example, glassine).
- Make vents in the ground grillage at a distance of at least 30 cm from the ground: lay sections of asbestos-cement or plastic pipes perpendicular to the formwork walls and fill them with sand. For wooden houses, air vents are also installed in a raised grillage.
- Install the reinforcement cage. If the pillars are made of hollow pipes, the vertical frame rods are placed into them during the concreting process. Longitudinal rods are tied to the verticals with wire at two levels, below and above. The distance from the rods to the concrete surface is at least 3 cm.
- Pour concrete, bleed.
- The formwork is removed after a month. Blow sand out of the vents and perform waterproofing.
Another type of grillage on a raised foundation is prefabricated. It consists of a hollow pyramid without the top and a slab that is placed on the larger base of the pyramid. The pyramid is placed between the pillar and the slab.
DIY construction
It is not so difficult to fill a slab foundation with your own hands. Between the layer of heat insulation and the concrete screed it is necessary to lay a layer of polyethylene. This is done to ensure that the concrete mixture does not leak: water from the composition can penetrate into the upper layers of the soil. This will lead to a violation of the consistency of the cement mortar and uneven shrinkage of the base. The polyethylene layers are overlapped and the seams are taped. After pouring the blocks, the structure is left to dry completely. The depth of the support is calculated in advance.
Small screw piles can be installed manually. Supports up to 2.5 m long are screwed in by two people, a third monitors the accuracy of the work. It is better to choose piles about one and a half meters high. After installing the last support, the evenness must be checked with a laser level. To cast concrete piles, a metal base is first screwed in, and then it is poured. As the concrete hardens, the supports are connected with a grillage made of channel bars. Such a device ties the piles together and distributes the load from the building evenly to each support.
There are step-by-step instructions for casting a grillage for piles. To install the grillage, you must first create a reinforcement frame, mix the concrete solution and prepare the formwork form. The form can be made by analogy with the technology of pouring a strip foundation - from panels or a wooden frame.
A mesh is attached to the reinforced piles; along the entire contour of the building, its pitch should not exceed thirty centimeters. Its installation is carried out on special fasteners inserted into the holes on the pile. The metal frame is partially inserted into the piles and combined with longitudinal rods. In the case of concrete piles, the reinforcement is connected to metal ropes protruding from the supports.
The formwork is straightened, the frame must be level. The uniform distribution of the mass of the structure over the surface will depend on the quality of the work done. Curvature of the structure will lead to uneven soil laying. Concrete is poured into the formwork starting from the pile heads. Strengthening the structure is achieved by deepening the supports into the grillage at a short distance.
For a wooden building it will be the most profitable. The wood must first be dried and treated with a special moisture-proofing compound. Installation of the grillage begins with cutting the material into fragments - the ends of the beams are cut out in the shape of a castle. The structure is assembled by attaching it to the piles with bolts.
Columnar, strip and monolithic foundations can be made with your own hands. But under no circumstances should you violate the installation technology. It is better to carry out work under the supervision of a specialist, taking into account all the subtleties. A detailed drain diagram is used throughout the entire work process, so do not underestimate this stage of preparation.