As you know, all men understand politics, football and construction. Or they think they understand... In a word, when building his own private house, the future owner has to hear a lot of advice on how to make a basement “correctly”.
However, in such conversations on construction topics conducted by non-professionals, many specific engineering and architectural terms are often used not entirely correctly, with a distortion of meaning. Therefore, first you need to decide: what is a “base”?
Types of base
This type of superstructure not only protects the structure from moisture, but also creates a unique original design and a complete architectural ensemble. With its help, you can highlight and emphasize the appearance of the building, its color and composition.
- flush - if the protruding part of the foundation smoothly passes into the wall of the building, which takes on the appearance of a monolithic box, its height visually increases,
- recessed - the wall of the structure protrudes beyond the foundation, and the protrusion reaches 15 cm. The house looks like it is located on a leg and there is a feeling of its fragility and instability. It is preferred because of its cost-effectiveness, since the consumption of materials is less when pouring the foundation and there is no need to additionally install a drain cornice.
- Overhanging is the most common type when the wall of the building is smaller in width than the base. It clearly separates the parts of the house, establishes the boundary between the foundation and the load-bearing wall, and creates the effect of strength and stability of the structure. When installing it, it is mandatory to construct a drain to ensure the flow of water from the wall of the building onto the foundation.
Requirements for materials of the basement of the building
As already mentioned, the materials used in the construction of the basement work under extreme conditions: humidity and negative temperatures. Therefore, when choosing options for finishing it, you should pay attention to the quality and characteristics of the materials. You should not experiment with materials that are not intended for outdoor use. This must be taken into account when choosing glue, mastic or impregnation. In the video you will see how to properly arrange the base and protect it from external influences.
The first requirement directly for materials is low water absorption. The frost resistance grade of a material is assigned during testing, when the material is frozen and thawed several times in a wet state. Naturally, the lower the amount of moisture that a material can absorb, the lower the risk of its destruction when the water frozen in the pores increases in volume and tears the material from the inside.
Advantages of installing a plinth
By raising the walls of the house above the ground, the main task is solved to protect the structure from moisture penetration. The higher the wall is located above ground level, the more reliable the protection is from rain, melt water in the spring, flooding during a flood or after a rainstorm, as well as the penetration of capillary moisture when groundwater is close.
- The plinth takes on the load of the load-bearing wall and distributes it evenly onto the foundation due to the larger support area.
- The barrier between moisture and the wall performs a waterproofing function.
- Serves as a support and pedestal for the frame and, in the event of foundation deformations, protects the walls from cracking.
- Thanks to the air gap between the floor and the ground, it retains heat and prevents the penetration of cold. Serves as a wall for basements, increases the height of the building.
- Prevents the occurrence of fungus and mold, the proliferation of microorganisms in the wall; in a wooden frame it serves as a barrier to moss and insects.
- The house acquires a finished architectural appearance that matches the style of the chosen design and nearby buildings.
- If there is no basement under the building, then it levels and distributes the load of the foundation backfill under the floor of the house.
Waterproofing
To protect the plinth from capillary suction of moisture, especially if the plinth is made of monolithic concrete as a continuation of the foundation, it is necessary to waterproof the surface with roll or coating materials.
The easiest way is to coat it with bitumen-polymer mastic 2-3 times after preliminary priming with a primer. There is also a large selection of special waterproofing compounds in the form of dry construction mixtures.
As adhesive waterproofing, special bitumen-polymer materials based on fiberglass or polyester canvas are used, for example, waterproofing, mostoplast, but roofing roll materials are also suitable.
Device Rules
The base should rise above ground level. Its height depends on the material of the walls. For light materials such as wood, foam blocks, sand-lime brick, the height is from 30 to 50 cm.
For buildings with basements, multi-storey structures or a basement, its height can reach 2.5 m. For frame construction of gazebos, verandas, dachas, cottages, the height can be 20 cm.
To ventilate the space inside the base, slots are installed around the perimeter of the foundation, which are protected with a metal mesh, grating or glass. The shape of the vents can be square, rectangular or round, they are located at a height of at least 15 cm above the ground, the size depends on the area of the protruding part and is selected in accordance with the project. The quantity is calculated based on the rule that there should be one vent per 3 m. With the onset of frost they close tightly.
To increase the service life of the superstructure and protect it from negative environmental influences and ground moisture, it is treated with bituminous materials. Waterproofing of the foundation base is carried out along the entire perimeter of the building with a layer of roofing felt or cement screed up to 3 cm thick.
If the groundwater is located high, a drainage system is installed that will ensure drainage and protect the structure from moisture and swelling of the soil in winter.
A blind area is poured around the entire perimeter of the building, which is adjacent to the foundation and protrudes beyond the edge of the roof by 25 cm. It will protect the bottom of the superstructure from accumulating moisture. Make it at an angle of at least 250 so that the water does not stagnate, does not erode the soil and flows freely. Most often, concrete and asphalt are used, less often natural and artificial stone.
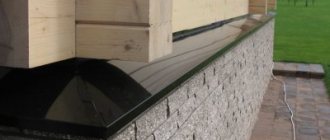
The flashings for the foundation plinth on the protruding part are also made at a slope so that the water drains and does not stagnate on the protruding part of the foundation.
Masonry technology
Laying a brick
The DIY masonry technique itself has several features:
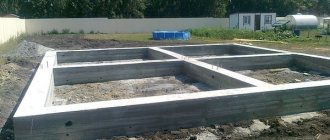
- To prevent moisture from seeping from below, we lay waterproofing on the solid foundation. Construction regulations provide for the installation of two layers of roofing material with mandatory sizing with mastic.
- We lay a thin cement-sand screed on top of the waterproofing. Its task is to level the surface under the brick.
- Next, we lay building blocks in all four corners without mortar. We check their position using a level, and also carefully compare the lengths of the diagonals. They must be equal, otherwise adjustments must be made to the position of the corners.
- Next we proceed to the row laying. It is advisable to lay the first row using the butt method, and the next row according to the established pattern (in one and a half or two blocks).
- Every four rows it is necessary to reinforce the base with brick. To do this, we place a metal mesh made of wire 2-4 mm thick into the seam. The mesh cell should be from 50x50 to 100x100 mm.
Advice! Provide ventilation holes at a distance of about 150 mm from the ground.
- After the structure has been brought to the planned height, it is necessary to lay a second layer of waterproofing. Its structure is similar to the first layer.
- Also desirable would be coating waterproofing, in which the constructed brickwork is coated with moisture-proof mastic on the outside and inside.
In some cases (for example, when laying a basement under a multi-story building made of hollow material), a monolithic reinforced belt is laid on top of the waterproofing. The main task of this belt is to evenly distribute the loads from the walls and ceilings onto the plinth structure.
Type of foundation and its influence on the design of the protruding part
The base of a pile foundation on buildings made of light materials and non-residential premises is not equipped. Supports and piles serve as a protruding part of the foundation and ensure sufficient ventilation of structures. This type of construction is used in the construction of bathhouses, verandas, terraces, porches, and outbuildings.
In a residential building on stilts, the foundation base is insulated from the outside to protect the house from heat loss.
You can make a foundation plinth with your own hands using a strip base from the following materials:
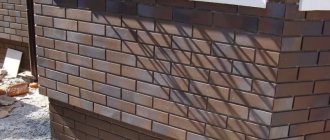
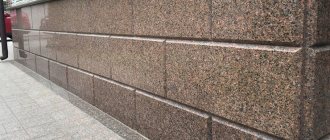
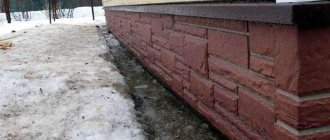
- natural stone is a strong, durable, environmentally friendly material, but it is expensive and takes a lot of time to install. It is used in the construction of buildings in classical or English style. Creates an original color and attractive appearance.
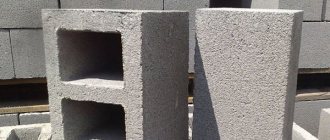
- Concrete blocks are a simple, fast, economical way to build a superstructure, but require additional finishing and special equipment to install the blocks. The material is strong, reliable with high performance characteristics and durability.
- sand-lime brick is the most affordable and easiest type of elevation construction. They use brick for the base of the foundation, brand M-50, solid, silicate. But after the work has been carried out, the foundation base is waterproofed and finished with facing materials.
Siding structural element
Siding is often used when constructing basement floors in private homes. The building material is not very expensive, but is often used for finishing. When choosing, follow the following recommendations:
- Select only moisture-resistant types of panels.
- Choose the appropriate color in dark shades.
- During installation, first apply the necessary waterproofing.
- Do not bury structural elements into the ground.
- Make accurate calculations.
- Adjust building materials to exact size.
Important. If siding is used to finish the basement, when the work is completed, the joints are sealed with special moisture-resistant sealants to prevent moisture from penetrating the closed elements of the building.
Finishing methods
To increase thermal and waterproofing, to give the building an architectural zest and design elegance, it is finished with various materials.
For this purpose, decorative plaster, asbestos-cement sheets and panels, natural stone, artificial materials imitating stone or wood, plastic sheets with different textures, corrugated sheets, ceramic tiles, tiles based on crumb rubber and polymer materials, cement finishing followed by painting are used.
The material used for finishing must withstand elevated temperatures, be resistant to ultraviolet radiation, precipitation, frost-resistant, durable and of high quality.
Correct arrangement of the upper part of the foundation, its height, width, and the presence of a protruding edge will protect the house from moisture, cracking, and distortion of the doors and windows of the building. The house will last for decades and will delight and warm more than one generation that has grown up in it.
How to build
We mark the guides for laying the first row of foam blocks in the same way as is done for bricks. In the photo above you can see a fishing line stretched 10 cm above the foundation. This is done so that the foundation wall is as level as possible. Armed with a cement-sand mortar, a trowel and a level, we lay out the first row. Be sure to check the level of the stacked blocks and, if necessary, correct them with a rubber hammer.
The first row of foam concrete blocks for the basement of our house.
We fill the interblock spaces with the same solution. We wait for the cement to harden and proceed to the next stage - the armored belt. In order for our base to be subject to deformation as little as possible due to various natural phenomena, it needs to be reinforced, that is, reinforcement must be laid around the perimeter.
To do this, we cut a furrow 4-5 cm wide and deep and lay reinforcement, pre-bent in the right places.
A cut groove with reinforcement inside. We used a hand-held circular saw for cutting.
A furrow around the perimeter of the main part of the house.
We fill our reinforcement with cement and wait for it to harden.
Furrow with reinforcement and cement.
Further – it’s easier. We lay out the second and third rows of foam blocks, not forgetting to move them to the side, at least 10-15 cm in relation to the previous row. We also do not forget about the evenness of the walls. The smoother the construction, the fewer problems with finishing later.
The second and the beginning of the third row.
Third row.