Knitting reinforcement is one of the main stages of work to create a reinforcement frame. By connecting the reinforcement, a reinforcing structure is created, thanks to which the concrete receives greater strength in both compression and tension. If the rods are connected incorrectly, the finished monolithic structure will not receive the design strength. In order to avoid this, we will look at how to knit reinforcement correctly, observing all the rules and regulations, and what tool can be used to do the work; this will be useful for novice reinforcement makers and for experienced builders.
Tools for tying reinforcement, technology for working with them
You can make a crochet hook for reinforcement with your own hands from wire with a diameter of 4 mm. For this purpose, welding electrodes are used as they are the most durable. The manufacturing procedure is as follows:
- A small loop is formed at one end of the wire. It will serve as a support for the handle. The loop is made carefully so that the end is rounded towards the rod. During work, this place should not cling to clothing.
- In the central part, the rod is bent at an angle of 30 degrees in the shape of a rocker arm.
- Several washers are threaded onto the rod until they stop with a loop. This place will fix the handle.
The handle can be made in different versions:
- Take 2 tubes, constituting 1/3 of the length of the rod. If the rod is 4 mm in diameter, then one of the tubes should have an internal diameter of 5-6 mm. It is put on a rod. The second tube should have a larger internal diameter. It is put on from above, and the entire system is riveted with a hammer.
- 1 tube is taken. Slides onto the rod. The washer is welded to the handle and rod for fixation.
- A handle with a hole for a rod is turned from dense wood on a lathe. Instead of wood, you can use a polymer pipe. A washer is welded for the stopper.
If you do not make a ring at the bottom, then you also need to weld a washer.
Regardless of the type of device, the knitting technology is the same. The work is carried out according to the following scheme:
- The cut wire is folded in half.
- It is stretched under the intersection of the reinforcement.
- The free ends of the wire are crossed.
- The hook is pulled through the wire loop and hooks the loose ends.
- Rotational movements begin, during which the wire is wrapped.
- The hook is removed and the knot is checked for strength.
When checking the strength of the connection, the rigidity of the structure is checked. She must be motionless.
The process of knitting with a screw product is the same. The difference lies in the finishing stage. When threading a hook into a loop, you do not need to wrap it yourself. Thanks to the worm mechanism, just pull the handle towards you and the rotational movements will begin automatically.
We suggest you read How to install a round door handle
Low carbon steel is used as wire material. To prevent rupture during knitting, it must be held over the fire. After cooling, it is ready for use. Its diameter can be 1 mm, 1.2 mm, 1.4 mm. Parameters are selected based on experience. A wire that is too thin will break, and a wire that is too thick will be difficult to work with.
Nobody does the work manually. It's practically impossible. There are special tools for this purpose that speed up and simplify the process. Each tool has its own characteristics of use. The following devices are available for tying reinforcement:
- Hand hook.
- Knitting gun.
- Screwdriver.
- Ticks.
Each of the tools has its own pros and cons, we will consider them, as well as the technology for their use, and based on these data and the opinion of an expert (a reinforcement specialist with 10 years of experience), we will summarize and choose the best option for tying reinforcement.
The peculiarity of the work is that it is done manually. At first, the process will be lengthy, as you need to get better at it. The hook is made of steel, and the handle is made of wood or plastic. The cost of such a hook is 1 thousand rubles.
There are even automatic hooks on sale, but reviews about them are mixed. Some note the short lifespan, others say that it is difficult to twist wire 2 mm or more thick.
Calculation
The consumption of reinforcement must be carried out at the stage of planning the foundation drawings, in order to know with accuracy in the future how much building material will be required. It is worth familiarizing yourself with how to calculate the amount of reinforcement for a shallow foundation 70 cm high and 40 cm wide. First, you need to establish the appearance of the metal frame. It will be made of upper and lower reinforced belts, each with 3 reinforcing rods. The gap between the rods will be 10 cm, and you also need to add another 10 cm for a protective concrete layer. The connection will be made by welding sections of reinforcement of identical parameters in increments of 30 cm. The diameter of the reinforcement product is 12 mm, group A3.
Calculation of the required amount of reinforcement is carried out as follows:
- to determine the consumption of rods on the axial belt, you need to calculate the perimeter of the foundation. You should take a symbolic room with a perimeter of 50 m. Since there are 3 rods in two armored belts (6 pieces in total), the consumption will be: 50x6 = 300 meters;
- Now you need to calculate how many connections are required to join the belts. To do this, it is necessary to divide the total perimeter by the step between the jumpers: 50: 0.3 = 167 pieces;
- observing a certain thickness of the enclosing concrete layer (about 5 cm), the size of the perpendicular lintel will be 60 cm, and the axial lintel - 30 cm. The number of separate types of lintels per connection is 2 pieces;
- you need to calculate the consumption of rods for axial jumpers: 167x0.6x2=200.4 m;
- consumption of products for perpendicular jumpers: 167x0.3x2=100.2 m.
As a result, the calculation of reinforcing materials showed that the total amount to be consumed would be 600.6 m. But this number is not final; it is necessary to purchase products with a reserve (10–15%), since it will be necessary to strengthen the foundation in corner areas.
Methods
You can tie reinforcement with wire using a number of tools and devices known to everyone. Let's list them.
Special pistol. He gets the job done quickly. However, this tool is quite expensive: it costs about 1 thousand dollars. But with it it is impossible to approach the internal pins of a wide and high foundation frame. This device is convenient to work only at the extreme points of the frame.
You can soften any steel by heating it red-hot and then letting it cool under normal conditions.
If there is no opportunity or desire to purchase ready-made binding wire, then you can burn any old tire, after which only steel wire of the required softness will remain. But burned steel partially turns into scale, becomes thinner and more brittle, so this solution is a last resort.
How to knit reinforcement mesh yourself
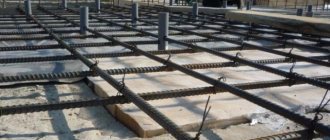
The following step-by-step instructions will give you the opportunity to learn how to properly make a frame and provide the foundation with the necessary properties. The easiest way is to knit ready-made reinforcement for a strip foundation on the ground. Straight sections of the mesh are created outside the structure, but the corners are knitted after the frame is lowered into the trench.
- First you need to cut pieces of rods. It is better to start knitting with the shortest section of the foundation in order to gain a little experience. You need to cut to a minimum, trying to use the entire length of the working rods. If we take as an example a width of 40 centimeters and a height of 120 centimeters, then the indicators are as follows.
- The metal is poured on all sides with a layer of concrete at least 5 centimeters thick. The net dimensions of the frame in height are a maximum of 110 centimeters, width – 30. For knitting, add 2 centimeters on both sides for an overlap. It turns out that the blanks for horizontal jumpers should be about 34 centimeters long, and vertical ones - about 144 centimeters. This is for high foundations, but usually a base with a height of about 80 centimeters is used.
- 2 rods are placed on a flat surface, horizontal spacers are knitted at a distance of 20 cm from the ends on both extreme sides: the wire is folded in half, pushed under the fastening point and tightened by twisting the hook.
- At a distance of about 50 centimeters, all the horizontal struts are fastened in turn, the structure is put aside, another one of the same is made - these are the lower and upper frames that need to be tied together: adapt stops for both meshes between the rods and 2 struts vertically at the ends, attach the remaining pieces. The same should be done with all straight sections of the structure.
- Then, pads with a height of at least 5 centimeters are laid at the bottom of the trench, side supports and a mesh are installed correctly. Now you need to knit every corner and joint, creating a single frame. The overlap of the ends of the rods must be equal to at least 50 times the diameter of the rods.
- Next, the lower turn is tied, the vertical posts are attached, and the upper frame is attached to them. Then, on all surfaces of the formwork, you need to check the distances, indentations, and overlaps at the joints so that everything is done correctly and clearly.
- Connecting rods along the length usually does not cause problems, but fastening the frame parts in the corners must be done in accordance with established standards. There are two ways: between two perpendicular structures or at the point where a wall adjoins another.
Corner knitting technologies:
1) Rigid with a foot - at the end of each rod, knit a foot at a right angle with a length of at least 35 diameters of the rod, connect the bent part to the perpendicular section. This is how the outer rods of the wall frame are attached to the outer rods of the other, while the inner ones are also welded to the outer ones.
2) G-clamps - instead of a clamp, take a clamp with a length of at least 50 reinforcement diameters, one side is attached to the frame of one wall, the other is attached perpendicular. The outer rods are connected to the inner ones, the pitch of the clamps is ¾ of the height of the wall.
3) U-clamps - for one corner you need to install two U-shaped clamps with a length of at least 50 reinforcement diameters, each welded to one perpendicular rod and two parallel ones.
Junctions are created using similar fastening methods.
Rules for fastening rods
According to this scheme, you can tie the reinforcement:
- The wire is tied in half.
- A hook is inserted through the loop.
- On the reverse side, the end is wrapped around the intersection and also placed in the hook.
- The wire twists.
Recommended rules and methods of work when knitting:
- The rods are pulled up, twisted, the ends are bitten off with wire cutters;
- The wire twists several turns when it is tightly stretched;
- The rods and clamps are tied.
Using paper clips, staples, clamps
If necessary, speed up the knitting using the above-mentioned materials. In these situations, knitting is done by hand without using a tool. Rods with a small diameter can be tied with self-tightening plastic clamps. Universal devices suitable for any sections. They are light, installed by hand and do not smudge. Do not forget that they have low strength and can be damaged at low temperatures.
Advantages of staples and other fasteners of the same type:
- Productivity increases;
- The density of connected nodes increases;
- Easy to use.
Reinforcement of corners and joints of strip foundations
As a rule, the sequence of assembly of the reinforcement frame of the foundation consists of the sequential assembly of straight sections and their connection at the corners of the foundation and at the junction of internal partitions
It is worth paying special attention to these areas, since the main bending and shear stresses arise here
Reinforcement of the corners of the strip foundation and the junction of the walls is carried out using rigid legs, L and U-shaped clamps.
When using a rigid poker-like foot with a length of at least 35d of the working rod, the bent part of the reinforcement is positioned so that the outer rods in both directions are connected, and the inner rods are welded to the outer rods. In this way, you can avoid a common mistake when reinforcing - the lack of connection between external and internal rods. In places of bending, vertical reinforcement is installed on the inside.
The principle of installing an L-shaped clamp is similar, only instead of a tab, a bent rod with a side of at least 50d of the working reinforcement is used. Here, too, the internal rods of one direction are connected to the external rods of the other side. U-shaped clamps allow you to connect parallel external and internal rods in one direction to a perpendicularly located external rod in the other direction. Two such clamps are used at the corners of the foundations, and only one at the junction of the wall.
The diagrams below clearly show the connections between corners and reinforcement joints:
Here the question arises, how to properly bend reinforcement for the foundation. To do this, use a special device - a reinforcement bender, consisting of three rods of different diameters, rigidly fixed to a stable, mostly steel base. You can make such a device yourself or purchase it in a store.
How to choose the right reinforcement for the foundation?
If you purchase reinforcement for a strip foundation, then pay attention to its designation:
- Index C indicates that the reinforcing bars are weldable.
- Index K - means that the reinforcement is resistant to corrosion cracking, which can occur under stress.
If one of these indices is missing, then the reinforcement for the foundation is not suitable.
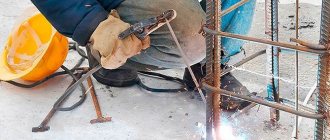
By the way, for welding frames made of rods 12 mm in diameter, due to the labor-intensive process, electric arc welding is not used - especially since the rods are so easy to burn out. Arc welding is also not applicable for class A-III, 35GS fittings.
The amount of overlap is 30 reinforcement diameters. Moreover, it should be installed so as not to touch the formwork at all - this distance between the plane of the formwork and the reinforcement is called the protective layer. It is he who protects it from temperature and atmospheric influences and corrosion.
Types of reinforcement for tying
Before starting work, you need to decide on the fittings that are best suited. How to properly knit reinforcement for a strip foundation? Tying the strip foundation reinforcement is done with any pneumatic tool or hook. What if they are not around? An improvised tool is used. This is what is good about a strip foundation. Knitting of reinforcement can even be done using pliers.
Corrugated reinforcement is used in the main sections, because it has better adhesion to cement concrete, and smooth reinforcement is used for bonding in cross sections. It will cost a little less than the corrugated one.
Tying metal reinforcement
There are certain rules for mating. When choosing fittings, it is necessary to choose one that meets the requirements of GOST. During construction, a material that complies with GOST-5781-82 is often used. Has six strength classes.
It can be bent if necessary, and also welded using a welding machine. In the manufacture of the first class, low-carbon steel is used, and when the class is changed, the concentration of alloying additives increases, due to which the mechanical strength increases.
Bonding of composite reinforcement
Made from fiberglass, carbon fiber, basalt plastic. It contains fibers of carbon, basalt, as well as glass and aramid. The most common is fiberglass. It is lighter, cheaper, does not rust, does not bend, and cannot be welded with a welding machine. In the absence of welding capabilities, composite reinforcement has to be tied together. The advantage of this type is that it has low thermal conductivity.
Tying fiberglass reinforcement
Bound plastic reinforcement can be distinguished from metal reinforcement by the permissible distributed weight. When choosing fiberglass reinforcement as a reinforcing material, it is necessary to calculate the possible loads because the specific gravity it perceives is significantly different from the weight that metal reinforcement is capable of supporting. The binding process itself remains the same. The same tools and the same accompanying materials are used.
Basic Tools
Having decided to tie reinforcement for a strip foundation, you need to choose the right tools. If it fits the volume of work, then you can cope with the creation of the frame relatively quickly.
A knitting gun is used when you need to quickly connect a large number of rods. But it will not be able to cope with work in hard-to-reach places, so it is used infrequently. Chinese models cannot withstand heavy loads - a gun may be enough to knit the frame of one foundation. The cost of the tool is about 3,500 rubles.
Crochet hook - standard option. This tool is easy to use, but it leaves long wire tails. The connection and fixation of each element is done manually.
To tie the reinforcement for a strip foundation with your own hands, you can use pliers. They are convenient for twisting the wire and removing unnecessary tails. But this tool does not create a strong enough bond, which may affect the structure in the future.
Methods
You can knit reinforcement using different methods:
- manually;
- using an inertial semi-automatic hook;
- using a special knitting gun.
Manual
The knitting pattern does not depend on the tool.
The above describes knitting by hand, that is, using a regular hook. Such a tool can be purchased at a hardware store or made independently. It is made from sharpened reinforcement. The handle is fused with melted plastic.
The hook itself can have almost any bend and length. The master chooses the most convenient hook configuration for himself experimentally.
Semi-automatic
The tool, which works on the inertial principle, also has the shape of a hook. Its use speeds up and simplifies the process. It is inexpensive and sold in hardware stores.
The operating principle of such a tool is as follows:
- hook the wire and pull it upward with force;
- at this time, the leg of the hook, which has a spiral thread and is placed in a plastic case, rotates, twisting the wire;
- If after one such movement the wire loop is not twisted tightly enough, hook the loop again and pull.
Semiautomatic is used by professional builders in the construction of private houses.
Using a knitting gun
The gun is a complete construction equipment.
It performs the knitting automatically. When creating a frame, the gun is simply brought to the joint, after which you need to press a lever or button (depending on the model of the tool).
The gun will wrap the wire around the joint, tighten it, and cut it. The whole procedure takes a few seconds.
The video contains tips and guidance on tying reinforcement with a screwdriver and a hook:
Settlement stage
At the design stage, it is important to skillfully calculate what kind of reinforcement is needed for a strip foundation. This will create a reliable foundation that will ensure the strength characteristics of the building under construction with a long service life.
When performing calculations at the preparatory stage of work, many factors should be analyzed:
- soil characteristics in the conditions of a specific construction site;
- acting loads, which the reinforcement frame perceives;
- the mass of the building due to the design features and materials used;
- climatic conditions in the construction area;
- soil reaction associated with the proximity of groundwater and soil freezing at negative temperatures.
The rules for reinforcing strip foundations provide a special approach to the selection of base material
Based on the results of design work, the diameter of the reinforcement for the strip foundation is determined and a decision is made on the degree of penetration of the foundation into the ground:
- To a depth limited to 0.5 m for hard soils that are not prone to heaving.
- To an immersion depth increased below the soil freezing level for problem soils.
The options don't end there. After all, construction science does not stand still; new supporting structures with increased strength are being developed. A new base option has been introduced and tested in operation, when a monolithic reinforced slab is poured onto a pre-made reinforced strip frame. Which base design is better is determined at the design stage, taking into account the specific conditions of the actual terrain. Depending on the characteristics of the base chosen according to the project, designers decide whether to reinforce the tape or reinforce the foundation slab, as well as which reinforcement is best to use for the foundation.
How to knit reinforcement
Since reinforcement in the form of steel rods is mainly used in the construction of foundations and main walls, their connection to absorb compressive or tensile stresses is mandatory. In mass construction, the welding and tying method is used for connections, in individual construction, usually only tying. In this case, the reinforcement is knitted using:
- knitting wire;
- reinforcement clamps.
The term “knitting wire” means round wire made of low-carbon steel in accordance with GOST 3282-74. It can be regular or heat-treated (marked “O”), coated or uncoated. The thickness of the zinc coating determines the class of the material.
When choosing which wire to knit the reinforcement with, you should pay attention to the grade of concrete and the operating conditions of the structure. This takes into account the mechanical properties
So, if tying reinforcement for the foundation is supposed to be done manually, it is better to choose a thinner option, since without a special tool, thick wire for tying reinforcement requires significant effort.
In addition to industrially produced low-carbon wire, it is permissible to use metal cord from car tires. When tires are burned, the metal cord is released and simultaneously undergoes heat treatment, which makes it easier to work with in the future. This option of knitting material is acceptable only for small volumes of work and individual low-responsibility construction.
Knitting reinforcement is one of the main stages of work to create a reinforcement frame. When connecting reinforcement, a reinforcing structure is created, thanks to which the concrete receives greater strength in both compression and tension. If the rods are connected incorrectly, the finished monolithic structure will not receive the design strength.
Plastic clamps, regular and with a steel core, are also applicable. They are usually used for fiberglass reinforcement. The use of clamps is permissible in cases where liquid concrete will not be subjected to mechanical loads during the hardening process (they will not walk on it, stack heavy things, or load it with other building materials). This option is applicable for low-rise buildings, since during the process of pouring a large mass of concrete mixture, the fastenings can move along with the reinforcement. The displacement disrupts the functioning of the frame and leads to a change in the design strength of the structure.
What kind of fittings are used?
The first step in creating reinforcement is selecting reinforcement. Based on the material of manufacture, the reinforcement used for foundation frames is divided into metal and composite. Each of these options has its pros and cons.
Metal
Metal rods have been used in foundation construction for a long time.
This is a classic proven version of the material. When constructing private houses, metal reinforcement is used, manufactured in accordance with GOST 5781-82.
The fittings that comply with this standard are divided into 6 classes. The higher the class, the stronger the material.
Reinforcement of all classes except the first is manufactured mainly with a corrugated surface. Thanks to the corrugation, the rods adhere better to the concrete.
In low-rise construction, mainly class 3 material with a diameter of 12-18 mm is used. It is used to make longitudinal frame elements that bear the main load of reinforcement.
For clamps, jumpers and additional elements, smooth first-class reinforcement is used. It is cheaper than more durable analogues, but it bends well, making the work of the master easier.
Composite
This is a modern material used in the construction of concrete structures only in recent years.
The raw material basis for the manufacture of composite rods can be:
- basalt plastic;
- carbon fiber;
- fiberglass.
Composite reinforcement is more expensive than metal reinforcement. But its popularity is growing as it has more attractive characteristics. Of the three main options for composite materials, fiberglass reinforcement has become the most popular. Its price is lower than the cost of the other two options, and its strength indicators are quite high.
The composite type of material, unlike metal, has low thermal conductivity. Therefore, frames made from it do not increase the level of heat loss of the building through the foundation. In addition, composite rods are not subject to the negative effects of temperature changes and high humidity. Therefore it is more durable.
Composite material is easier to work with. It is lighter than metal, and during the process of knitting and laying it does not leave traces of rust on hands and clothes. But it is impossible to say unequivocally that composite reinforcement is better than metal reinforcement. When choosing a material, all properties should be compared.
The main differences between composite (polymer) material and metal material:
- Composite rods can only be tied together, they cannot be joined by welding.
- Polymer materials lose their elasticity when heated strongly, which does not happen with metal.
- The elasticity of fiberglass in its normal state is several times less than that of metal.
- Fiberglass is a low-flammable, self-extinguishing material, while metal is a non-flammable material.
- In terms of thermal conductivity, fiberglass wins.
- Composite reinforcement does not conduct electricity.
- Fiberglass is not susceptible to corrosion processes.
- Polymer rods are 3.5 times lighter than metal rods.
- The tensile strength of composite reinforcement is an order of magnitude higher.
Knitting or welding?
To ensure increased strength of the slab base, reinforcing bars are assembled into a load-bearing structure in several ways:
- The rods and lattice fragments are tied together with binding wire. To impart plasticity, the wire is additionally fired. When connecting parts, use a special steel hook.
- The elements of the load-bearing frame are fixed using electric current. In domestic conditions, welding is carried out in the traditional way; in industrial conditions, resistance spot welding is used.
Methods of fixation with wire and welding are characterized by their advantages and disadvantages, which, in turn, predetermines the lack of consensus among craftsmen.
So, the advantages of mating are as follows:
- preserves the structure and strength of the metal along the entire length of the steel elements;
- the cost of work is much lower than the use of electrodes.
The main disadvantages of the technology for binding the reinforcing frame:
- the mobility of the structure creates difficulties during the assembly process;
- installation requires significant time and labor costs.
Advantages of welded reinforcing frames:
- joint rigidity;
- high assembly speed;
- practicality of the technique.
Disadvantages of the method of fixing the frame by welding:
- the need for sources of electric current and a welding machine;
- a high probability of metal burnout and a decrease in the strength of steel at welding points.
Taking into account the ambiguity in the effectiveness of both methods, in practice the following recommendations are followed:
- For the construction of multi-storey buildings, which will place a significant load on the foundation, the welding method is used. Highly qualified welders are involved in the work to reduce the risk of metal burnout at joints.
- In private housing construction, the reinforcing frame is mounted using knitting wire. The method is advantageous in its ease of assembly without the use of expensive equipment, as well as the absence of increased stress at the points where the elements are joined.
Video
Video about how to quickly learn to knit.
The technology for constructing a grillage frame structure is no different from a strip structure. Here are the same schemes and methods of knitting structures from reinforcement. As for the frame for a columnar foundation, one must take into account the fact that the frame itself in these structures is a vertical structure with vertically installed main rods, which are connected to each other by rods of smaller diameter.
This is if the frame has a rectangular cross-section. Therefore, exactly the same knitting is carried out here as in slab or strip bases. If the cross-section is circular, then the longitudinal rods are one rod rolled into a circle. It is tied to vertical elements in certain places of the frame, taking into account the installation step.
Possible errors and how to fix them
A small overlap of reinforcement or its absence in the frame is unacceptable, since the frame may move during the concreting process.
This may damage the finished product. It is better to leave allowances of 200 mm.
Welding elements or tying with unsuitable material, such as rope, is not permitted.
Welding makes the fastening unit fragile, and the rope does not provide sufficient strength to the connection.
Reinforcement of corners without overlaps. Reinforcing lap corners with whip can lead to rapid failure and uneven load transfer between the two parts of the foundation structure. To solve the problem, additional bent elements are included.
How to make reinforcement correctly
In order for the reinforcement to be done according to all the rules, the following requirements must be met:
- The distance between the longitudinal reinforcement belts should not exceed 50 cm. The number of belts depends on the height of the foundation.
- Vertical and transverse reinforcement bars (that is, transverse chords) are installed in increments of 30 cm according to the recommendations of SNiP, but in practice they are often made in increments of 50 cm. Sometimes the transverse chord is made in the form of a rectangular clamp.
- From each corner in both directions it is necessary to install 3-4 transverse belts with a step of 0.5 from the main one.
- From the junction point in each direction it is also necessary to make 3-4 transverse belts with a step of 0.5 from the main one.
- The choice of diameter of the main longitudinal reinforcement depends on the load on the foundation, that is, the greater the load, the thicker the reinforcement.
- Only special wire is used to knit the frame.
- In order for a protective layer of concrete 50 mm thick to form around the metal frame on each side after pouring the solution, it is necessary to install special devices: “chairs” or “frogs” on the bottom of the frame, and “stars” on the sides.
- It is necessary to reinforce the corners of the frame only by using special structures reinforcing schemes, and not by simply overlapping perpendicular reinforcement rods.
- It is advisable to make straight sections of the frame with solid pieces of reinforcement (standard factory length 11.7 m).
- When joining longitudinal reinforcing elements, it is necessary to strictly observe the dimensions of the overlap of one bar on another (for concrete grade M200 - 50 reinforcement diameters, for M250 - 40 diameters, for M300 - 35 diameters).
- It is unacceptable to join longitudinal reinforcement bars in the same place vertically (the spacing should be at least 60 cm or 1.5 times the overlap length).
What to knit with? Tie wire VS plastic clamps
What is better for tying reinforcement: regular wire or fashionable plastic clamps? Let's figure it out together.
Steel wire: where to get it and how to make it yourself
Foundation binding wire is made from annealed low carbon steel. It is soft to bend and easy to use. The color is white - galvanized - and black, without any coating. By the way, interestingly, many craftsmen consider beautiful galvanized wire to be used for a foundation as a real excess - after all, there is no access to oxygen in concrete, and therefore there can be no corrosion.
What diameter should I use for the wire? Experienced builders say that the most convenient and durable option is 1.2-1.4 mm. A two takes a lot of effort, but a one is too weak.
Here's how you can get hold of tying wire for a foundation. We take an old truck tire and burn it. This tire contains metal cord - it is this that is used in the new quality. The only point: tires from imported trucks may contain synthetics instead of metal. This is easy to check: use a knife to cut through the inner side, the one adjacent to the rim. Did the knife hit the metal? So, the wire will work. Didn't resist? Then the tire will simply burn in the fire, and that’s it.
Plastic clamps: pros and cons
Most builders look at the recently introduced plastic clamps with some apprehension - will they then withstand the load in the foundation? Won't they break? How reliable are they really?
And the advantages of this material, of course, are pleasing: the simplicity and speed of tying, the cost is not much more expensive than tying wire.
And the most popular in this regard today are plastic clamps with a heart made of steel wire. They are used for attaching pipes for cables to fences, and when installing perimeter security systems. They are more expensive, but they are especially convenient to use.
Pouring concrete onto the frame
We have just figured out how to reinforce the foundation, now we will look at how to pour concrete correctly so as not to damage the integrity and increase the strength of the structure. The first step is to make a good base. To do this, pour 5 centimeters of broken brick or cinder block under the first strapping belt. Next, fill it with liquid solution so that it penetrates well into all the cracks and ensures maximum strength of the sole.
Important: you cannot fill the foundation and plinth in “waves,” especially at the junction of the reinforcement - the crack will go along this line. If you need to perform the operation in 2 times, then it is better to make the “break” in the middle of the foundation. For example, if its height is 150 centimeters, then at the level of 75 cm you can take a break. Next, you need to fill everything with a monolithic layer, and that’s the only way.
The metal is poured at least 8-10 centimeters so that it is not near the edge, otherwise the foundation will fall apart under an average load. This will not affect the overall strength, but the base will lose its appearance - the edges will crumble.
Do-it-yourself calculation of strip foundation reinforcement
Any construction work is regulated by GOSTs or SNiPs. Reinforcement is no exception. It is regulated by SNiP 52-01-2003 “Concrete and reinforced concrete structures”. This document specifies the minimum amount of reinforcement required: it must be at least 0.1% of the cross-sectional area of the foundation.
Determination of reinforcement thickness
Since the strip foundation in section has the shape of a rectangle, the cross-sectional area is found by multiplying the lengths of its sides. If the tape has a depth of 80 cm and a width of 30 cm, then the area will be 80 cm * 30 cm = 2400 cm2.
Now you need to find the total area of the reinforcement. According to SNiP it should be at least 0.1%. For this example it is 2.8 cm2. Now, using the selection method, we will determine the diameter of the rods and their number.
Quotes from SNiP that relate to reinforcement (to enlarge the picture, right-click on it)
For example, we plan to use reinforcement with a diameter of 12 mm. Its cross-sectional area is 1.13 cm2 (calculated using the formula for the area of a circle). It turns out that in order to provide the recommendations (2.8 cm2), we will need three rods (or they also say “threads”), since two are clearly not enough: 1.13 * 3 = 3.39 cm2, and this is more than 2.8 cm2, which SNiP recommends. But it will not be possible to divide three threads into two belts, and the load on both sides will be significant. Therefore, they stack four, laying a solid margin of safety.
In order not to bury extra money in the ground, you can try to reduce the diameter of the reinforcement: calculate it at 10 mm. The area of this rod is 0.79 cm2. If we multiply by 4 (the minimum number of working reinforcement bars for a strip frame), we get 3.16 cm2, which is also enough with a margin. So for this version of the strip foundation, you can use class II ribbed reinforcement with a diameter of 10 mm.
Reinforcement of a strip foundation for a cottage is carried out using rods with different types of profiles
We have figured out how to calculate the thickness of longitudinal reinforcement for a strip foundation; we need to determine with what step to install vertical and horizontal lintels.
Installation step
There are also methods and formulas for all these parameters. But for small buildings it’s simpler. According to the recommendations of the standard, the distance between horizontal branches should not be more than 40 cm. This parameter is used as a guide.
How to determine at what distance to lay reinforcement? To prevent steel from corroding, it must be embedded in concrete. The minimum distance from the edge is 5 cm. Based on this, the distance between the rods is calculated: both vertically and horizontally it is 10 cm less than the dimensions of the tape. If the width of the foundation is 45 cm, it turns out that between the two threads there will be a distance of 35 cm (45 cm - 10 cm = 35 cm), which corresponds to the standard (less than 40 cm).
The reinforcement step of a strip foundation is the distance between two longitudinal bars
If our tape is 80*30 cm, then the longitudinal reinforcement is located one from the other at a distance of 20 cm (30 cm - 10 cm). Since medium-level foundations (up to 80 cm in height) require two reinforcement belts, one belt from the other is located at a height of 70 cm (80 cm - 10 cm).
Now about how often to install jumpers. This standard is also in SNiP: the installation step of vertical and horizontal dressings should be no more than 300 mm.
All. We calculated the reinforcement of the strip foundation with our own hands. But keep in mind that neither the mass of the house nor the geological conditions were taken into account. We relied on these parameters to determine the size of the tape.
The procedure for creating formwork
The creation of formwork traditionally precedes the implementation of reinforcement.
Formwork can be created for the construction of small buildings from OSB boards, plywood, wood, and fiberboard. When the height is expected to be more than 150 centimeters, it is better to create the formwork from metal. Next, you will need to evaluate how to properly make the foundation. The foundation can be created in a dug trench
The bottom layer of the base becomes sand up to 150 mm high, which will need to be carefully compacted and filled with a layer of concrete of about 4-5 centimeters. When creating the foundation, it is important to consider the location of communications. The bottom of the formwork will be held in place by pegs installed around the perimeter; deviations from the width are best checked with pre-prepared slats. The formwork can be held together with nails driven from the inside, which are removed after the foundation is completed.
Next, it’s worth moving on to reinforcement.
Hand knitting technology
Let's look at how to properly tie reinforcement to a foundation using a hand-held device.
There are several methods of knitting under the foundation. Let's consider a proven method, guided by which, perform the work according to the following algorithm:
- cut a steel wire with a diameter of 1.2-1.4 mm and a length of about 20 cm for each attachment point;
- bend the wire in the middle of the segment;
- place diagonally at the point where the rods meet;
- insert the working part of the hook into the resulting loop;
- pull into the loop, using a hook, the ends of the wire located on the opposite side of the loop;
- rotate the hook in the loop until the connection is strong.
When performing work manually, control the tightening force. By twisting the wire with increased tightening force, you can break it.
Wire is most often used, because it is a reliable and proven option.
Slab foundation
Since a floating slab is considered the most expensive foundation, discharged reinforcement can be used in the middle part of the structure. However, this method of saving materials requires professional calculations in special programs. Therefore, individual developers most often use reinforcement mesh with the same cell size.
Correctly knitting reinforcement into meshes is not difficult, however, amateurs who do not have experience and specialized education make mistakes:
- lack of connection at the ends - the rods of the upper and lower chords must be connected with U-shaped clamps along the entire perimeter of the slab;
- one mesh instead of two belts - the lower mesh works in tension solely from the weight of the building; at the slightest occurrence of frost heaving under the slab, tension zones appear near the upper plane, so the second mesh is a prerequisite for normal operation (if the slab thickness is equal to or less than 15 cm, it is allowed to use one mesh);
- failure to comply with protective layers;
- the size of the mesh cells is too large, the cells should not exceed 40 cm, the optimal size is selected by calculation, in practice it is often no more than 20 cm.
To assemble the reinforcement frame of the slab, the upper mesh must be fixed at some distance above the lower chord. For this purpose, tables, frogs, spiders, and other elements with bent legs to rest on the lower cells and shelves supporting the top layer are used.
Spider made of reinforcement with a diameter of 8 mm.
When bending reinforcement on site, it is prohibited to heat the rods with gas welding. Bending machines or clamps must be used that provide the required bend radius. Where load-bearing walls are located, the slab foundation is reinforced with additional reinforcement, i.e. The cell pitch is halved.
In slabs with stiffening ribs under the load-bearing walls, frames are located by analogy with strip foundations and grillages. They are rigidly connected to the slab mesh and provided with standard protective layers of concrete.
More detailed information in the article: How to properly knit reinforcement for a monolithic slab.
Reinforcement of obtuse angles
With the complex geometry of the strip foundation, some angles can be much greater than 90 degrees. An obtuse angle also needs to be reinforced according to special schemes that increase the strength of the frame. There are two main ways to properly reinforce obtuse corners of a foundation.
First way
The optimal solution for reinforcing an obtuse angle is to bend the external longitudinal reinforcement at the required angle. The internal longitudinal whips are also bent at the same angle and tied to the external longitudinal component of the frame. The length of each bent part of the internal longitudinal rod is at least 50 diameters of the main reinforcement.
Second way
To strengthen the blunt corner parts of the frame, additional elements are used, bent at the required angle. The length of the arm of such a curved element must be equal to at least 50 diameters of the longitudinal reinforcement. The overlap when knitting varies from 35 to 50 reinforcement diameters, depending on the brand of cement used for the concrete mortar.
How to make a frame correctly?
Before proceeding with the reinforcement of the strip foundation, drawings of suitable frames should be studied. After all, the strength of the frame determines whether the foundation will serve for many decades or will become covered with cracks in the first spring due to seasonal fluctuations in soil level.
Strip foundation reinforcement scheme
In order not to make mistakes during manufacturing, you need to remember a few rules:
- The overlap (the distance from the place of knitting to the edge of the rod) should be at least 5 centimeters.
- At corner joints, perpendicularly running rods must be connected to each other - in no case should you use two separate blocks that are not connected to each other. The ideal solution would be corners made from bent reinforcement - this type of foundation reinforcement scheme is the most reliable. But for this you need to have special equipment; if the reinforcement has a diameter of 14 millimeters or more, smaller diameters can be bent at home.
- Connections using wire must be tight - if you use a crochet hook, then tighten the wire until it stops so that there is no free space between the clamp and the main reinforcement. Also check with your hand; if the clamp moves when touched, you should make an additional tie with wire.
- The overlap during reinforcement should be equal to 40-50 diameters of the reinforcement. There must be a separation between adjacent connecting rods and the top and bottom layers, according to the design.
- The reinforcing frame must stand level in the formwork. It is also necessary to take care of a protective layer of concrete for the reinforcement, done according to the requirements of the drawing. It should be remembered that the minimum protective layer is equal to the diameter of the reinforcement.
Corner reinforcement scheme
Junction reinforcement scheme
As you can see, the rules are as simple as possible. But some inexperienced builders are unaware or forget about their existence. This leads to the fact that the reinforcement technology of the strip foundation is disrupted and its service life is significantly reduced.
Using a crochet hook
Before reinforcing the strip foundation, it is worth learning how to use the working tool. A special gun is rarely used for private house construction; such equipment requires additional costs. Investing in tools is only beneficial for fulfilling orders, and not when building one house.
For this reason, the most common tool for knitting in private housing construction has become a hook. It will be easier to use if you prepare special templates in advance. This part works like a workbench and makes the work much easier. Things will go faster. To make a template, wooden blocks are required, the width of which is about 30-50 cm, and the length cannot be more than 3 m, since such a workbench is inconvenient to use.
The most common way of knitting is crochet
In the wooden fixture you need to drill grooves and holes that will follow the outlines of the rods in the frame. Pieces of knitting wire 20 cm long are laid out in advance in such holes, and then the reinforcement rods are fixed.
In order to understand the knitting technology, you can consider examples. During construction, two options will be required: for crosses (when the elements are located perpendicular to each other) and for overlap connections. In a strip foundation, the second technology is often needed; when constructing a slab structure, the first will be the most relevant.
Knitting methods
To connect the laid frame into a single whole when joining with an overlap, the hook should be used in this order:
connections are made in several places along the length of the joint, the location of the wire is designated so that it is in the recessed part of the reinforcement profile; the wire is folded in half and placed under the junction; use a hook to hook the loop; the free end is brought to the instrument and placed on it with a slight bend; begin to rotate the hook, twisting the wire; carefully remove the instrument.
For one overlap connection, the procedure is repeated 3-5 times. Connecting the elements at one time, as is done with cross-connection, is not enough. Tying reinforcement under a strip foundation in this case will be unreliable, since fixation at one point does not prevent the elements from shifting.
Proper connection of the frame will ensure the reliability, strength and durability of the supporting part of the building.
About the need for strengthening
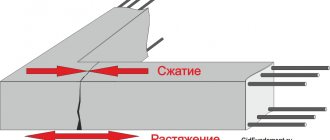
To what extent is it necessary to strengthen a concrete mass with steel wire? After all, concrete has fairly high strength characteristics. Indeed, concrete has increased resistance to compressive loads, but requires reinforcement against the destructive effects of tensile forces.
The greatest likelihood of stretching is on the surface of the base, this is where the reinforcement should be placed
This feature of concrete can be compensated for by laying steel rods at two levels of the base. This solution increases the strength characteristics of the array, allowing it to maintain integrity under the influence of bending loads, torques and tensile forces.
Peculiarities
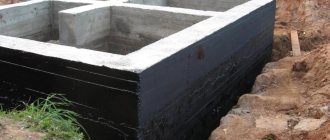
The strip foundation is a monolithic concrete strip without breaks at doorways, which becomes the basis for the construction of all walls and partitions of the structure. The basis of the strip structure is a concrete mortar, which is made from M250 cement, water, and sand mixture. To strengthen it, a reinforcement frame is used, made of metal rods of different diameters. The tape goes deep into the soil a certain distance, while at the same time protruding above the surface. But the strip foundation is subject to serious loads (groundwater movement, massive structure).
In any situation, you need to be prepared for the fact that various negative influences on structures can affect the condition of the foundation. Therefore, if the reinforcement is not done correctly, at the first slightest threat the foundation may collapse, which will lead to the destruction of the entire building.
Reinforcement has the following advantages:
- prevents soil subsidence under the building;
- has a positive effect on the soundproofing qualities of the foundation;
- increases the stability of the foundation to sudden changes in temperature conditions.
Wire for tying reinforcement cage
The reinforcement is knitted when installing the foundation frame using wire, the technical characteristics of which are specified in the documents GOST 3282–74.
For tying reinforcement, annealed steel wire of the BP grade is most often used.
The wire is made from low-carbon steel and is divided into several types:
- According to the processing method. There is heat-treated (annealed) and untreated wire.
- In terms of manufacturing accuracy. So, the wire can be of high precision or regular.
- According to the temporary resistance to loads and rupture of a product that has not undergone heat treatment, there are first and second groups.
- The wire may have a special protective coating or be without it.
The wire can be steel or black. The cross-section diameter varies from 0.16 to 10 mm. In this case, deviations in the cross-section of the product are allowed by 0.02 mm.
In GOST documents you can find more detailed characteristics of this product. Some of them:
- The elongation of wire that has undergone heat treatment and has a protective coating is 12÷18%, and without protection 15÷20%.
- For products not treated at high temperatures, depending on their cross-section, a parameter such as tensile strength varies and is (N/mm²):
— 590÷1270 for diameter 1.0÷2.5 mm;
— 690÷1370 for diameter less than 1.0 mm.
The manufacturer of these products must ensure compliance with the following GOST standards:
— products without heat treatment with a diameter of 0.5 to 6.0 mm must maintain integrity after four or more folds;
— the zinc protective coating must maintain its integrity and fit tightly into the steel after winding the wire in the form of a spiral. In this case, the presence of small zinc deposits, plaque, white sparkles and color heterogeneity is allowed;
— wire should be sold in coils. These coils can have different weights, which depend on the diameter of the wire and the presence or absence of a protective coating. Thus, the mass of the coil varies from one kilogram with a cross-section of products of 0.16÷0.18 mm to 40 kg with 6.3÷10 mm.
Heat treatment of the wire (annealing it) makes the material more plastic, easier to use, without significant loss of strength properties. So it makes sense to immediately purchase this option. Annealing, of course, can be done independently - but is it worth spending effort on this when ready-made wire is already on sale, and at a more than affordable price?
Probably, for a strip foundation there is no particular need to purchase zinc-coated wire if concrete is poured immediately after installing the reinforcing frame. In such a short period of time, corrosion will not have time to “gobble up” the connections, and then, after the concrete has fully matured, it will not be terrible at all.
As a rule, when constructing strip foundations independently, wire with a diameter of 1.2 or 1.4 mm is used, less often - up to 1.8 mm. The millimeter one is still rather weak for such purposes - it can cause breaks when tightening the knots, and with a diameter of 2 mm or more it will be very difficult to work with, it will take a lot of effort for high-quality tying without any special benefits.
The construction market has been replenished with another extremely convenient material for knitting frames. These are coils of ready-made wire segments with a diameter, as a rule, of 1.2 mm and a length of 80 to 180 mm, already having ready-made loops at the ends. Usually there are 1 thousand of these products in a bay.
Coils of ready-made wire loops “Kazachka” or “Bison” are a very good purchase, greatly simplifying the knitting of the reinforcement cage.
The cost of such packages of wire loops is very affordable, and labor productivity, as practice shows, almost triples.
Below, the reader is offered a calculator that will help to quickly calculate approximately how many connection points will need to be connected to the reinforcement frame being created, and how much wire will be required for this. It is taken into account that some areas of reinforcement require additional reinforcement.
Step-by-step instruction
Before knitting, you need to set up the formwork, concrete it, you need to purchase materials, deliver them and perform a number of other preparatory steps.
Start of reinforcement
List of actions for reinforcement and binding:
- Sorting;
- Cleaning from dirt;
- If necessary, align the rods;
- Cutting into pieces of the required size;
- Tying reinforcement blanks in the plane of the frame;
- Connecting planes to each other.
The diameter of the selected reinforcement and wire is selected based on the total load and the expected dimensions of the strip foundation.
Installation is carried out at the construction site. The four frame elements are tied together with an overlap. As a result, the belt will consist of pairs of twisted rods, which will be vertically and horizontally located.
Laying the finished reinforcement cage
Before installation, you need to prepare the base and place the formwork. Then comes the installation of two belts, which are then both concreted.
Action diagram:
- Driving in fixing rods;
- Sequential stacking of blocks;
- Checking elements.
Core mating
The best options are considered to be a rectangular or square strip foundation. For maximum stability, the reinforcement is made in a square, at 90 degrees. At the corners of the foundation, the production process becomes a little more complicated due to the use of bent rods. The workpieces are attached with bundles (clamps), and reinforcements are attached at the joints. To increase the strength of the house, the reinforcement is bent and overlapped using clamps.
Helpful Tips:
- Pay attention to the reinforced corners of the foundation;
- Use clamps so that the reinforcement cage does not come into contact with the soil and formwork;
- Use metal of the required quality without rust;
- Knit reinforcement with overlaps;
- If the wire is not flexible enough, place it in the fire for half an hour.
Using additional parts for spatial fixation of reinforcement
You should not assume that the use of fixing devices when constructing a strip foundation can be neglected. They form a “protective layer” that will help protect your foundation from corrosion and premature destruction. This seemingly trifle will save the building and a huge amount of money.
Clamps are used to fix the lower plane of the reinforcement frame, laying them on the base, and fixing the side planes to the walls of the formwork. Also for temporary fastening of elements during frame installation.
Another great tool is staples, which are used to tie together rebar intersections. They are very elastic and act in a springy manner. They have a diameter from 2 to 4 millimeters.
When building a strip foundation, it is necessary to take work with reinforcement very seriously. Be extremely careful! It is very important to choose high-quality materials that do not have rust, and when working, strictly follow the technological sequence so that your home lasts a long time. If in doubt, it is better to leave this work to professionals.