All builders know that reinforcement of a strip foundation is a necessary stage in the construction of buildings, thanks to which it is possible to achieve the necessary characteristics of strength, reliability, resistance to external influences, and significantly extend the service life. The tandem of concrete and metal guarantees the best properties that neither of these materials can provide separately.
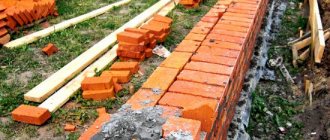
Strip foundations are most popular in individual construction of residential buildings, as they are relatively inexpensive, involve low consumption of materials, and quick and simple construction. But without strengthening the foundation, a structure of this type will not have the necessary properties and will not last long. Therefore, hardening must be done; all work can be done with your own hands.
Requirements for fittings
To understand what reinforcement is needed for a strip foundation, it is necessary to perform calculations and consider the main types of material. To perform the work, mechanically strengthened, hot-rolled, heat-treated construction reinforcement is used. The class is selected according to maximum loads, taking into account tensile characteristics, ductility, weldability, corrosion resistance, ability to withstand temperature changes, etc.
The main brands of rods: hot-rolled rod (A), cold-deformed wire (BP), very strong rope (K). For the foundation frames, rods of the A400 (AIII) yield strength class with a crescent-shaped herringbone pattern are selected.
Proper reinforcement involves the use of the following types of rods:
- Workers - for laying around the perimeter
- Transverse vertical
- Transverse horizontal (clamps)
- Additional - usually a binding wire is used instead
To understand which fittings are best to use, you need to remember some rules. To strengthen the base of one- and two-story buildings and light structures, rods with a diameter of 10-24 millimeters are suitable. The strength characteristics of thicker (and much more expensive) reinforcement are unlikely to be used.
The rods must be corrugated, as they provide excellent adhesion to the concrete mortar; their thickness must clearly correspond to the values specified in the documents. Smooth rods are cheaper, but they will not allow you to create a reliable and durable reinforced frame. They can only be used in transverse connections where the load is not very large.
When creating a strip foundation frame on homogeneous soil, you can choose a material with a diameter of 10-14 millimeters; on heterogeneous soil, 16-24 is better. If the side of the building is more than 3 meters, the working reinforcement of the monolithic foundation is made from rods of at least 12 millimeters, but not more than 40.
The technology requires that horizontal clamps in diameter should not be less than a quarter of the working rods - usually 6 millimeters. Vertical rods for low-damage foundations of 80 centimeters or less should be at least 6 millimeters in cross-section. Having thought everything through, you can determine what diameter of rods is needed for different types of work.
About the need for strengthening
To what extent is it necessary to strengthen a concrete mass with steel wire? After all, concrete has fairly high strength characteristics. Indeed, concrete has increased resistance to compressive loads, but requires reinforcement against the destructive effects of tensile forces.
The greatest likelihood of stretching is on the surface of the base, this is where the reinforcement should be placed
This feature of concrete can be compensated for by laying steel rods at two levels of the base. This solution increases the strength characteristics of the array, allowing it to maintain integrity under the influence of bending loads, torques and tensile forces.
The concrete base is additionally reinforced with auxiliary rods located in a vertical plane. Vertical elements provide fixation of the rods of the upper and lower levels of the load-bearing frame.
Reinforcement requirements
Before reinforcing, you need to decide what size the frame will be, make a drawing, draw a diagram of all the work and structures. The geometric dimensions of the foundation must be such that the location of the reinforcement is free. The concrete layer completely covers the frame, protecting it from external influences and corrosion.
The minimum distances between the rods must be sufficient for effective joining and compliance with all technology rules. Only high-quality fittings are used in the work, in accordance with SNiP 3.03.01. Bending of rods is performed using special devices. The bending radius corresponds to the diameter and physical parameters of the rods.
Video of manual machine for bending reinforcement
And another useful video:
Video on how to bend reinforcement using a homemade machine
Calculation of size, quantity and diameter of reinforcement
It is important to immediately know how much reinforcement is needed to make the reinforcement cage reliable and durable. Knowing the dimensions of the building, you can carefully calculate everything.
Standard frame configuration for small houses:
- Bottom and top row of belt
- 3-4 rods for each row
- The current distance between the rods is about 10 centimeters. The distance from the rods to the edges of the base should be at least 5 centimeters.
- The belts are connected with clamps or sections of rods in increments of 5-30 centimeters.
So, if you need to build a building with an area of 150 square meters, the perimeter of the external walls is 50 meters. To calculate the amount of reinforcement, you need to take everything into account: 2 belts of a longitudinal row of 3 rods each equals 6 rods, multiplied by 50 meters, that gives 300 meters of main rods. If the lintels are laid in increments of 30 centimeters, the result is 167 pieces per 50 meters. The length of the transverse lintels is 30 centimeters (167x0.3=100.2 meters), vertical - 60 (167x0.6=200.4 meters).
It turns out that to the question of how much reinforcement is needed to strengthen a house with an area of 150 square meters with a wall perimeter of 50 meters, the answer is: 300 meters of thick corrugated rods and 300.6 thinner rods. Plus 10-15% for stock and docking.
Distance between rods
According to SNiPs, the distance between horizontal threads should not exceed 40 cm; for unloaded bases, 50 cm is allowed.
Important! The edge of the metal reinforcement should not come into contact with the formwork and should not come out of the thickness of the concrete!
The minimum distance to the edge of the foundation tape is 5 cm. If the width of the base is 35 cm, subtract a margin of 10 cm and get a horizontal thread pitch of 25 cm. The value is less than the established one and meets the requirements.
- For shallow foundations up to 80 cm high, two horizontal strips are allowed. We retreat the recommended 5 cm from the bottom and top of the monolith, obtaining a height between the threads of 70 cm.
- The jumpers are installed vertically and horizontally with a minimum pitch of 30 cm.
- When constructing a main wall made of sand-lime brick, a multi-storey building, or locating the structure on moving and heaving soils, the cell pitch is reduced and the number of threads is added.
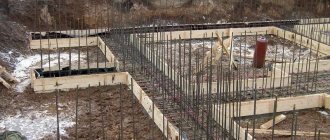
Rules for reinforcing strip foundations
- Working rods must comply with at least class A400.
- Welding is not used to connect rods due to the likelihood of weakening the cross-section of the element.
- The frame is tied at the corners, not welded.
- It is better not to use smooth reinforcement even for clamps.
- The layer of external protective concrete should be at least 4 centimeters, which will guarantee effective protection against rust.
- In the longitudinal direction, the rods in the frame are connected with an overlap equal to at least 25 centimeters and at least 20 diameters of the rods.
- The standards require that when metal rods are frequently placed, the aggregate in the concrete solution is not very large and does not get stuck between the rods.
- How to properly lay reinforcement in a trench - this can be done in two ways: create a frame outside the foundation or directly in the trench. The reinforcement methods are almost equivalent, but you will have to hire someone to work in the trench, while constructing the frame separately on site can be done independently.
- Knitting is carried out with a special crochet hook or knitting machine.
- Many people wonder what kind of wire is used for knitting - the answer is simple: soft thin wire of not a very high level of strength. It needs to be pulled well; a strong knot is obtained in 2-3 turns of the hook.
- The overlap (the distance from the edge of the rod to the knitting point) should be at least 5 centimeters.
- All wire connections should be as tight as possible, with no free space between the clamps and the frame, and no element should move.
Crochet
The design of the hook for these purposes may be different, but this is not so important. The meaning lies in the presence of a hook as such, because it is used to thread the wire. The rules for tying reinforcement for the foundation are shown schematically in the figure.
Pay attention to the sequence of actions:
- Bend the wire in half;
- Follow the arrow, as in the figure, bring it into position for threading;
- Insert the hook into the loop that will now be wound;
- Place the hook loop inward between the free ends of the wire;
- Without removing the hook, twist until tightened, but do not pinch;
- Ready!
There are motorized screw hooks in which the wire is tightened by rotating a screw. It turns out very quickly and conveniently.
How to knit reinforcement mesh yourself
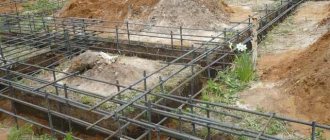
The following step-by-step instructions will give you the opportunity to learn how to properly make a frame and provide the foundation with the necessary properties. The easiest way is to knit ready-made reinforcement for a strip foundation on the ground. Straight sections of the mesh are created outside the structure, but the corners are knitted after the frame is lowered into the trench.
- First you need to cut pieces of rods. It is better to start knitting with the shortest section of the foundation in order to gain a little experience. You need to cut to a minimum, trying to use the entire length of the working rods. If we take as an example a strip foundation 40 centimeters wide and 120 centimeters high, then the indicators are as follows.
- The metal is poured on all sides with a layer of concrete at least 5 centimeters thick. The net dimensions of the frame in height are a maximum of 110 centimeters, width – 30. For knitting, add 2 centimeters on both sides for an overlap. It turns out that the blanks for horizontal jumpers should be about 34 centimeters long, and vertical ones - about 144 centimeters. This is for high foundations, but usually a base with a height of about 80 centimeters is used.
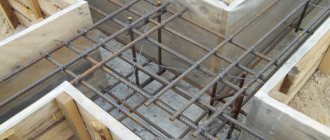
- 2 rods are placed on a flat surface, horizontal spacers are knitted at a distance of 20 cm from the ends on both extreme sides: the wire is folded in half, pushed under the fastening point and tightened by twisting the hook.
- At a distance of about 50 centimeters, all the horizontal struts are fastened in turn, the structure is put aside, another one of the same is made - these are the lower and upper frames that need to be tied together: adapt stops for both meshes between the rods and 2 struts vertically at the ends, attach the remaining pieces. The same should be done with all straight sections of the structure.
- Then, pads with a height of at least 5 centimeters are laid at the bottom of the trench, side supports and a mesh are installed correctly. Now you need to knit every corner and joint, creating a single frame. The overlap of the ends of the rods must be equal to at least 50 times the diameter of the rods.
- Next, the lower turn is tied, the vertical posts are attached, and the upper frame is attached to them. Then, on all surfaces of the formwork, you need to check the distances, indentations, and overlaps at the joints so that everything is done correctly and clearly.
- Connecting rods along the length usually does not cause problems, but fastening the frame parts in the corners must be done in accordance with established standards. There are two ways: between two perpendicular structures or at the point where a wall adjoins another.
Corner knitting technologies:
1) Rigid with a foot - at the end of each rod, knit a foot at a right angle with a length of at least 35 diameters of the rod, connect the bent part to the perpendicular section. This is how the outer rods of the wall frame are attached to the outer rods of the other, while the inner ones are also welded to the outer ones.
2) G-clamps - instead of a clamp, take a clamp with a length of at least 50 reinforcement diameters, one side is attached to the frame of one wall, the other is attached perpendicular. The outer rods are connected to the inner ones, the pitch of the clamps is ¾ of the height of the wall.
3) U-clamps - for one corner you need to install two U-shaped clamps with a length of at least 50 reinforcement diameters, each welded to one perpendicular rod and two parallel ones.
Junctions are created using similar fastening methods.
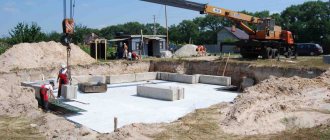
Stages of work
- Drawing up a project that will take into account all the soil features based on geological research. Depending on them, it is worth deciding on the type of foundation, its depth, and making calculations about upcoming expenses .
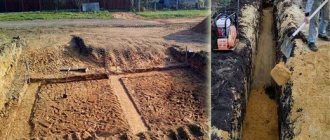
- Site preparation - removing the fertile layer and marking the future foundation. All distances are measured with a tape measure, pegs are driven into the ground at a distance of approximately 30 cm from each other, they must be installed at the corners. A cord or thick threads are stretched between them. Please ensure that the corners are strictly rectangular, especially if you are going to build a house made of timber .
- After the trench has been dug, you should go to its bottom lay a sand cushion approximately 10 - 15 cm thick for soil compaction. Most often, sand is moistened with water for maximum shrinkage, this is enough, but on some soils it is sometimes necessary to use geotextiles to prevent groundwater from penetrating and having a destructive effect on the foundation.
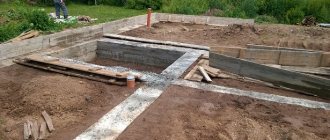
- The next stage is the assembly of formwork from wooden panels , the height is adjusted according to the level, all cracks are covered with film or other material.
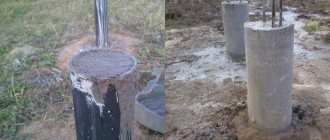
- The most important point is the installation of fittings . Depending on the correct knitting and location of the steel rods, the rigidity and strength of the foundation will depend.
- Pouring concrete mixture into the resulting structure . Now all that remains is to wait for complete drying and hardening, which occurs within 3 to 5 days and depends on the weather.
As you can see, almost all stages are not difficult to complete, except for reinforcement, which requires certain knowledge and skills. It is important to remember that openings should be provided for various communications .
Step reinforcement
If the construction site has large differences in height, then the foundation is poured with steps , which are reinforced according to a certain pattern:
- The reinforcement of the step is extended by 1 meter from the ledge .
- Rods 2 meters long should be placed in the upper part , its middle should be at the center of the ledge.
- Horizontal rods should be laid one and a half meters apart from each other .
Corner reinforcement
A lot of mistakes are made when reinforcing corners, but in no case should they be allowed, because this place experiences multidirectional loads , and incorrect laying of reinforcing rods will lead to the fact that the foundation will not be a monolithic structure, but a set of separate parts, cracks will appear , the concrete will delaminate.
Usually simple crossing , without additional vertical and horizontal reinforcements, which does not ensure the strength of the entire foundation.
To prevent this from happening, additional reinforcements should be used in the form of U-shaped or L-shaped rods; they are used at the joints of the reinforcement.
There are many schemes for their location. Transverse rods are laid twice as often as in the middle .
Additionally, vertical rods are laid. If it is necessary to reinforce an obtuse angle, then several L-shaped rods should be used , located in a certain way. The structure is reinforced with additional cross members.
Connection methods
There are two ways to connect steel rods to each other.
Welding is a quick and easy process, but it has a number of disadvantages:
- Due to high temperature, the properties of the metal change.
- In order for the welding units to be strong, a highly qualified welder is required .
- Welding increases the rigidity of the structure , thereby increasing the likelihood of violating its integrity when pouring concrete.
Knitting is the most effective method , although it takes more time. Knitting is done with wire using pliers and a special hook.
Knitting reinforcement using a special device - a knitting machine
To create this tool, you need to take several boards 20 millimeters thick, cut 4 boards along the length of the reinforcement, connect two at a distance equal to the pitch of the vertical posts, creating 2 identical templates. Next, two vertical supports are made with a height equal to the height of the reinforcement mesh. The supports are constructed with side corner stops; it is better to choose a flat area for work.
The device is used as follows: the legs of the stops are installed on two knocked down boards, the two upper boards are placed on the top shelf of the stops and fixed. That's it, the reinforcement mesh layout is ready, now you can quickly knit it. It is enough to place the vertical reinforcement struts in the marked places, fixing them with nails, install the rods on each steel lintel, doing this on all sides of the frame. Next, take a hook and wire - that’s it, you can knit. Such a device is relevant where it is planned to create many similar mesh sections.
Video on how to knit reinforcement using a device
How to knit reinforced mesh in a trench
Working in a trench is more difficult, so you need to plan everything ahead of time. Special devices or ordinary stones are placed at the bottom of the trench at a height of at least 5 centimeters in increments of the width of the mesh. The stones are laid out with longitudinal rods, and horizontal struts are tied. Until the rods are in the desired position, a second person holds their ends.
The reinforcement is knitted with a step between spacers of 50 cm wide. We install the pegs and begin to knit the monolithic structure. This is done on all straight sections. Parts of the frame should not touch the formwork; they should be at a distance of several centimeters from the formwork.
Then the corners are knitted using one of several existing methods. It is imperative to maintain the length of the overlaps, with the installation of vertical rods. Rods are often used here with a larger diameter, increasing the strength of the material. Upon completion of the binding, the concrete solution is poured in one go, covered with polyethylene, and during the drying process, it is periodically watered with water by spraying.
Welding fittings for reinforcement
In most joints, it is better to use knitting instead of welding - the finished structure will be more durable. Welding is possible only if you have a machine and extensive experience, exclusively on straight sections.
In order for the foundation to be truly reliable, it is also necessary to take care of the correct execution of the excavation work under the tape, arranging several layers of materials (not only for the base and top of the foundation, but also for filling).
Necessary tools, technologies used
With the help of tools for tying reinforcement, work on reinforcing the foundation, partitions, and walls is carried out quickly and efficiently. This could be hooks (simple, reversible), knitting guns or welding.
Which wire is best to use?
Special annealed steel wire with a diameter of 0.8–2 mm will allow you to tie the reinforcement. Its characteristics:
- bends easily;
- plastic, does not burst when knitting;
- fits tightly onto the joint.
The use of such wire allows you to knit the frame of a columnar base, piles, support columns, etc. with the same quality.
Tying is done with wire, the length of which is 25-30 cm. In order not to constantly measure or cut off the required length, experts advise rolling the wire into pieces of the required length and cutting at the bends with a grinder.
The footage of the required knitting wire is calculated from the number of joints multiplied by 0.3 m. This is exactly how much wire will be needed for one connection.
Practical advice
In places where there is no heavy load, you can select reinforcement in favor of bars of smaller diameter. If strength does not suffer from this, but it is possible to reduce the cost of work, this option is allowed. Deciding what diameter of reinforcement to use in your work should take into account two parameters: ensuring sufficient strength and the cost of work, choosing the optimal price-quality ratio. In some places, the use of thick reinforcement is simply not relevant, but purchasing more expensive material will significantly increase the cost of the entire construction.
The layout of the frame in the formwork must be level. Before laying the structure, it is necessary to carefully check all dimensions to exclude distortions, deformations, and non-compliance with parameters.
Video reinforcement of shallow monolithic strip foundations
And another video:
Other methods of tying the frame
In addition to welding or tying with a homemade hook, there are other options for how to tie reinforcement.
Tying with plastic clamps
A quick, simple dressing option that does not require skills or special tools. The disadvantages of this method include:
- fragility of screeds at low temperatures,
- greater susceptibility to stretching, leading to a decrease in rigidity,
- questionable strength of connections.
Using metal staples
A quick method, performed manually, without special tools, no special skills required, the connections are equally tight.
Flaws:
- used only for linking simple cross connections,
- low fastening strength.
Tying joints with a screwdriver
A quick option, similar in technology to using a simple hook.
You need an attachment in the form of a hook, which you can make yourself from an ordinary nail.
Reverse crochet tying
A variant of tying with a hook that works on the principle of a spinning top. The connection point is wrapped around the wire, the hook is rotated with several clicks until the desired result.
The reversible hook will be indispensable in places that are difficult to reach with other tools, and it is impossible to use welding or a knitting gun.