- home
- Useful articles
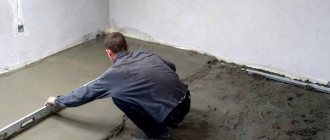
- Concrete floor
- How to avoid concrete voids when creating a floor?
»
»
»
The main problem when working with concrete is the formation of voids in its structure after it hardens. The consequences of such a defect are the appearance of cracks on the surface, wet spots, corrosion, etc. All this together has a negative impact on the service life of the concrete surface. Unfortunately, inexperienced or frivolous builders do not take into account a number of factors when pouring concrete onto the floor and then screeding it. What are these factors? – read below.
Amount of water in concrete
Water should also be handled carefully and added sparingly to the concrete. Otherwise, if there is an excess of moisture in the concrete mixture, the water may not be absorbed by fillers and cement, which will lead to its preservation there in its original form. Over time, it will evaporate from the concrete, and voids will form in its place. Thus, the water factor is also of direct importance when creating high-quality concrete for the floor.
As we see, all the described processes are interconnected. A frivolous attitude to one of the factors can cause a mistake that will reduce the durability of the concrete surface. Therefore, it is recommended either not to pay attention to these subtleties at all, if, for example, you need to make a concrete floor in a barn, where there is no emphasis on quality, or to strictly follow the technological rules.
Concrete defects, their classification and elimination
Let’s immediately outline the main condition - concrete defects can be correctly identified only after a thorough inspection of the structure with cleaning/removing defective areas and identifying voids and cavities; restoration actions are possible only after agreeing on methods for eliminating concrete defects with the design organization and construction control.
- Concrete defect - gravelly surface - this defect occurs, as a rule, due to poor-quality formwork, which is often simply forgotten to repair and is used many times. This flaw can be seen with the naked eye - it lies in the fact that the edges of the solid filler protrude from the body of the concrete. Because of this, finishing work becomes seriously difficult or even impossible.
Photo of concrete defect:
gravel surface
How to eliminate the defect of a gravelly surface: clean with metal brushes, rinse with a stream of water, and then plaster with a cement-sand mortar of composition 1:2 (by volume) using Portland cement grade 400-500.
2. A concrete defect - a cavity on the surface of the concrete - usually occurs due to a violation of the technological process for making the mixture or its laying.
Photo of concrete defect:
cavities on the surface of concrete
How to eliminate a cavity defect on a concrete surface: clean with metal brushes, rinse with a stream of water, and rub the surface with cement mortar.
3. Concrete defect - Sinks - are formed as a result of dropping concrete into the formwork from a great height, due to insufficient compaction, the use of a rigid concrete mixture, as a result of long-term transportation, during which the concrete mixture delaminated and began to set. Most often, sinks appear in places of greatest saturation with reinforcement, difficult to access and inconvenient for laying and compacting concrete.
Photo of concrete defect:
sinks in concrete
sinks in concrete
sinks in concrete
sinks in concrete
When prescribing a method for eliminating cavities, it is necessary to take into account their number and size.
How to eliminate a shell defect in concrete: in heavily loaded columns, the shells are sequentially cleared, removing compacted concrete from each side of the column, then they are washed with water and the prepared strips are concreted. To seal sinks, use mortar or concrete with aggregate grain size up to 20 mm. Portland cement grades 400-500 are used as a binder. The mortar or concrete is prepared in small portions near the site of repair work. To ensure adhesion of new concrete to old and to reinforcement and to obtain increased strength in a weakened area at an early age, it is recommended to use concrete whose grade is one step higher than the grade of concrete of the structure being repaired. If during the inspection, through holes are found, the clearing of which will cause a significant decrease in the load-bearing capacity of the loaded columns, then reinforced concrete clips or linings are installed, followed by pumping cement-sand mortar into the voids through pre-installed tubes. It is recommended to install at least two tubes at the site of each defect, followed by injection of cement-sand mortar into the voids.
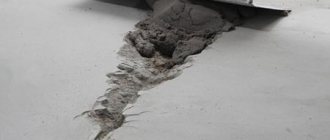
4. Concrete defect - voids in the body of a concrete structure - is one of the most serious defects that can lead to the collapse of the entire structure, so it must be corrected immediately. Often the voids can be huge and even expose the reinforcement. They are common and appear, as a rule, due to the failure of concrete in a given area. The voids sometimes reach such sizes that the reinforcement is completely exposed, through gaps are formed in the structures and their solidity is disrupted.
Photo of concrete defect:
voids in concrete
voids in concrete
How to eliminate a void defect in concrete: the surface of the joints is cleaned of loose old concrete, after which the joints are thoroughly washed with water. At the concreting sites, suspended formwork is installed with pockets slightly elevated above the upper joint. The voids are filled with concrete on fine crushed stone. The work contractor, together with technical supervision, checks the correct preparation of the concrete mixture and the thoroughness of its compaction by bayoneting or vibrating.
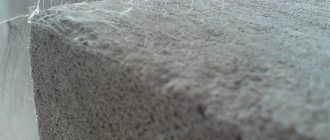
5. Concrete defect - cracks - the reason for such defects is difficult to determine, but the most typical ones include: incorrect calculation of the amount of required materials, exceeding design loads, corrosion of reinforcement, violation of laying technology, and so on.
Photo of concrete defect:
concrete crack defect
concrete crack defect
How to eliminate a crack defect in concrete: The method of correcting a defect directly depends on many factors (position, direction, opening width and the presence of its change, and many others), and can differ significantly in various situations. In most cases, the injection method is used for repairs - the crack is filled with a special repair compound under pressure.
All concrete defects are not the norm for continuing work; in any case, measures must be taken to eliminate them. The lack of measures to identify and eliminate concrete defects usually leads to more negative consequences. Construction control will help you minimize concrete defects.
Surface and through cracks
Surface cracks are preliminarily repaired. Jointing can be done either manually, for small amounts of work, or with the help of special tools (perforators, wall chasers, seam cutters). The grooves are washed with water under pressure. To fill the grooves, both repair thixotropic materials “KTtron-3” and “KTtron-3 T500” and suture material “KTtron-2” are used. Through cracks are sealed in the same way, only on both sides.
Concreting defects
In modern construction, monolithic concreting occupies one of the leading places.
Naturally, with the huge scale of work being carried out, cases of defects are not uncommon and require special attention. Concreting defects during the construction of monolithic structures include:
- Peeling of the protective layer of concrete with exposure of reinforcement.
- Superficial and deep sinks.
- Sharp protruding ridges and sagging concrete.
- Surface and through cracks.
- Chips.
- Local depressions and others.
In addition, there are places provided for by the concreting technology that are subject to subsequent filling with a repair mortar mixture:
- Shrink seams.
- Working (cold) seams.
- Technological holes for coupling bolts and others.
Load calculation
The minimum thickness of the monolithic floor, the number and cross-section of reinforcement, as well as other parameters are determined based on the calculation of the loads acting on the structural element.
The ability of a floor slab to withstand certain loads directly depends on the thickness of the reinforced concrete monolith, as well as the cross-section and amount of reinforcement, and the grade of concrete. In order for a monolithic reinforced concrete floor to withstand a load of 500 kilograms per square meter, the thickness must be 20 centimeters.
In accordance with the calculated loads, the cross-section of the reinforcement is determined that can withstand tensile forces and bending moments. It is very difficult to independently calculate a monolithic reinforced concrete floor, but you can try using special formulas or find an online calculator on the Internet.
If you plan to take more than 18 centimeters, the decision must be justified by accurate calculations, because the load on it increases in proportion to the increase in the thickness of the slab. Thus, before you start designing and installing a monolithic floor, drawings must be drawn up.
How to fill a slab: technology
The technology itself involves several stages of the process: calculations, preparation of equipment/materials/tools, assembly of sealed formwork, creation of a reinforcement cage and placing it inside the formwork structure, mixing of concrete mixture, pouring, proper maintenance.
Installation of formwork
Before pouring the floor slab with your own hands, you need to install the formwork. You can rent a ready-made structure or assemble it yourself from boards, plywood, or timber. Factory-made formworks are supplied with telescopic supports, saving time on installing supports. But the second option will be cheaper, although labor-intensive.
To make your own formwork, take an edged board with a thickness of at least 2.5-3.5 centimeters or moisture-resistant plywood sheets with a thickness of 2 centimeters or more. The boards are knocked down as tightly as possible and covered with waterproofing film.
The formwork elements are connected with nails or dowels, and the inside is covered with waterproofing material. Compared to their wooden counterpart, metal telescopic stands are considered more preferable due to their reliability and durability.
Reinforcement of the floor, reinforcement of reinforced concrete floors
Before making a concrete floor with your own hands, you need to lay a reinforcement cage into the formwork, which will give strength to the structure and make it resistant to bending loads.
To create a frame you will need: metal rods with a diameter of up to 16 millimeters, tying wire, a hook for tying, special clamps for the rods (ensure that the reinforcement is poured with concrete from all sides). It is also advisable to prepare a grinder with a metal disc and a device for bending rods in advance.
Concrete preparation
Before pouring a monolithic floor slab, it is necessary to determine the composition of the concrete. Usually, durable brands of solutions are chosen to ensure the required parameters and resistance to loads. Concrete in Moscow and the regions can be ordered ready-made from the factory, or you can mix it yourself.
Operational damage
Drawdowns, dust and other malfunctions
Cracks on a subsiding screed
Experts classify so-called operational defects into a separate group. These include the following:
| Defect | Characteristics and possible cause |
| Screed deformation | It is expressed in a change in the level of the poured concrete floor (most often the coating sinks in the center and rises at the edges). Can be caused by several factors: · Uneven density of the base due to insufficient compaction. · Defects in the compaction of the mortar. · Difference in moisture content of the top and bottom layers of cement. · Insufficient reinforcement thickness. |
| Cracking | In most cases, cracks do not arise from mechanical stress, but from deformation of the structure as a whole. It can be triggered by both excessive loads exceeding the design ones and thermal expansion. |
| Peeling | Peeling of small scales on the surface usually begins with the appearance of a network of microscopic cracks. In this case, the cause of peeling is most often the accelerated evaporation of moisture from the outer layer of the solution, which leads to insufficient hydration of the cement. |
| Surface dusting | It is expressed in the constant formation of fine cement dust on concrete. May be caused by: · Lack of cement in the solution. · Excess moisture during pouring. · Water entering the surface during grouting. · Insufficiently high-quality cleaning of gravel from the dust fraction. · Excessive abrasive effect on concrete. |
Peeling of the surface
All of the above disadvantages arise either due to a violation of technology or due to improper operation of the concrete structure. However, eliminating them is somewhat more difficult than mechanical defects.
Tips for arrangement and restoration
As in the previous case, the main recommendation will be strict adherence to the technology for constructing a concrete structure:
- Firstly, the solution must be poured and processed according to all the rules, preventing it from stratifying and peeling when dried.
- Secondly, the base needs to be prepared equally well. The more densely we compact the soil under a concrete structure, the less likely it will be to subsidence, deformation and cracking.
- To prevent poured concrete from cracking, a damper tape is usually installed around the perimeter of the room to compensate for deformations. For the same purpose, polymer-filled seams are installed on large-area screeds.
- You can also avoid the appearance of surface damage by applying polymer-based strengthening impregnations to the surface of the material or “ironizing” the concrete with a flowing solution.
Surface treated with a protective compound
Chemical and climatic effects
A separate group of damages consists of defects that arise as a result of climatic exposure or a reaction to chemicals.
This may include:
- The appearance of streaks and light spots on the surface - so-called efflorescence. Typically, the cause of the formation of salt deposits is a violation of the humidity regime, as well as the ingress of alkalis and calcium chlorides into the solution.
Efflorescence formed due to excess moisture and calcium
Note! It is for this reason that in areas with highly carbonate soils, experts recommend using imported water to prepare the solution. Otherwise, a whitish coating will appear within a few months after pouring.
- Destruction of the surface under the influence of low temperatures. When moisture enters porous concrete, the microscopic channels in the immediate vicinity of the surface gradually expand as water expands in volume by about 10-15% when it freezes. The more often freezing/thawing occurs, the more intense the solution will degrade.
- To combat this, special anti-frost impregnations are used, and the surface is also coated with compounds that reduce porosity.
Before repairs, the fittings must be cleaned and treated
- Finally, corrosion of reinforcement can also be included in this group of defects. Metal embeds begin to rust where they are exposed, which leads to a decrease in the strength of the material. To stop this process, before filling the damage with a repair compound, the reinforcing bars must be cleaned of oxides and then treated with an anti-corrosion compound.
How to make a monolithic floor slab with your own hands
Monolithic flooring is one of the options for creating a structural element of a building, which is used along with prefabricated and precast-monolithic ones.
If prefabricated floors are formed from ready-made reinforced concrete slabs, which are produced in a factory and delivered to the installation site by special transport, then monolithic structures are poured directly on site. A monolithic floor slab can be created by craftsmen independently; it does not require the use of lifting equipment: panel formwork is installed, a reinforcement frame is mounted in it, then the whole thing is filled with a concrete mixture of the selected brand.
With correct calculations of the formwork and the floor itself, the result is a strong and durable structure that can withstand the loads placed on it.
Monolithic reinforced concrete floors demonstrate increased strength characteristics, resistance to load-bearing loads and the effects of external negative factors. Pouring a floor slab yourself makes it possible to save significantly, because the final cost of an individual slab is significantly lower than the total cost of purchasing a reinforced concrete product, the cost of delivery and installation of floor slabs using special transport.
Making a floor slab with your own hands
It’s quite possible to make monolithic floors yourself. If you calculate and think through everything correctly, prepare materials and tools, and break down the task into its components, the process will not seem so difficult.
If you want to do everything yourself, you need to carefully study all the parameters, take into account important factors, features of materials, design, etc.
The main stages of work that need to be completed to make a concrete floor between floors with your own hands: performing calculations, preparing tools and materials, installing formwork, laying reinforcement, pouring concrete, proper care of the screed.
Defect correction methods
Let us examine in order the technological methods for correcting the listed defects.
Peeling of the protective layer of concrete with exposure of reinforcement
If the protective layer of concrete above the reinforcement peels off, it should be removed to durable concrete, the reinforcement should be treated to remove traces of corrosion, and the surface of the concrete should be washed with water. Then you can use one of the options: either gunite with the KTtron-gunite M composition, which provides minimal rebound, or restore the surface layer-by-layer with the thixotropic repair composition KTtron-3 T500, having previously treated the reinforcement with KTtron-primer. The outer edge of the defect should be made with a perpendicular cut with a depth of at least 10 mm, followed by sampling of concrete from the side of the defect.