Concrete is most often used to create screeds. This material can be considered universal: it fully meets the expectations of buyers and meets all quality standards. In addition, concrete is easy to install, reliable and can be used for a long time. Concrete mortar (CR) removes defects of the main surface well. If you decide to prepare a BR, from our article you will learn how to calculate the amount of concrete for pouring the floor.
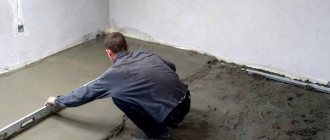
Concrete screed
What you need
To select the right tools, you should consider the scope of application. This list may change due to certain circumstances, but in any case you will not do without:
- waterproofing and damping films;
- reinforced mesh;
- insulation;
- gypsum;
- beacon profiles.
You will also have to use a rule, a level and a concrete mixer.
Next, we describe the substances required for the solution.
Experts advise creating floors in residential buildings from fine-grained concrete. This material is DSP. Often in its composition you can see cement type M400-500. In order to improve the quality of the material, a little squeak and plasticizers are added to it.
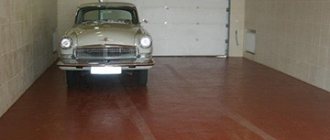
“Standard” BR is suitable for creating floors in a garage or outdoors. In addition to sand, you should also have crushed stone or gravel. Try to select crushed stone with a small fraction - this will make it easier to create a smooth surface. And it will be much more pleasant to work with such a solution.
To make the floor a little warmer, add expanded clay or expanded polystyrene granules to the BR. These substances also make the screed easier.
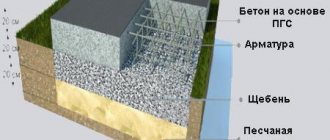
Options for arranging a rough screed on the ground
The specific option is chosen by the builders, taking into account the maximum load on the structure and the proximity of groundwater. The classic solution is compacted soil, a layer of sand and crushed stone of varying thickness, plastic film and a rough screed with or without reinforcement.
Classic rough screed
This method is recommended for use in cases where groundwater is located closer than two meters to the surface. Groundwater is much lower - the construction scheme can be simplified. It is allowed to pour the rough screed directly over the ground, using only sand or crushed stone as bedding. In some cases, the subfloor can be poured directly onto the ground without using plastic film. For rough floor screed, the film is used not so much for waterproofing (concrete is not afraid of moisture; on the contrary, in conditions of high humidity it increases strength) but rather for retaining cement laitance in the mixture. Without the film, it will quickly leave the concrete, which will have a very negative impact on strength.
What proportion of concrete is needed for the screed?
Experts advise making a layer at least 4 cm thick. The floor area on which BR is laid almost never exceeds 20 m². By following these rules, you will be able to evenly distribute the solution over the floor covering. And it will begin to harden faster.
In houses, use concrete with a strength of 200 kg per cubic meter. To obtain such a solution, simply mix cement and sand 2 to 8.
The proportion of water is 1:0.5.
To calculate the amount of mortar, use a simple formula - multiply S of the room by the height of the screed. For example, if the room is 6*5, and the height of the screed is four cm, then it comes out to 6*5*0.04=1.2 m³.
Mixing solution components
The dry and liquid components of the solution are mixed in various containers. The mortar for filling the floor is made according to the proportions in a certain order. First of all, the dry components are mixed, that is, fiber, sand and cement. M400 cement is mixed with sand in a ratio of 1 to 3, for example, 50 kilograms of sand requires 16.7 kg of cement. Mixing of dry elements is carried out for 5 minutes.
In the second container, the plasticizer is mixed with water. For 50 kg of cement, about 190 g of plasticizer is required. The required volume of water is 1/3 of the mass of cement, that is, 5.6 liters of water are needed for 1/3 of the bag (taking into account that 0.6 liters will be used for the plasticizer). Then the liquid and dry elements are mixed, and then the dry mixture is gradually poured into a container with water, while it is mixed well.
To mix the mixture without lumps, it is best to use a construction mixer.
When pouring water into a dry mixture, lumps may appear that are difficult to stir.
Mixing the solution by hand is very long and difficult, so it is recommended to use a construction mixer or a drill with an attachment. Power tools allow you to perform this procedure more efficiently.
So, the floor screed is ready, and with the correct proportion of cement and sand, you can get a reliable solution. It should be borne in mind that working with a viscous solution is much more difficult, but there will be fewer cracks on the surface.
To avoid the formation of cracks when drying, it is necessary to wet the surface daily.
We combine sand and cement
For BR, sand is a kind of filler, which prevents deformation of the screed and strengthens it.
Sand fills well the space between large crushed stone grains. The fewer voids in the BR, the better. Sand makes concrete:
- waterproof;
- frost-resistant;
- resistant to bending and compression.
It is allowed to add only washed sand to the BR, which will be free of foreign impurities (if they get into the solution, they will sharply reduce its quality).
Washed sand
We bring to your attention a table with the proportions of sand and cement.
| Concrete grade for screed M400/M500 | Cement (kg) | Sand (kg) |
| 100/100 | 1/1 | 4,6/5,8 |
| 150/150 | 1/1 | 3,5/4,5 |
| 200/200 | 1/1 | 2,8/3,5 |
| 250/250 | 1/1 | 2,1/2,6 |
| 300/300 | 1/1 | 1,9/2,4 |
| 400/400 | 1/1 | 1,2/1,6 |
| 450/450 | 1/1 | 1,1/1,4 |
Ratio of concrete mixture components for floor screed
The construction mixture for forming a monolithic floor includes three main components: lime cement, coarse river or quarry purified sand, and clean water. To increase the workability of the mixture, various synthetic additives can be added to the solution, for example, to increase viscosity or plasticity, but a properly mixed solution and a consistent ratio of bulk and liquid materials give excellent results, and the solution perfectly levels and adheres to the prepared floor surface without purchasing additives that will cost a pretty penny.
Building materials markets sell ready-packaged dry concrete mixture for floor screed. Their advantage is that it is possible to more accurately dose the proportions of concrete for floor screed and pour the working surface faster. There is only one drawback of such dry mixtures: they cost 1.5-2 times more than a mixture prepared independently. Therefore, in order to save money (and in individual construction this goal is constantly pursued), when given the task of pouring a floor on the ground at a minimum cost of building materials, the solution is prepared with one’s own resources and resources. In this case, it is necessary to observe the following proportions of concrete for pouring the floor inside a residential or non-residential building (in weight or volumetric proportions):
- One part of cement TsEM I 32.5H PC (M 400) to three and a half parts of river or washed quarry sand, and 6/10 parts of industrial water;
- One part of Portland cement CEM I 42.5H PC (M 500) to four parts of river or quarry sand, and 7/10 parts of industrial water.
The ratio of grades M 400 and M 500 to other components of the composition
When mixing concrete, the developer has to independently measure the volumes (weight) of bulk or liquid substances and mix them, so the result (ready-made solution) will be much cheaper than a factory-packaged mixture. For M 400 and M 500, the ratio of components given in the list above will correspond to the concrete grade M 150. A similar grade of concrete is used for the floor in a garage or in other unheated rooms with high humidity.
The solution that will be poured and used outdoors differs in composition and proportions from the solution for indoor use. Screed in open space is constantly exposed to changes in temperature, humidity, weathering, and solar radiation, so its mechanical properties should a priori be better.
High-strength concrete screed for self-leveling floors
| Portland cement, brand | Concrete mortar, brand | Portland cement|sand|crushed stone (weight, kg) | Portland cement|sand|crushed stone (volume, l) | Volume of solution from 10 liters of Portland cement |
| 400 | 100 | 1,0|4,0;6,0|7,0 | 10|41|61 | 78,0 |
| 500 | 1,0|5,0;8,0|8,1 | 10|53|71 | 90,0 | |
| 400 | 150 | 1,0|3,0;5,0|5,7 | 10|32|50 | 64,0 |
| 500 | 1,0|4,0;5,0|6,6 | 10|40|58 | 73,0 | |
| 400 | 200 | 1,0|2,0;8,0|4,8 | 10|25|42 | 54,0 |
| 500 | 1,0|3,0;5,0|5,6 | 10|32|49 | 62,0 | |
| 400 | 250 | 1,0|2,0;1,0|3,9 | 10|19|34 | 43,0 |
| 500 | 1,0|2,0;6,0|4,5 | 10|24|39 | 50,0 | |
| 400 | 300 | 1,0|1,0;9,0|3,7 | 10|17|32 | 41,0 |
| 500 | 1,0|2,0;4,0|4,3 | 10|22|37 | 47,0 | |
| 400 | 400 | 1,0|1,0;2,0|2,7 | 10|11|24 | 31,0 |
| 500 | 1,0|1,0;6,0|3,2 | 10|14|28 | 36,0 |
An example of a concrete structure that will be constantly exposed to all kinds of atmospheric influences on the street is a concrete blind area around the circumference of a house or garage. In this case, the grade of concrete for the garage foundation should be M 150 and consist of the proportions of the components given below.
Blind area around the house
The surface of the finished screed must be ironed with pure cement:
- One part of Portland cement brand CEM I 32.5H PC (M 400) to four parts of river or purified quarry sand, five and a half parts of crushed stone (marble, gravel or granite chips) and 9/10 parts of clean industrial water;
- One part of Portland cement CEM I 42.5H PC (M 500) to 4.1 parts of river or purified quarry sand, five and a half parts of crushed stone (marble, gravel or granite chips) and 7/10 parts of clean industrial water.
For screeds or floors on the ground that do not experience large mechanical and shock loads, marble, gravel or granite chips acting as crushed stone can be replaced with construction rubble: brick waste, furnace or blast furnace slag, waste ceramic building blocks, etc.
Why is only the M 150 brand recommended? It complies with SNiP 2.03.13-88, which states that for pouring concrete screeds, building materials with a compressive strength of ≥ 15 MPa or 150 kgf/cm2 should be used, and these indicators are only suitable for grade M 150.
Recommendations for designing floors SNiP 2.03.13-88
How to correctly calculate the required cubic capacity of concrete
As an example, let's calculate the fuel consumption for a room measuring 42 m². The required thickness of the screed is 7 cm. We multiply these two indicators, and the result is a number of 2.94 m³, which tells us the required amount of BR. Cement and sand should be combined in a ratio of 1:3. That is, we need 2.94*3/4=2.2 m³ of sand. 0.74 m³ of cement is needed.
Now we calculate the ratio of the components:
- 10 liters of sand weighs 14-16 kg. One m³ of substance weighs 1400-1600 kg.
- 10 liters of crushed stone weighs 15-17 kg. 1 m³ will tighten by 1500-1700 kg.
- 10 liters of cement weighs 13-14 kg. Accordingly, we will need 1300-1400 kg of material.
According to our ratio, 2.2x sand is needed.
Now we calculate the volume of additives with binders and sand. In the example we use sand, cement and crushed stone. Rounding up, we reach 1:3:5. The approximate volume determined earlier helps to calculate the amount of sand. 1.75*(3/9), comes out to 0.57 m³.
We calculate the amount of cement: 1.75 – 0.57 – 0.95 = 0.23 m³.
Now we move from volumetric units to mass units. Each mixture (10 l) must be calculated separately. We got the following:
- Crushed stone – 1425 kg.
- Sand – 798 kg.
- Cement – 299 kg.
The above calculation is only approximate, but based on it you can roughly calculate how much materials you need to prepare.
Note! First take into account the possibility of a decrease in the volume of the screed after it has completely dried. From BR you can get an average of 0.59-0.71 m³ per 1 m³ of the entire finishing area. So it’s better to buy all the BR “ingredients” with a small excess.
Calculation of solution in buckets
In individual construction, scales are rarely used to measure the amount of bulk materials, much less water. The most common measure in private households is a bucket. Therefore, we will consider how to accurately measure dry building materials using household buckets with the most common volumes of 10, 12 and 15 liters.
For example, the ratio of components for mixing 1 m3 of concrete prepared from the CEM I 32.5H PC grade: 0.42 tons of cement and 1.47 tons of river or quarry sand. To find out the number of buckets, you need to know their volume and the ratio in kg of building materials to volume in m3.
- First step: you need to convert the volume of the bucket to m3. Knowing that 1 l is equal to 1 dm3, and 1 m3 is equal to 1000 dm3, the result will be the following numbers: 10 l is 0.01 m3, 12 l is 0.012 m3, 15 l is 0.015 m3.
- Second step: it is necessary to convert the weight of cement into m3. There are 1.3 tons of cement per cubic meter (the arithmetic average, taking into account the different densities of the brands). The % ratio calculation for converting 0.42 tons to 1 m3 would be: 420 kg x 100 / 1300 = 32.3% (0.323). This means that the volume of Portland cement per cubic meter is: 1 x 0.323 = 0.323 m3.
- Third step: calculating the number of buckets for Portland cement. Bucket with a volume of 10 liters, number of units: 0.323 / 0.01 = 32.3. Bucket with a volume of 12 liters, number of units 0.323 / 0.012 = 26.9. Bucket with a volume of 15 liters, number of units 0.323 / 0.015 = 21.5.
- Fourth step: convert the volume of sand into cubic meters: 1 m3 will contain 1.75 tons of sand. Calculation of the % ratio to convert to volume units: 1470 kg x 100 / 1,750 = 84% (0.84). This means that the volume of sand per cubic meter is: 1 x 0.84 = 0.84 m3.
- Fifth step: calculating the number of sand buckets: 10 l bucket, number of units: 0.84 / 0.01 = 84. 12 l bucket, number of units: 0.84 / 0.012 = 70. 15 l bucket, number of units: 0, 84 / 0.015 = 56.
How to make a solution by measuring material in buckets
How to prepare the solution correctly
We have already mentioned that the brand of cement affects the amount of all components of the solution.
The quality of the pour is influenced not only by the structure of the casting, but also by the correctness of the work.
Let's consider the technology for preparing BR:
- before adding to the mass, sift the sand;
- pour all the “ingredients” into the concrete mixer; they must be dry;
- wait until everything becomes a homogeneous mass;
- pour in water. You will need 0.5-0.8 liquid from the total volume of the solution;
- add plasticizer.
Plasticizer
After obtaining a homogeneous mass, add solid filler. Make sure there are no unnecessary substances in it. Any contamination must be removed immediately.
The concrete mixer should distribute all the components evenly. Only then can it be turned off.
How to apply mixtures
The key to success is careful preparation for pouring. To do all this, the surface must first be thoroughly cleaned of debris. Then you need to make sure there are no cracks.
After this, beacons should be placed. It will be clear from them when and how many cm of the mixture layer will be needed. They are placed around the perimeter in different places. When installing beating cords, the potential installer understands how much mixture will need to be installed.
Interesting! Lighthouse slats are much more convenient than bars when it comes to reinforced flooring. Half a day after applying the composition, you can work with the equipment.
Next is laying the mixture. It occurs in the form of breaking into sections with further processing of each of them. The solution is poured between the beacons until the level of the mixture reaches the desired level. Work begins from the far corner and moves closer to the front door.
If there are gaps, then the solution is simply added to them, without spreading it over the entire area where the mixture has already been poured. It turns out that the residues are discarded, and the screed is leveled. If you do everything correctly, then there will be less chance of touching the emerging floor.
You can walk on the flooded floor within a few hours. If tubercles are found, they are cut off immediately.
The longer the floor takes to dry, the more difficult it will be to remove defects.
Towards the end of the work, when the formed floor has already acquired sufficient strength, the surface is grouted. But this is not the end of the work. After grouting, you need a little more than a week (to be more precise, 10 days) to moisten the screed. As a rule, this is done with a spray gun, but it can also be done with a roller. Why should this be done? This is the only way to achieve uniform drying of the cement used to screed the floor.
Important! Do not open windows, creating drafts. This will cause the solution to lose its natural moisture.
The load should be increasing. First you need to lay wooden slats and walk cleanly on them. Over time, you can increase the load - walk one at a time, then remove them completely. The result can be seen after a certain period of time - usually two weeks.
Important! The first thing to be checked is the color. It will show how evenly the composition has been distributed and dried. The second is the presence of gaps that need to be closed quickly, while the mixture is still suitable for processing.
In general, if we talk about pouring or screeding a floor, we can say that it is not so much complicated as it is labor-intensive. But if you follow all the tips, requests and recommendations, the manufacturer’s style and the technical process, then nothing will stop you from making your own floor screed.
You may be interested in knowing which external wall insulation to choose .
What to give preference: concrete or fiberglass?
3 parts of quartz sand are combined with 1 part of cement and create a cement-sand screed (CSS). The amount of water is 45-55% of the total dry mass. This proportion creates a cement grade of 100-200. The consumption of the poured layer is determined by the thickness and type of coating.
DSP
A two-centimeter ball is enough to level the surface. If you need to fill small areas, it is better to use a DSP. It is also suitable for working with a flat base.
In other situations it is better to use BR. If its thickness reaches 4 cm, the solution will not crack. The thermal insulation properties of BR can be increased by adding expanded clay concrete to it. Increasing the adhesion of the mass can be achieved by adding crushed stone to it. Such a coating will be resistant to increased loads.
Types of filler and their purpose
There is a coarse aggregate used mainly in the process of producing heavy concrete (crushed stone, gravel, etc.). There is also fine aggregate, which is used only when preparing ordinary concrete. Surely, everyone knows that sand is used almost everywhere in construction, and the process of preparing concrete mortar is no exception. Sand is called fine aggregate because its grains are quite small in size. But sand can also be coarse, medium and fine.
Sand for mortar is a necessary component and it varies in size. Photo to compare the size of sand grains.
Floor screed: which is better - concrete or cps?
Before starting to screed a floor, many people are faced with the question of what is better: concrete or cement-sand mixtures? Practice shows that for thin screeds it is desirable to use a mixture of cement and sand, and for thick screeds (more than 4 cm thick) it is recommended to use traditional concrete, because it does not crack.
There is one more thing you need to know. When concrete is mixed with expanded clay, an excellent heat insulator is obtained, and when mixed with crushed stone, the resulting coating can withstand enormous loads (crushed stone has excellent adhesion to cement).
In addition, concrete is selected when pouring the bud mixture onto the ground to obtain a monolithic base or decorative coating.
It is worth adding that if you have a minimum set of tools (measuring container, shovel, scoop, bucket) and a calculator, you can independently calculate the correct proportions. And with a known proportion of concrete or cement, or other components, you can independently make a high-quality mixture for floor screed. In addition, if you wish, you can find many graphs, tables, electronic calculators and other useful materials about portioning on the World Wide Web.
How to protect a concrete floor
We have already discussed the composition of concrete for the floor, now it is useful to know how to protect the BR from damage. Polyurethane varnish will help with this.
The varnish is able to penetrate into the layers of BR and create a protective ball. As a result, the solution becomes stronger and more durable. The varnish is presented in a wide palette, so you can choose the most suitable option.
You can also use polymer-based compositions. They allow you to install so-called self-leveling floors, which completely seal the space. This coating is durable and durable.
Instructions for making a rough floor screed on the ground
Let's consider the most complex and time-consuming option using all layers of bedding.
Step 1. Take measurements. First, you need to mark the level of the finished floor on the foundation tape.
Elevations in the project
To do this, you should use a laser or hydro level. The size is determined according to design and technical documentation or working drawings for the facility. Further down, you need to put marks on the thickness of the floor depending on its design, the thickness of the finishing screed, rough screed, layer of gravel and sand.
Using a hydraulic level
Performing markup
Step 2. Remove the soil to the calculated depth, clean the site, and prepare it for filling with sand. Compact the loose soil or carefully clean the base with a shovel.
Soil compaction
Step 3. Add sand. As a rule, the thickness of the layer varies within ten centimeters. If you need a large amount of sand, you need to pour it in stages, compacting each layer separately. The quality of compaction will improve significantly if the work is performed using special mechanisms: vibrating rammers or vibrating compactors. During compaction, you need to ensure that the sand has a more or less flat and horizontal surface.
Compacting sand bedding
Sand pillow
Compacting sand with a vibrating plate
Packed pillow
Practical advice. During compaction, it is recommended to wet the surface; this significantly increases the degree of sand shrinkage. You can wet it with a hose or buckets.
Tamping is a very important stage in arranging a rough screed on the ground; there is no need to rush. All holes are filled up and compacted again, the tubercles are cut off.
Vibratory rammer
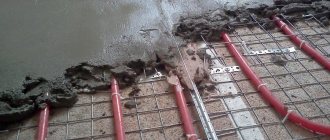
Step 4. Pour a layer of crushed stone ≈ 5–10 cm thick and compact it thoroughly. It is better to take crushed stone in several fractions of sizes. Coarse sand is poured onto the sand, fine sand is poured under the rough screed. In this way, the load-bearing characteristics of the base are improved. Part of the utilities can be hidden in layers of bedding or directly in the rough screed. There is no need to try to install all the pipes and electrical networks there; in case of emergencies, it is very difficult to get to them to carry out repair work.
Crushed stone pillow
Step 5. Prepare the concrete mixture.
Hand kneading
Making your own concrete mix
You can do it yourself using a concrete mixer or order a ready-made one from construction companies. You need to choose yourself; both options can be optimal under certain conditions. It is recommended to calculate the cost of materials in both cases, evaluate your material capabilities and physical strength, and the number of workers.
The concrete mixture should be below average in density. Such indicators allow concrete to independently spread over the floor area. One of the advantages of using liquid concrete is that there is no need to install beacons and perform time-consuming manual leveling work.
Prepare liquid concrete
Workers only need to slightly adjust the level where the material is poured. If reinforcement is required, a mesh is installed at the same time. Building regulations require that it be installed in such a way that the concrete thickness on all sides exceeds five centimeters. Otherwise, the structure will not work as a single whole, and the actual strength of the reinforced concrete will become much less than the calculated one. The consequences can be the most tragic.
Reinforcement - order and choice of material
Pouring the floor with concrete
Step 6. To increase the strength of the rough screed the next day, it must be thoroughly moistened. If the weather is hot and dry, it is recommended to water it at night. These steps should be repeated for two to three days. It is recommended to carry out further work 10–14 days after pouring. During this time, concrete gains at least 50% of its maximum strength, which allows construction work to continue without fear.
Wetting the screed
The developer chooses what the finished floor will be like. Regardless of the chosen option, builders recommend making sure to provide reliable waterproofing on top and install insulation. On top of these structures, a finishing screed is made under the tiled floor or wooden logs are laid under other options for finishing floor coverings. Such schemes make the floors warm, which is very important given modern prices for coolants. At the same time, following the recommendations of professional builders significantly increases the service life of floor coverings.
Finishing screed for thermal insulation
Pouring concrete under a heated floor
Now let's talk about how to properly install a concrete screed for a heated floor.
The whole process consists of the following steps:
- Preparation of tools and materials
- Preparing the base
- Installation of a heated floor system
- Installation of beacons
- Preparation of concrete mixture
- Filling the screed
- Care of hardening concrete
Step 1: preparing tools and materials
You will need:
- Rubber boots
- Construction gloves
- Damper tape
- Polyethylene film thickness from 200 to 250 microns
- Foamed polyethylene with a heat-reflecting foil layer or extruded polystyrene foam (5-10 mm). Density – minimum 35 kg/m2
- Steel mesh with cells 10x10 or 15x15 cm
- Laser level
- Cement, sand, crushed stone (if you want to prepare concrete and not CFRP), water
- Plasticizer and fiber (for DSP)
- A container for measuring out the components of the solution (for example, buckets)
- Concrete mixer or container for manual mixing (trough, basin)
- Bayonet shovel
- Deep vibrator
Step 2: preparing the base
By base we mean a rough screed, which should have fully gained strength by the time work begins. The first step is to clean the surface of the screed from debris. Please note that any unevenness or foreign objects may negatively affect the quality of the finishing coating.
A damper tape with a thickness of at least 40 mm to the height of the screed is installed around the perimeter of the room. It will compensate for the expansion of concrete under the influence of temperature, and also prevent heat from escaping into the walls.
If the area of the room exceeds 40 m2 and is not divided by partitions, or if the length of any of the walls of this room exceeds 8 meters, it is necessary to install expansion joints. They are also made using damper tape.
Then a waterproofing layer is installed. To do this, a polyethylene film is laid on the screed with an overlap of 10-15 cm. The film is secured with mounting tape.
Foamed polyethylene or expanded polystyrene is laid on top with a height of 3 cm for residential premises and 9 cm for basements or outbuildings. Expanded polystyrene acts as a heat insulator. Without this layer, the warm floor will heat not only upward, but also downward, which will lead to loss of efficiency.
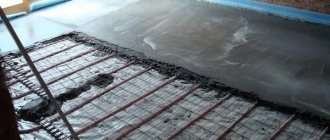
Now you need to mount the fasteners for pipes or electrical cables, and also install the reinforcing mesh. Please note that the mesh should not be located on the insulation, but above it - at a height of 10 mm. Otherwise, there will be no reinforcing effect.
Step 3: installation of a heated floor system
We will not describe this stage in detail, because it all depends on what specific system you have. As a rule, underfloor heating manufacturers provide detailed instructions for their products. There you will find all the information regarding installation.
After laying pipes or cables, you can lay another layer of reinforcing mesh for additional strength.
Step 4: installing beacons
In the center of the room it is necessary to pour semi-dry concrete, and then compact and level it - so that you get a small platform 8 cm high. A laser level is placed on it.
Further along the perimeter of the room and throughout its entire area, the same concrete embankments are made for future lighthouses. It is best to place them at a distance of no more than a meter from each other. Or focus on the length of the rule: it should be greater than the distance between the beacons.
After installing the beacons, leave them for 3 days so that the concrete has time to harden. If deadlines are tight, you can skip this step.
Step 5: preparing the concrete mixture
The setting reaction of concrete begins after you mix water with cement. Next, you will have 1 to 2 hours to lay the solution; after this time, it will harden and completely lose its plasticity. Therefore, you need to work quickly. Organize your space so that you have quick access to all components of the mixture.
When laying concrete, it is important not to allow the hardened screed to come into contact with fresh mortar, as this will greatly reduce the strength of the structure. Accordingly, if you are pouring the floor in several rooms, you need to plan the work so that by the end of each day you do not have any under-filled areas within one room.
To prepare the mixture, it is most convenient to use a concrete mixer. A volume of up to 90 liters will be quite enough. Otherwise you will have to do the kneading manually. To do this you will need a construction trough or basin.
First, cement and sand are poured into the container. They must be mixed to a homogeneous consistency without lumps. If you don’t have a concrete mixer, you can work with a shovel. Next, water is gradually poured in. It is better to add it in small portions until the solution becomes thick enough. The resulting mass is mixed very well for 5-6 minutes. Plasticizer and fiber are added according to the manufacturer's instructions.
At the end you will get a cement-sand mixture. If you need to prepare concrete, then now crushed stone should be added to the container with the remaining components. It is always added at the very end, because mixing large stones is quite difficult. It is necessary that absolutely all grains of crushed stone are covered with the solution.
Here's how to make sure you've prepared the right mixture: Scoop up the solution with a shovel and then let it drain back. If the concrete does not stick to the shovel, it means its plasticity is too low. It will be very difficult to fill it. Add a little more water and stir. If, on the contrary, the mixture turns out to be too fluid, the amount of cement and sand should be increased. However, this way you will most likely violate the ratio of components and will not get the required strength.
Step 6: pouring the screed
Please note: if you are installing a warm water floor, then you must fill the pipes before laying concrete. Otherwise, during pouring, they may become deformed under the weight of the solution.
The concrete mixture should be laid in small sections - from the far wall of the room towards the exit. Each section must be leveled using a rule.
The concrete must be very well compacted. The fewer voids there are, the more reliable the screed will be. Typically, the bayonet method is used for compaction. To do this, a shovel or reinforcement rod is repeatedly immersed in the solution. Under its own weight, the concrete is compacted, and excess air comes to the surface.
But when laying the mixture on pipes or cables, it is important not to damage them. Therefore, the only way to compact the solution is to use a deep vibrator. They need to walk several times in different directions throughout the entire area of the room.
At the end, the beacons are removed. The recesses from them are also filled with solution.
Step 7: Caring for Hardening Concrete
As we have already said, the screed will gain full strength only after 28 days. It is very important to provide the concrete with optimal conditions for hardening in the first 7 days. To do this, after pouring, the floor is covered with plastic film. Every day you need to remove it and wet the concrete with water. If this is not done, the top layer of the screed will dry out too quickly and become covered with cracks.
In addition, during the first week the concrete should not be exposed to loads or sudden temperature changes. Do not try to speed up the hardening of the screed by turning on the floor heating. This will have the opposite effect.
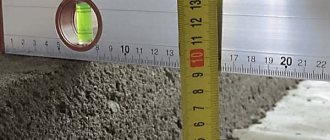
The evenness of the coating is checked using a two-meter strip. It is laid on the floor and the clearance is measured - it should not exceed seven millimeters. If the gap is larger, it is necessary to apply a leveling layer. To do this, you can purchase a self-leveling filling mixture.