Hello, dear blog reader, in the article we will look at the expansion joint and its significance in structures, and we will consider in detail the construction of joints in concrete floors.
Expansion joint - necessary to reduce loads on structures in buildings in places of possible deformation. What causes deformations that appear in the form of cracks throughout the building:
- Fluctuations in air temperature, heating of a building from the sun do not occur evenly and concrete or metal expands in one part, while in another the temperature does not change and deformation occurs.
- Seismic phenomena, a small earthquake can break or crack a building.
- Uneven ground settlement, a building may have different number of storeys and some parts of it sag more, some more slowly, because of this, cracks appear along the entire height of the walls.
To avoid cracks, an expansion joint is made in buildings, which divides all structures into separate blocks and runs along the walls, floors, roofs and, in some cases, foundations. Expansion joints are divided into temperature, sedimentary, anti-seismic and shrinkage.
If your house is no more than 10 meters in length, then you do not need to worry about these seams, and in this article I wanted to talk about the construction of seams in concrete floors or screeds.
Expansion joints in floors
Why are seams cut in a freshly laid concrete floor? All for the same reason to avoid cracks. I think I won’t be wrong if I say that everyone saw cracks in the floors. Now companies engaged in the production of concrete floors provide a minimum five-year warranty on floors.
And the manufacturer doesn’t want to have to come back to a once-made facility to repair cracks. For this purpose, shrinkage joints are cut in concrete floors, generally 6 by 6 meters. The shrinkage joint weakens the concrete slab at the point where it is cut and gives direction to the crack in the concrete, which appears when it deforms.
Previously, they cut seams on all objects, but recently I learned a trick that they don’t cut concrete floors. The manufacturer agrees with the customer that when the floors are cracked, he will come and repair them.
The argument is that cracks will still appear in other places. It is more economical for the manufacturer to repair the cracks than to spend money on diamond discs for concrete, the cost of wages for workers and then come again to repair it. Many customers agree.
What do SNiPs write about expansion joints in floors?
10.13. In rooms where sudden temperature changes (positive and negative air temperatures) are possible, expansion joints must be provided in the screed, which must coincide with the axes of the columns, with the seams of the floor slabs, and expansion joints in the underlying layer. Expansion seams must be embroidered with a polymer elastic composition.
3.14 It is recommended to install expansion joints by cutting through the concrete of the underlying layer with a milling cutter to a depth of at least 1/3 of the concrete thickness after 2 days of hardening. When constructing expansion joints in the concrete underlying layer, it is permissible to place slats coated with an anti-adhesive compound or wrapped in rolled roofing material at the locations of gaps before laying concrete, which are removed after the concrete mixture has hardened. The resulting seams are filled with sealing materials
on floor design (in development of SNiP 2.03.13-88 “Floors”) MDS 31-1.98
10.5. In the concrete underlying layers of the floors of premises, during the operation of which sudden changes in temperature are possible, it is necessary to install expansion joints located among themselves in mutually perpendicular directions at a distance of 8-12 m.
Expansion joints in floors must coincide with the expansion joints of buildings, and in floors with slopes for liquid drainage - with the watershed of the floors.
Snips write that they need to be cut. And please note that the concrete floor is cut after two days of hardening. I can tell you from my own experience that often after two days concrete floors were not cut into shrinkage joints. After a week, or even at the end of the project, all poured floor maps were cut, regardless of when the concrete was laid in them.
After such cutting, one could see a crack next to the cut seam; it would have been better not to have cut it then.
In addition to shrinkage joints in concrete floors there is the same expansion joint, structural or cold and insulating.
Expansion joints are made according to the design; factory inserts are used or from two metal corners in industrial buildings. In an expansion joint, the concrete between the fill maps does not touch; these are separate structures.
Structural or cold joints separate fill maps. When producing concrete floors in warehouses, you need to think about how to arrange pour maps so that cold joints fall into the area of least load.
The cold seam expands over time; all shrink and insulating seams are filled with sealants after a month. Since over the course of a month, concrete slabs deform and the seams increase. But cold joints expand over the course of a year, I can’t explain this exactly, most likely due to the fact that concrete gains strength over the course of a year and deforms probably the same amount.
Insulating seams are cut in places of loads and possible deformations from the building columns and foundation subsidence. The columns are cut into a diamond shape at a distance of approximately 1.5 meters. Before pouring the concrete floor, structures, columns, and walls that may sag are wrapped in polypropylene 1 centimeter thick.
Expansion joints will be sealed with sealants in several stages, the first is cut two days after laying the concrete, the second a month later is cleaned of dust, dirt and Velotherm with a diameter of 5-8 millimeters is laid, and the last stage is sealed with sealants.
Laying technology
General requirements for the base
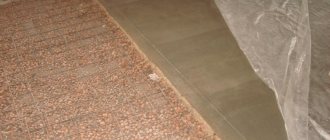
Before laying, the base needs to be prepared, otherwise we will soon get a picture like this
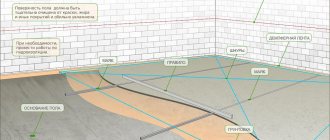
SNiP for floor screeding and foundation formation generally contains the following recommendations:
- The base for laying the flooring is planned in accordance with the profile or marks specified in the design documentation. If soil is added during planning, it must be thoroughly compacted and leveled.
Note! For backfilling, a sand-gravel mixture is most often used.
- If the floor is laid on an earthen base, then work on its construction is carried out only after complete thawing. Weak soils must be replaced or strengthened.
- The base is strengthened using crushed stone (fraction 40-60 mm). The strength of the material used for this must be at least 200 kgf/cm2.
- If a concrete slab is used as a base, then before starting work it must be cleared of construction debris and dust free. After dust removal, the surface is washed with water to remove small contaminant particles.
- The joints between the slabs, as well as the cracks where the slabs adjoin walls and other vertical surfaces, must be filled with cement mortar. The filling depth must be at least half the depth of the seam. To fill voids, a solution of grade 150 and higher is used.
As an additional operation to simplify and reduce the cost of screed installation, in some cases the concrete base is polished. In this case, all irregularities are removed from the surface, which allows you to pour a thinner layer of solution.
Materials
As a rule, a cement-sand screed is installed for arranging floors in apartments and private houses. The exception is bases made of asphalt concrete, which SNiP allows for laying under piece parquet flooring.
The higher the grade of cement, the better the result
The following materials are used during the work:
- Sifted river sand.
- Cement grade not lower than M150 (for residential buildings and apartments it is better to use grade M300 - M400).
- Gravel or crushed stone fraction from 5 to 15 mm. The compressive strength of gravel should be 20 MPa or more.
Note! The use of additional components such as plasticizers, hardeners, pigments, etc. is not regulated by regulations and therefore must be specified separately.
Reinforcement
To give the structure being built greater strength, it is sometimes reinforced.
The following materials are used as reinforcement:
- Wire mesh with cells 100x100 or 150x150 mm.
- Polymer mesh for strengthening cement floors.
- A frame made of reinforcing bars tied or welded together directly on site.
- Fiber reinforcement is steel, basalt or polypropylene fibers that are added directly to the grout and strengthen it.
As a rule, reinforcement is carried out when laying screeds with a thickness of 40 mm or more.
Note! In residential buildings and utility rooms with low floor loads, SNiP allows not to reinforce screeds up to 70 mm thick.
Reinforcing mesh and beacons on stands
The laying of reinforcing material is carried out at the stage of foundation preparation. To ensure correct positioning of the reinforcement (preferably, it should be in the middle of the poured layer), either mortar slides or special plastic supports are used.
Pouring technology
The instructions for doing the work yourself are as follows:
- We process the base in accordance with the requirements set out in the previous section. To ensure the best adhesion, we treat the concrete with primers.
- After polymerization of the primer composition, we prepare a small amount of cement mortar for pouring the floor (the ratio of cement and sand is 1:3).
Damper tape
- If soundproofing material or insulation is preliminarily laid on the base of the floor, a damper tape must be installed around the perimeter of the entire room, as well as around vertical elements (columns and the like). The thickness of such tape ranges from 10 to 25 mm.
- Using a level, we install metal profile panels on the floor - the so-called beacon slats. To fix the slats and level them on a plane, we use a pre-prepared solution, laying it out in small slides.
Note! Some craftsmen prefer to install guides from a cord tied to anchors screwed into the floor. This technology also has a right to exist, but is more labor-intensive.
- Next, we begin to prepare the bulk of the solution for pouring. Since the standard requirements for floor screed according to SNiP do not allow for its mapping (i.e. the floor must be leveled throughout the entire room at once so that stress areas do not form), it is worth involving an assistant in the work.
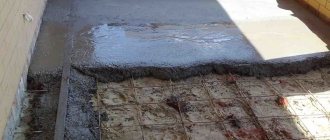
Photos during the pouring process
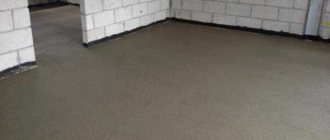
- While the assistant is preparing the next portion of the solution, we are laying the screed. From a bucket, we evenly pour the solution onto the base between the beacons, after which we very carefully and smoothly level it with a rule slat.
- After pouring and leveling the entire floor, we wait for some time, after which we remove the beacon profiles. Then we fill the resulting cavities with cement mortar and level the surface of the screed again.
Advice! You should move along the screed no earlier than 24 hours after pouring. To avoid damage, it is better not to stand on concrete, but to use a sheet of plywood or chipboard laid on the surface.
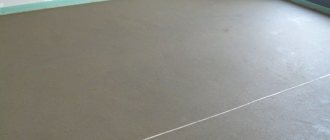
Surface with traces of beacon removal
Drying and sanding
When using a standard solution (i.e. without adding modifying additives), it will be possible to carry out work on the poured surface no earlier than 7-10 days after completion of installation.
During this time, the screed must be provided with conditions that maximize strength gains:
- The slower the surface dries, the stronger the base for the floor covering will be. To reduce moisture loss, it is worth covering the floor with a layer of plastic film.
- Every day we lift the films and inspect the surface of the subfloor. If even minimal cracking or dusting is noted, it is imperative to moisten the cement and cover it again with polyethylene.
- If possible, drying should be carried out for 28 - 30 days. This is exactly how long it takes for the solution to gain maximum strength.
Note! Drafts and sudden changes in room temperature can lead to cracking of the cement-sand layer. To avoid this, it is worth considering in advance the operating mode of a room with a freshly poured screed.
After drying, we check the quality of the base leveling again. If during the work we were careless and irregularities formed on the surface, it is better to remove them by grinding. We also carry out grinding when gravel-based concrete was used for laying, since it is almost impossible to level it perfectly.
Finishing
For grinding, we use either a special device (it’s better to rent it, since its price is quite high) or a grinder. A grinder is suitable for those cases when we need to remove only small nodules or bumps.
After sanding, it is worth treating the surface with a strengthening solution. When the solution has dried, you can install the floor covering.
What is an expansion joint
A seam is a cut (an artificial gap) in a monolithic concrete slab, which divides it into sections that can move independently of each other within small limits.
Why do you need a cut in a floor screed? Essentially, it is a monolithic concrete slab that is subject to such serious loads as pressure from the entire structure, shrinkage, thermal expansion, and swelling. The heterogeneous structure of a large monolith causes uneven expansion (compression) of different areas, which causes internal stresses leading to cracking.
Cutting a large slab into several elements reduces internal stresses. Each block can move relative to the neighboring section, regardless of it. As a result, the likelihood of cracking is reduced.
The largest distances between seams in a floor screed
According to their purpose, deformation gaps are divided into 3 main categories:
- Insulating type. Such a gap is formed around the perimeter of the room, near the walls, as well as around columns and other architectural elements. It is designed to compensate for expansion of both the walls and the screed itself.
- Shrinkage. They must prevent the destruction of concrete as a result of uneven shrinkage during hardening. These gaps divide the concrete slab into separate squares with a length to width ratio of about 1.2-1.5. They are made in the form of straight gaps, without branches. The greatest distance between expansion joints in a floor screed is 3 m. If the width of the slab is 3.5-4 m, then the joint is made in the middle. The gap depth is usually at least 1/3 of the coating thickness.
- Structural. It is arranged during a break in pouring concrete in the place where work is suspended. The construction seam may coincide with the shrinkage gap.
The parameters of deformation gaps depend on the coefficient of thermal expansion of the material, shrinkage characteristics, load, and operational factors. The distance between them is usually calculated from the expression (25-37)h, where h is the thickness of the screed. If the concrete solution shrinks significantly, the parameter is taken at the lower limit. The seam width is selected within 4-6 cm.
Conclusion
When carrying out renovations in an apartment, SNiP for floor screed is rather advisory in nature. But at the same time, we should focus specifically on its requirements - this way we can guarantee the strength and durability of the laid floor.
If you need to buy a hovercraft, call or write to us, we will be glad to mutually beneficial cooperation! Contact us - our polite managers will definitely answer your questions! From us you can buy wedges and clamps on the best conditions in the required quantity, so that you do not have to overpay for this product! Contact us, we will definitely please you with pleasant discounts and promotions! See you in touch!
Features of cutting seams
The question of how expansion joints are made is decided depending on the type of screed (semi-dry, self-leveling, etc.), the size of the room and specific conditions.
The likelihood of concrete cracking increases as the moisture content of the solution increases and the rate of hardening increases, if the proportions of the ingredients are violated. The risk is reduced due to proper care after pouring, which involves gradual hardening of the concrete. An important role is played by controlling the humidity and temperature conditions in the room. Expansion joints of various types are performed at various stages of floor construction. Their arrangement is developed in advance, calculating the distance between them and the cutting depth. When forming a channel, it should be remembered that cracking is typical for sharp corners, and therefore they must be avoided.
All seams can be divided into 2 types:
- Technological elements. They are needed only at the stage of manufacturing the concrete screed and its complete hardening. Subsequently, there is no need for them, and therefore they must be sealed. This category includes construction and shrinkage seams.
- Permanent type. The main representative is the insulating seam. Deforming loads persist throughout the entire life of the building, which requires the constant presence of a compensation gap.
Based on the purpose of the seams, the corresponding work is planned. Gaps of a technological nature will interfere and must be eliminated. To do this, a sealing and sealing stage is provided at a certain stage of construction. Permanent seams should be kept in working order, but disguised to give the proper appearance.
In a semi-dry screed
The most typical semi-dry screed for private construction is made from a thick solution with a minimum water content. This reduces shrinkage problems somewhat, but does not eliminate them. Such screeds require cutting all of the specified types of expansion gaps:
- The insulating seam is formed at the screed manufacturing stage. To do this, before pouring concrete, a strip (batten) that does not have adhesion to the mortar is laid around the entire perimeter of the room, close to the wall. Its thickness is selected within 10-20 mm. After the concrete solution has set, it is removed, opening the cavity between the screed and the wall. Next, the seam is masked with a plinth.
- Shrinkage cuts are made after pouring, but before the mass has completely hardened. They are not needed during the period of active evaporation of moisture, when shrinkage has not yet occurred, but are necessary at the stage of structural transformations. It is necessary to form seams within 2-6 days after pouring. To cut them, it is best to use a special concrete joint cutter. You can use a grinder. Sometimes the following technology is used. A few hours after pouring, when the mass still retains a certain plasticity, a bar is pressed into it. The depth of the shrinkage seam is selected within 1/3-1/4 of the thickness of the screed.
- Construction joints are special elements. They are necessary only when there is a forced break in pouring concrete. In this case, after completion of the work, transverse slats or metal cones are installed at the pouring boundary. As a result, the seam is formed according to the “groove-tenon” system. In fact, this is the only type of deformation gap with uneven channel walls. When planning work, you should think about the location of structural cuts in advance.
Sequence of flooring
In order for indoor floors to serve for a long time and reliably, you need to carefully perform each stage of work:
- Prepare the surface of any base properly - clean it from dirt and debris.
- If the base is an old concrete surface, you need to open up the cracks, clean them and fill them with liquid mortar.
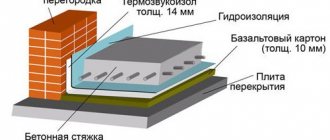
- If provided for in the project, waterproofing and thermal insulation are installed.
- Using a water level, the floor level is marked on the walls of the room.
- Plastic clamps for the reinforcement are laid out, or pads are made from the solution for the mesh to ensure its position in the thickness of the concrete.
- A mesh is laid on the clamps with sheets overlapping by 1-2 cells.
- Next, beacons are installed - boards, slats or guides for factory-made plaster. The distance between the beacons should be 10-20 cm less than the length of the rule.
- Concrete or mortar is poured between the beacons.
- When the screed has set, the beacons, if they were bars or boards, are removed, and the holes are sealed with concrete or mortar.
To prevent the reinforced fresh screed from drying out unevenly in places, it needs to be watered for several days and covered with plastic wrap.
Sealing expansion joints
Sealing is necessary to eliminate the water channel and give the gaps an aesthetic appearance. The following methods are used:
- Sealing tape. This is the easiest way. It is implemented by placing a sealant in the form of a bundle into the cut cavity. Most often, a rope made of foamed polyethylene is used, which has sufficient elasticity and a low price.
Sealants. You can use special sealing mastics, sold in finished form. After hardening, the mass turns into a monolith, providing waterproofing properties. Filling the seams is done using rubber spatulas.- Waterstops. They are made in the form of a plastic or rubber tape. The special profile allows their dense and durable placement in the canal cavity.
- Profile elements. Essentially, this is a special system of rubber inserts and profiles. The main advantage is protection from significant mechanical loads.
Which method to seal the seam should be decided taking into account specific conditions. It is necessary to take into account the size of the gaps and real loads. We should not forget about appearance.
Deformation gaps are necessary when making concrete floor screed. The compensation, insulating gap must be maintained throughout the entire life of the house. Other types of seams are only necessary during the construction phase. They will have to be carefully and elegantly sealed.
A common option for floors of buildings, structures and coatings in industrial premises with intense mechanical stress is a concrete floor. The material from which these structural elements are made is subject to shrinkage and has low resistance to deformation, as a result of which cracks occur. To avoid repeated repairs, artificial cuts are created in monolithic structures. For example, expansion joints in concrete floors, building walls, roofs, bridges.
Reinforcement of the screed with a network
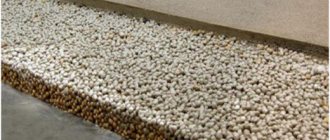
Reinforcement of the floor screed is carried out using a mesh consisting of cells of 1-1.5 cm, and the wire thickness should be 4 mm. It is fixed on special mounting supports, prematurely installed on the concrete base. If the base is loose, then another layer of mesh is needed, which is mounted inside the expanded clay cushion, which will increase the technical characteristics of the floor.
Reinforced screed is required in rooms where a huge load is placed on the floor. This could be, for example, a large amount of furniture, etc. For garages and utility buildings, this work with the floor base is also required. Reinforcing a floor screed is not a difficult task. In this case, the goal is to achieve a completely flat surface. It is important to add another layer of self-leveling consistency on top after the reinforced screed has completely dried.
Additional Information:
- Reinforcement of a concrete floor During major repairs and construction of a private house, reinforcement of the concrete floor is required. Anyone who wants to save money only makes a concrete screed, and...
- Thickness of the screed for a heated floor The thickness of the screed for a heated floor depends not only on the wishes of the user, but also, first of all, on the design features of the building,…
- Concrete floor screed Do-it-yourself concrete floor screed is a completely possible undertaking, however, in order to know when to lay the finishing coating it is important to understand how long it takes to dry...
- Which floor screed is better Arranging a floor screed is an important event during repairs and construction. However, which floor screed is better? After all, from...
- Why does the floor screed crack? Many builders claim that a narrow crack is acceptable and does not require repair, but this is not always the case. It is important why the screed cracks...
- Pouring and screeding the floor in the garage The first step in pouring and screeding the floor in the garage is preparing the foundation. In a garage, the base of the floor can be an ordinary…
- Pouring the floor with concrete in the garage Pouring the floor with concrete in the garage is one of the important and critical stages in the repair and construction of the garage. Garage floor...
What are they needed for?
The concrete floor appears to be a strong and durable base. However, under the influence of temperature fluctuations, shrinkage processes, air humidity, operational loads, and soil settlement, its integrity is lost - it begins to crack.
To impart some degree of elasticity to this building structure, expansion joints are created in the concrete floors. SNiP2.03.13-88 and its Manual contain information on the requirements for the design and installation of floors, indicating the need to create a gap in the screed, underlying layer or coating, which ensures the relative displacement of isolated sections.
- Minimizing sudden deformations by dividing a monolithic slab into a certain number of cards.
- The ability to avoid expensive repairs with the replacement of rough and base coatings.
- Increased resistance to dynamic loads.
- Ensuring the durability of the structural basis.
How to check the quality of the finished screed
You can check the quality using the rule.
There are many masters. Only the lazy today do not fill the screed themselves, and not everyone follows the norms. At the same time, it is not difficult to determine the quality of the poured screed.
Important! If the screed does not become cracked after a month of drying, then we can safely say that the proportions of the mixture are correct and it is strong enough.
In addition to strength, the evenness of the coating is also important. Many types of flooring are demanding on this parameter. For laminate and parquet, the maximum height difference reaches 2 mm per 2 linear meters.
To check this value, you can use a long rule and level. If the rule leaves a gap of more than 2 millimeters, then you will have to use a finishing leveler. The strength of the screed is not so important in residential premises, because it does not experience heavy loads. The evenness of the coating is much more important.
Permissible deviations for floor screed
As already noted, it is not always possible to comply with the requirements for floor screed. Tolerances and deviations from design standards are included below:
- The thickness of the screed should have a deviation from the design value of no more than 10%
- The maximum height difference for laying parquet, linoleum and laminate is 2 mm per 2 linear meters.
- The maximum height difference of the rough foundation for laying waterproofing is 4 mm per 2 linear meters.
- The maximum height difference when laying other coatings is 6 mm per 2 linear meters.
- The deviation from the horizontal level of the room should not be more than 50 mm.
As you can see, the requirements are simple, and this is not a whim, but a necessity, so that the floor covering and the base itself last a long time. In this case, the requirements are imposed on both the final coating and the rough base.
Average score of ratings is more than 0
Share link
Comments There are no comments yet, but you could be the first...
Main types: insulating seam
Expansion joints in concrete floors, depending on their purpose, are divided into three types: insulating, structural and shrinkage.
Insulation cuts are made at the junctions of structural elements of the room. That is, they are an intermediate seam between walls, foundations for equipment, columns and floors. This makes it possible to avoid cracks during shrinkage of concrete in the contact areas of the horizontal and vertical elements of the room. If you neglect their arrangement, then when the screed dries and decreases in volume with a rigid adhesion to the wall, for example, it will most likely crack.
An insulation joint is created along walls, columns and in places where the concrete floor borders other types of foundations. Moreover, near the columns the seam is cut not parallel to the edges of the column-shaped element, but in such a way that a straight cut falls on the corner of the column.
The considered type of seam is filled with insulating materials that can allow horizontal and vertical movement of the screed relative to the foundation, columns and walls. The thickness of the seam depends on the linear expansion of the screed and is about 13 mm.
Fiber reinforcement
Fiber protects against microcracks, but will not protect against the appearance of significant defects.
Reinforcing a screed with fiber fiber is somewhat different from using mesh. The reinforcement material is a mixture of special fibers (basalt, fiberglass, steel, polypropylene), which are added to the screed solution. When hardened, they form a single durable monolithic coating. Fiber protects against microcracks, but does not protect against the appearance of significant defects.
The choice of fiber type depends on the characteristics of the floor and its purpose. For example, to obtain a light screed, glass or polypropylene fiber is used. Metal fiber is suitable for high traffic floors. If the screed will be performed outdoors or in difficult aggressive conditions, then choose basalt fiber.
To use fiber, it is poured into a dry composition in a concrete mixer. Once mixed with cement, water can be added. The prepared mixture is placed on the base and leveled along the beacons. Fiber can be used in combination with any reinforcing mesh to increase the strength of the screed.
Main types: shrink seam
If insulation joints prevent deformation of a monolithic concrete floor at the points of contact with the walls, then shrinkage cuts are necessary to prevent chaotic cracking of concrete over the entire surface. That is, preventing damage caused by shrinkage of the material. As the concrete dries from top to bottom, tension appears inside it, created by the hardening of the top layer.
The construction of expansion joints in concrete floors of this type occurs along the axes of the columns, where the cuts meet the corners of the perimeter joints. Cards, that is, parts of a monolithic floor bounded on all sides by shrinkage joints, should be square; L-shaped and elongated rectangular shapes should be avoided. The work is carried out both during laying of concrete using forming slats, and by cutting the seams after the screed has dried.
Main types: construction seam
Such protection of monolithic floors is created in the event of technological interruptions in work. The exceptions are rooms with a small pouring area and continuous supply of concrete. Expansion joints in structural concrete floors are cut at the junction of screeds made at different times. The shape of the end of such a connection is created according to the “tongue and groove” type. Features of structural protection:
- The seam is placed at a distance of 1.5 m parallel to other types of deformation boundaries.
- It is created only if concrete is laid at different times of the day.
- The shape of the ends should be of the tongue-and-groove type.
- For a screed thickness of up to 20 cm, a 30-degree cone is made on the wooden side protrusions. Metal cones may be used.
- Tapered seams protect the monolithic floor from minor horizontal movements.
Fiberglass mesh
Reinforcement of floor screed is possible only with impregnated fiberglass mesh. Impregnation allows them to withstand the effects of the alkaline environment formed in the thickness of concrete.
The material for the reinforcement is threads containing aluminoborosilicate glass. The performance qualities, characteristics, and scope of application are the same as those of polypropylene mesh.
The downside, although insignificant, is that it is undesirable to use fiberglass in rooms with a possible risk of fire. The critical temperature for fiberglass reinforcement is 150°C.
Expansion joints in concrete floors of industrial buildings
Increased wear resistance requirements are imposed on floors laid in factories, warehouses and other industrial facilities. This is due to the appearance of the influence of different intensities of mechanical impact (movement of vehicles, pedestrians, impacts from falling solid objects) and the possible ingress of liquid onto the floor.
As a rule, the design feature of the floor consists of a screed and a covering. But under the screed there is an underlying layer, which in a rigid version is laid from concrete. In it, a seam is cut in mutually perpendicular directions every 6-12 m, with a depth of 40 mm, with at least 1/3 of the thickness of the underlying layer (SNiP 2.03.13-88). A prerequisite is that the expansion joint of the floor coincides with similar protective gaps in the building.
A distinctive feature of the floor structure in industrial buildings is the creation of a top layer of concrete. Depending on the intensity of the mechanical impact, coatings of different thicknesses are designed. With a thickness of 50 mm or more, an expansion joint in concrete floors (SNiP “Floors” clause 8.2.7) is created in the transverse and longitudinal direction, repeating the elements every 3-6 m. The cut is sawed 3-5 mm wide, its depth is not less than 40 mm or a third of the coating thickness.
Reinforcement materials
Floor screed reinforcement can be done using several types of materials:
- Dispersed reinforcement when iron, basalt or glass fiber is used.
- Extended reinforcement, namely iron mesh, composite mesh, large frame made of fiberglass or polypropylene.
You cannot replace one with the other, since in each individual case one of these options is used, but their combination is possible. As a rule, it is individually calculated which specific size and material will be used. This depends on the planned loads on the floor. For example: a screed in residential premises with a thickness of 40-60 mm, which is laid using a dry consistency, is secured with a welded net made of iron wire with a diameter of 4 mm and cells of 10 * 10 or 15 * 15.
In order for the reinforcement to be of high quality and achieve high strength characteristics, the mesh must be installed correctly, so that it does not touch the preliminary floor in any case, and it must also be ensured that it is inside the concrete layer. To do this, it is placed on mounting supports before pouring.
Requirements for creating deformation protection for floors
Concrete cutting must be done with a milling cutter after two days of hardening. The cutting depth according to the standards is 1/3 of the concrete thickness. In the underlying layer, in places where there are supposed gaps, before pouring concrete, it is allowed to use slats treated with anti-adhesion compounds, which are removed after hardening of the material and as a result, protective seams are obtained.
The lower parts of columns and walls to the height of the future coating thickness should be covered with rolled waterproofing materials or foamed polyethylene sheets. In those places where the design provides for expansion joints in concrete floors. The cutting technology begins with marking the places of artificial breaks with chalk and a ruler.
A test seam serves as an indicator of timely cutting: if the aggregate grains do not fall out of the concrete, but are cut by the cutter’s blade, then the correct time for creating expansion joints has been chosen.
Minimum requirements for the installation of high-quality floor screed according to SNiP standards
Many people do not realize that even an ordinary cement screed is subject to a lot of requirements according to GOST. Professional builders follow all regulations and carry out a specific project to ensure that they adhere to them. What are the main requirements that concrete floors must meet when laying them themselves?
Concrete floors have structural requirements, including minimum thickness and finishing quality
Requirements for floor screed
Standards and requirements do not come out of thin air; it is important to comply with them, especially if repairs are being carried out in an apartment building. For example, you can’t just remove walls. The same standards apply to floor structures.
The requirements apply to all levels of the floor - from the rough to the finishing coating. In order for flooring materials to last a long time, they must be observed. Therefore, you should not reject SNiP. A brief study of its requirements will help you avoid mistakes that are so easy to make. The regulatory documents stipulate absolutely all standards, from waterproofing the subfloor to the proportions and components of the cement-sand mortar.
When arranging a cement-sand screed, the following technical characteristics are taken into account:
- minimum thickness;
- structural strength;
- waterproofing;
- minimum layer above the heated floor system;
- reinforcing layer;
- presence and location of expansion joints.
Minimum layer
They are guided not by how much mixture is needed, but by the requirements for the minimum thickness of the screed
When choosing a minimum layer, they depend on the type of mixture. But despite the composition, according to SNiP, the minimum thickness of the floors cannot be less than 3 cm. When adding reinforcing fibers, the thickness of the screed is allowed to be at least 1.5 cm. If pipes pass through the floor screed, the screed is poured no thinner than 4 cm.
Attention! Determining the strength of a coating is a difficult matter, because this requires special technical means. Of course, you need to be guided by GOST requirements, but in this matter the assessment is carried out only indirectly. It can be argued that the coating will be durable if you follow the proportions and recommendations of the manufacturer, as well as other requirements for arranging the screed.
Waterproofing
Lubricant waterproofing on concrete floors
The use of a waterproofing layer is mandatory, because if the screed becomes waterlogged, water will flow to the lower floors. For this reason, SNiP establishes requirements for the waterproofing layer.
If waterproofing is performed above a room, the following types of waterproofing material are used:
- On bitumen mastic (Brizol, hydrostekloizol).
- On polymer adhesive (PVC, fiberglass, polyisobutylene).
If screeding is carried out on the ground: SNiP obliges the soil to be compacted with black crushed stone with additional impregnation from bitumen or poured concrete composition.
Reinforcement
To reinforce or not depends on specific situations
The reinforcing layer is used in cases where the thickness of the screed exceeds 5 cm. For this, any technology can be used. This standard applies to premises with an average degree of load, that is, residential.
When reinforcing, according to the standards, it is recommended to use the following materials:
- Wire to create a mesh with cells 10 x 10 cm.
- Polymer mesh.
- Metal rods.
- Fiber fiber.
Reinforcement of a concrete screed strengthens it and prevents the risk of cracks, maintaining integrity and reducing deformation loads. Reinforcement of a screed whose thickness is less than 5 cm may be necessary if a water heating system is installed. Moreover, the reinforcing layer is not used with a rough screed, since almost the entire load falls on the finishing layer.
Expansion joints
Floors in different rooms are separated by expansion joints
With a large area of the room, the risk of cracks increases. Therefore, a screed technological map is being designed. It indicates the sequence of work, the materials used and the location of expansion joints, including the distance between them and other technical information.
Solution
When pouring a cement screed yourself, all these norms can be ignored due to ignorance or reluctance. Many people believe that the entire technological effectiveness of the process lies only in the preparation of the solution. Although this is not incorrect, as has already become clear from the material presented above, it is still worth noting the features of preparing the solution. The proportions vary depending on the brand of cement, layer thickness and other criteria, but all solutions consist of the following components:
- Sifted river sand;
- Cement. Brand M300-M400 is suitable for residential premises; M500 is used in industrial premises;
- Gravel or crushed stone. The size of the fractions should be 5-15 mm and withstand pressure from 20 MPa.
If you use ready-made mixtures for filling, then you don’t have to worry too much about the composition, because manufacturers prepare mixtures that meet the standards.
How to check the quality of the finished screed
You can check the quality using the following rule:
There are a lot of masters. Only the lazy today do not fill the screed themselves, and not everyone follows the norms. At the same time, it is not difficult to determine the quality of the poured screed.
Important! If the screed does not become cracked after a month of drying, then we can safely say that the proportions of the mixture are correct and it is strong enough.
In addition to strength, the evenness of the coating is also important. Many types of flooring are demanding on this parameter. For laminate and parquet, the maximum height difference reaches 2 mm per 2 linear meters.
To check this value, you can use a long rule and level. If the rule leaves a gap of more than 2 millimeters, then you will have to use a finishing leveler. The strength of the screed is not so important in residential premises, because it does not experience heavy loads. The evenness of the coating is much more important.
Seam processing
Normal functioning of the seam is achieved by sealing it. Sealing expansion joints in concrete floors is carried out using the following materials:
- A waterstop is a profiled tape made of rubber, polyethylene or PVC, laid when pouring a concrete screed;
- A sealing cord made of foamed polyester is placed in the slot and retains its elasticity during temperature changes, ensuring safe movement of the concrete covering;
- Acrylic, polyurethane, latex mastic;
- Deformation profile consisting of rubber and metal guides. It can be built-in or overhead.
Before sealing, the working surface of the gaps must be cleaned and blown with compressed air (compressor). Also, to increase the service life of concrete floors, it is advisable to strengthen the top layer with topping or polyurethane material.
Materials for arranging seams
Materials intended for arranging seams (regardless of type and size) are subject to the same requirements. They must be resilient, elastic, easily compressible and quickly recover their shape after compression.
Damper tape
It is designed to prevent cracking of the screed during its drying process and compensate for loads from building structures (walls, columns, etc.). A wide selection of sizes (thickness: 3÷35 mm; width: 27÷250 mm) of this material allows you to equip almost any screed and concrete floors.
Sealing cord
A popular and easy-to-use material for filling deformation gaps is a cord made of foamed polyethylene. There are two types of it on the construction market:
- solid sealing cord Ø=6÷80 mm,
- in the form of a tube Ø=30÷120 mm.
The diameter of the cord must exceed the width of the seam by ¼÷½. The cord is installed in the groove in a compressed state and filled with ⅔÷¾ of the free volume. For example, to seal 4 mm wide grooves cut in a screed, a Ø=6 mm cord is suitable.
Sealants and mastics
Various sealants are used to seal seams:
- polyurethane;
- acrylic;
- silicone.
They come in either one-component (ready-to-use) or two-component (they are prepared by mixing the two components immediately before use). If the seam is of small width, then it is enough to fill it with sealant; if the gap width is significant, then this material is applied on top of the laid cord made of foamed polyethylene (or other damping material).
A variety of mastics (bitumen, bitumen-polymer, compositions based on raw rubber or epoxy with additives to impart elasticity) are used mainly for sealing external deformation gaps. They are applied on top of the damping material placed in the groove.
Special profiles
In modern construction, expansion joints in concrete are successfully sealed using special compensation profiles. These products come in a variety of configurations (depending on application and joint width). For their manufacture, metal, plastic, rubber are used, or several materials are combined in one device. Some models in this category must be installed during the process of pouring the solution. Others can be installed in the groove after the base has completely hardened. Manufacturers (both foreign and domestic) have developed a wide range of such devices, both for outdoor use and for indoor installation. The high price of the profiles is compensated by the fact that this method of sealing gaps does not require their subsequent waterproofing.