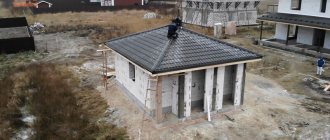
It is most important to install such a protective structure under any type of floors and roofs. Mauerlat is an element of the roofing system on which the roof is installed.
In order to distribute significant loads from the roof and protect the load-bearing walls from the occurrence of various cracks, a special structure is erected from a more durable material than aerated concrete wall blocks.
The armored belt or seismic belt must be made strictly in accordance with the design in dimensions that meet the construction characteristics of the house.
The need for a seismic belt in an aerated block house
The reinforced belt is made, as a rule, on weak walls made of aerated blocks, in the form of a closed structure. It is a monolith, brick or U-blocks.
This protective structure is created for the purpose of :
- Uniform distribution of the weight of the roof and transfer of the total load through the walls to the foundation, thereby protecting the walls from overload and cracking.
- Strong connection of the roof with external load-bearing walls.
- Seismic protection of the house.
- Compensation of deformations in aerated concrete walls with non-uniform overload or elastic modulus.
- Reliable fastening of the Mauerlat to the load-bearing aerated concrete wall with anchor connections.
- Carries the function of a thrust when using a complex of hanging rafters.
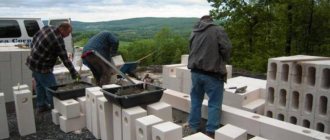
In the photo there is an armored belt for aerated concrete under the Mauerlat:
Aerated blocks have a lot of advantages as a wall material. This is primarily heat resistance and lightness due to the porosity of the internal structure. However, with an increase in the porosity coefficient, the mechanical strength characteristics of aerated concrete decrease, which is not able to withstand significant local static and dynamic overloads from a heavy roof.
A reinforced belt is quite often called a seismic belt, which corresponds to this term, since the structure is capable of accepting uneven loads, distributing them evenly , thus protecting the wall system from destruction.
This is explained by the fact that concrete or reinforced brick has much greater resistance to external compressive loads than gas silicate, and the reinforcement integrated into the structure prevents tensile failure. Due to the joint functioning of these 2 building materials, such a protective belt can even withstand much more powerful stresses than the standard ones.
The monolithic structure of the reinforced belt forms a sufficient stiffening rib in the gas silicate wall system, thereby preventing its destruction.
Read more about the need for armored belts on walls made of aerated concrete blocks here.
Consequences of absence
For modern concrete blocks, such as aerated concrete, the installation of a reinforcing belt is mandatory. Despite the fact that brick walls have higher strength compared to aerated concrete and, in principle, the Mauerlat can be attached to them with classical anchors, nevertheless, in areas with seismic activity, the installation of such a seismic belt under the Mauerlat is required even for brick buildings.
If the developer does not install an armored belt on aerated concrete wall structures, the house will be subject to the following negative phenomena :
vertical loads will not be evenly distributed and buildings will lose rigidity;- a process of movement of the floors will occur, since this is caused by the characteristics of aerated concrete, which expands when moisture and steam enter it;
- the edges of the upper blocks will collapse under the influence of ceilings;
- destructive point loads from roof beams will occur;
- making holes in gas blocks under the Mauerlat will lead to the appearance of wall breaks; hanging rafters create multidirectional loads, which can cause the blocks to spread.
How to make formwork for pouring concrete
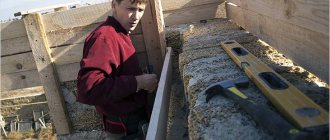
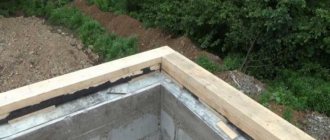
If at least one side of the armored belt goes outside the building, the construction of mandatory formwork is required.
It can be made from flat boards, OSB, plywood sheets, laminated chipboards. The formwork is attached directly to the aerated concrete walls using wood screws. If boards are used, then it is necessary to provide vertical jumpers to ensure structural rigidity.
Horizontal jumpers are attached to the top of the formwork, securing it on both sides. The jumpers are screwed with self-tapping screws or nailed every 80–100 cm.
If the insulation layer extends onto the outer wall of the house, and wall finishing has not yet been provided, it can be disguised. To do this, the formwork is not installed flush with the wall, but directly on the wall. After removing the formwork, a depression about 3 cm deep remains, which is quite enough for a layer of finishing material.
Materials for reinforced belt under the roof
The armored belt is made in the form of a continuous strip along the perimeter of load-bearing wall structures. It can be formed by formwork with a reinforced frame filled with concrete mortar, built with brick or U-blocks, or a combined method .
Brick armored belts are practically no longer installed on aerated concrete walls under the Mauerlat. There is only one objective reason for placing it on aerated concrete - if the developer does not have the opportunity to install a reinforced concrete monolith or U-blocks.
To prevent cold bridges from being created on the brick structure, brickwork on aerated blocks under the Mauerlat is made using “winter” assembly adhesive; in addition, it is insulated to increase thermal resistance.
Concrete seismic belt is by far the most popular form of protection for aerated concrete walls. Traditionally, it is performed in removable formwork from low-grade boards or collapsible panels. To do this, use unnecessary furniture panels and other auxiliary materials.
The procedure for fixing the formwork:
- The edges are secured with reinforcing pieces or steel wire.
- At the top, stiffeners are created from 40x40 mm bars, nailed to the top of the boards, located parallel at a distance of at least 1 m.
- The bottom is strengthened with a cross piece of reinforcement to prevent the formwork from shifting.
The thickness of the boards is selected according to the size of the belt; the higher it is, the thicker the board will be required. To prevent the solution from leaking out when pouring, seal all leaks, corners and turns.
Reinforcement frame, tied from iron reinforcement 12 -14 mm. Inside the formwork it is installed on plastic or wooden supports 3 cm thick. In cross section it should have a square or rectangle.
Transverse reinforcement is fixed to the base part of the frame with wire D 6 or 8 mm, every 300 mm. After the frame is installed in the formwork, it is filled with concrete not lower than M200. Most often, a mixture of M 250 with crushed stone filler is used .
Filling is carried out evenly over the entire formwork at a time. It is easier to do this using a concrete pump with a locking mechanism. When performing small volumes of concrete work, pouring can be done manually. After that, the solution is vibrocompacted with a special construction vibrator or by bayoneting the mass with a piece of reinforcement and an ordinary trowel.
Filling must be done at once without interruption. If, nevertheless, the developer is forced to take a break, for example, if the solution runs out or as a result of other force majeure situations, a vertical cutoff is performed.
Dismantling of the formwork is carried out no less than every 24 hours in the summer and no less than 72 hours in the winter . Since concrete has a thermal conductivity significantly higher than gas silicate, in winter it “becomes a cold bridge”, a place for condensation to form and destruction of the wall and cladding. Therefore, this type of protective structure requires insulation from the outside.
If you use non-removable warm formwork, then insulation of the reinforced belt is not required. For this purpose, modern industry has launched the production of box-shaped U-blocks. They are easy to install.
The developer will only need to install them on the top row of gas blocks using special glue, and the free cavity should be turned upward. Next, a heat insulator, for example, polystyrene foam or Penoplex, is installed in the internal cavity.
Then the assembled reinforced frame is laid and, in the same way as when making a monolithic concrete structure, the concrete mixture is laid, followed by compaction. The production speed of the belt with this option is very high, since there is no need to install/dismantle the formwork.
Recently, a combined device method has also been used quite often. On the outside of the load-bearing wall, blocks 150 mm wide are placed on the adhesive solution, and the inside is insulated with foam plastic or other similar heat insulator. Next, a reinforced frame is mounted inside and the form is filled with concrete.
Preparatory work
Before making an extension from aerated concrete and starting construction, you must obtain official permission from the relevant authorities. To do this, a new part of the building is first designed, preferably with the participation of specialists, to avoid significant mistakes during independent construction, leading to destruction during operation.
An additional room, bedroom, veranda, kitchen, loggia, etc. can serve as an extension. When constructing any type of extension, the required elements are the foundation and walls. The roof can be made in the form of:
- adjoining the slope of the roof of the house;
- adjoining the gables;
- devices of the general rafter system;
- independent design option.
Attention: construction from aerated concrete blocks is quick and does not require significant construction knowledge and skills. Taking into account the differences in loads, it is recommended to make the foundation of a new room separately to prevent the formation of cracks during possible seasonal heaving of the soil
It is more rational to make the walls of the extension from modern analogues of concrete. We are talking about aerated concrete and blocks made of this porous thermal insulation material. Aerated concrete is indeed a very effective material, having a high degree of thermal insulation, due to the presence of a lower density and a large number of internal pores
Taking into account the differences in loads, it is recommended to make the foundation of a new room separately to prevent the formation of cracks during possible seasonal heaving of the soil. It is more rational to make the walls of the extension from modern analogues of concrete. We are talking about aerated concrete and blocks made of this porous thermal insulation material. Aerated concrete is indeed a very effective material, having a high degree of thermal insulation, due to the presence of a lower density and a large number of internal pores.
Design requirements
The dimensions of the reinforcing belt are responsible for the reliability of aerated concrete walls. Their sizes are directly related to their block widths. The height of the formwork is determined by strength conditions; as a rule, it is established during the design of the load-bearing structures of the house.
In order for the armored belt to be durable, the following regulatory requirements are usually adhered to :
The height of the armored belt is usually taken from 25 to 40 cm.- The width of the external load-bearing wall and the belt must match.
- The minimum permissible cross-section of the protective structure must be at least 25x25 cm.
- The seismic belt must be monolithic, with equal strength characteristics for all component areas.
- The reinforcement frame is continuous.
- Longitudinal reinforcement is installed with an overlap of at least 80 cm.
- The diameter of the reinforcement installed in the longitudinal direction should not be less than 10 mm
- The diameter of the transverse reinforcement is from 6 to 8 mm, installed in increments of 200 to 400 mm.
- It is recommended to use long 8 m rods.
- The reinforcement is covered on all sides with a protective concrete layer of at least 50 mm.
- Longitudinal and transverse rods are not connected by welding, but only by knitting wire.
- At corner turns, the longitudinal rods are bent and overlaps are made away from the corner.
- The frame is positioned only strictly horizontally.
About the importance of the Mauerlat
Before moving on to considering methods of attaching a roof to aerated concrete walls, I would like to say a few words about the Mauerlat itself. Let's start with the fact that this is one of the most important parts of the house design. Because in terms of its functional load it can be compared to a strip foundation. Only the Mauerlat is subject to the loads of the roof structure.
And the loads from the roof, I must say, are considerable. Moreover, they act not vertically, but horizontally, that is, perpendicular to the plane of the walls. The latter in this case work in bending, which is very dangerous for vertically located structures. In fact, the roof of a house has a destructive effect on its own walls.
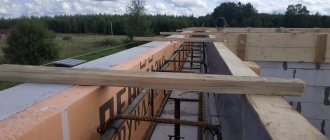
The rafter system creates a perpendicular load on the walls of the house. Source domo-stroi.com
But that is not all. A rafter system consisting of rafter legs is a structure that acts on the walls of a building with point loads. And for structures assembled from piece wall material, which includes gas silicate blocks, this is a point destructive action. So the Mauerlat distributes these loads evenly along the entire length of the walls, reducing them at each point individually.
And the third positive quality of the Mauerlat is the simplification of the process of connecting the rafter legs to the walls of the building. It would be difficult to attach every rafter to the wall. It is much easier to do this when two wooden elements are connected to each other. This opens up quite a large number of fastening options, from traditional “blind” ones using nails and self-tapping screws, to movable ones, which use modern fasteners.
Typically, timber with a minimum cross-section of 100x100 mm is used as a Mauerlat. But there is an unspoken opinion among builders that the height of the timber used should not be less than two thicknesses of the rafter legs. As for the width, the optimal option is the thickness of the wall on which the Mauerlat is mounted, minus 5 cm. That is, the main task is to prevent natural loads from acting on the Mauerlat, both from the outside and from the inside.
Beams of different sizes for the mauerlatSource azbykalesa.ru
Since the Mauerlat is subjected to quite serious loads, first-grade timber with a low moisture content is chosen for it. Experienced craftsmen recommend using hardwood timber for the mauerlat. But finding such material today is not easy, so pine is often used.
If the rafter system is made of metal trusses, then instead of wood for the Mauerlat you can choose a steel profile, usually a channel or an I-beam. In private housing construction, metal profiles are rarely used. This is the exception rather than the rule. Preference is still given to wood.
Equipment and materials for construction
The equipment and tools that are required for pouring concrete depend on the technology of work: manual or machine.
Most often, developers use the following devices and tools:
- chute or hose for concrete pump;
- a tub for moving the solution;
- conveyors and lifting mechanisms for working at heights;
- concrete mixer;
- buckets;
- Master OK;
- measuring instruments, beacons.
For consumables, you will need a reinforced frame and M200 mortar, which is prepared in the following proportions :
- cement M400 – 1 hour;
- sand – 2 hours;
- crushed stone - 5 hours.
For M250 - in proportion:
- cement M400 - 1 hour;
- sand – 2 hours;
- crushed stone - 4 hours.
Water is added to concrete in a minimal amount, for 10 parts of cement - 5 parts of water, and a plasticizer is added to obtain the plasticity of the finished solution.
Insulation if there is a gap
To carry out foaming, you will need to make holes with a distance of no more than 250–300 mm through the skin along the line of the armored belt. Foam is poured into every second hole.
Be sure to use professional foam - the insulating layer will last for several years and will not crumble.
With proper insulation, in winter the reinforcing belt will not allow cold air to pass through and the building will last a long time.
Question:
Hello, I am building a house from 400 mm thick gas blocks, the walls are covered with plaster inside and out. The reinforced belt was lined with bricks as permanent formwork. After this, the brick was also plastered. No one lives in the house yet, but in winter we noticed that the reinforced belt was frozen. So we need to insulate it. I looked at many sites, received advice from developers and accepted the following: Use an RPG, of course this is the same EPP, but covered with a mesh. To keep costs to a minimum, I would like to glue the RPG directly onto the external plaster, with an overlap of 100 mm on the upper and lower gas blocks. As a result, I will get a semblance of protruding half-timbering, which I can later putty and paint. All this is good, but I am confused by the vapor permeability indicator of the RPG, or rather the complete lack of permeability. I’m also interested in your opinion on how correct and effective it is to do it the way I intended.
Answer:
Greetings, Miroslav.
The solution you have conceived is 100% effective and correct. In this case, it is not necessary to make such an overlap, and the fact that extruded polystyrene foam does not allow steam to pass through is not a problem if it is applied correctly.
In your case, you will be covering an already almost vapor-tight concrete belt with it. The total area of the vapor-tight part of the facade will be 5%, and this will not create obstacles to the passage of vapors and will not contribute to turning your home into a thermos.
Provided that the laying of the blocks and the general structure of the wall are done correctly, and the blocks rest on the distribution belt, then you can do the following:
- line the reinforced belt with bricks on the outside - like permanent formwork, so you can dismantle it later.
– the place of the brick can be filled with extruded polystyrene foam, the thickness of which is 50 mm (provided that the masonry is the size of half a brick). With such a width, the thermal resistance in this section of the enclosing structure will be less than 2.0 m? * C/W, and this will prevent freezing of this section.
– then you can use plastic, crack-resistant cement plaster.
The result will be a smooth wall and no freezing along the distribution belt.
In order for a house built on your own to be durable and serve without problems for many years, it is necessary to ensure the rigidity of the structure and high-quality walls. To do this, it is necessary to erect an armored belt under the floor slabs.
To construct a high-quality reinforced belt, it is important that the circular pouring process be continuous and one-time. A monolithic reinforced belt evenly distributes pressure along the entire perimeter of the wall and provides a flat surface for subsequent covering
A monolithic reinforced belt evenly distributes pressure along the entire perimeter of the wall and provides a flat surface for subsequent covering.
A monolithic belt is erected along the perimeter of the walls of each floor under construction; on the last floor it plays the role of a base for the roof and ceiling of the attic. At the same time, window and door lintels can be made to a minimum size with a small amount of reinforcement, since the belt takes on the main load and distributes it evenly.
DIY construction instructions
The technology for constructing an armored belt consists of 6 important stages: installation of formwork, production of reinforced frame, installation of reinforced frame, insulation, concreting process and dismantling of formwork.
Technology for reinforcing the protective belt under the Mauerlat:
- carry out thorough cleaning of wall structures from all types of contaminants in the area where the belt is installed;
- lay steel outlets under the installation of formwork;
- assembly of wooden formwork elements;
- installation of a reinforced frame, with clamps, to ensure the creation of a protective concrete layer;
- installation of insulation so that after filling it is located on the outside of the armored belt;
- set notches and an indicator of the level of concrete poured into the structure;
- preparation of working areas and platforms for receiving concrete mortar;
- installation of scaffolding and ladders in order to have access to each section of the structure after laying concrete, for monitoring and wetting the concrete of the monolithic belt;
- pour the concrete mixture manually, carrying the solution in buckets or mechanically, using a concrete pump and supply hoses.
The formwork is made removable or permanently insulated . The first structure is made locally from wooden products - boards or unnecessary furniture panels. They are secured to the wall and then on top with wooden blocks. When dismantling the formwork, the upper bars are removed, and the lower ones remain in the concrete structure.
In addition, to prevent the formwork from moving apart under the weight of concrete, side stops and threaded rods are used, inserted into prepared holes in the formwork. In order to insert a pin to tighten the structure, first select the diameter of the tube, and then insert a pin into it, install washers and tighten firmly. After dismantling the formwork, only the tubes will remain in the structure.
The upper edge of the formwork structure must be set strictly horizontally using a building level. In the process of forming the strength of the monolithic belt until the concrete belt is completely matured over several weeks, daily moistening should be carried out.
The reinforced structure in the seismic belt works in bending, forming significant intrinsic rigidity. The reinforcement is continuous along all load-bearing walls. In the case where there are very long openings in house construction, these places in the protective belt are reinforced below with additional reinforcement. The structure is knitted with standard knitting wire , so that the rods are inside the frame.
At the corners, the reinforcement must be bent and reinforced with additional clamps. It is convenient to bend the fittings using long pipes.
Concrete is poured directly after transporting the prepared mortar to the construction site using a mixer machine. It can also be done directly on the construction site. It should be poured into the formwork no later than 6 hours after preparation.
The poured mass is subjected to vibration with a special device, or manually, piercing the thickness with a piece of reinforcement. This is done to remove air bubbles from the thickness of the solution. Concrete is poured into the formwork at a time so that it has a monolithic structure. In the poured reinforced belt, the embedded parts of the Mauerlat fasteners are laid.
The wooden formwork is removed no earlier than after 24 hours , and preferably after 3-5 days; the structure gains strength in no less than 4 weeks.
Use of chemical anchors
To attach a wooden beam to a wall where there is no reinforced belt, you can use chemical anchors. They appeared on the market not so long ago, but have managed to prove themselves well. Chemical anchors are divided into the following types:
- Capsule design. An ampoule containing a special composition is inserted into the hole made under the anchor. After contact with air it begins to harden. A pin is driven into the prepared hole, which breaks the tightness of the ampoule. After 30-45 minutes, the composition in the hole polymerizes, forming a reliable connection.
- With cartridge. The anchor design contains a pipe filled with a polymer composition. A dispensing gun is used to supply the mixture into the hole. The polymer hardening time is about 45 minutes.
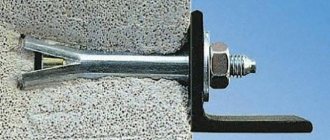
Comparison of conventional metal and chemical anchors Source ack-nn.ru
Chemical anchors, despite their high cost, are very reliable. The service life of such connections reaches 50 years. The polymer composition penetrates deep into the pores of aerated concrete, providing a high degree of adhesion.
Fastening technology
The most common options for attaching a Mauerlat to a reinforced belt are anchors and studs. After the armored belt gains strength, prepare the support beam for attaching the power plate. It is treated with antiseptic and fire-resistant impregnation. Special locks are prepared for splicing timber along the entire perimeter of the seismic belt. As a rule, these connections are made with an oblique cut or a straight lock.
Standard scheme for attaching the Mauerlat to the armored belt:
- Drill holes in the support beam with dimensions corresponding to the installed anchors in the concrete.
- The Mauerlat is placed on anchors with a diameter of at least 12 mm and with protrusions 40 mm higher than the Mauerlat.
- Before installation, waterproofing of the seismic belt is carried out in order to cut off capillary moisture, which will rise through the concrete to the wooden elements and can cause their premature wear of the roof due to rotting processes. Waterproofing is carried out with bitumen or 2 layers of roofing material.
- A timber is laid along the perimeter of the wall structure, as close as possible to the outer boundary of the wall.
- At the corners it is connected using the tenon method.
- When the Mauerlat is installed in its place, holes are drilled with a diameter corresponding to the size of the anchors.
- The top of the hole is further widened to allow the anchor head to be flush.
- Final fastening is performed using a washer, nut and locknut.
- After complete tightening, the remains of the protruding anchors are cut off with a grinder.
How to properly reinforce aerated concrete masonry with reinforcement
Which zones need to be reinforced with reinforcement - through how many rows and in which zones to lay it, was described above. Now let's look at how to do it correctly.
To lay a rod with a diameter of 8 or 10 cm in a horizontal seam, you have to pre-cut grooves. This is done using a tool called a wall chaser. The groove should be deep enough for the rod to sink completely into it. When single-row reinforcement of a house made of aerated concrete is made, grooves are cut along the axis of the wall (in the center of the masonry). Most often these are partitions
With double-row reinforcement (it is performed when the wall thickness exceeds 200 mm), it is important to maintain a distance of 6 cm from the front edge of the block to the groove to avoid concrete spalling. To improve the adhesion of the mortar placed in the joints, the dust formed in the grooves as a result of sawing must be removed. Using a vacuum cleaner would be very convenient, but most often masons simply sweep away the debris with a brush.
Masonry mortar is poured over the laid rods
It is very important that the reinforcement located in the grooves is completely recessed in it and does not protrude above the plane of the blocks
How to calculate reinforcement
Before reinforcing aerated concrete masonry with reinforcement, it is necessary to perform a simple calculation. The formula is quite simple: R = 2LH/4h.
The values are deciphered as follows:
- L – wall length;
- H – wall height;
- 2 – double-row reinforcement;
- 4 – serial number of the row in which the reinforcement is installed;
- h – row (block) height.
As a result, you get the number of rods needed to reinforce a given wall. All values are entered in a single unit of measurement.
To determine how much reinforcement will be used to strengthen the openings, their number is simply multiplied by the number of grooves in which it should be placed. To the final figure, 10 cm is added to each element for overlap.
How to choose the right tools for the job
For the convenience of processing blocks and performing masonry work, you must have the following list of tools:
| Tool type | Purpose |
| Trowel for aerated concrete | The tool can be a carriage or a bucket with a comfortable handle and teeth on the working edge. Thanks to it, the masonry mortar is accurately dosed and consumed without loss. |
| Plane | The device is made on a metal or wooden base, on which saw blades with fine teeth are mounted. By using a plane, similar in shape to a trowel, it is very convenient to cut off beads of mortar or lumps from the surface. |
| Wall chaser | It is this tool that is needed to cut grooves for laying reinforcement in horizontal masonry joints. The wall chaser can be either manual or powered. Considering that electricity is not always supplied to sites, masons more often use manual ones. It does not create noise, weighs little and is quite convenient for work. |
| Aerated concrete hacksaw or saw | Cellular concrete lends itself well to sawing, but this requires a special tool. A manual hacksaw for aerated concrete differs from carpentry models in the increased length and thickness of the blade. Also, its teeth have a carbide or pobedite brazing, and the teeth themselves are larger in size. When performing large volumes of work, it is easier to use an electric tool. The most convenient way is a reciprocating saw. If you have a chain saw, then to cut aerated concrete you need a special chain with Victory tips. |
| Kiyanka | A hammer with a rubber striker is used to adjust the block in masonry. The usual metal version may compromise the integrity of the block. |
Difficulties and errors
The technology for installing a Mauerlat on an armored belt is quite complex and responsible; even the slightest violations, for example, when setting the working surface of a protective belt horizontally, can destroy the entire roofing system.
The most common mistakes that developers make when installing armored belts on aerated concrete walls:
Pouring formwork in 2 times or even more times.- The filling was done in hot weather and the belt was not moistened with water.
- The installation of the Mauerlat was carried out when the concrete had not reached its working strength.
- Thermal protection of the armored belt has not been completed.
- The timber under the Mauerlat was not treated with antiseptic and fire retardant impregnations.
- The seismic belt has not been waterproofed.
- The anchor system is not installed correctly.
- The diameter of the reinforcement for the reinforced frame is incorrectly selected.
High Level Gain
Particular attention is paid to strengthening the upper perimeter of the walls, which serves as the base of the roof. The weight of the roofing structure, especially those equipped with natural materials (tiles, slate), creates loads on the aerated concrete wall that can lead to deformation and damage
Therefore, thinking about whether it is worth reinforcing the upper chord of the building is not appropriate. The gain circuit will help:
- reduce individual, point-applied loads;
- distribute the efforts evenly along the entire upper perimeter of the wall;
- level the masonry horizontally without using expensive compounds.
The diameter of the reinforcement is selected based on the calculated weight of the roof structure.
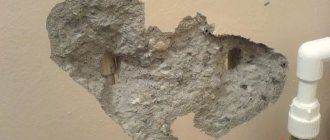
Embedded studs
Sometimes, in order to secure the Mauerlat, studs with a diameter of 12 mm or more are pre-installed on the armored belt, protruding 3-4 cm above the Mauerlat. The installation step of such studs is 100 cm: they are attached to clamps with knitting wire.
As for the question of the feasibility of making a Mauerlat in the presence of a reinforcing belt, then indeed, theoretically, the rafters can be fixed to the belt. However, in practice this will require a significant number of additional measures. So it’s much easier to go the traditional route of using a reinforced belt under the Mauerlat.
What will you need?
The installation of a reinforced protective structure is technologically carried out in several different stages from formwork, frame and pouring of concrete mixture or installation of special cellular U-blocks. All operations require the use of various tools and devices by the performers.
To perform the entire range of work on pouring a reinforced concrete monolith, the developer
will need the following tools and equipment :
- measuring instruments: ruler, angle, level, tape measure and plumb lines;
- concrete mixer;
- electric drill with attachments;
- Bulgarian;
- impact wrench and screwdriver;
- hammer, sledgehammer and mallet;
- spatula, trowel and grater for foam blocks;
- hook for tying wire;
- bucket-row;
- capture;
- regular saw and electric saw;
- wall chaser;
- paint brush;
- anti-corrosion impregnation for steel frames.
Grillage
Initially, you should determine the depth of the foundation. This parameter depends on the type of soil, the depth of its freezing, as well as the depth of groundwater. Then you should dig a trench around the perimeter of the future house. This can be done manually, which is long and tedious, or with the help of an excavator, which is quick and efficient, but entails additional costs.
After special equipment is used, the bottom and walls of the trench should be leveled to solid ground. The surface should be as hard and smooth as possible.
Now you need to form a sand cushion, the height of which should be 50–100 mm. If it is necessary to backfill sand more than 100 mm, it must be mixed with crushed stone. This activity may be necessary to level the bottom of the trench. Another way to level the bottom is to pour concrete.
Making a frame for a grillage
After filling the sand cushion, it must be compacted. To complete the task faster, pour water on the sand.
Then the reinforcement should be laid. During the construction process, under normal conditions, you need to use reinforcement of 4–5 cores, the diameter of each rod should be 10–12 mm. It is important that when pouring the grillage for the foundation, the reinforcement does not touch the base. It must be recessed in concrete. Thus, the metal will be protected from corrosion. To achieve this, the reinforcing mesh should be raised above the sand cushion, placing brick halves under it.
Grillage for a strip foundation
If you are building a house on heaving soil or where the groundwater level is high, then the grillage should be made more durable. To do this, instead of reinforcing mesh, you should use a reinforcement cage. He imagines 2 meshes consisting of 4 wires with a diameter of 12 mm. They should be laid below and above the armored belt. Granular slag is used as a base instead of a sand cushion. Its advantage over sand is that over time, granulated slag turns into concrete.
To make the mesh, a knitting wire is used rather than a welding seam.
For the grillage, M200 concrete should be used. To ensure that the filling height corresponds to the specified value, install a beacon in the trench - a metal peg equal in length to the height of the grillage. It will serve as your guide.
Tilt angle
The larger the angle, the higher the windage. Therefore, the roof slope should always be directed towards the most frequent winds. This reduces the load during a major storm.
It is important to take into account the climate zone when making calculations
A slight slope can cause large amounts of snow to accumulate. If you do not remove it in time and wait for ice to form, the roof under its significant weight will, at best, bend, and at worst, break.
Natural precipitation along the roof is an equally important reason when taking into account the surface and strength of covering materials. Rough types are better suited for arid regions, smooth ones for places famous for heavy rains and snowy winters.
Optimal values for tiles:
- metal, ceramic and cement-sand - at least 6 degrees;
- bitumen - no less than 12.
Limit values for sheet roofing:
- slate, corrugated board, ondulin - at least 6 degrees;
- copper, galvanized sheets (zinc-titanium) – from 17;
- asbestos cement slabs – from 27.
When choosing roofing materials, it is worth double-checking the information. Sometimes the declared slope values for the coating specified by the manufacturer do not coincide with GOST. It is better to entrust the calculation itself to professionals, because there are many nuances, especially for large buildings.
After determining the magnitude of the slope, one of the load-bearing walls is brought to a level that will ensure the implementation of the project.
To ensure water drainage and protect the walls from getting wet, the roof is extended an average of 600 mm. For technical buildings, the minimum for overhang is 20–25, for two-story residential cottages and mansions – up to 1200 mm.
The aesthetics of the entire building are also important. To determine your own preferences, before creating a project, you can use computer programs. This will allow you to see not only the entire roof, but also its harmonious combination with the house.