Home |GOST and SNiP |What is the minimum thickness of a floor screed according to SNiP?
Date: October 21, 2018
Comments: 0
A layer of cement-sand screed is the basis for the final coating, representing the upper part of the base of the floor. The screed should provide a perfectly flat surface for finishing. The quality of the screed determines the service life of the floor of the room, strength, and thickness is of fundamental importance. A reduced layer will not have the necessary strength, and a thicker layer will cause excess consumption of the mixture. That is why SNIP regulates the requirements for the design, operation, and restoration of floors, describes the structure, and requirements for elements, including screeds.
Document structure
Building codes and regulations contain requirements for the design of floors intended for public premises, administrative facilities, industrial enterprises, and private homes. The document structure contains:
- general requirements for floor design features and its development;
- classification of coatings depending on strength and material thickness;
Today there are many ways to perform work related to leveling the subfloor for further laying of floor coverings
- interlayer requirements;
- list of measures to protect against water penetration;
- recommendations on the area of application and thickness of the screed;
- litter characteristics;
- requirements for the bases on which floors are installed.
WHERE YOU CAN ORDER QUALITY FLOOR SCREED IN SOCHI AND KRASNODAR REGION
The floor is one of the most important structures in any home.
It is the floor that is constantly exposed, and more often than the walls or ceiling. The reliability and durability of your floor depends on how well the floor screed work is done and what materials are used for the screed. Floor screed is a whole complex of works, which includes leveling the floor, and may also include the need to perform thermal insulation of the floor and sound insulation of the floor. Any finishing coating, such as parquet boards, linoleum or laminate, is laid on the leveled floor surface.
All screeds, based on the material used and the technology for preparing the solution, are divided into
cold and heat-insulating (warm) .
The first category includes
— sand-cement screeds (prepared manually from cement and sand),
- concrete screed (ready-made mortar M150 or M200),
- semi-dry screed .
All these screeds require additional insulation and sound insulation.
The second category includes
These screeds consist of foam concrete and polystyrene concrete, respectively, and do not require the use of additional heat and sound insulation. At the same time, the warmest and most sound-proofing screed is a polystyrene concrete screed.
The choice of floor screed and roof screed is determined by the operating conditions of the room or building, as well as the customer’s requirements for the characteristics of the premises or floors where the screed will be performed.
The Profi-Stroy company performs work on pouring screeds of any type, both “cold” screeds and “warm” screeds, depending on the customer’s instructions. If necessary, our specialists are ready to advise which screed is best to use for your facility or premises.
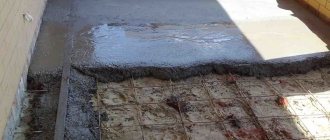
The process of pouring the screed itself determines that the following work is performed:
1) preparation of the floor or surface,
2) installation of guides (beacons),
3) pouring mortar (sand-cement, concrete, foam concrete or polystyrene concrete).
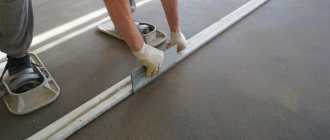
All ties are carried out by our specialists with minimal deviations thanks to the use of high-precision optical instruments (laser level and leveler).
Our company has extensive experience in performing work on installing screeds of any complexity and in any volume. The screed can be performed in any room, on the ceiling or on a used flat roof. You can screed at different levels in the same room or floor, taking into account areas for coverings of different thicknesses. Screed on a flat roof can be done with a slope in various planes. Our company’s specialists also produce combined screeds from different materials, taking into account the operation of the premises and the use of heated floors.
Cost of floor screed
The cost of sand-cement screed is from 300 rubles/sq.m. (with a thickness of up to 6 cm).
The cost of concrete screed (mortar M150, M200) is from 300 rubles/sq.m. (with a thickness of up to 6 cm).
The cost of foam concrete or polystyrene concrete screed is from 600 rubles/sq.m. (for thickness up to 6 cm.)
Minimum order – from 20 sq.m.
The final cost of the screed depends on many factors, such as the cost of raw materials (cement, sand, filler if any) at the time of the start of work, the thickness of the screed, the volume of work, the remoteness of the site, working conditions, pouring location, availability of communications, etc.
The cost of the screed is calculated taking into account the specifics of the object at the lowest rates.
Draw your attention to! There is a flexible system of discounts.
Basic terms
The rules use terminology according to which the floor is divided into tiers, components that have specific names:
- External covering
- the outer layer of the floor surface that absorbs the load during operation. - The intermediate layer
is a floor element that provides elasticity and is located under the top layer. - The waterproofing contour
is a layer that impedes the access of groundwater, wastewater, and liquids through the floor surface. - Screed
is a leveling layer that serves as the basis for installing the floor, which ensures the flatness of the base, distributes loads, and covers various communications. - The bedding
is the bottom layer that evenly distributes the forces from the floor and the weight of the screed onto the surface of the base.
All work related to leveling the floor with cement mortars, even if done with your own hands, must meet certain requirements
Let's sum it up
When getting married, call an expert who will evaluate everything and competently explain your interests to unqualified executors. If you yourself understand the situation, then record all inaccuracies on paper and draw up a bilateral agreement with the builders or, in case of their refusal, with witnesses.
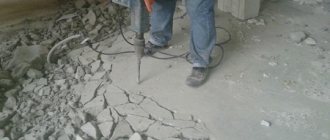
Unevenness and large slopes are corrected with a thin layer of leveling compounds. They are expensive and require a qualified specialist. Few cracks are opened and sealed again; if there are many, the bad one is removed and a new screed is installed. Areas of voids are removed to scratch, primed and filled with new mortar. In serious cases, a new screed is also placed.
Be careful, take your time and check the quality after each step taken.
This will ensure you peace of mind and comfort during the subsequent stages of repair. Share:
Choosing a solution
When deciding on a coating device, make an economically sound, technically competent decision, taking into account the points specified in the standards:
- service life and structural strength;
- rational use of materials taking into account characteristics;
- the possibility of mechanizing work, reducing labor costs;
- the influence of negative aspects, the ability to violate the integrity of the flooring;
- hygiene and fire resistance.
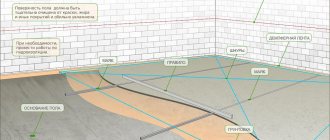
When designing floors, standards require taking into account the degree of mechanical impact indicated in the table, as well as the level of influence of liquid on the surface. With abundant moisture, the rules require the floor to be constructed with a slope of 0.5 to 2%, which is ensured by pouring a layer of varying cross-section.
Evaluation of results
Let us summarize all the criteria that the completed work must meet:
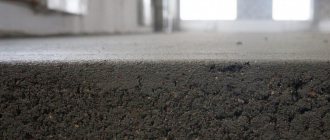
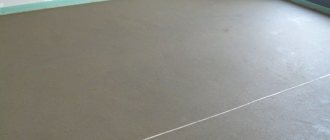
The floor is smooth, the color is uniform, there are no cracks.
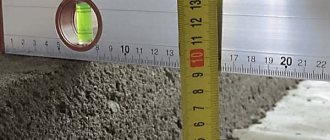
The maximum gap between the rule rail and the floor is no more than 0.4 cm.
The slope to the zero level is no more than 0.2%, i.e. if the length of the room is 5 meters, then 5 m / 100 * 0.2 = 0.01 m is the permissible slope.
The sound from tapping (with a wooden hammer) is uniform over the entire surface, ringing and hard.
Main, interlayer and insulating coating layers: types and requirements
The choice of coating for certain types of premises is made according to the recommendations of the tables attached to the standards. They regulate the degree of influence of mechanical, thermal and liquid factors. In particular, the cement-sand surface of the production facility must withstand a specific gravity of 50 kgf/cm², a heating temperature of no more than 100 degrees Celsius and exposure to alkaline media with a concentration of up to 8%.
The thickness of the cement-sand composition, according to SNiP, in residential premises should not be less than 30 mm
According to SNIP recommendations, common types of coatings intended for domestic premises, administrative buildings, and public facilities are:
- Linoleum.
- Wood.
- Polyvinyl chloride tiles.
- Fiberboard.
- Parquet.
- Cement-concrete base.
The minimum thickness and strength characteristics of the material used for coating are given in the document table. When using a common cement-sand mortar as a coating, its minimum thickness at low intensity of exposure is 20 mm, and at moderate intensity - 30 mm. In this case, the strength of the material used should be 200-300 kg/cm².
As a layer, bitumen mastic, fine-grained concrete, as well as cement-sand mortars, the minimum thickness of which is 10 mm, are used.
At high levels of load on the coating, standards require waterproofing to protect the floor from exposure to liquids: ordinary water, oils, acids, emulsions, alkalis. The material used for insulation from moisture is concrete or polymer compounds. According to the requirements of the standards, 1-2 protective layers must be applied, depending on the possibility of liquid penetration into the material.
The minimum layer directly depends on the mixture used
Drying the screed
Your task is to stretch this process for 8-10 days. The cement should not dry out (which is natural), but harden, and you must help it with this, otherwise everything will crack due to disruption of the chemical processes in the solution. Wet the screed 2-3 times a day with plain water. On the second or third day, remove the beacons, level the surface (prime the holes and fill them with fresh mortar) and moisten the entire screed generously. If possible, then cover the entire treated area with polyethylene. If not, wet the surface 2-3 times every day. By speeding up the process, you will have a unique opportunity to start over.
Construction seams
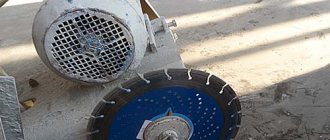
In the practice of installing concrete floors, it is very rare that the screed is poured without long breaks (more than 1 day). This is only possible in small areas and subject to an uninterrupted supply of concrete mixture. Typically, pouring is carried out with technological breaks, during which time the laid concrete has time to gain a certain strength. In places where concretes with different laying periods come into contact, it is advisable to cut construction joints. Construction joints are cut where the day's concrete work has been completed. If possible, they are performed at a distance of at least 1.5 m from any other types of seams located parallel to them. The shape of the edge of the tie for a construction seam is usually done using the tongue-and-groove principle. If the side projections are made of wood, a 30° cone is sufficient for a screed with a thickness of 12...20 cm (45° cones are not allowed). Metal cones are also used. They should be installed according to the manufacturer's instructions. Taper seams work like shrinkage seams: they allow small horizontal, but not vertical movements. Metal cones are not recommended for floors with heavy wheel traffic: in such cases, it is better to use a “hairpin” joint. If a construction seam occurs where neither a shrinkage nor an insulation seam is desired, sleepers (slats) placed across the seam can be used. The latter should be installed in the middle of the screed depth at the correct angles to the seam. These slats should not be confused with the smooth steel “hairpin” slats described below, which provide horizontal movement of the seam. Stud joints are usually used in areas with pedestrian traffic, as well as in floors with high loads from wheeled vehicles. The purpose of the pin is to hold the two edges of the seam level as the wheel passes through the seam. To ensure horizontal movement of the seam, the studs must be embedded in the concrete on at least one side of the seam. For proper operation, the studs must be at the same level and parallel to each other. The seam should run through the center of the pin. To meet all of these requirements, studs are often supplied in “baskets” that can be installed directly into the concrete.
How are they performed?
Thermal and shrinkage (as well as seismic and sedimentary) types of seams can be combined in a design - a shrinkage-temperature (and seismic-sedimentation) seam is obtained. The first runs along the width and length of the building from the top of the foundation to the roof, while the second involves the complete division of the structure into blocks independent of one another.
In this case, the reinforced concrete box is divided into vertical joints 2-3 centimeters wide, filled with a hydrophobic elastic sealant. Proper release can be ensured by installation in adjacent areas of adjacent parts of paired beams and columns.
In buildings of different heights and on different soils, even if they are combined with an inset span, sedimentary joints are made. Thermal expansion in the blind area made of reinforced concrete is compensated by dividing it into two-meter squares by installing bitumen-impregnated wooden blocks in the formwork. The connection of the formwork to the walls must be movable and airtight.
Concrete floors deform if their area exceeds 30 square meters, causing cracks to spread. The surface of the screed is cut to a depth of a quarter to half the height so that the material breaks under the seams. Screed areas can be up to 6 meters in size and not only square, but also with an aspect ratio of 1:1.5. Joints of different materials and screeds poured at different times are made with dampers.
Insulating seams separate the screed from the walls to the full height along the perimeter of the building; they are filled with elastic materials. Columns and flights of stairs are also insulated from the floor screed. Monolithic floor slabs are separated by cuts from the supporting frame of the structure, the optimal width is calculated individually.
Interfloor ceilings are filled with fragments of a certain size. All voids are filled with sealant and sealed. They are divided along the entire height into separate blocks and strip bases, which compensate for stress and load.
Foundation cutting step: 30 meters on weak soils and 15 meters on heaving soils. The seams are filled with durable sealants. Vertical structures of external/internal walls create horizontal sections dividing the building into compartments. The height of the compartment for the interior wall is 30 meters, for the front wall – 20.
In such openings of the frame, a tongue and groove, wrapped twice in roofing paper, is installed, it is clogged with tow, and then sealed with clay. The width of the seam can range from 3 millimeters to 100 centimeters.
Rules for making expansion joints on screeds:
- The cuts should go along the axes of the columns, joining with the corners of the seams running along the perimeter of the columns.
- Floor cards must be square or with sides 1:1.5, straight, without branches. The smaller the map size, the lower the risk of chaotic deformation of the monolith.
- In driveways/aisles, seams are made at a distance identical to the width of the screed (in the case where the passage is more than 3.6 meters, a longitudinal seam can be made in the center).
- The distance between seams in open areas is a maximum of 3 meters in all directions.
- Expansion joints are made using forming laths, otherwise the cuts are made after the final processing of the concrete.
- Standard screed joints are cut into 6x6 meter blocks one third of the thickness of the concrete layer.
- The location and number of seams are determined based on the coefficient of thermal expansion, probable deformations of the junction of walls and floors, foundation and columns, etc.
- All seams must be sealed, based on operating conditions and requirements.
- Special rails can be used that fit into the frame at the pouring stage.
Reinforced concrete structures during operation can be subject to various loads and influences, which can be compensated for by making expansion joints.