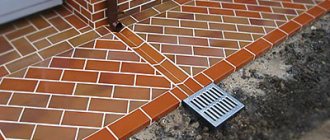
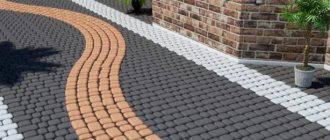
To construct a blind area around a house with your own hands, concrete, asphalt, paving slabs, ceramic materials or paving stones are most often used. This coating guarantees high-quality drainage of storm and melt water from the walls of the building.
Thanks to the presence of a protective coating, soil swelling does not occur even in the most severe frosts, and moisture does not penetrate into the concrete foundation. Well, in addition, such a tile coating improves the overall design of the house and adds completeness to the entire structure as a whole.
Why choose paving slabs?
Despite the fact that concrete protective covering is cheaper, many homeowners lay paving slabs. This happens because the tiles:
- long service life while maintaining the original appearance;
- it is possible to construct a blind area without the use of special construction equipment;
- the technology eliminates the laying of a reinforcing frame;
- ease of repair, dismantling and reassembly without extra costs;
- beautiful appearance and the ability to choose the desired color shade of the surface.
Schematic illustration of a concrete blind area.
In addition, the technology for constructing such a blind area allows you to complete all the work yourself, without involving additional assistants. This way you can reduce costs and do this coating in your free time. Our step-by-step instructions given later in the article will tell you how to perform such work.
Pros and cons of concrete pavement
pros
- The price is very low, especially when compared with similar materials. High-quality pavement is not always easy to obtain, which means that the price of a good pavement can be quite high.
- Easy to install. When an asphalt pavement is made, special equipment is needed to fully complete all operations. If you choose to lay paving slabs, you can practically not worry - the installation is done quickly and independently.
- Large range of this material. In addition, the number of assortments is constantly increasing, because new paving slabs are being produced continuously.
- Quite a strong and durable base. The assortment includes special types of tiles that are non-slip even in heavy rainfall.
- It is stable under various temperature fluctuations, and also easily resists various types of mechanical damage. Manufacturers usually provide a guarantee for this decorative material; depending on the type of tile, the period ranges from 10 to 40 years.
The concrete blind area is suitable for our climate.
Ease of repair work. In case of damage to the coating, it is quite easy to replace the damaged tile. This is precisely why experts advise purchasing a slightly larger quantity of tiles than required. This allows you to insure yourself for repairs to the coating in the future, and in case of damage to the material during the installation process.- Thanks to its design, the coating is not subject to severe icing, because all moisture is absorbed into the soil through the seams between the tiles.
- This material is known for its environmental friendliness, since no toxic components are used in its production and installation.
- Easily tolerates high temperatures and exposure to the sun. When heated, it does not emit any harmful substances.
- Has a universal shape. Thanks to the huge range of different shapes, you can create absolutely any type of coating.
Return to contents
Minuses
The disadvantage of such a coating is that when laying the material it is necessary to maintain a slope of several degrees. This is necessary so that moisture does not collect on the surface of the tile. In the case of updating an old coating, the costs of which are not taken into account, the disadvantages include the cost of a concrete screed. It will also be very expensive to make strong foundations, because they are already paving surfaces in themselves.
Return to contents
What does it take to get the job done?
To work on constructing a blind area from paving slabs, you will need the following materials:
- colored or gray tiles, equal in total area to the surface of the blind area, which will first need to be measured and calculated;
- roll waterproofing or thick polyethylene film to cover one and a half area of the blind area;
- geotextiles with an area equal to the size of the waterproofing;
- curb stone along the entire perimeter of the outer edge of the blind area;
- sand, quarry or river;
- cement grade of at least M300;
- crushed stone;
- ordinary clay;
- drainage collectors.
If you do the work yourself, you will need a set of tools, which includes:
- measuring tape at least 5 meters long;
- pegs and nylon cord;
- building level;
- bayonet and shovel shovels;
- rubber hammer;
- Master OK;
- container for mixing mortar and concrete.
After you have purchased all the necessary materials and prepared the tools, you can begin work. You can watch the progress of work and a description of its stages in the attached video at the end of the material.
Tools and materials
From the necessary tools, you should immediately prepare a rubber hammer.
- Shovel.
- Wooden pegs.
- Cord.
- Level.
- Master OK.
- Rubber hammer.
- Circular saw or grinder.
- Buckets.
- Clay.
- Geotextiles.
- Border.
- Paving slabs.
- Sand.
- Crushed stone.
- Cement.
Preparatory work
Marking with pegs.
For quality installation, it is very important to properly prepare the base. To do this, first of all, you need to remove the surface soil over the entire area occupied by the blind area of the house, which means that it is necessary to mark out the area of the future protective coating.
The width of the covering should be at least 60 cm, but it is recommended to make the flooring from one meter to one and a half. The fact is that the wider the strip, the more convenient it is to walk along it, and the effectiveness of protection from water is proportional to the width of the blind area. But you need to remember that excessive width will lead to additional financial costs.
How to create a foundation correctly?
In order for the paving stone blind area to last for several decades, you should provide a reliable foundation for your future structure. In cross-section, the base resembles a layer cake. It must be laid in several successive layers in strict compliance with all technological requirements.
Due to the ability of paving slabs to absorb moisture, it is very important to provide high-quality protection from water - this will prevent rain and melt water from flowing into the foundation. Construction polyethylene or roofing felt works best for this task.
The latter option is considered more reliable and practical, but the first is cheaper and easier to install.
Laying the waterproofing layer takes very little time. To do this, the canvas is rolled out, if necessary, cut with scissors or a stationery knife into fragments of the required size, then placed on top of a layer of clay or gravel. The edge of the waterproofing material that is adjacent to the wall of the house should be bent and fixed to a vertical surface using a metal strip.
River or construction sand is poured on top of the polyethylene in a layer of 4-6 cm. It needs to be thoroughly leveled (for this you can use a hard sheet of plywood), and then compacted. To make the work easier, the sand can be slightly moistened - this way it will hold its shape better and crumble less.
At this stage, you can install a curb, if one is planned. To do this, stretch a rope along the inner edge of the future curb at the set level and dig a trench. Its width should be equal to the thickness of the curb plus 20-25 cm, since there should be at least 10 cm of concrete on both sides of the curb.
After this, formwork is placed from boards about 10 cm wide, a thick concrete solution of cement and sand is mixed in a ratio of 1 to 3, which is poured into the formwork. The border is placed along a thread, immersing it 5-7 cm in the mortar. In order for the fixation to gain the necessary strength, you need to give the mortar a chance to set; depending on the weather, this takes 1-2 days.
A layer of crushed stone or fine gravel 9-10 cm thick is poured on top of the sand and compacted well. The crushed stone is again covered with sand and compacted.
Excavation
After marking, it is necessary to remove the soil from the work site.
The depth of the excavation consists of the thickness of the tiles and 30 centimeters for arranging the base for laying. As a result, it turns out that you actually need to remove the soil almost to the bayonet of a shovel. The first layer in the dug trench is a layer of clay, 8-10 cm thick.
When laying it, it is advisable to make a slope away from the house. This will ensure better water drainage to the side. The clay must be compacted well. This can be done using a special construction mechanism or manually - with a tamper or shovel.
A layer of sand at least 5 cm thick is poured on top of the clay and compacted in the same way as clay - at a slope from the building.
Design of the blind area
In order to improve the blind area and organize a beautiful landscape design, a flower garden is laid out on it. To create full-fledged flower beds, you can create special fences based on borders, and place soil in the formed recesses.
It is necessary to provide for effective drainage of water from the flower beds from the base of the building, otherwise it will be constantly deformed. Each hole in the ground is equipped with an additional outlet. To prevent problems with vegetation growth, the size of the recesses must be optimal.
For productive growth of plants, they should be provided with balanced watering. It is selected taking into account the requirements of each planting.
To prevent root rotting, the flowerbed should be covered during heavy rainfall. You also need to add nutritious fertilizers from open ground to the soil.
To organize a stylish design, the use of climbing crops is allowed.
Waterproofing works
The installation of the waterproofing layer itself does not take much time.
As a waterproofing material, you can lay roofing material, gilroizol or durable polyethylene film. Waterproofing and roofing felt are durable and reliable, but polyethylene costs less and is easier to install. But, despite the cheapness of polyethylene and the fact that many people use it, a choice must be made between good quality, durability and low price. You just need to roll out the rolls over the surface, cutting off the required length. The edge adjacent to the wall is bent with a slight rise along the surface.
Reinforcement of a concrete pad
The concrete base around the building is reinforced with a flat steel mesh with a cell size of 15x15 or 20x20 cm from reinforcement with a diameter of 6-8 mm. The pieces of mesh are laid sequentially in a row with an overlap on each other in 2 cells, fastening the overlaps with knitting wire with your own hands. The plane of the installed reinforcing mesh should be positioned so that after laying the concrete it is under a layer of mortar of at least 3-4 centimeters. The mesh should also not have stressed areas, which, after pouring concrete, will bend outward from it.
Especially on heaving soils: a special cushion and reinforcement are required
Installing a curb
After waterproofing work, you need to install a curb in such a way that the blind area around the house made of paving slabs is strictly limited and does not have horizontal movements. The line for its installation is determined by the width of the tile and must be a multiple of its size. The trench for installing the curb stone should be 20 cm wider than it.
Table of proportions of concrete components.
Now you need to mix the cement mortar with crushed stone at the rate of 1 part cement, 3 parts sand and 4 parts crushed stone. Lay part of the concrete in the trench and place a curb on it, and throw the rest of the concrete into the empty space between the ground and the curb stone.
When installing a curb stone, you must constantly measure the height of its position using a level or level.
Common mistakes made when laying a tile blind area
The final result can be spoiled by the following mistakes made when arranging the blind area:
- Incorrect tape width. The maximum parameter is not set. And the minimum width should be such that the tape protrudes 20-25 cm beyond the projection line of the roof overhang. Otherwise, even with a properly organized drainage system, rainwater from the roof will fall onto the ground and seep to the foundation.
- Lack of slope of the tile covering necessary for proper drainage of water.
- There are no drainage trays around the perimeter, without which it is impossible to effectively protect the foundation from water.
- No expansion joint between the blind area and the foundation.
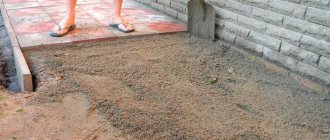
Base structure
A layer of sand about five centimeters thick should be poured onto the waterproofing layer. This layer must be carefully leveled and compacted. If the sand is dry, then you need to moisten it, otherwise you simply will not be able to lay and compact it well. To level the sand, you can use a simple piece of plywood with a straight edge.
The next layer (see photo), 8-10 cm thick, should be compacted crushed stone. A layer of sand up to five centimeters thick is again poured over the crushed stone.
After this, all layers must be simultaneously spilled with water and compacted well. Scheme of blind area with waterproofing.
At this point, the preparatory work with the foundation structure is considered complete.
We make a concrete blind area around the house with our own hands
How to practically make a blind area with your own hands is well known.
The manufacturing technology of classic monolithic concrete tape involves:
- pit construction,
- backfilling of sand and crushed stone cushion,
- production of formwork,
- laying of fittings,
- pouring concrete.
The following describes this entire process chain step by step.
Choosing the thickness of the blind area, digging a pit
The thickness of the anti-water tape, designed to protect the foundation of a one- or two-story residential building standing on sandy loam or loam, is 25-30 cm. On weak or heaving soils, it is advisable to increase the depth by 5-10 cm. Excavation work to construct a blind area When determining dimensions pit, the width of the blind area should be taken into account. Meter width is very popular. A meter of width ensures ease of walking on the blind area, sufficient water protection for a shallow foundation and an aesthetically pleasing appearance of the tape. An important principle is that water from the roof should fall at a distance of 20-30 cm from the edge of the concrete strip. This means that a meter-long blind area is quite suitable for houses with a roof overhang of 70 cm or less. If the roof overhang is 100 cm, then a blind area 130 cm wide will be needed.
Digging a pit for such water protection around a 6 x 6 m house will require excavation work of 6-7 cubic meters. If the tape is made at the stage of building a house, then this volume of soil is easily distributed throughout the site.
Pillow device
The technology for constructing a pillow is extremely simple: pour it, wet it, tamp it. Step-by-step instruction:
- The sand layer of the pillow is poured first. Taking into account the upcoming compaction, sand is poured to a height slightly greater than the planned layer thickness.
- The poured layer is thoroughly shed with water. At the same time, the grains of sand slip slightly and the sand becomes compacted.
- After pouring, the sand is compacted. Use a manual tamper or an electric vibration one.
- After the sand, crushed stone is poured. Some experts recommend mixing crushed stone with thirty percent sand to fill the gaps between the stones.
- A layer of crushed stone (or crushed stone with sand) is also carefully shed.
- Finally, compact and level the entire pillow.
The laid pillow should have a hard, almost stone surface. Forming a pillow from crushed stone
Concrete for blind area
Concrete grade M300 is used. This is one of the most common brands of concrete. Often it can be easily purchased at a specialized concrete plant. Many homeowners (without having a concrete mixer in the shed) do just this. Especially when it comes to installing a tape around an already built house. If the protection is done at the stage of building a house, immediately after the foundation is completed, builders usually easily manage to mix the required couple of cubes of concrete right on the construction site.
Concreting a monolithic blind area
In order to concrete a monolithic strip, it is necessary to make formwork and lay reinforcement. Formwork is usually made from boards nailed together. Metal road mesh is often used as a reinforcement frame. Pieces of mesh cut to size are laid on a crushed stone-sand cushion with an overlap. Sometimes it sticks by welding. Reinforcing the blind area before pouring Concrete is poured into the prepared formwork. The poured concrete is compacted to compact it. At the same time, do not forget to provide a slope of 5 degrees in the direction from the wall.
Pouring concrete around the house
After the final hardening of the concrete, the formwork is removed, the surrounding soil is leveled, the ribbon is ceremoniously cut and they go to the set table to celebrate the successful delivery of the completed object.
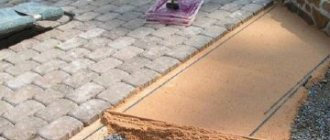
Tile laying
It is best to start laying from the corner of the house. When laying, try to fit the individual tiles as closely as possible to each other. If this does not work, then determine for yourself the permissible gap and insert plastic crosses or simply wooden chips between the tiles. The gaps will allow you to make the masonry even, regardless of the quality of the material.
Laying paving slabs.
After all the paving slabs for the blind area around the house have been laid, mix the solution in a proportion of one part cement to three parts sand for subsequent fixation of the tile covering. The solution must be made thick, since the liquid mixture will quickly release water and the quality of the solution will decrease.
Ceramics or vibrocement
Tile for covering the blind area creates a completely different design of the house than other finishing materials.
This photo clearly shows that the tiles have transformed the standard solution and significantly improved the appearance. The durability of ceramics is undeniable, since the production process and the quality of the products are confirmed by international quality certificates. But its installation has always been difficult; you need a flat base, correct installation and other subtleties. All this is not needed for paving slabs, although its production is quite simple, but nevertheless the material has a significant thickness and is less susceptible to fracture. For paving slabs, it is enough to prepare a concrete, sand or sand-cement pad, lay it on such a base and you can already walk. The only negative is that the decorative component is significantly inferior to the possible options for ceramic tiles.
Note! At the moment, mass production of thickened ceramic tiles has begun, including for finishing blind areas. This tile is more than 2 centimeters thick and can simply be laid on a flat base, including the ground.
True, the decoration of such ceramic tiles now also does not have many surface options. Manufacturers will probably soon diversify their offerings, but at the moment even these offerings are superior in beauty and decorativeness to paving slabs.
What options can compete with ceramics and vibrocement:
- Concrete (you can pour a blind area, but its quality will depend only on the quality of the concrete. In this case, it must be poured under the formwork of the walls, creating a slight elevation);
- Asphalt concrete;
- Brick.
Finishing the blind area with ceramic tiles will look much more advantageous, provided that the tile was chosen correctly.
Treatment of seams and remaining voids
After the base is securely fixed and the paving slabs are in place, you need to proceed to processing the seams. To do this, you need to remove any plastic crosses or slivers that were installed to smooth out the uneven edges.
Various materials and methods can be used to fill seams.
The easiest way is to fill the seams with sand. In this case, excess water will escape through these seams and, having reached the waterproofing layer, will roll down along a predetermined slope in the opposite direction from the house.
Then the blind area will always remain dry, and the water will be drained away from the foundation. The disadvantage of this option is that the sand will weather over time and need to be replenished.
Another option involves grouting the joints with cement mortar in the same proportion as was used during laying. As a result, the surface of the blind area will become perfectly smooth, but a general monolith will be formed, in which the thermal expansion of materials is not taken into account. It is possible to use this filling method only when the width of the blind area does not exceed 800 mm.
After grouting the joints with cement mortar, you need to wait a couple more days and rinse it well with a brush and water. Now it will finally take its proper form. Next, you are offered step-by-step instructions on how to make a blind area around a house from paving slabs with your own hands in the video.
How to make a blind area with your own hands?
Let's take a closer look at the step-by-step instructions for arranging a paving area. It is not at all difficult to complete these works.
Laying
Patterns for laying paving stones may be different, but in any case it is better to start laying from the corner. Try to fit the tiles as tightly as possible. If their edges are not smooth enough, use small wood chips. They should be inserted between individual tiles so that the distance at the junction points does not exceed 2-3 mm - this will allow even those tiles whose edges are maximally curved to be laid out as evenly as possible.
When the paving stones are laid, concrete should be prepared; it is used as a fixative to secure the blind area. It is best to make a solution of 1 part dry cement and 3 parts sand (there should be a little water). The consistency should be thick, otherwise the cement laitance will completely go into the pillow. This will significantly reduce the density of concrete and the quality of placement. At one time, it is necessary to mix a small volume of concrete solution - based on its consumption in one hour. With longer storage, especially in hot weather, it begins to thicken and this greatly increases the complexity of installation.
Remove the first row of tiles and apply concrete mortar on top of the sand layer. You shouldn’t feel sorry for it - the layer should be thick enough, about 4 cm.
When fixing the paving stones in their original place, you should carefully tap them with a rubber or wooden hammer; they should sink slightly into the concrete - this ensures the most durable fixation.
Important. Do not use a regular metal hammer, as any blow, even the weakest, can split the paving stones
If this is the only tool at your disposal, then lay a board on top of the coating and knock on it. This way you can reduce the risk of chips, cracks and other damage.
After finishing the work, you need to wait for the concrete to dry. As a rule, this requires at least two days, and in cold and rainy weather it is better to increase the time to 3-4 days. At this time, you should not walk around the area and place heavy objects on the blind area. Otherwise, the paving stones will shift - such a blind area will turn out uneven.
Grouting joints
When the blind area is completely done, and the concrete layer has hardened and firmly holds the tiles, you can move on to the final stage of work, the design of the seams. If wood chips were used during installation, they should be removed. To fill the resulting seams, you can take a variety of materials. The simplest and most cost-effective option is ordinary sand. It can quickly solve the problem of rainwater and melting snow - moisture will quickly seep through the sand, and the sidewalk will remain dry. Moisture, having reached the waterproofing material, simply rolls off due to the slope made in the direction from the building.
The only drawback of this solution is its fragility. Under the influence of natural factors, as well as during cleaning of the territory, the sand is eroded or washed away, so after 3-5 years you will have to renew it by pouring it into the empty cracks. Such work does not take much time, money and effort, since filling the seams with sand is quite easy. To do this, sand is poured on one side and distributed onto the other using thick cardboard, a piece of fiberboard or plywood.
Concrete is considered a more reliable and durable option. The composition is prepared in the same proportion as for installing the base of the blind area, that is, mix cement with sand in a ratio of 1 to 3. In this case, the surface of the blind area will be perfectly smooth.
In addition, cement does not have the property of being washed out and weathered.
However, with this approach, it is very important to maintain the slope of the blind area so that drops of water immediately roll off without stagnating on the slabs. The seams are filled with concrete using the simplest brush
At the same time, it is necessary to ensure that the filler not only covers the cracks from above, but also completely fills them, otherwise it will very quickly crack from the simple walking of users.
Laying paving stones on concrete
Most often, tiled covering is arranged:
- on sidewalks and squares;
- around administrative buildings, offices, shopping, sports and entertainment complexes, train stations, airports, educational institutions and other places with high traffic volumes;
- in public parks, lawn and garden paths on private plots;
- private car parking areas and parking lots for large equipment;
- when improving suburban areas.
Main types of products
Depending on the manufacturing methods, the following varieties are distinguished:
- vibrocast;
- vibration-pressed;
- hyperpressed;
- polymer sand.
The composition of paving slabs usually includes sand concrete with the addition of granite chips, limestone, slates or rubber crumbs. Basalt chips are added less frequently.
In areas with significant loads, it is recommended to lay paving stones. The most popular are paving stones with the addition of granite chips. The following types are produced by industry:
- sawn paving stones with all edges smooth;
- sawn and split with a smooth bottom and top edge;
- chipped, with uneven edges.
In the first two types, the flat top surface can be subjected to heat treatment, which makes it non-slip.
The most common square paving stones with sides of 10 cm and a thickness of 3 to 10 cm.
In what cases is it necessary to lay paving slabs on concrete?
The following can be used as a base for tile covering:
- crushed stone or gravel-sand cushion;
- concrete, reinforced with steel mesh or individual rods, composite reinforcement or vibrating fiber to increase strength.
The tiles can be laid on existing concrete screeds or on newly installed ones.
Although in the first case the work is much easier and faster, laying tiles on concrete is necessary to ensure a stable and durable coating in the following cases:
- the presence at the work site of soils with increased susceptibility to shrinkage (recently filled embankments, silty sands, peat);
- heaving clay soils, characterized by uneven swelling in certain areas;
- a concrete base for paving slabs is installed when the surface is exposed to significant loads, for example, parking for a car;
- when facing on existing solid concrete bases, when their dismantling is impractical and is highly labor-intensive (blind areas around the house, existing concrete coverings, floors in garages and outbuildings). The decision whether it is possible to lay paving slabs on concrete is made after a thorough examination of the existing old concrete pavement. Laying over old concrete allows for significant savings on building materials, protects the existing coating from further destruction and significantly improves its appearance.
Advantages and disadvantages of laying paving stones on a concrete base
The concrete base for laying paving stones has the following advantages:
- high strength and resistance to the application of significant loads and mechanical stress;
- durability;
- installing tiles on a concrete base minimizes the risk of shrinkage;
- ease of implementation, allowing you to lay paving slabs with your own hands;
- there is no need to use complex expensive technical devices;
- resistance of the base to chemical influences, water washout, temperature changes;
- on a solid concrete base, the process of leveling tiles in a single plane is much easier, resulting in a clear, straight shape and a perfectly flat surface
- absence of failures caused by poor-quality compaction of the base;
- environmental friendliness of paving with tiles.
Existing disadvantages:
- the technology for laying paving stones on a concrete base is more complicated than on sand and crushed stone pads;
- the need for reliable drainage systems. Having seeped through the seams in the coating, water will remain between the concrete base and the tiles and, when freezing temperatures set in, it can swell and even split the paving stones. To avoid this, paving stones are laid with certain slopes, point water inlets are laid in the concrete, and stormwater systems are installed;
- a concrete base for paving stones is more expensive than a simple base of crushed stone and sand;
- If the technological process is disrupted, coloring of the concrete base may occur after the end of the first winter.
What requirements must paving slabs meet?
- when laying tiles outdoors, frost resistance ≥ 200 cycles;
- compressive strength ≥ 30 MPa;
- water absorption by weight ≤ 5%;
- abrasion during annual operation ≤ 0.7 g/cm2;
- the purchase of products must be made from one batch, since in different batches, even from the same manufacturer, the tiles will differ in geometric dimensions and color saturation;
- environmentally friendly cleanliness of products, when used both for external and internal work with the installation of cobblestone flooring in warehouses and utility rooms;
- lack of porosity on the surface;
- strict adherence to geometric dimensions with evenness of all edges;
- absence of internal and external cracks, as well as chips;
- naturalness and uniformity of coloring.
Technology for laying paving slabs on a concrete base
The following methods of paving on a rigid base are distinguished:
- A dry mixture of 1 to 5 cement with sand is poured on top of the concrete base, the thickness of such a dry solution is taken to be up to 5 cm. Due to the difficulty of creating the necessary slopes for water drainage, a slope of 2 to 5 degrees is created in the process concrete foundation installations.
To prevent moisture from being retained under the tiles, pieces of polymer or asbestos pipe, 1 piece each, are placed vertically into the concrete screed. for every m2. After the concrete mixture has hardened, the top of the pipes is cut off at the level of the top of the concrete and the holes are filled with fine crushed stone. Laying paving stones begins directly from the curb; after laying 4 elements, a check is made to maintain the specified level using a building level. Ensuring the quality of the fit is carried out using a rubber hammer; by lightly tapping, the tile is sunk into a mixture of cement and sand or, if necessary, raised with a sprinkle of dry mixture (prance) or a cement cushion. With this paving method, labor costs are significantly reduced and costs for materials and labor are saved. Laying is done in front of you, moving along an already paved surface. The downside is the need to carefully compact the mixture, and then the finished cladding. Tamping can be done with vibrating plates, or if they are not available, you can use a piece of thick, wide board. The method is most repairable, as it allows easy replacement of individual damaged tiles. - For mortar, it is widely used for paving large areas.
The cement-sand mortar is applied to the base in a layer of up to 3 cm per reachable area by the master and leveled using a notched trowel. Laying paving stones on concrete using this “wet” technology is carried out first in whole tiles, taking into account the desired pattern, all mortar is removed from unpaved areas with trowels, cut tiles are installed on fresh mortar after the base mortar has hardened under the solid tiles. Compliance with the required slopes and the flatness of the coating are checked using a level and rules. In all methods, the tiles are laid with equal gaps (5 mm), the resulting seams in both of the above methods are filled with grit or simply sifted quartz sand and spilled with water. Movement of people on the laid surface is allowed no earlier than after 24 hours. - Glue the tiles to the concrete using a special construction adhesive. With this method, it is possible to create the necessary slopes only on a concrete base, since the glue is spread in a very thin layer (from 5 to 10 mm) on the surface of a small area (≤ 1 m2), since its hardening time is indicated on the attached instructions for use , small. For the same reason, paving slab adhesive is diluted in small quantities to avoid hardening. The seams are filled with the same glue or you can use a garter, as in previous cases. Cured special construction adhesive provides a strong and reliable connection with concrete, so this method is used quite often, but it will not be possible to replace a damaged element without its final breaking.
Guide to pouring a blind area
The blind area makes a big contribution to the durability of the foundation, so its creation must be approached with maximum responsibility.
Design of the blind area
Design of the blind area
The structure consists of an underlying and a top layer. The first is responsible for creating an even, compacted base for the next layer. It is created from sand and small gravel. The total thickness of the layer is about 2 cm. You can also use clay. When choosing a specific bedding material, focus on the material of the top layer.
The top layer is designed to create water resistance and increase the resistance of the structure to water. Can be created from small cobblestones, clay, concrete and other materials. The thickness of such a layer is about 10 cm.
The instructions will discuss the procedure for arranging the most popular type of blind area - concrete. Having dealt with its construction, you can make a blind area from any other materials suitable for this purpose without any problems.
How to make a blind area with your own hands. Digging trenches and erecting formwork
- Remove the top layer of soil. Select the thickness taking into account the characteristics of the underlying and top layers described above. In the case of a concrete blind area, about 20-25 cm of soil is traditionally removed.
- Prepare a level and neat trench around the entire perimeter of the house. The bottom of the trench should be compacted.
- Proceed to assemble the formwork. To create this structure, wooden boards about 2 cm thick are perfect. Place a thin layer of clay in the trench, level it and compact it. Fill in about a 10-centimeter layer of sand and also compact it thoroughly. Usually, this is simply done by moistening the sand with some water. Do not overdo it with water, remember that there is clay underneath and it does not need excessive moisture.
- Finally, fill in about a 6-7 cm layer of crushed stone.
Reinforcement of the blind area
The technology for arranging a blind area around the house requires mandatory reinforcement. Thanks to the reinforcing mesh, the rigidity and durability of the concrete structure will be increased. As noted, you can buy a ready-made mesh or assemble it yourself from metal rods. Cells with a side of 10 cm are considered optimal.
Reinforcement of the blind area
Expansion joint
Special attention must be paid to the expansion joint. It is created at the junction of the basement of the house with the blind area
Due to such a seam, the said structures will be protected during the process of soil subsidence. That is, the blind area will be able to sink along the seam without causing damage to the base of the house. The standard seam width is 1-1.5 cm. The seam must be filled with roofing felt, sand-gravel mixture or bitumen of your choice.
Expansion joint
You can also use a special rope for filling, the manufacture of which uses foamed polyethylene.
The technology for constructing a blind area requires that seams be present across the concrete structure, approximately every 200-300 cm. They will protect the blind area from ruptures during frosts. It is most convenient to make transverse seams using wooden slats. It is enough just to install the slats so that their top is located at the same level with the upper border of the concrete pour. Also, expansion joints must be present in the corners of the building. Don't forget to take into account the slope of the blind area.