- home
- Useful articles
- How and with what to fill dowel holes
»
»
Almost all advice for renovating an apartment/house boils down to the fact that first of all you need to eliminate the cracks, holes and openings left after removing the dowels. There are always a lot of the latter within the walls. If they are small in size, then during the repair it is quite simple to close the hole from the dowel by covering it with wallpaper. You just need to remember these places so you don’t drill there later.
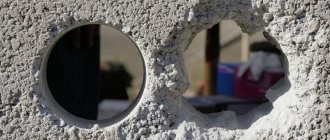
If the holes have a diameter of 1 cm or more, you will have to worry about how to seal the hole from the dowel. Experts advise eliminating all such damage, since they can then increase in size and cause additional cracks and other troubles.
How to fix a hole in the wall in the bathroom?
If the hole between the bathtub and the wall is narrow, you can use a simple sealant or tile grout. If the gap is a little larger, then in a hardware store you can look for a special border, which is a “corner” and is glued to the bathtub and wall.
Interesting materials:
How much Hercules do you need for 1 glass of milk? How long should you boil tomatoes? How much material is needed to sew trousers? How many meters does it take to make a Paracord bracelet? How much Nitrite salt is needed for 1 kg of meat? How much do you need to save to save 100,000? How long does it take to grow hair for sugaring after shaving? How much barley do you need for a 3 liter pot of soup? How much polyester cord do you need for a carpet? How much valerian should you take?
Professional Tips for Concealing Nail Holes
Specialists can easily repair any hole in a concrete wall, even if it is large. With the help of professional compounds and tools, you can even get rid of holes after dowels and anchors, through holes.
Required tools and materials
First of all, you need to buy a repair mixture based on cement, gypsum, acrylic or polyurethane foam (depending on the chosen method and the size of the defect). Also for work you may need:
- sharp instrument - nail, screwdriver;
- paint brush;
- sandpaper;
- putty knife;
- primer;
- vacuum cleaner;
- syringe.
The most popular repair products
The main method of repairing holes from screws, nails, or other types of fasteners is to cover the hole with a suitable repair mixture. Most often, putty is purchased for this purpose - a dry mixture or a ready-made composition that can be applied without dilution.
The following types of putties are suitable:
- Cement. Suitable for working with external and internal surfaces of walls made of concrete, brick, wood. It is very strong, durable, not afraid of moisture, but takes a long time to dry. Due to low elasticity, it may become cracked.
- Plaster. Suitable for work in dry rooms, can be applied in a thick layer and does not crack. The material quickly deteriorates from contact with water.
- Acrylic. Excellent for filling holes and leveling foundations. Moisture-resistant, durable, but applied only in a thin layer, so it is not suitable for covering large holes.
To repair walls with through or large holes, use foam. It expands in volume and fills any holes, and after hardening it becomes completely sealed. The foam is also suitable for filling small nail holes as it is dispensed from a thin spout.
How to cover a small hole
If the nail was small in diameter, repairing the remaining hole will have to begin by increasing its size. Otherwise, the repair solution will not get inside.
Carefully widen the hole using a nail or screwdriver. Use a vacuum cleaner to remove dust from the inside, treat the area around the defect with a primer, and pour a little primer inside from a syringe. After the soil has dried, fill the depression with putty or foam it, and as the composition dries, sand the surface with sandpaper.
Filling a hole in the wall
How to repair a large defect
To restore through holes and large holes, use cement mortar and finishing putty. The work is carried out in the following sequence:
- Clean the defect from dust, dirt and debris.
- Apply primer.
- Pieces of crushed brick are placed in the largest holes, then cement mortar is introduced.
- Wait until the repair mixture has completely hardened (at least 12 hours).
- The area is treated with sandpaper and a thin layer of finishing putty is applied.
If the hole was made with a dowel, it is important to remove all components of the fastener before starting the repair. Otherwise, the repair composition will soon fall out from the inside.
Plastic parts are removed using self-tapping screws, screwing them in and removing them with pliers. Afterwards the hole is cleaned with a vacuum cleaner, primed and covered with cement mixture.
How to repair a hole in drywall
Small holes are covered with gypsum putty, but a small piece of reinforcing mesh is first introduced inside. Afterwards, the problem area is treated with putty again, and as it dries, it is sanded and painted.
Patch in drywall
Large holes are sealed with plasterboard patches, which are cut to size, inserted inside and carefully puttied. The renovated area is decorated in accordance with the overall design of the room. With a careful and attentive approach, it will practically merge with the surface, which will save money and time on a full repair of the entire wall.
Using tile adhesive instead of plaster
Tile mixtures differ from ordinary plaster: they are more durable, can be used in damp areas (for example, in the bathroom) and at low temperatures (during street work or in an unheated garage). Therefore, the question often arises, why not use tile adhesive instead of plaster. Especially if you need to lay tiles in the bathroom.
Advantages and disadvantages of this method
Among the advantages of using glue instead of plaster are the following:
- higher adhesive properties compared to plaster solutions;
- resistance to sudden changes in temperature and high humidity;
- plasticity, which allows you to apply the mass in a thin layer;
- resistance to mechanical damage (comparable only to cement mortars);
- high drying speed.
Despite all the advantages, there are also limitations to plastering with glue. The main thing is the possibility of applying the composition only in a thin layer, no more than 1 cm. Therefore, if the brick or concrete wall initially has strong differences, then you will have to apply the glue in several layers. And this can lead to shedding of the material. The plaster mixture, on the contrary, can be immediately laid in a thick layer.
Glue is recommended for use in small areas because it sticks to the tool. When leveled as a rule, it will be much easier to work with plaster.
Basically, tile adhesive is more expensive than plaster mortars due to the additives in the composition.
Important! It is not recommended to plaster aerated concrete walls with tile adhesive due to the porous structure of the material. Thick adhesive blocks air flow, which can lead to moisture inside the home and cracking of the finish.
Crack repair
The surface of the crack is expanded with a grinder and its edges are leveled. For better adhesion to the material used for repair, apply two layers of primer. The next layer is applied after the previous one has dried.
How to fill a hole in the wall:
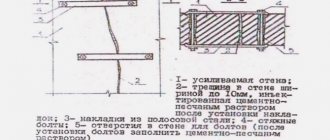
- Cement mortar with added lime. Most often, cracks form at the joints of bricks, at the junction of a concrete surface with a brick wall. In this case, construction mesh is used during repairs. The cavity is filled with solution, and a steel mesh is laid on it. After the first layer has dried, fill the remaining space with lime-cement mortar.
- A waterproof putty is prepared from a mixture of concrete and paint. Cement is poured into the paint and stirred constantly until a mixture of creamy consistency is obtained. Fill cracks with this composition.
- Wood glue is mixed with chalk powder until a creamy mass is obtained. Apply the composition to the cracked area. Protruding excess is immediately removed.
Restoring surfaces with small holes
If there is a dowel left in the wall, you must first pull it out. To do this, screw a screw into the dowel, grab it with pliers and pull it out of the wall with loosening movements.
After this, the hole is cleared of dust, which will be an obstacle to the surface from adhering to the solution. Wet the hole with water. The following can be used as a mixture for sealing holes in walls:
- cement-sand mortar mixed in a ratio of 1:3;
- building gypsum;
- Ceresit tile adhesive.
The prepared solution should have a creamy consistency. If the hole is large, add small pebbles to the mixture.
Push the solution to the very base, compact it well with a thin stick or other object. After the surface has dried, it must be plastered, filling the remaining voids and cracks formed during drying.
When the surface is completely dry, grout with sandpaper.
Prices for work in the Russian Federation
Services for providing assistance in repairing monoliths are offered by construction companies and individuals on social networking forums. The cost of the process of performing repair work in Russia can be seen, for example, in this table:
| Cities of Russia | Cost of repairing concrete walls (per 1m2/rub.) |
| Moscow | 810 |
| Khabarovsk | 580 |
| Krasnodar | 445 |
| Novosibirsk | 700 |
| Nizhny Novgorod | 610 |
Market prices for services may vary significantly. They depend on whether the service is provided professionally (from a construction LLC under a contract, from highly qualified craftsmen), or whether the specialist works under an oral employment agreement (private contract).
It also matters whose materials and tools are used to carry out the repair work. If the consumables are provided by the master, the cost of the work may be higher. The average cost in the Russian Federation for repairing a monolith starts from 450 rubles/m2.
The cost of professional services from LLCs is an order of magnitude higher than that of private builders. But it is always possible to agree on a service on terms favorable to the owner.
Electrical installation rules
Compliance with generally accepted building codes and requirements is the key to the safety and durability of electrical wiring. Therefore, before preparing wall stubs for cables, you need to familiarize yourself with the rules for electrical installations (PUE). The location of the wiring is determined by the following points:
- 15-20 cm higher than baseboards;
- 20-30 cm below the ceiling and beams;
- from the corners at a distance of 10 cm;
- in the area of heating pipes, gas pipes with an indentation of 50 cm.
This also applies to television cables.
It is better to purchase wires in coils. In this case, the cables will be solid, and there will be no need to lay spliced and insulated connections under the plaster.
Electrical wires are laid hidden in walls, floors or corrugated pipes. When laying in a non-combustible surface, including plaster, the absence of corrugation is allowed
According to the PUE, aluminum wires can only be used with a cross-section of 16 mm2 or more. Smaller sections - only copper. This is due to the fact that aluminum has higher electrical resistance than copper. Under heavy load, it heats up and can melt.
Depending on the installation conditions, the following types of wires are used:
- VVGng: fire-resistant, non-flammable, for laying under plaster;
- VVGng-LS: mainly under plasterboard, for protection against mechanical influences it is placed in PVC boxes; its analogue can be the gray cable NYng-LS with a layer of rubber, more expensive, easy to install, not very convenient for grooves, since it has a round rather than flat cross-section;
- PVA: stranded, white, can only be used as an extension cord or when connecting electrical appliances directly to an outlet.
In old wiring, a 2-wire cable is used, and in new wiring, a 3-wire cable is used. Chandeliers with two-key switching require 4 wires.
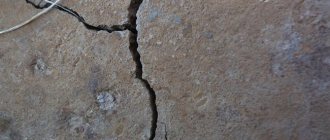
Cracks
Holes in the wall can occur if cracks are not covered for a long time; when cracks appear, the wall structure weakens. To prevent this, it is necessary to seal the cracks when they first appear. To do this, the crack must be carefully cleared on all sides at an angle of forty-five degrees. Prime and seal generously.
Cracks must be repaired when they first appear.
Different solutions are used for this. Firstly, this is the same mixture that was mixed to finish the wall, and secondly, these are various plasters and adhesive bases that contain cement.
But the most suitable material is considered to be sealant. It benefits from the fact that when it dries, it acquires a rubbery consistency, therefore it has the ability to expand and contract, which is why new cracks do not appear on the wall.
The sealant is applied using a construction gun. Excess can be removed with a rubber or metal spatula. The only contraindication is silicone-based sealants, since they contain fatty substances that do not come into contact with paint and putty.
Step-by-step technology for eliminating defects
To eliminate a small hole in the wall, prepare the following materials and tools:
- knife, nail or screwdriver;
- paint brush;
- vacuum cleaner;
- narrow spatula;
- sandpaper;
- deep penetration soil;
- one of the finishing and repair materials: cement or gypsum putty, alabaster, polyurethane foam, a mixture of cement and sand (1:3).
If the hole depth is more than 50 mm, the list is supplemented with pieces of brick or foam plastic, as well as a wide spatula for applying plaster. To get rid of a defect in a concrete wall with your own hands, proceed in the following order:
- Using a knife, awl or nail, cut a crack or hole. The loose layer of the previous finish is cleaned out so that the fresh “patch” does not fall off after drying.
- Remains of old putty or plaster are carefully removed with a dry rag, brush or vacuum cleaner.
- After cleaning the hole, wipe it with a wet sponge or rag and soak it with a primer for better adhesion of the repair material to the concrete.
- Now you can fill the hole with the prepared mixture (a large hole is filled with brick or polystyrene foam before doing this). After the surface has dried, it is rubbed with sandpaper until smooth. If polyurethane foam was used, you must first trim off the excess before stripping.
- To completely repair the problem area, it is covered with suitable wallpaper or treated with finishing putty and then painted.
Choosing Hole Filling Methods
You should take a closer look at how to repair holes in concrete in specific situations. For each of them there is a standard scheme, supported by practical experience.
1. Holes in the wall on the balcony.
In this situation, maintaining the thermal protection circuit is of great importance. To repair a small hole or crack, use a frost-resistant sealant. If the wall is severely damaged, it will be more difficult to repair the balcony: To get rid of a defect in a concrete wall with your own hands, perform the steps in the following order.
- Cracks or holes are filled with foam plastic (the transverse size of the insert should be 20 mm less than the diameter of the hole).
- The gaps between the foam and the contour of the hole are foamed with sealant.
- In order for the balcony wall to acquire a flat surface, it must be covered with a repair mixture. To do this, a polymer plaster mesh (mesh 10-15 mm) is attached to the foam plastic with metallized tape. Then a layer of CPS is applied, after which it is puttied and treated with sandpaper.
2. Holes from drilling.
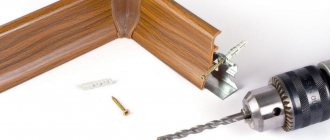
Extra holes in the wall appear if you need to rehang a picture, attach a lamp in another place, or change the location of a wall cabinet. How to repair the resulting hole? For this purpose, first remove the unnecessary dowel. A self-tapping screw is screwed into it to a depth of 15 mm (to prevent expansion) and its head is grabbed with pliers. The chop is swung in different directions, then removed.
To cover up a hole in the wall, follow the standard procedure:
- use a vacuum cleaner to remove dust and concrete chips from the hole;
- moisturize the cavity abundantly;
- Seal the hole with putty or repair mixture.
Layer-by-layer application of putty with intermediate treatment with abrasive sandpaper will help to carefully cover the defect. Thanks to this technique, the wall will be smooth, without a depression.
3. Holes after replacing pipes.
During such work, the wall is broken through, resulting in deep cracks around the perimeter of the hole. There are two ways to carefully seal a through hole.
- Scheme with concrete solution. To close the hole, select a piece of cotton fabric of the required size. Prepare a concrete mixture of sand and cement, soak a rag in it, and fill the hole in the wall around the pipe with it. The homemade “seal” is carefully compacted so that its ends do not stick out. When the insert dries, all that remains is to cover the unevenness with liquid concrete and putty the surface.
- Scheme using polyurethane foam. The hole is filled with sealant, the dried mass is cut off. The height difference is leveled with sand-cement mortar. To make the wall smooth, it is rubbed with sandpaper.
Cold Welding Crack Repair
How to seal a gap in a wooden floor: 16 ways that work
Currently, specialized cold welding for sewer pipes is offered in specialized stores. It is manufactured specifically for the repair of plastic products used in the organization of water supply systems, cooling systems, and heating communications.
Using cold welding, damage of almost any degree of complexity can be repaired. There is no need for thermal exposure, since a chemical reaction is used to bring the components into working condition.
The work itself to repair a damaged plastic pipe has the following sequence:
- It all starts with surface preparation, for which the entire problem area is treated with emery cloth. This is followed by degreasing the base using alcohol-containing liquids. If you neglect this procedure, the applied patch will serve much less.
- You need to calculate exactly how much material is needed for a high-quality seal. For this, a simple visual inspection is usually enough: the main thing here is that the repair mixture can cover the entire problem area.
- You need to take the substance into your hands, which you have previously put on protective rubber gloves, and begin to knead. This procedure is continued until the material is painted a specific brown shade. Another sign that the material is ready is when the mass reaches the state of plasticine.
- You need to seal the damage well with the finished plastic material, pressing it with a tourniquet. Next, there is a pause in work for about an hour: during this time, the repair mixture hardens. It must be made so strong and dense that any drilling, cutting and other impacts on its surface are completely safe.
It is important to take into account the presence of components harmful to the human body in cold welding. For safety reasons, it is recommended to acquire protective gloves and goggles in advance.
To speed up the hardening process of the plastic mass, some experts recommend exposing it to warm air, using a construction or regular hair dryer.
Cold welding for sewer pipes is suitable for repairing damaged plumbing fixtures. For example, if a piece of material breaks off from a sink or toilet, cold welding will help to properly glue it back. When purchasing this universal product, you should check its expiration date, composition features and availability of a quality certificate.
Is it time for a facelift? Don't get around to fixing that annoying hole in a visible place? For this category of users, in this article we will consider a problem related to the issue of eliminating holes in the walls of residential and domestic premises.
Long-term repair of defects
When deciding how to repair cracks in concrete for a long time, you should pay attention to this method of treating defects.
Resin and sealing mixtures based on it are suitable for restoring screeds, blind areas and various concreted areas or horizontal surfaces. Repairing cracks in concrete using such compositions has a number of advantages. First of all, this is the low cost of the mixtures, as well as their quick drying. On the other hand, the resin allows you to securely fix the seams and keep them from subsequent enlargement.
So, to eliminate defects you will need to prepare:
- angle grinder and diamond-coated discs;
- vacuum cleaner;
- spatulas and a trough for diluting the composition;
- primer composition for concrete;
- Epoxy (base A and hardener B);
- Fine-grained sifted sand.
Before you repair a crack, you need to clean it of dust and dirt. After this, we carry out the sealing in the following sequence:
- We repair the crack. In this case, the width of the resulting recess must be at least 5 mm.
- Using a grinding machine, we cut transverse seams in the concrete in increments of 400 mm (the length of the grooves is about 100-150 mm).
- We remove the loose layer of concrete and remove dust from the surface using a vacuum cleaner.
- We treat the surface of the defect with a primer, and fix the transverse grooves using repair brackets.
- We prepare a solution from resin (base), hardener and sand according to the instructions on the packaging with the composition.
- We fill the defect with the resulting mixture and quickly level the surface, since the setting time of the resin is only 10 minutes.
After this, it is recommended to fill the surface with sand, which will need to be removed with a vacuum cleaner before plastering the base or covering it with finishing material.
The best epoxy compounds
If we talk about the best materials for repairing cracks in concrete walls and other surfaces, the most effective today are considered to be:
- Domestic epoxy resin ED-16 and ED-20 costs about 2,000 per 3 kg. The hardener will have to be purchased separately (costs about 300-500 rubles).
- Epoxy 520 resin from the Czech manufacturer Spolchemie costs 3,500 rubles per 5 kg.
- German composition UZIN KR 416, which will cost 2,700 rubles per 0.75 kg.
Also very popular are compositions from the Italian manufacturer Sika.
However, it is worth considering that this method of correcting defects is not suitable for treating holes that form in concrete foundations under strong pressure from water. In this case, it is worth using a sealant.