A hole in the ceiling is unpleasant in itself. If the ceiling is plastered, then a crack that is not repaired in time will constantly increase. A deep hole formed near the riser can lead to a significant reduction in sound insulation in the apartment.
Knowing how to repair holes in the ceiling, you can carry out minor repairs yourself at any time convenient for you. The repair method depends on the ceiling material. Ceilings can be:
- suspended cassette;
- tension (fabric);
- hanging plasterboard;
- plastered.
This kind of problem needs to be resolved in a timely manner.
Repair of suspended ceilings
Before you repair holes in a stretched fabric ceiling, you need to assess the extent of the damage. Tiny holes are carefully sewn up with strong nylon threads. If a large hole forms, you will need a patch from a suitable-sized piece of fabric left over after installing the ceiling.
If you don’t have such material on your household, contact the company where you purchased the ceiling: they will always have fabric of a suitable color. The hole must be sealed using instant glue. The patch smeared with it should not be pressed too hard against the ceiling surface, otherwise the glue may protrude through the edges of the insert.
Repairing damage to plasterboard ceilings
There are several ways to repair holes in a plasterboard ceiling.
If a crack has formed between the ceiling slab and the wall, carefully cut the edge of the plasterboard sheet diagonally with a knife so that an angle of 45° is formed. Then the gap is filled with gypsum putty and sanded. The putty area is covered with paper tape coated with PVA glue.
If the hole in the plasterboard sheet is located away from the wall or is located near the riser, you should first cut out a rectangular or square stencil from cardboard that completely covers the hole in size. Having applied the stencil to the hole, you need to carefully cut out a hole of the correct shape in the ceiling plasterboard. Then, using the same stencil, you need to cut out an insert from a new sheet of drywall.
In order for the insert to have something to hold on to, a strip of thick plywood or a wooden block is inserted into the hole and screwed with dowels or screws to the ceiling sheet (preferably several pieces on each side). After this, the patch itself is attached to the piece of wood using screws.
Small cracks are sealed with reinforcing tape and puttied on top. To give the surface a smooth and aesthetic appearance, serpyanka is applied to the plasterboard insert, and plaster is applied on top of it. All dowels and screws must be screwed in so that their heads do not protrude above the ceiling surface.
How to Fix a Hole in Drywall Using a Patch
If the diameter of the unwanted hole is more than 10 cm, then to eliminate the defect it is necessary to apply a patch made of a similar material. To do this you need:
- Use a hacksaw to smooth out the uneven edges of the hole.
- Carefully cut out the damaged area of the sheet, giving the hole an even shape (square, triangle or rectangle).
- Using a ruler, take measurements from the new hole.
- Using a knife, remove the front layer of cardboard by 2 cm from all edges of the hole. The gypsum mass must be left untouched.
- On a prepared sheet of drywall, draw a similar figure, but 2 cm wider at each edge. From the back side of the patch along its entire perimeter, remove 2 cm of plaster and cardboard, leaving only the outer layer of paper.
- Fit cut drywall, the thickness of which corresponds to the thickness of the wall material, to the hole.
- Apply plaster mixture around the perimeter of the hole.
- Install the patch and press firmly.
- Level the surface and the joints of the two sheets using putty.
- After the solution has dried, level the surface by sanding with sandpaper.
It is also possible to apply a patch by cutting its edges and the hole at an angle of 45 degrees. In this case, the internal contour of the workpiece must be processed, and the external contour of the hole must be processed.
Repair of plastered ceilings
There are several ways to cover up holes in the ceiling.
Shallow cracks in the plaster are sealed with putty. The cracks formed at the junction of various materials (for example, plaster and wood) are covered with a special elastic putty. The place where the layer of plaster has fallen off is cleaned and treated with a primer with antiseptic properties.
Then the hole is covered with a primer, which improves the adhesive properties of the putty. The putty is applied in two or three layers: each subsequent one after the previous one has dried. The dried putty should be sanded and coated with a primer.
If the shingles on which the plaster is applied are damaged (rotten), the damaged area can be replaced with a piece of drywall. Serpyanka is applied to the plasterboard insert and the area is puttied. It is better to apply the putty in two layers: the second after the first has dried, and then sand it.
Video on how to repair a hole:
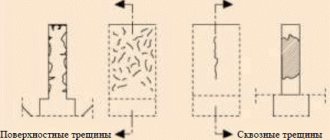
A more difficult option is a deep crack or hole. Narrow, deep cracks usually form between floor slabs. Such cracks are filled with polyurethane foam; when it dries, the excess is removed with a knife.
A very narrow and short gap can be painted over with white paint and covered with a bandage on top. After the bandage has dried, another layer of paint is applied on top. For large cracks, instead of a bandage, a metal mesh is applied, which is plastered on top.
If the deep hole is located near the riser, then its edges are slightly beaten with a hammer and chisel to create more notches. Then the hole is sealed in several stages with a cement-sand mixture (each subsequent portion is applied as the previous one dries), covered with a water-repellent primer, and when it dries, it is plastered. Holes of large diameter, so that the cement holds better, are pre-reinforced with thick wire (several electrodes).
Using tips on how to repair holes in the ceiling, you can easily deal with minor damage to plaster or drywall on your own. While working, you will probably have your own original ideas about improving the apartment.
��������� ����� � ������� � ���� ����������.
��� ���������� ��������, ���������� � �� ����� ����� �� �������� ���. ���������� ���������� �� ���� ��������, ��, ������ �� ��� �����, ��� ��� ��������� �������. ��� � ��� �������� ���� � ������� � ��������� �����.
�������
������ �� ������� �� ���� ����������� �����, ��� ��������� �� ������ ���. ��� ����, ����� ������������ ������� ���� � ���� ��� �� ����� ���������� ���������, ����� ���, ��� ���������� � �� �������, ���������� �������� ������� ��������� ����.
���� ���������� ����� ����������, �������� ��� ����� �������������� ��������, �������������� ��� �������. � ���� ������, ����� ����������� ��������� � ��������� �������� � �� ��� ����� ������� �������� ����������� ���������� �������� � ���� ������ ��� ���������� �������� ��� ���������� ���������.
������ �������� �������� ����� ���� ��������� ����� � ��������. ���� ����� ��� ����� ����� ����� �� ������� ������. ��������� ������ ����������� ��������� ����� ���������� ��� ��������� �������� �� �����������.
����� ������� ���� ����������� ��������� ���� ����� ����� �������� ��������. ���� �������� ���������� ������� �� � ������� ���� ����� 5 �����������, ����� ������� ����������� ���������� �����. ����������� ������� ���� ���������� ����� ������ � ��������� �������, � ������������ �������������� ���������� ����� ��� ������ ����������.
�� ����, �������� ��������� ��� � ����������� ����������, ����� ����� ������� ����� �������, �� ������� ��� �������. ������, ����� ����� ����� � ���� �� ������� �������� ������� � ���� �� ��� ����� �������.
��������� ������ ����� ����� ��� ����� �������� ������������� �������� ��������. ��������, ��� �������� ����� �� ������ ���� ��� �������.
��������� ��������� �������� ������������� �����, ����� ����� ����������� �������� ���� ������������� �������� �������. ��� ����� ����, ��� ������� ��������������� �������, ��� � �����������, ��������� �� ��������� ���������, ��������� ������ ��� ����.
��������� �������� ������� ��������
����� �����, ������ �������� � ���������� �������������, ���������� �� ��������� ������������ ���������. ����� ��� �������� � ������ ������������ ����� �� �����. ������� �������������� �������� �� �����������, ����� ��� � ����� � ������� �� ����� �������.
� �������� �������� �� ������������, ���� �� ����� ����� ������� �������. ������� ������� ��������� �����, ����� ���� �������� ����� ��������, ���� ������ ������ ������������ ��� ������������� ���������� �����������.
� ��������� ����������� ��� ����� ������� �������. ��������� ����� ��������� ������� �������, � ������, � ������� ��������� ����� ������� ���������. ���� ��� ������ ����� �� �������, �� ����� ������ ���������� �������� � ��������� �����������, � ������ ������� ���������� ����.
� �������� ������������� ���������, �������� ����������. ��� ������, ��������� �������� ������������ ������� �� ����� � �������� �������, � ����� � ���������� ��� ���������� � ���������������� ����������.
����� ����������, ����� ��������� ��������� ���������� ���������� ��� �����������.
���������� ���������� ������� � ��� ����, � ��������� ������� �� ������� ���������. �� ��������� ���������, ����������� ����� ���������� ������� ��� ����������� ������, ��� ��������� ������� �����������. ��������� ��������� ���� ������.
����������� �������
���� ���� � ������� ��������� �� ����� ����� ���� ���� ����������, ����������� ��� ������� ����� �����. ��� ������ ������� ���������� ������ ���� ����������� ���� ��������. ���� �� ������� ������� ��� ���������, ���������� ����������� ������ ��� ����� ������� ��� ����������.
����� ��� ����� ����������: �����, ���������, �������� ���������� ����� ��� ������ �������� � �������� ���������. ����� �����, ����������� ������������� ������ ��� ������� � ������������. ����� ��������, ����� ����� �������� ���������� �� ���������� ���������.
���� ������� ��� � ������� ���������� ����� ��������� ��� ������������ ����, ������� ����� ���� ������� ����. ��� �����������, ������ ������� �� ��������� 5 �����������, ������ ���������� ��������� �� ������� ����������� ����������. ��� ������������ �������� ������ � ������� ����� ����������� ����������������, � ������ �������� ����� ������, �������� �� � ��������� ����������� ������� �����������, ������������ ����� ������.
����� ������� �����������, �������� ��������� �������.
����������� ���������� �����������. ��� ����� ��������� �������� ����� ������� ��������� ��� ������� �� ���������� ���������. ���������� �������� ����� ����������� ������� ����������� � �� ��������� ����, �� �������� �������.
���, ��� ����� ������� � ��������� ������ ���, ����� �� ������ ������� ���������� ����� ���������� ���������� ������������. ���� ������������ ����, ���������� �������� �� � ��������� �����, ��������� ��������� �������. ��������� ���� ����������� �� ������������ ������.
����� ���������� ��������� ������ ���� ��������� ����������, �� ���������� ������������ � ��������� ����� � �������� ���������.
If it's time to make repairs, then you will have to deal with the need to eliminate many defects.
Of course, if you intend to do everything yourself. And therefore the question may be relevant: how to repair a hole in the ceiling? It is worth considering typical situations and how you can find a way out of them.
But first, it’s worth finding out the reasons why a hole may form.
- When installing suspended structures. This mainly concerns the joints between drywall and walls.
- When installing large items indoors. Sometimes situations occur when careless movement creates a hole in the ceiling.
- It is not a rare occurrence for a defect to form when replacing a riser.
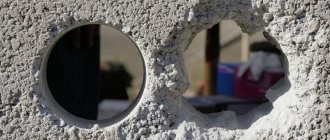
- The plugs in the communication openings collapsed. After all, these holes remain in the floor slabs to accommodate the elements, and then they are sealed.
- Defects between floor slabs. And even though they may be insignificant, they still have to be eliminated.
- The plaster or putty has fallen off. Sometimes, when preparing the surface, pieces of the old coating simply fall off the walls and ceiling. This is especially true if the layer of material exceeded five centimeters during application. And often in this case a hole appears that will have to be removed.
Pipes in interfloor ceilings for risers
I had to deal with various installation solutions when installing pipes in interfloor ceilings for laying cables along a low-current riser. And in terms of strength too, but less often. So, when working on a multi-story residential building, they placed one plastic pipe in the ceiling and ran the entire bundle through it. Well, at most two - on the lower floors there were already a lot of cables gathering, they all didn’t go into one pipe. And recently, when working on an office center, also multi-story, the customer expressed a desire to install cassettes of metal pipes in the ceilings and run each cable through a separate pipe (which, of course, did not work out - two or three cables ran through each pipe).
And the question is: is it really important that in a residential building you can install plastic in the ceilings, but in a non-residential building you must use metal? Isn't the customer punishing himself with a ruble?
And then - on the upper floors the cassettes weigh 6-10 kg, and on the lower floors - more than 70, the largest one will pull 120 kilograms. And the work costs such a penny, I don’t see the point in tearing the veins.
Register to vote!
Voted: Rating:
Nuances of heating systems
When installing heating systems in houses, some of the pipes end up in the thickness of foundations, ceilings, walls, etc.
Cassette ceiling
If you need to repair a hole in a cassette ceiling, then it is enough to replace the cassette that is damaged. Such elements are inexpensive, and replacing them yourself is not difficult.
If you cannot find a similar cassette, you can use a design solution. For example, place a ventilation grill or a lamp. You can take a different route, replacing several panels at once to create a different design for the ceiling.
The edges of the sheets that are adjacent to the wall should be cut at 45 degrees to obtain a chamfer. The resulting space must be filled with gypsum putty and then sanded. On top of this you need to stick paper tape using PVA.
If the walls are plastered and the ceiling is concrete, then the gap is sealed differently.
First it needs to be increased to 5-10 mm. Next, using a brush, you need to prime the surface and then putty. To do this, you can use gypsum or acrylic putty, using sickle tape.
When the putty has dried, it can be sanded with sandpaper.
Typical examples
If a hole in the ceiling appears at the junction of two floor slabs, even more work will be required. Using a hammer, knock out all the material filling the joint. If you cannot do this completely, you must try to remove as much of it as possible.
Then everything is more standard: primer, putty, sticker of reinforcing tape or a strip of serpyanka and finishing putty. After this, the surface is leveled with a grater or sandpaper and painted. Before painting, you need to go over the resulting surface again with a primer.
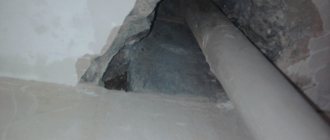
If sealing holes in the ceiling is necessary near riser or heating pipes, the solution may be slightly different. For damage the size of which does not exceed 5 millimeters, it is quite enough to fill them with ordinary silicone sealant. Its plasticity will allow hot water pipes to expand unhindered, and the special properties of such mixtures allow them to easily withstand the high temperatures typical of such pipes.
Larger damage is somewhat more difficult to repair. Reinforcement will be required. Pieces of strong wire or scraps from a welding electrode are perfect for this. Further operations can be performed using different materials - from polyurethane foam to ordinary cement.
All you need to do is fill the recess so that there is about a centimeter of free space left to the ceiling level. If foam is used, it must be applied in several layers, waiting for each layer to dry. The last layer is trimmed to the required level.
After filling the main volume of the hole with the selected material, it must be puttied in several layers with finishing sanding.
Fill holes - restore the surface to its former evenness and attractiveness
If you do everything correctly, carefully looking at photos and video materials, you can achieve an excellent result. The ceiling will become smooth, reliable and beautiful, especially if you then apply the proper finishing method.
Home / Installation, repair, maintenance / Sealing holes and cracks / How to seal a hole in the ceiling?
The appearance of a hole in the ceiling is an unpleasant thing.
It attracts attention, is annoying and certainly does not decorate the house in any way. It is necessary to get rid of this problem, but not everyone knows how to do it correctly. How and with what to repair a hole in the ceiling - we will tell you further.
General tips and tricks
A few simple but important tips will help you avoid mistakes in your work and avoid additional expenses:
- Take only the glue that is suitable for your ceiling.
- Read the instructions carefully and determine the setting time.
- Secure the edges of the hole to prevent them from unraveling while you decide how to repair the damage.
- Be sure to degrease the surface. This way the glue will adhere better and there will be no unevenness along the seam.
- Patch first, then decorate. Self-adhesive decorative elements are not always able to withstand the tensile force of the canvas.
- If there is a lot of damage, it is easier to replace the ceiling than to repair it.
- Don't be afraid to experiment! There are a lot of decorative elements on sale for every taste and color. All you have to do is choose.
If your ceiling was damaged by a flood, it will require complete dismantling and drying of the concrete floor.
Causes
Whatever the size of the hole that appears, it appeared for a reason. In order to subsequently protect yourself and your home from such unpleasant surprises, before you begin to seal it, you need to find out the reason for the hole.
If part of the plaster crumbled, the cause could be poor-quality material used in finishing. In this case, it is worth carefully inspecting the rest of the coating - it may show signs of further destruction of the coating in the form of cracks or partial shedding or delamination of the material.
The second reason for shedding could be moisture getting into the material. Most often, the fault here will be a flood from the neighbors above. A sign will be a characteristic change in the color of the plaster or the appearance of streaks on the surface.
A very thick layer of applied material can also cause shedding. If the finishing technology is violated and a layer of more than 5 centimeters is laid, this phenomenon occurs quite often. Thick layers of plaster can be applied only in several stages, with the obligatory use of reinforcing mesh or other materials.
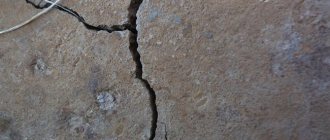
Not less often, the reason for the appearance of holes in the surface of the ceiling can be a crack between the slabs of which it consists. Typically, such a hole will be in the form of a not too deep crack and runs along the seam between the slabs.
Repair work can be another cause of such defects. This is especially true for work on replacing pipes or risers.
The last possible cause of holes may be damage to the outer layer of the decorative coating of the ceiling. This can be either finishing with plasterboard sheets or a surface assembled from hanging elements, like cassettes or slats.
Big deep hole
The reasons for the occurrence of this particular defect can be different. This could be a hole after removing the socket box or simply the result of your child’s interest in geology. But don't panic. The instructions below will help you complete repair work effortlessly.
Step-by-step action plan:
- Using a running vacuum cleaner, clean the area being treated from plaster chips and dust;
- moisten the gap from the inside using a wet brush or foam rubber;
- Depending on the depth of the hole, select the required finishing material. If the depth is no more than 5 cm, it is enough to simply cover the defect with a repair solution. After drying, repair any cracks that have formed. For deeper holes, it is better to use a brick or a replacement brick, which must be placed inside the hole and covered with plaster or putty;
- in case of such a defect, it is better to use a large spatula, with which you apply finishing plaster, putty or gypsum mortar, and the surface should become perfectly flat. Undamaged areas around the sealed hole also need to be captured;
- wait a while for the wall to dry. After this, clean the repair area with a sheet of sandpaper and finish it with paint or wallpaper.
Possible solutions to the problem
The easiest way to solve problems is with suspended structures consisting of individual decorative elements. Here it all comes down to replacing the damaged part with a new one. No additional actions are required, except perhaps a trip to the store for a new part.
Repairing plasterboard coverings will also not be a very big problem. Having found out the reason for the hole, you can either replace part of the coating, or simply re-plaster or putty the ceiling surface.
With concrete planes everything will be much more complicated. It is much more difficult to destroy such a foundation, which means that the reason for the appearance of the hole is much more serious. If it is just a flood from neighbors, then it will be quite enough to clean and dry the surface, and reapply the finishing layer.
With major damage to the plane, you will have to tinker. First, you need to clean the damaged area from dirt and finishing residues, and then treat everything with a primer and antiseptic impregnations.
After drying, you can carefully fill the recess with putty or plaster.
Putty must be applied in at least two layers, with each layer drying until completely dry. After finishing the putty, the surface must be treated with sandpaper or a special grater to obtain a smooth surface. The last layer of paint is applied.
Almost invisible hole
Often these are marks from unsuccessful attempts to drive a nail, the result of a removed dowel or a game of Darts, or simply a neighbor who had an unsuccessful attempt to hang a huge TV on his wall. To eliminate this problem you will need the following materials: sandpaper, vacuum cleaner, small spatula, foam rubber, brush, alabaster or gypsum material.
Before starting repairs, do not forget to carry out preparatory work, that is, free the damaged area from any debris and dust present, as well as remnants of finishing material.
Subsequent actions must be carried out according to plan:
- Use a suitable dowel or screw to slightly widen the hole in the brick wall. This is required so that the repair solution (most often putty or cement is used) freely penetrates deep into the hole;
- by using a vacuum cleaner, you need to remove the resulting debris and dust;
- Having previously wetted the brush, use it to treat the resulting gap. This action eliminates the possibility of the plaster absorbing moisture from the cement mortar or putty, which will cause a deterioration in the strength of the finish;
- Apply the repair solution with a spatula, carefully rubbing it deep into the error. The result should be an even coating;
- wait until the repair area has completely dried, after which it must be treated with sandpaper;
- at the end of the work, it is necessary to disguise the place of work with paint to match the tone of the wall, wallpaper or original appliqué.