Concrete is a strong, wear-resistant and solid building material. However, over time it is subject to various deformations (cracks, chips, holes, cracks). There are many reasons that influence the formation of defects - from the rearrangement of furniture and sockets to the shrinkage of the building. The process of filling holes in a concrete wall with your own hands is not difficult, but you must adhere to the correct technology and sequence for eliminating defects, and also take into account the nature and size of the gap.
Reasons for the formation of defects
Concrete, like other building materials, has a degree of wear and service life. The quality of a building material is determined by such parameters as the composition of the material, proportions of components, type of filler, vibration, weather conditions, etc. In addition to low-grade material, the formation of holes and openings in a concrete wall is caused by many factors:
- Uneven shrinkage of the structure and vibration. It occurs due to incorrect distribution of the load on the walls of the building or improper laying of the foundation. Subsequently, gaps and cracks form in the wall. When significant deformations of the structure occur, collapses of ceilings and walls occur, so first the root causes are eliminated - the supports and foundation are strengthened and issues with shrinkage and vibration load are resolved. Only after this work is done to seal the holes.
- Impact of natural conditions. Temperature changes, active solar radiation, and strong winds negatively affect the condition of concrete masonry. External seams, staircases and the upper floors of the building are primarily affected.
- Drying out of the concrete solution over time leads to the appearance of holes and cracks. Reinforced concrete structures are characterized by through cracks and gaps.
- Repair work. Moving sockets and switches, laying pipes, rearranging kitchen furniture, attaching cabinets, chandeliers, plumbing fixtures, and air conditioning leads to the formation of various kinds of holes in concrete structures.
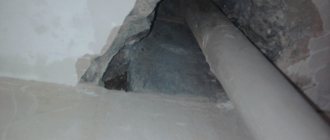
Hole in a concrete wall.
The importance of sealing process holes
The procedure is especially relevant in humid climates and when constructing buildings on soils with high groundwater levels. In the absence of sealing of the formwork installation sites, destructive processes in swimming pools and other reservoirs that are constantly in contact with liquids gain greater speed.
Technological holes are placed inside vertical, horizontal and curved surfaces. Only permanent formwork structures do not have passages for mounting tie screws. Sealing, regardless of the functional purpose of the monolithic surface, is carried out in the form of:
- injection of sealants at the locations of embedded parts in concrete;
- waterproofing formwork holes in the foundation, basement, walls and floor slabs;
- filling with sealants the joints of surfaces and embedded sleeves for cable utilities, points of passages and entries of pipelines, air ducts, etc.
Waterproofing holes in concrete is necessary to comply with standards for thermal protection of buildings. Moisture constantly seeping through local areas of communication passages provokes deterioration of building materials, the development of mold and corrosion of fittings. Water leaks, despite the presence of seals, inside the cable and wire glands. Sealing utility passages promotes long-term operation of enclosing structures, basements and inspection wells.
Tools and materials for restoration
Before starting work, you need to decide on the scale of the restoration and prepare the necessary tools. The concrete surface is restored using the following means:
- cement;
- sand;
- ready-made concrete solution;
- fragments of bricks, stones, rags;
- gypsum;
- primer;
- antifungal agents for walls;
- putty.
Sand and cement.
Necessary tools for repairing most defects:
- vacuum cleaner to remove dust;
- eye protection glasses;
- sandpaper for cleaning the surface;
- brushes of different diameters;
- narrow and wide spatula;
- dowels;
- knife, screwdriver.
Depending on the size of the hole, the amount of materials and the set of tools changes.
Step-by-step instructions for filling small holes
After removing a nail or screw from a wall or moving a shelf or cabinet, small holes are formed. You can cope with sealing such a hole using putty or concrete mortar and several tools. The sequence of work for the restoration of minor defects includes the following activities:
- widening the hole with a screwdriver, knife or nail for deeper penetration of the mixture;
- cleaning the hole with a vacuum cleaner or brush from dust and small debris;
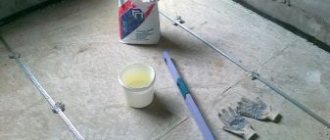
- spraying with water to moisturize;
- priming the surface with a sponge or spray gun for better adhesion and less consumption of putty material;
- after the primer has dried, putty is applied and the surface is leveled;
- cleaning the surface with sandpaper after drying.
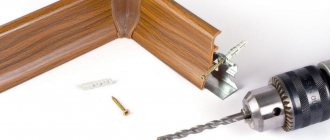
How to seal hardware holes
It is not difficult to understand what and how to seal holes in the wall from dowels, nails or screws. You can do this in a few steps:
- Remove the dowels and slightly widen the gap with a knife, screwdriver or nail so that the solution penetrates as deeply as possible.
- Remove all dust and debris from the crack with a vacuum cleaner, brush or broom. You can only use a construction vacuum cleaner - household models are not designed for cleaning construction waste.
- Moisten the gap with water from a spray bottle or a wet sponge, let it dry and apply primer over the entire surface. This is necessary so that the wall and the repair compound adhere better to each other.
- Seal the hole with the prepared mixture and wait until it dries.
At the end, you need to sand the surface until smooth and paint the wall or stick wallpaper.
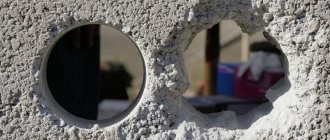
Important! This method is suitable for sealing holes with a diameter of up to 5 cm and a depth of up to 5 cm.
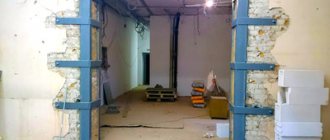
Fixing large gaps
Holes of significant size are a consequence of dismantling work (relocating electrical sockets, switches). To seal such holes you will need a primer mixture, cement or gypsum mortar, crushed stones or crushed bricks, finishing putty, spatulas, and sandpaper.
Work to eliminate defects includes 5 stages:
- Cleaning the gap from debris and dust. Use a vacuum cleaner or brush.
- Treating the problem area with a primer mixture.
- Filling the hole with crushed stone or fragments of brick mixed with cement (gypsum) mortar. This will strengthen the problem area and reduce the consumption of putty material. The resulting mixture is compacted well to avoid the appearance of voids. Cement mortar is prepared from 3 parts sand and 1 part cement with the addition of water. Ready-made compounds for concrete walls, tile adhesive or building plaster are also used. The mixtures are diluted according to the attached instructions to the consistency of thick cream.
- After the patch has dried, putty work begins. If necessary, the remaining voids and cracks are filled. The putty dries within 10-12 hours.
- The finally dried area is leveled with sandpaper or a sander to the level of the main wall.
Putty the wall.
The mixture may fall out of large holes after drying. To restore the integrity of the surface, the main part of the pothole is laid with bricks on a concrete mortar. The hole is pre-expanded. Further restoration work is carried out according to the given scheme.
Correct timely assessment of the size of the defect and selection of the right materials will make it easy to handle the restoration on your own.
How to fix a hole in the wall
Life often throws us various challenges. Here is one of them - you urgently need to fix such a nuisance as a hole in the wall. How this hole could have formed in the wall of an inhabited apartment is a separate question. As a rule, there is a reasonable answer to this, but we are still busy with the main problem.
There are many solutions, and they all depend on two factors - what your wall is made of and what size the hole in the wall is.
Concrete wall, brick wall - need foreign putty
How to cover a hole in a brick or concrete wall? The preparatory stage for working with a hole in such strong walls does not really depend on the size of the defect and is always the same. It is necessary to clean the edges of the hole from cracked plaster, peeling paint or whitewash. If there is wallpaper, carefully cut a piece of wallpaper of the correct shape around the damaged area with a sharp knife. That is, remove everything that may fall off later and ensure that we continue the repair work. How to fix a hole in the wall
Option 1. The walls are the same, the hole is very small.
Minor damage to the walls can include the following: a mark from a nail, or rather an attempt to hammer it in, a dowel for a painting that became unnecessary (where did they put the painting?!), here the children played Darts, and here a neighbor tried to hang an LCD TV through the wall.
To quickly repair such defects, you will need: a screw of a suitable size, a brush or a piece of foam rubber, a spatula, a vacuum cleaner, sandpaper and high-quality putty or alabaster, gypsum, satengypsum, isogypsum or some other types of building gypsum. Cement mortar with sand in a ratio of 1:3 is also suitable.
Sequencing:
- Using a screw of a suitable size (for the hole), moving it back and forth, slightly widen the channel of the hole for better penetration of putty or mortar there.
- Use a vacuum cleaner to remove plaster chips and dust from the hole.
- Using a wet brush or foam rubber, lightly moisten the hole so that the plaster does not draw water from the repair mortar so much. This will reduce its strength.
- Using a spatula, apply putty or plaster, thoroughly rub into the recess, and level the surface.
- When the repair area is completely dry, we clean it with sandpaper. Now you can try to paint this place to match the rest of the wall, or stick wallpaper, or use some design trick like appliqué.
Option 2.
The walls are the same, the hole is big
Why can such a hole appear in the wall? Perhaps from the socket box that has become unnecessary. Or because of caring friends who gave your child a young geologist kit. So, here I was already trying to hang an LCD TV and got carried away. How to repair a large hole in a wall?
The list of tools and materials from the previous section needs to be slightly supplemented. We add two positions: a large spatula and finishing plaster. If there are problems with plaster, any of the building gypsums that are already on the list will do just fine. How to fix a hole in the wall
Don't break the drywall! After all, it is difficult to repair
How to repair a hole in a plasterboard wall? The most useful section. After all, it is quite difficult to seriously damage a brick wall. But the drywall that is widespread today is very vulnerable and often suffers from the carelessness of its owners. Especially when they once again decide to rearrange the furniture and zealously get down to business. One careless movement, and the corner of some piece of furniture ends up inside the plasterboard wall. Let's hurry to help!
We will need: a hacksaw with a narrow blade, a pencil and a square, two spatulas, putty ( Vetonit ), reinforcing mesh, sandpaper, a wooden board, a piece of drywall, self-tapping screws.
Sequencing:
- Using a square and a pencil, outline the repair area in the form of a regular rectangle.
- Using a hacksaw, cut along these lines and remove the entire damaged fragment of the wall.
- Try on and refine the shape of the wooden plank. The width should be slightly narrower than the hole in the drywall. For ease of work, we screw a powerful screw into the center of the board, which we will use as a handle.
- Holding it by the screw, we insert the board into the cut hole, press it from behind to the surface of the drywall and secure it in this position with four self-tapping screws.
- The handle screw can be removed.
- From a piece of drywall, cut a rectangle in the shape of the hole and put it there. We attach them to the board with self-tapping screws, while we recess their caps into the drywall .
- We putty the edges of the patch and all the irregularities, apply a reinforcing mesh and rub it into the putty. Let it dry and sand it.
- Apply a second, finishing layer of putty on top.
- After the putty has completely dried, carefully sand the surface.
- We are proud of ourselves. We made it!
Source: https://stroitelinfo.ru/steny/kak-zadelat-dyru-v-stene
Eliminating Through Holes
Often, through cracks and holes appear in concrete structures after the transfer of communications and plumbing. The technology for filling a through gap is to alternately cover the hole with plywood or boards on both sides. First, filler is placed in the hole, after which concrete or gypsum mortar is applied.
Through hole in the wall.
If access to one side of the hole is closed, installation is carried out according to the following instructions:
- the area is expanded, excess debris, dirt and dust are removed;
- the opening is moistened;
- primer is applied;
- a support point for the filler is created using dowels and a concrete drill or self-tapping screws (4-5 holes for dowels are drilled in the concrete wall along the edges or self-tapping screws are screwed in);
- after installing the fastening, the empty areas are filled with filler (stones, polystyrene foam, crushed bricks or cloth soaked in the solution) and filled with the prepared mixture;
- the dried area is puttied;
- After hardening, the putty is rubbed with a fine-grained mesh or sandpaper to the level of the wall.
When using rags as filler, you need to saturate them with the solution. After this, the entire fabric is tightly placed in the hole and filled with a solution with the addition of small pebbles (this way the filler will be better compacted).
The concrete mixture is easily prepared with your own hands from cement and sand in a ratio of 1:3. Water is added until the solution reaches the consistency of thick sour cream. Ready-made mixtures are also diluted with water until a homogeneous mass is obtained. The technique for filling such holes is shown for both wet rooms and dry ones.
Advantages of using injection waterproofing
PVC pipes are filled with cement for sealing purposes. However, the adhesion rates of polyvinyl chloride and the solution are very low. This facilitates rapid washout of the sand-cement filler from the formwork holes under water pressure. Compositions for injection waterproofing are resistant to suffusion and are characterized by strong adhesion to wet and dry surfaces.
The cylindrical tubes remaining after removing the formwork are removed and filled with hydrophilic cushioning rubber or polyethylene foam to protect against leaks. After this, the holes are caulked with a non-shrink solution. The disadvantage of this waterproofing method is the difficulty of removing the tubes and uniformly distributing the material throughout the entire thickness of the wall, and its washability under high water pressure.
Polyurethane resins and acrylate gels are characterized by high adhesion to concrete, reinforced concrete, polystyrene, brick and other building materials. Injection is carried out without removing PVC pipes. The low viscosity of the solutions used for waterproofing formwork holes allows them to penetrate into the depths of the structure and strengthen the working surface from the inside.
The plugs used by GKNR act on the principle of a plug, swelling upon contact with water and filling the mounting hole. Rubber products with polymer components are suitable for sealing pipes with a diameter of 22 mm only. If the diameter of the formwork entry points is large, hydrophobic gaskets and cement putties are used simultaneously with plugs. When installing bushings consisting of tie bolts and EPDM rubber, holes are drilled in the walls to a depth of up to 50% of the thickness. This type of sealing is quite labor-intensive.
Injection waterproofing compositions are used to fill joints between floor slabs, technological seams of any size, thread-like cracks and PVC pipes without restrictions on indicators d. The depth of holes in concrete for injection of gels and resins is small due to viscosity comparable to the fluidity of water. There are no restrictions for the use of penetrating waterproofing in
- places where cable channels pass,
- air ducts
- communication pipes.
Liquid rubber and other mastics fill the formwork entry points without deep penetration into the pores of reinforced concrete and concrete structures. Injection sealants create a strong bond to the building material. The created hydrophobic membrane becomes part of the seams and other surfaces of the monolithic structure.
Repairing a breach with foam
Large holes, cracks and potholes in a concrete wall are sealed with polyurethane foam:
- The problem area is deepened and cleared of dirt and dust.
- The area is moistened with a sprayer for better adhesion of the foam to the surface.
- Before spraying, shake the foam canister and apply the product from bottom to top. The foam increases in volume, so the area is not filled to its full depth.
- After drying, excess foam is cut off with a sharp knife a little deeper than the wall level.
- The required area is leveled with the solution until it hardens completely.
- The patch is puttied and sanded after drying.
The foam has a high ability to penetrate into the most inaccessible and small areas. In 24-48 hours it fills the desired area, after which the excess is removed.
For repair work with potholes in rooms with low air temperatures, frost-resistant polyurethane foam is used. Restoration of deep seams, cracks and interpanel discrepancies requires the presence of a special device - a foam gun, which will provide better quality and ease of work.
The sequence of sealing seams with foam is no different from eliminating holes. Deep cracks and gaps are foamed in layers. After one layer has completely dried, the next one is applied. When working with polyurethane foam, you must be careful, as it sticks tightly to clothing and the body.