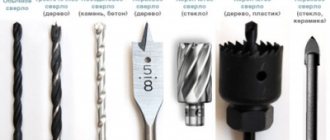
To attach a nail to concrete, use the following working accessories:
- A construction hammer, it must be at least 1 kg, and the handle must be quite long. The long handle will act as an excellent lever, and the heavy weight of the tool will facilitate the driving process.
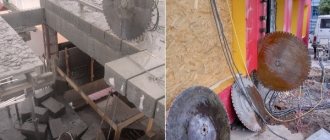
- Electric drill. The best choice in this case would be a tool with a pobedit or diamond drill.
Note. Choose a model with a hammer drill function.
- A carpenter's knife or any other sharpened knife.
- Wooden slats.
- A regular nail or a dowel nail. Dowels are special nails for working with concrete; they are made of a special type of steel. They are characterized by the presence of longitudinal or spiral notches. In addition, they end in a massive cap and are thicker than usual.
There are several types of dowels:
- round - the classic variety, most often used;
- grooved - they are used for driving into the heaviest concrete blocks;
- square - used to perform specialized work;
- flat - used for fixing small objects.
Fasteners using them are durable. They are made of hardened stainless steel, which means they are not afraid of corrosion and destruction.
Working with a concrete base without a drill
The process is complex and has nuances. To properly drive a nail into a concrete wall without an electric drill, you need to use the advice of experts:
- Mark the location with a pencil. Take it by the middle and place the tip at the desired point.
- Position it perpendicular to the wall. Apply 3-4 blows to the cap with a hammer.
- After this, the nail should penetrate the surface ¼ of its length.
- If you need to drive deeper, you should hit it a few more times. The cap and part of the stem will remain outside.
Attention! If you make a mistake, the rod will bend. This situation will arise when the nails were made from low-quality material.
The video contains interesting information on how to work with a wall without a hammer drill:
Construction of houses
How to hammer a nail?
It would seem that every self-respecting man should know the answer to this question.
But is everything really that simple, if every now and then you hear about split boards, falling off plaster, bent nails and injured fingers? Maybe there are still some rules, nuances and secrets for carrying out this “manipulation”? Let's try to figure it out.
Table of contents
- Every nail has its own hammer
- Basic secrets of hammering nails
- How to hammer a dowel into a nail correctly?
Every nail has its own hammer
The most common carpenter's hammers come in four sizes:
- MST-1 (handle – 25-28 centimeters, working part – 9 centimeters, weight – 250 grams) is intended for driving parcel and wallpaper nails (up to 40 millimeters long);
- MST-2 (handle – 30-32 centimeters, working part – 11 centimeters, weight – 500 grams) is intended for driving larger fasteners. The most versatile tool;
- MST-3 (handle – 30-32 centimeters, working part – 12 centimeters, weight – 800 grams) will cope with the same tasks as MST-2, it’s just heavier;
- MST-4 (handle - 35-37 centimeters, working part - no more than 13 centimeters, weight - 1000 grams) is intended for driving large (over 80 millimeters in length) nails, as well as dowel nails.
Of course, a wallpaper nail will fit nicely “into place” with the help of a fourth hammer, but it’s much more comfortable to work with a striking tool of adequate size for your purposes.
Basic secrets of hammering nails
- Start driving with gentle movements; proceed to sharp blows only after you are sure that the nail enters correctly. Hold the hammer by the end of the handle, while making blows, try to concentrate your gaze on the head of the product. Remember, the fewer blows a nail gets, the better and more reliable it will hold. Three or four wrist and two or three solid elbows should be enough.
- If you are working with wood, make sure that the diameter of the nail does not exceed a quarter of the thickness of the board. For a thin board, it would not be a bad idea to blunt the product - bite off the edge with pliers. The fibers will wrinkle and tear, but the wood will not subsequently split.
- To firmly connect two boards, you need to select nails in such a way that they can completely “penetrate” the first and enter at least a third into the second. If you drive fasteners at an angle to each other, the strength of the structure will increase even more.
- If necessary, lubricate the tip of the nail with wax or soap - the work will go like clockwork.
- It is not recommended to hit a large number of nails on the same line in close proximity to each other - the board will crack.
- For hanging joints, you can use a massive hammer as a support.
- To prevent a long nail being driven into hardwood from bending, it should be held with pliers close to the head.
- If there is a need to install fasteners close to the edge of the board, be sure to compact this place using a punch and a hammer.
- A punch can help to thoroughly deepen a nail into almost any surface for plastering - just place it on the head of the product and hit it with a hammer. If you use only a hammer for these purposes, you will not be able to avoid dents in the area.
- Before hammering a nail into a wallpapered wall, use a blade to make an X-shaped cut into the wallpaper. Carefully move the corners apart, install the fastener, and glue the corners.
- Before nailing telephone wiring, you must first pierce it with nails - in the middle, carefully, so that they do not touch the cores.
- Many craftsmen are often interested in how to hammer a nail by hand. It is impossible to drive a fastener into wood or concrete manually - this is obvious to any sane person. But in sand, earth or clay - very much so. The main thing is to be careful and perform manipulations confidently.
- An ordinary clothespin can help a “newbie” to protect his fingers from being hit by a hammer.
Technique for driving a regular nail
Hold with the thumb and index finger of your left hand. Place the tip on the marked spot. Typically the nail is placed perpendicular to the wall. To work with wooden bases, three blows of the hammer are enough for the rod to enter 30% of its length. When driving into a concrete or brick surface, it is worth considering that it goes with great difficulty and bends.
This problem also occurs among experienced builders. The reason is low-quality metal and the minimum thickness of the leg. Sometimes the nail breaks and bends because it hits the seal. A small diameter drill will help.
Attention! Often driving a long nail without a hammer drill will result in cracks in a wooden wall. To avoid this, you need to drill a small hole. If you first dull the tip with a file, you can be guaranteed to avoid splitting the wood. This happens because the natural material diverges to the sides and does not tear.
Professional approach to work
Pulling algorithm
A protruding nail disrupts the aesthetic appearance, so it must be removed or hidden. When removing old fasteners from the wall, your wits and ability to use power tools will come in handy.
It is often necessary to remove the remaining plastic casing in the wall without a metal rod. Experts advise doing this:
select the appropriate self-tapping screw of the required size for the sleeve (more about the types of screws for concrete), screw in three-quarters of the length, then loosen and remove, use a hand corkscrew to remove the dowel, carefully unscrewing it; if you cannot pull it out using the above methods, you should try cutting off the protruding parts with a knife, the rest hammer into the wall, drill out the plastic sleeve, selecting a tool of equal or larger diameter.
Before carrying out work, builders recommend assessing their feasibility. It is really necessary to think about pulling it out if you need to make a new hole nearby. For example, if you need to hang a new cornice in the same place, but the old fasteners do not fit.
The resulting depression, after you manage to remove the nail, will become large and will have to be sealed. To do this, you need to fill it with putty or plaster, apply a paint mesh, clean it, and level the surface with sandpaper after drying.
What to do if a dowel falls out of the wall?
The condition of the concrete does not always correspond to the required level, since low-quality mortar was used during construction. Interior partitions and window openings are made of material that, after decades, has become loose and free-flowing. In houses like this, nails fall out.
There are several ways to solve this problem:
The main thing is to adhere to the rules that ensure reliability and durability during operation: make additional reinforcement, select an element with dimensions larger than usual.
Choosing a quality hammer
Every man should know how to drive a dowel into any surface. The difficulties are due to the fact that the process has many subtleties. When choosing a hammer, follow the rules:
- Comfortable and practical handle.
- The hammer head should fit tightly so that it does not slip off during operation.
Advice! To drive in a dowel, a small MST-2 hammer is enough. This tool can work with nails up to 11 cm in length. It weighs 400-600 g. It is considered universal and should be in the home workshop.
Types of hammers
Step-by-step instruction.
1. Before driving a nail, check whether it is in “working” condition: there are no kinks or bends, or rust. If any, measures should be taken to eliminate these shortcomings.
The bent nail must be leveled with hammer blows, and the rust must be removed so that it does not subsequently spoil the surface into which the nail is planned to be hammered.
2. Next, you need to choose the right hammer.
If your nail is up to 4 cm long, then choose a hammer weighing 250 g. Larger nails require a tool that is twice as heavy as the previous one. Five hundred gram hammers are considered universal, due to which they are widely distributed in relevant stores. There are hammers weighing 1 kg. Such assistants are good for driving nails and dowels longer than 8 cm. We also note that with the help of a correctly selected hammer, the nail will penetrate dried wood better and faster (if, for example, this is what we are talking about).
3. Now you can begin the process itself.
How to drive nails correctly
There are some simple tips for scoring:
- When hitting, concentrate on the cap.
- The first blows should be weak. Move to strong ones when you are sure that the product is in the correct position.
- The tip of the nail can be lubricated with soap so that the rod fits better into the wall.
- If you need to drive a long rod, it is held close to the head with pliers.
- If you need to hammer into a concrete partition covered with wallpaper, you need to cut them slightly crosswise. Move the corners apart to position the rod correctly. At the final stage, glue the wallpaper.
Similar topics
How to sharpen a saw. Correct tips for sharpening saws
In this article we will tell you how to sharpen a saw and what to use it in the future. I even decided to write a brief principle of sharpening a saw, since the master did not express his thoughts quite accurately and, in my opinion, did not explain in detail the principle of sharpening and how to find the tooth we need. If you look at the saw,
Linear cable structures.
Linear cable structures (LCS) include cable channels, cable manholes (MCM), input channels, outputs to building facades and supports of overhead communication lines (OCL).
Foam for installation.
Polyurethane foam is a polyurethane foam sealant. This sealant is placed in specialized packaging - an aerosol. After the sealant is applied it begins to harden and its volume increases.
Sharpening and grinding tool
Sharpening and grinding tool
How to lay floor tiles in a hallway
There are few rooms as complex in their operational features as the corridor. The floor is subjected to especially heavy loads here. It is only necessary to finish it
Choosing a drill for personal use
Tips on how to choose a drill for the job
Using heavy duty dowels
Beginners need to learn how to drive a dowel into a concrete base using a drill. To do this, mark the location of the nail with a hammer or mark it. Then use a drill to punch the required hole.
Attention! The diameter of the drill must match the diameter of the dowel. Otherwise, it will not fit into the hole or will fall into it.
Instead of a hammer drill, you can use a drill. Remove dust with a vacuum cleaner.
Huge range of dowels
Remember the life hacks of the masters
If the dowel does not hold, you already know how to secure it. Choose the method that suits you best, or better yet, test several options on an inconspicuous area of the wall. Finally, we have prepared lifehacks from experts for you that will help you achieve better results. Take note!
It is better to drill loose materials in a non-impact mode or in a soft impact mode - if your hammer drill has one. The hole will be more accurate, without chips and the required diameter. As a tool, craftsmen recommend a drill with a pobedit tip. If there is a risk that the fastener cannot be secured in a large hole, it is better to take a drill 0.5 mm smaller than the diameter of the dowel.
After preparing the hole, remove dust from it . You can take a special brush or use a construction vacuum cleaner. It is especially important to do this with materials that crumble a lot. Otherwise, it will not be possible to strengthen the dowel well. For greater reliability, craftsmen suggest priming the hole. Apply primer using a cotton swab and let dry. This will prevent dust from forming inside and improve grip.
We hope our tips will help you choose the best way to fasten dowels in loose materials. May your renovation go smoothly! And you can buy fasteners on our website.
How to drive a massive nail into a plasterboard interior partition
Drywall is a soft material. It is important to ensure a reliable connection. To secure lightweight objects, use fasteners designed for this material. The workflow consists of three stages:
- A mark is applied with a marker.
- Use a drill to drill a hole of the required diameter.
- Insert the fastening element. For reliability, glue is used.
Special fasteners for plasterboard profiles
Weight and dimensions
Nails for metal and brick are most often produced to order, so their sizes are regulated not by GOST, but by TU. The table shows the most common parameters of concrete and metal nails for mounting guns.
| Name | Rod diameter, mm | Rod length, mm |
| 2,7*16 | 2,7 | 16 |
| 2,7*19 | 2,7 | 19 |
| 2,7*22 | 2,7 | 22 |
| 2,7*25 | 2,7 | 25 |
| 2,7*32 | 2,7 | 32 |
| 2,7*3 | 2,7 | 38 |
| 3,05*16 | 3,05 | 16 |
| 3,05*19 | 3,05 | 19 |
| 3,05*22 | 3,05 | 22 |
| 3,05*25 | 3,05 | 25 |
| 3,05*32 | 3,05 | 32 |
| 3,05*38 | 3,05 | 38 |
| 3,68*50 | 3,68 | 50 |
| 3,68*60 | 3,68 | 60 |
| 3,68*65 | 3,68 | 65 |
Application of professional tools
To work, you will need a concrete drill, a hammer drill or drill, a dowel, pliers, and a hammer. Select the drilling location carefully to avoid contact with electrical wiring. If the drill hits metal reinforcement, it may be destroyed. The drill will slip out of your hands, break or cause injury to the master.
Having chosen a place, anchor the concrete so that the drill does not go to the side. At the beginning, the tool should operate at minimum speed, the speed can be increased gradually. Then insert the dowel, removing dust from the hole.
Installation features and product prices
Nails for metal and concrete are hammered in manually extremely rarely.
- If the base is relatively soft - clay brick, for example, driving is done with a small sledgehammer or hammer weighing more than 1 kg. In this case, it is necessary to observe safety precautions: wear goggles or a protective mask to prevent the ingress of concrete or brick chips.
- If the base is highly dense or when metal work is to be done, it is necessary to use a special tool: gas, pneumatic, powder nailer. Nails for the device are supplied assembled into a clip, and the absence of any muscular effort makes fastening a simple matter.
Nails are most often sold in the form of ready-made clips of 10 pieces, in packs of 1000 pieces. The cost depends on the coverage and size. So, the galvanized version costs from 1230 to 2000 rubles. per package. Brass-plated fasteners for concrete will cost 2955–3599 rubles. per package.
Nails for concrete, despite the highest strength, are specialized fasteners, and besides, their cost is considerable. So it is irrational to use such nails to fasten the roof or sheathing.
The video below shows how to harden a screwdriver and nails at home:
When carrying out renovations in an apartment or installing various cabinets and shelves, you cannot do without using various types of fasteners. When it comes to reliable fastening in monolithic buildings, dowel-nails for concrete are often used. If installed correctly and the expected load corresponds to the characteristics of the selected fastener, they can reliably fix metal doors, various interior items and other hanging structures.
Briefly about the main thing
A dowel for masonry or concrete is a fastener made of steel or plastic with antennae, protrusions, and spikes. Basically, it expands when the hardware is tightened.
In brick construction, elongated fasteners are mainly used. Special nails are often secured in concrete. Products with a plastic element can be driven in with a hammer, and all-metal sharp fasteners are often installed with a construction gun. It cannot be installed by hitting a brick.
Manufacturers produce spacer, butterfly-shaped, facade, wide-threaded fasteners for aerated concrete and other types of fasteners. It is selected according to the material of the wall in which it is installed. The applied load is also taken into account.
The dowel is mounted into the previously created hole. It must have a depth no less than the length of the hardware. During installation in brick, an additional adhesive mixture can be used.
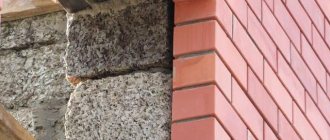
Brick wall
Brick is softer than concrete, but harder than wood; this material has its own characteristics that must be taken into account if you want to hang something on the wall:
- Choose a place - this must be approached carefully, since the bricks are attached to mortar, which can spill out from strong impacts. It is best if the nail goes into the middle of the brick.
- Carefully drill the holes - start at a slow speed, and then increase the speed when the drill reaches a depth of 1 cm.
- Carefully remove crumbs and dust from the hole - brick crumbles much better than concrete.
The hole is ready - you can proceed in two ways:
- drive the nail in immediately;
- insert the cartridge.
Actions with the cord
If you need to stretch a cord between the corners (during construction and repair work, for example), then follow a certain sequence of actions. First, tie nails and scraps of wire to a nylon thread, then insert them into the mortar seam (if it is soft, they will go in easily, if not, use a pick). You should not hammer the parts deep, as they will then have to be pulled out constantly.
The rod is chosen so that it can withstand the load of the cord. The element in the seam should not sit very firmly, which is why it is loosened.
Features of fixing fasteners in brick
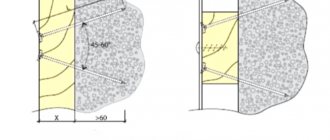
Experts note that fixing fasteners in masonry is more difficult than fixing a similar element in concrete. Although professionals quickly solve this problem even when installing structures with significant weight.
First of all, before fixing the anchor in the hollow brick, the exact anchoring depth is determined. It must be no less than or maximum equal to the distance from the corner of the building structure to the installation point.
In addition, qualified craftsmen often consider the minimum length of the screw used. To do this, fold the same size dowel and the sharp part of the hardware. The last parameter is usually equal to the diameter of the screw. In addition, the thickness of the mounted part is added to the obtained value.
The value obtained as a result of addition is rounded up. In this case, they are guided by standard lengths of hardware. At the end of the entire calculation, the required depth of the hole in the brick structure is determined. It should be greater than or at most equal to the length of the selected hardware minus the thickness of the attached part.
The depth of the hole in the brick must be no less than the length of the hardware used minus the thickness of the fixed part Source sdelai-lestnicu.ru
On a note! If you decide to use a dowel or nail for brick, then it is better to use it in a solid block. In hollow material it may adhere poorly or not at all. We are talking about a plastic dowel with pointed threaded hardware. It also has a cross slot.
A high-quality installation process for fixing dowels in bricks is as follows:
- A recess is created for fixing the fastener.
Important! To drill a recess, use a power tool without impact. Otherwise, the brick may crack or break off, especially if it is hollow. In addition, due to tool impacts, sometimes the recess is larger in diameter than the dowel used. After all, brick is a softer building material compared to concrete.
Brick and other similar blocks are softer compared to monolithic concrete Source sun9-24.userapi.com
- All debris is blown out of the created hole.
Advice! To more securely secure the fasteners in the recess, tile adhesive is additionally used. It is diluted in accordance with the instructions, which are always present on the packaging. Fill the hole as deep as possible with the mixture.
- Insert the element into the recess until it stops.
- Wait for the adhesive to cure. It hardens in about 24 hours.
- Screw threaded hardware into the dowel.
The screw or pin must fit into the installed fastener with force. If the element is not installed securely, then it will scroll. With high-quality installation, such fasteners can withstand significant loads.
This method of fixing a dowel in a wall is often used if the structure is made of hollow material. It is often used in foam blocks.