Whether you are going to move to a new building or, on the contrary, are renovating an old house, sooner or later you will have to face the problem of ceiling defects . How to fix a hole in the ceiling? We will look at the most typical cases and suggest solutions for them.
A familiar problem, isn't it? Let's look for possible solutions.
A familiar problem, isn't it? Let's look for possible solutions.
Here is a list of reasons. Of course, this is far from complete: here is only what the author has encountered:
- Falling plaster. It may be the result of flooding, destruction of the surface by a fungus, or simply poor quality plastering of the surface.
Advice: falling plaster is possible even when using high-quality modern materials. To prevent this problem from affecting you, remember: the layer of plaster should not be thicker than five centimeters ; if the thickness is more than 2 centimeters, the plaster is applied in at least two layers with mandatory laying of reinforcing mesh.
- Cracks between floor slabs. They are rarely deep, let alone through; however, this fact does not solve the problem.
- Destroyed cement plugs in communication openings. Openings are left in the floor slabs for heating, water supply and sewage risers. Cyclic heating of hot water supply risers, condensation or leaks of risers gradually destroy the mortar with which builders seal these holes.
- Alternatively, a hole may appear when replacing risers .
Here the ceiling was destroyed for many years by moisture and fungus.
- In the case of a suspended structure, a hole in the ceiling may appear simply due to negligence when moving large objects . Breaking a plastic panel or gypsum board is not that difficult.
- Finally, we also include the need to seal various cracks when installing suspended structures . First of all, the joints between the ceiling and the walls.
What to do if the hole is big?
All these methods are only suitable if the hole size does not exceed 15 centimeters.
Otherwise, the canvas must be completely changed. Here you can’t do without replacement with the help of a professional craftsman who will install a new stretch ceiling. If possible, contact specialists from the company that installed the previous coating. They may be able to replace only part of it using the same materials.
Fixing holes in a suspended ceiling is not as difficult as it might seem at first glance
But it is important to always remember safety rules and not skimp on materials for repairs.
��������� �������� ������� ��������
����� �����, ������ �������� � ���������� �������������, ���������� �� ��������� ������������ ���������. ����� ��� �������� � ������ ������������ ����� �� �����. ������� �������������� �������� �� �����������, ����� ��� � ����� � ������� �� ����� �������.
� �������� �������� �� ������������, ���� �� ����� ����� ������� �������. ������� ������� ��������� �����, ����� ���� �������� ����� ��������, ���� ������ ������ ������������ ��� ������������� ���������� �����������.
� ��������� ����������� ��� ����� ������� �������. ��������� ����� ��������� ������� �������, � ������, � ������� ��������� ����� ������� ���������. ���� ��� ������ ����� �� �������, �� ����� ������ ���������� �������� � ��������� �����������, � ������ ������� ���������� ����.
� �������� ������������� ���������, �������� ����������. ��� ������, ��������� �������� ������������ ������� �� ����� � �������� �������, � ����� � ���������� ��� ���������� � ���������������� ����������.
����� ����������, ����� ��������� ��������� ���������� ���������� ��� �����������.
���������� ���������� ������� � ��� ����, � ��������� ������� �� ������� ���������. �� ��������� ���������, ����������� ����� ���������� ������� ��� ����������� ������, ��� ��������� ������� �����������. ��������� ��������� ���� ������.
Small cracks
Sealing small cracks is not a lot of work, but it requires thoroughness. Even if only spot puttying is required, it must be done competently, without neglecting the details and not limiting ourselves to masking imperfections.
The sequence of actions is as follows:
- Anything that crumbles, chips, or peels off must be carefully removed. In some cases, until the concrete layer is exposed. The edges of the crack must be perfectly clean. Here you will need to actively work with a spatula or even a wire brush. Remove dust with a dry brush.
- The prepared, cleaned surface is moistened with water. Spraying is preferable to brushing.
- Application of gypsum mixture. It will not stick to a dry surface due to low adhesion, which is why it is necessary to moisten the repaired area well. The putty is applied with a small spatula along the entire length. The movements are smooth, with pressure. The main thing is that the putty fills the entire crack. It is advisable to avoid it falling on the floor; it is difficult to remove dried material, so there is no need to take a lot of it on a spatula. The finished mixture contains PVA, which makes the composition quick-drying. Therefore, when working with him, you cannot hesitate.
- The putty layer must dry for at least 24 hours.
- Leveling the surface until smooth. For this purpose, a skin or a grater is used.
Useful information: “How to putty the ceiling yourself”
If the cause of cracks is falling off plaster or peeling of paint material, it is practiced to seal the defects using primers. Before applying the putty, the cleaned area is primed in 1-2 layers (the first layer must be completely dry). The best choice is a deep penetration primer. It is required for wet rooms and ensures the quality and reliability of the putty fastening.
Types of primer
To do all the work better, you also need to understand the materials used. Construction stores have a wide selection of primers, varying by brand, quality, type and form of use.
Let's look in more detail at which primer is suitable for sealing cracks in the ceiling.
Primer types:
- Acrylic - used for surfaces such as concrete, wood, brick, cement, chipboard and fiberboard, fiberglass, plaster. This primer is ideal for priming cracks from the inside.
- Water-based primer - used for final surface treatment. In our case, this primer option is suitable for diluting water-based paint when finishing painting the ceiling.
- Alkyd primer is one of the most durable types. Used on tiles, fiberglass, glass and galvanized steel.
- Mineral-based primer - used when working with brick, concrete, gas silicate and expanded clay concrete blocks. It is made on the basis of lime, cement and gypsum.
The primer is also divided into types based on the purpose of its use:
- Primer paint – made from drying oils and resins, used for painting highly absorbent surfaces: wood, metal.
- Moisture-resistant primer - used on surfaces that are susceptible to moisture penetration.
- Anti-corrosion primer – used on metal surfaces to protect against corrosion.
- Deep penetration primer - used in cases where it is necessary to strengthen the base; in our case, it is suitable for sealing cracks. It also penetrates deeply into the material, so it is also great for filling holes.
- A primer with antiseptic properties - it contains special additives to combat and prevent mold and mildew.
- Quartz primer - used for decorative purposes, it contains sand, which after application creates an ideal beautiful rough layer on the surface.
The primer can be used in combination with various additives. For example, some people mix it with PVA glue, which is just one way to seal cracks in the ceiling. And also later they add it to the paint and paint the ceiling. Based on this, the primer can still be classified as follows:
- under enamel;
- under water paints;
- universal;
- special.
Primers for enamel and water-based paints are used specifically before applying enamel or paint to them. Due to the special composition, the applied material adheres more reliably to the primer.
Universal primers are used for almost any ceilings and materials. With its help, you can achieve reliable and durable repairs, and its universal consumption will help you save money.
Special primers include:
- emulsion primers with acrylic copolymer. It is used when priming old, loose surfaces.
- Latex strengthening primers are also good to use on old porous surfaces. It combines well with cement. It is also used for further tiling.
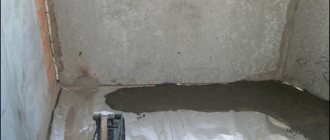
Small potholes
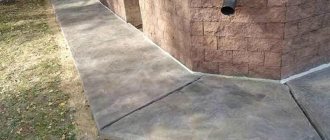
Concrete floor laying diagram.
As with traffic holes, potholes are quite common in concrete. Typically, the reasons for their appearance can be various construction works, such as drilling or blows with a sledgehammer. Also, the appearance of small potholes can be caused by a violation of the isotropy of the material or painting the wall along the cracks.
Small potholes are sealed using the same algorithm as sealing plug holes.
The pothole is treated with water with the addition of a primer, and then covered with a repair compound, gypsum or plaster with a spatula. If necessary, a dried pothole can be sanded with coarse sandpaper with a grain size of 80-100.
How to fix cracks in a floor slab
If the cracks are not deep and do not pose a danger to the ceiling, ceiling repairs are carried out in the traditional way using a plaster mixture. The situation is worse when the reinforcement of the floor slab is damaged inside, and the slab is bent, and ordinary fiber-reinforced concrete is not enough. Then reinforcement is the only possible solution that will restore the integrity of the floor and extend the service life of the base ceiling. Such work will have to be entrusted to professional builders.
The repair includes sandwich reinforcement, in which a layer of reinforcement is applied on both sides of the floor slab. The reinforcement is selected with a cross-section of 8-15 mm, depending on the calculated load. The number of layers of reinforcement depends on the thickness of the ceiling: up to 150 mm one layer is sufficient, above this value two layers are laid.
When the first layer of reinforced mesh is laid, the surface is filled with cement mortar. A second reinforcing layer is laid on the cement layer.
When performing ceiling repairs, it is necessary to pay attention to the presence and elimination of defects. Even a seemingly small crack will become a global problem and lead to unpredictable consequences if it begins to grow deep into the floor slab
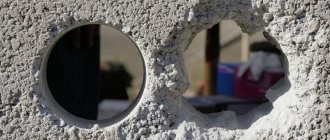
How to repair a hole in a concrete wall
First, let's look at how to repair a hole in a concrete wall. Let's come closer to our wall and take a closer look at it:
Scary, nothing to say. When you completely remove the wallpaper and remove all the excess, this is what it will look like. Everything must be removed down to the concrete. White spots on the wall may remain if these are pieces of stubborn old putty or glue that have already grown together with the concrete and cannot be intensively cleaned.
In a separate article, we discussed in great detail and step by step how to prepare a wall for wallpapering. In the worst case scenario, deep holes will have to be repaired in it, and then it will need to be plastered (Lesson 1) and putty.
How to fill a big hole
After the very first intensive treatment of the wall, which is described in detail in this article, holes of a very different nature may form on it. Let's go to the corner of the wall:
When we beat off the old crumbling plaster, pieces of cement fell off along with it. Moreover, in old buildings, if you touch it, all the cement will fall out. I’ll say right away that what crumbles easily, beat it off in any case!
Well, in the end, in the very corner, from the ceiling to the floor, a long hole appeared! What to do with it? How to repair holes of this nature? You can’t just plaster it, because the hole is deep enough and the plaster will gradually crumble. It is in these cases that foaming is a good option. That is, we take polyurethane foam and pass it along the entire seam.
Here is a detailed video tutorial on working with polyurethane foam and sealing such a hole.
I ASK FORGIVENESS IN ADVANCE. In the video tutorial, a mistake was deliberately made so that readers would guess what was going on (there was such a competition): foaming, of course, is done from the bottom up, and not vice versa, as shown in the video. But, unfortunately, this video tutorial was not re-shot as needed. Therefore, everything in the video is correct, except for this nuance:
And this is what polyurethane foam looks like. In fact, there are a lot of types of foam on the market today, and here is one of the options:
Now let's move on to another part of the wall and see a fairly large chip on it:
Deep chips cannot be plastered (too deep) or foamed (there is nothing for the foam to hold on to). In this case, such a wonderful tool as a repair composition comes to the rescue:
The packaging shown here is in polyethylene, but there is also paper packaging. Repair composition is a special fast-hardening and very durable cement mixture intended for repairing deep chips in walls, concrete floors and other concrete structures.
Watch a detailed video tutorial on working with repair materials for filling large holes:
How to repair small chips
We just have to consider the case when you assessed your primed wall and found that it is smooth, and there are only small chips and roughness not exceeding 5 mm:
How to repair a hole in the wall in this case? The answer is simple - ordinary putty will do:
A separate article describes in detail how to putty a wall (and this, accordingly, is suitable for the topic of repairing small chips).
�������
������ �� ������� �� ���� ����������� �����, ��� ��������� �� ������ ���. ��� ����, ����� ������������ ������� ���� � ���� ��� �� ����� ���������� ���������, ����� ���, ��� ���������� � �� �������, ���������� �������� ������� ��������� ����.
���� ���������� ����� ����������, �������� ��� ����� �������������� ��������, �������������� ��� �������. � ���� ������, ����� ����������� ��������� � ��������� �������� � �� ��� ����� ������� �������� ����������� ���������� �������� � ���� ������ ��� ���������� �������� ��� ���������� ���������.
������ �������� �������� ����� ���� ��������� ����� � ��������. ���� ����� ��� ����� ����� ����� �� ������� ������. ��������� ������ ����������� ��������� ����� ���������� ��� ��������� �������� �� �����������.
����� ������� ���� ����������� ��������� ���� ����� ����� �������� ��������. ���� �������� ���������� ������� �� � ������� ���� ����� 5 �����������, ����� ������� ����������� ���������� �����. ����������� ������� ���� ���������� ����� ������ � ��������� �������, � ������������ �������������� ���������� ����� ��� ������ ����������.
�� ����, �������� ��������� ��� � ����������� ����������, ����� ����� ������� ����� �������, �� ������� ��� �������. ������, ����� ����� ����� � ���� �� ������� �������� ������� � ���� �� ��� ����� �������.
��������� ������ ����� ����� ��� ����� �������� ������������� �������� ��������. ��������, ��� �������� ����� �� ������ ���� ��� �������.
��������� ��������� �������� ������������� �����, ����� ����� ����������� �������� ���� ������������� �������� �������. ��� ����� ����, ��� ������� ��������������� �������, ��� � �����������, ��������� �� ��������� ���������, ��������� ������ ��� ����.
Recommendations for performing cosmetic repairs
Apartment owners often have a question: how to cover up cracks in the ceiling? Experts recommend paying attention to two types of putties: starting and finishing. If the gap is deep, it is first filled with starting material, and then the finishing one is laid.
If the gap is small and barely noticeable, finishing will suffice.
This recommendation is also the answer to the question: how to cover cracks in the ceiling before painting. In this case, the materials proposed above are used. A small crack on a plasterboard ceiling can be repaired in a similar way and using the same types of putty.
When eliminating cosmetic defects, it is important to properly restore the integrity of the facing layer. It is not always possible to find paint or composition for whitewashing of the same shade
Additionally, the base finish may already have faded or otherwise changed from its original color. In this case, you will have to perform the entire complex of finishing work again.
Possible solutions to the problem
The easiest way to solve problems is with suspended structures consisting of individual decorative elements.
Here it all comes down to replacing the damaged part with a new one. No additional actions are required, except perhaps a trip to the store for a new part. Repairing plasterboard coverings will also not be a very big problem. Having found out the reason for the hole, you can either replace part of the coating, or simply re-plaster or putty the ceiling surface.
With concrete planes everything will be much more complicated. It is much more difficult to destroy such a foundation, which means that the reason for the appearance of the hole is much more serious. If it is just a flood from neighbors, then it will be quite enough to clean and dry the surface, and reapply the finishing layer.
With major damage to the plane, you will have to tinker. First, you need to clean the damaged area from dirt and finishing residues, and then treat everything with a primer and antiseptic impregnations.
After drying, you can carefully fill the recess with putty or plaster. Putty must be applied in at least two layers, with each layer drying until completely dry. After finishing the putty, the surface must be treated with sandpaper or a special grater to obtain a smooth surface. The last layer of paint is applied.
Restoration of stretch ceiling
Before you start filling a hole in a fabric ceiling, you need to determine how big it is. Small slits can be sewn up using strong nylon threads. And if a large hole is formed, then you will need a suitable piece of fabric. If you don’t find such material in the house, it doesn’t matter.
In order to seal a hole in a fabric ceiling, it is better to use instant glue. The smeared patch should not be pressed too tightly against the ceiling, otherwise the glue may protrude beyond the edges and ruin the appearance of the entire ceiling.
If the place where the plaster is applied is damaged, then the damaged area can be easily replaced with plasterboard. Serpyanka is applied to the insert, and then the area is covered with putty.
Repairing slits and unraveling seams
If a hole in the coating was formed as a result of a cut, that is, it has smooth edges, it will not be difficult to eliminate it without a trace. The same applies to the separated seams between the canvases.
The seam of the canvas has come apart
To work, you need double-sided tape, a roller and a primer.
Step 1. The edges of the canvas are slightly turned to the sides and dust and accumulated debris are cleaned out.
Step 2. The rough base is primed and dried.
Step 3: Place double-sided tape into the gap and attach it to the base along the seam.
Gluing double-sided tape
Step 4. Remove the protective coating and press the edges of the linoleum, then iron it with a roller.
If the edges of the linoleum do not meet tightly and a gap of 1-2 mm remains, you need to additionally process the seam using A-type cold welding. After this, it is almost impossible to detect the slot, and the coating will last for many more years.
How and with what to repair a hole in a suspended ceiling with your own hands?
Many apartment owners are faced with the phenomenon of holes in the walls or ceiling. This situation especially often manifests itself during preparation for renovation, when, after removing the wallpaper, holes are discovered in concrete floors, or when entering new buildings that completely require finishing. Filling holes in the walls and ceiling is an important part of the complex of preparatory work, after which you can begin finishing work: laying tiles, gluing wallpaper, painting or whitewashing the ceiling.
Diagram of holes in a concrete floor.
Holes in concrete walls can appear for various reasons, which also determines the method of sealing them.
Causes
Whatever the size of the hole that appears, it appeared for a reason. In order to subsequently protect yourself and your home from such unpleasant surprises, before you begin to seal it, you need to find out the reason for the hole.
If part of the plaster crumbled, the cause could be poor-quality material used in finishing. In this case, it is worth carefully inspecting the rest of the coating - it may show signs of further destruction of the coating in the form of cracks or partial shedding or delamination of the material.
The second reason for shedding could be moisture getting into the material. Most often, the fault here will be a flood from the neighbors above. A sign will be a characteristic change in the color of the plaster or the appearance of streaks on the surface.
A very thick layer of applied material can also cause shedding. If the finishing technology is violated and a layer of more than 5 centimeters is laid, this phenomenon occurs quite often. Thick layers of plaster can be applied only in several stages, with the obligatory use of reinforcing mesh or other materials.
Not less often, the reason for the appearance of holes in the surface of the ceiling can be a crack between the slabs of which it consists. Typically, such a hole will be in the form of a not too deep crack and runs along the seam between the slabs.
Repair work can be another cause of such defects. This is especially true for work on replacing pipes or risers.
The last possible cause of holes may be damage to the outer layer of the decorative coating of the ceiling. This can be either finishing with plasterboard sheets or a surface assembled from hanging elements, like cassettes or slats.
How to seal a through hole in the ceiling and on the loggia?
Repair
- 2015-09-03
- Author: Foreman
Anything is possible, when making repairs you can drill into the wall, for example, to a through hole or if the house was just built (builders can often leave through holes around pipes).
This can also happen spontaneously - rearranging old furniture, replacing pipes, installing various hanging equipment.
It’s not even a matter of reason, but a quick and less financially expensive way to seal the hole.
It’s easier and much more economical not to call a team of workers (when a lot of money will be spent and the quality will be questionable) to do everything yourself, so you will be completely confident in the quality of the work done and will not be afraid to step on the places of the former holes (if they were on the floor).
How to repair a through hole in the floor
Fixing a through hole is of course more difficult than the same pothole, but it is quite possible. To do this we will need to make formwork and reinforcement.
Sequencing:
It is necessary to chip away at the edges of the hole so that it tapers towards the bottom (cone) (in this case the “plug” will not fall out of the concrete).
Cut out a piece of plywood (necessarily larger than the hole itself), attach it to the bottom and fix it. You can attach it using spacers, you can make a reinforcement and tie plywood to it.
Fill the hole halfway with cement mortar.
Then lay reinforcing mesh on top (or thick wire and tie it together).
Fill the remaining part of the hole with cement mortar.
How to repair a through hole in a concrete wall
Holes in walls can be seen in several sizes:
- Inconspicuous (for example, unsuccessful driving of a nail or drilling);
- Large through hole.
Inconspicuous hole
Before carrying out work, you need to remove debris (remnants of wallpaper, pieces of concrete) and clean the hole from dust (with a regular vacuum cleaner).
Sequence of work:
- Using improvised tools, we slightly widen the hole.
- We remove dust with a vacuum cleaner.
- We take a brush, lower it into the water and moisten the edges of the hole with water (so that the plaster does not absorb moisture from the applied solution).
- Using a spatula, apply the cement mortar, trying to rub it as deep as possible.
- We wait until the solution dries completely.
- Sand the surface with sandpaper.
- After all the work, this place can already be painted or wallpapered.
If the hole is larger, then the sequence is the same, only you need to take a large spatula and you can put the brick deep.
Large through hole
- Ideally, you need to have access from two sides (for example, if this hole is between your rooms).
- But if you do not have access to the other side (it is located on your neighbors’ property), you can still solve this problem.
- Sequencing:
- We take a drill and use it to drive 4 strong dowels deep into the wall (they will serve as a support for bricks or stones).
- We use a brick or a piece of stone (depending on the size of the through hole), making sure that it completely covers the hole.
- We fix the brick or stone inside with cement mortar
- After this, we take putty or gypsum mortar (or you can take the same cement one) and cover up the marks and unevenness.
- Sanding the edges.
If you have a through hole at the junction of the plates, then it is better to use polyurethane foam followed by putty instead of cement mortar (it crumbles).
In general, there is nothing complicated here, even a person who is far from repairing can cope with this (although the size of the hole is directly proportional to the complexity of its repair) everything is absolutely real.
How to make an almost invisible hole?
In order to seal such a hole, you can use any of the above materials, depending on your capabilities and the expected result.
Before you start, you need to prepare the following materials and tools:
- a long nail or something similar - you need to increase the diameter of the hole in the wall so that the material with which you will seal the hole penetrates better into the base
- vacuum cleaner – remove excess dust
- brush and water – use a damp brush to treat the hole to improve the quality of work
- repair mortar – directly for filling the hole
- spatula - for applying repair mortar
- sandpaper - for final processing of the result
If the hole in the wall is large and deep enough, your efforts will be needed much more.
After standard cleaning of the hole from dust with a vacuum cleaner and a damp brush, you need to seriously consider the issue of choosing a material. Most often, specialists use several finishing materials at once - for starting and finishing work separately. For example, construction foam is covered with finishing putty on top.
If, after the finishing material has dried, cracks appear in it, they need to be covered up again.
If the hole is quite impressive in size, then you can place a piece of brick or other material in it, and then seal it with a building mixture. This will significantly reduce the cost of finishing materials and save your time.
Universal methods for repairing suspended ceilings
The simplest method, suitable for repairing both fabric and PVC sheets, is to glue some kind of applique over the damage. The use of reflective and luminous decorative stickers is very popular. They are available in a wide variety. You can also make stickers yourself from a suitable material (Oracle, etc.).
A single decor may look a little strange, so it is advisable to stick several applications on different areas of the tension surface. The result is a holistic, beautiful composition, the theme of which is selected depending on the purpose of the room.
Ways to fix holes in the ceiling
When looking for solutions to the question of how to fix a hole in the ceiling, you should take into account the type of ceiling structure. The question of how to repair a hole in a cassette-type ceiling can be solved very simply, just replace the damaged cassette
Elements of this design are inexpensive and are sold in almost all hardware stores. If it is not possible to purchase the necessary element, then you can put a lamp or ventilation grill in this place. In addition, you can replace not just one damaged panel, but several elements, creating a pattern of slabs of a contrasting color
The question of how to repair a hole in a cassette-type ceiling can be solved very simply; just replace the damaged cassette. Elements of this design are inexpensive and are sold in almost all hardware stores. If it is not possible to purchase the necessary element, then you can put a lamp or ventilation grill in this place. In addition, you can replace not just one damaged panel, but several elements, creating a pattern of slabs of contrasting colors.
Damaged polyvinyl chloride panels are more difficult to replace, but in this case it is possible to do the work yourself. If such a situation arises, it is necessary to dismantle several panels due to the peculiarities of their fastening.
Features of damage
A stretch ceiling avoids disappointment and remains flawless for many years. True, a hole may appear on such a ceiling. The reasons for its appearance can be very different: a champagne cork that unexpectedly “shot out” at the festive table, a toy with a sharp angle thrown high by a child (as well as darts, children’s pistols and arrows), the installation of a lamp or curtains. Unfortunately, electrical wiring and electrical appliances can also cause damage to the stretch ceiling.
Sometimes it seems that a small hole will not do much harm, especially if it is not located in a visible place. Be careful: repairing even minor damage to a stretch ceiling is mandatory , because over time the fabric or PVC film at the break point will sag and the size of the hole will increase.
What to do? Of course, don’t panic and remember that most often you can fix the hole with your own hands. According to reviews from the owners of premises with suspended ceilings, almost all of them have encountered a similar problem at least once.
Repairing cracks in floor slabs
There are situations when, when removing worn plaster from the ceiling, cracks are found directly in the floor slabs. Such damage may be a signal to take more serious measures than cosmetic sealing of cracks, so let’s take a closer look at how to repair a crack in a ceiling slab, and whether it is possible to do it on your own.
The formation of a crack in a reinforced concrete structure indicates a release of stress that has accumulated in this place due to various factors. The occurrence of cracks is caused by tensile forces arising in the structure from the total impact of internal processes in the product and external loads on it.
According to SNiP 2.03.01-84* “Concrete and reinforced concrete structures”, cracks with identical parameters may be allowed on one type of reinforced concrete products, but not allowed on other structures. Let's consider the situation with floor slabs in order to guide us in assessing the possibility of repairing them on our own.
In addition to the shrinkage (hairline) cracks described above, there are also the following types of cracks:
- technological - from temperature deformations or insufficient vibration when pouring concrete into a mold, uneven prestressing of reinforcement, resulting in delamination of the finished product;
- deformation – mechanical damage during transportation, installation and operation.
Cracks in monolithic reinforced concrete floor slabs, with the exception of hairline cracks, are very rare. But, even if they appear, if the width of the cracks in the ceiling is up to 2 mm, they are simply sealed independently with a cement solution using a construction syringe - to prevent moisture from accessing the reinforcement.
Hollow and multi-hollow floor slabs are more susceptible to cracking and require more careful inspection during production.
Small longitudinal cracks on them are acceptable and must be sealed with cement mortar.
If there are transverse cracks on the slab, then it is necessary to carry out a construction examination of the floor by specialists, since such damage is serious and may require strengthening or replacing the entire concrete element, which cannot be done by the residents.
To determine the dynamics of a longitudinal or diagonal crack, use the installation of control beacons; they can be made with your own hands from a strip of paper or a plaster lintel indicating the installation date (a paper beacon is less accurate).
After sealing small cracks in the slab, the ceilings are primed, puttied and painted, as after sealing cracks in plaster.
Technology for sealing holes in concrete ceilings
Minor cracks in the base do not interfere with the installation of some types of ceiling coverings, but a large hole in the ceiling and voids at the junction of the wall and ceiling surfaces require repair because they cause heat loss in the room. When installing a stretch ceiling, such defects lead to bulging of the coating due to the injection of air through holes and cracks into the ceiling space.
Depending on the size of the hole, location and depth, a suitable repair composition is selected. Starting putty, cement-sand mortar and polyurethane foam are suitable for these purposes. The easiest way to carry out the work is to use putty.
Depending on the components, the following mixtures are suitable:
- Cement-based putties are used to repair holes in concrete floors. They are used indoors and outdoors. The solution is resistant to moisture, it is very durable, but takes quite a long time to dry. The main disadvantage of cement putty is its low plasticity, which is why the ceiling becomes covered with cracks. For this reason, after repairing with cement mortar, the base is puttied with a finishing mixture.
- Before filling a large hole in the ceiling, buy gypsum putty. It is quite plastic, so after applying a thick layer it does not crack. Its disadvantage is that gypsum does not tolerate conditions of high humidity and temperature fluctuations, therefore gypsum putty is intended for use in a heated room with normal humidity.
- Acrylic compounds are resistant to high humidity and allow you to obtain an even and smooth surface. They are usually used for finishing leveling, so they are applied only in a thin layer and are not suitable for repairing large holes. In addition, acrylic mixtures are not cheap.
From the above, we can conclude that finishing acrylic putties are used to fill minor defects, and only mixtures based on gypsum and cement are suitable for repairing large holes and cracks.
If there are through holes in the ceiling, then putty is not suitable for sealing them, because it does not provide proper tightness. In such a situation, polyurethane foam is used. It comes in one-component and two-component types. The latter is used only in conjunction with a mixer. The foam adheres well to concrete surfaces.
Due to the significant coefficient of expansion of the foam, all holes and cracks are reliably sealed. After hardening, the surface density is ensured. Since the mixture is supplied under pressure, it is convenient to fill narrow and deep defects.
Cement-sand mixtures adhere well to the concrete base, so they are also suitable for ceiling repairs. They are distinguished by their strength, durability and resistance to sub-zero temperatures. Under any conditions, these compounds retain the stability of their characteristics. When adding antiseptic components, repair compounds protect surfaces from damage by mold and rot. The repair composition consists of a mixture of cement (1 part) and sand (3 parts) with the addition of water.
Required tools and materials
Before covering a hole in the ceiling, prepare the necessary supplies and tools:
- Sander;
- sandpaper;
- ladder;
- vacuum cleaner;
- narrow and wide spatula;
- silicone sealant;
- paint brush;
- screwdriver;
- polyethylene film;
- long nail or kitchen knife;
- brush;
- primer;
- cotton fabric (small piece);
- deep penetration soil;
- serpyanka
Solutions options
Let's touch on the simplest cases first.
In cassette ceilings of all types, sealing a hole in the ceiling comes down to replacing the damaged cassette. Decorative panels cost from 50 rubles apiece and are sold in all cities, so wasting time on attempts at repair is simply impractical.
Can't find the same panel? Place a raster lamp, ventilation grille or any other element of suitable size in its place. As an option, replace not one, but several slabs with cassettes of a contrasting color, creating a simple pattern.
Didn't find a panel of the same color? Put another one. Or several others.
It is somewhat more difficult to replace a damaged fragment of a ceiling made of PVC panels. Due to the method of their joining, it will be necessary to dismantle part of the decorative ceiling from the last panel fixed to the defective one.
However, if the solution here is prompted by simple logic, then to solve other problems a small amount of experience is needed.
The junction of the ceiling and wall
How to seal the gaps between the ceiling and the wall in the case of a plasterboard ceiling?
- The edge of the plasterboard sheets adjacent to the wall is trimmed: half the thickness of the sheet is chamfered at an angle of 45 degrees.
- The seam is puttied with gypsum putty and sanded.
- The joint is bandaged with paper tape and PVA glue.
How to seal the gaps between the wall and the ceiling if we are dealing with a concrete floor and a plastered brick wall?
- Expand the gap along its entire length to 5-10 millimeters.
- Prime it with concrete contact or its equivalent. The tool is a brush.
- Having filled the gap with gypsum or acrylic putty, press sickle tape into its surface and level the corner with a spatula.
- After the putty has dried, sand the surface.
Finally, you can get around the problem by gluing the ceiling plinth.
Falling plaster
How to fill a hole in the ceiling left after the plaster fell?
The obvious solution is to simply cover the recess with putty. However, the simplest method is not always the best.
It's more correct to do this:
If the ceiling in the defective area is affected by fungus, treat it with an antiseptic primer.
Tip: You can use any chlorine-containing bleach instead.
- Then we prime the hole and the area around it with primer. It will strengthen the surface around it and improve the adhesion of the putty.
- We putty the ceiling defect 2-3 times, allowing the layers to completely dry.
- We sand the leveled ceiling and re-prime it.
Crack at the joint of panels
How to remove a gap in the ceiling that appears between the floor panels?
- Armed with a hammer and spatula, we completely remove the seam seal. We break the plaster and pull it out in small pieces.
- Then the procedure is standard: prime; putty; glue with serpyanka; putty again; sand and reapply primer.
Before sealing the crack, it will have to be widened.
How to remove a gap in the ceiling if there is no gap between the slabs? In general, this is rather an exception; however, this type of flooring also occurs.
The solution would be the same sizing with sickle. Of course, with a preliminary primer and subsequent putty. In some cases, it may be a good idea to cover the entire ceiling with reinforcing mesh.
Holes near risers
How to repair holes in the ceiling formed after replacing risers or as a result of chipping of wet mortar?
Narrow (up to 5 millimeters) cracks around pipes can be easily sealed with silicone sealant
It is plastic and will not interfere with the thermal expansion of pipes; In addition, the sealant holds the temperature well, which is important in the case of hot water supply and heating risers.
Large holes are somewhat more difficult to seal: simple reinforcement is done (you can simply space several welding electrodes); then the hole is foamed with thin layers in two to three steps; after drying, the foam is cut 5 millimeters above the ceiling level; then the surface is puttied. In a dry room - with plaster, in a damp room - with acrylic putty.
As a result, we get a smooth ceiling for painting.
Dismantling floor slabs Openings in floors
Expansion of a monolithic floor with reinforcement from 27 channels
Partial dismantling of the floor slab. The channel is placed under the walls.
Installation of reinforcement of the floor slab according to the project
Reinforcement of the floor with 24 channels according to the project
Dismantling of the floor slab with reinforcement according to the project (1)
Partial dismantling of the floor slab with reinforcement according to the project. (2)
Dismantling of the floor slab with reinforcement according to the project (2)
Dismantling floor slabs on the first floor
An opening with reinforcement in a monolithic 20 cm ceiling according to the project. Cutting with a wall saw as close as possible to the wall 3 cm, after which, at the customer’s request, knocking down the side with a jackhammer.
Expansion of the monolithic ceiling by 20 cm, increase in the flight of stairs. The project requirement is to preserve the lower reinforcement.
Holes are drilled for the opening and preparation for reinforcement of the floor begins. Four heels are placed on a non-shrinking mortar and secured with anchors.
The reinforcement units are assembled below and all dimensions are checked.
Racks are placed level
The nodes are assembled on the columns. The I-beam with the overlap is wedged. The reinforcement is scalded and you can cut the opening in the ceiling for the stairs.
Openings in ceilings using diamond drilling without impact noise and dust are more expensive
We do not have other sites, but on many Runet sites, the topics of which are: diamond cutting, apartment redevelopment, strengthening openings and drilling holes
— photographs of works made by the Slom Service company are posted, as well as information from the site
slom-servis.ru.
We eliminate major defects
How to remove cracks in the ceiling if they are deep? In this case, the approach is different. Everything regarding the stage of cleaning the restored surface is similar to that described above. The changes concern the technological part and consist in the use of one or another filler. Each master has his own favorite way to repair cracks in the ceiling.
Let's look at the two most common ones:
- "Grandfather" Old, but still works well. Strips of material containing cotton are placed (plugged) into the cleaned crack. Next, they arrange the already known fabric bandage using PVA glue. A layer of putty (sometimes double) is applied to a flat surface, which is sanded after complete drying. You can seal the hole in the same way.
- Modern. How to repair a crack in the ceiling on your own using new products on the building materials market? It is easy to close it using special sealants and foams. The technology is simple, but differs in nuances for these two materials. The physical properties of the sealant are such that it does not expand, but the polyurethane foam increases in volume, so you only need to fill the crack space halfway with it. The fillers dry for a day, then the excess is removed with a utility knife. Next is puttying and leveling. Everything is as usual. If the waterproofness of the putty is important, it is better to use acrylic. Using the same technique, you can seal any hole.
Every business must have a skill. But how to acquire it without boldly getting down to business one day? Same thing with ceiling cracks. Do you have a great desire to make your home beautiful and well-groomed? Then you need to dare. Figure it all out and move forward. But how nice it will be to admire the results of your work later!
Water breaks
Unfortunately, cases of flooding of our apartments by neighbors above are not so rare. A PVC stretch ceiling can withstand a large mass of water, while the stretch fabric turns into an impenetrable bag. PVC ceilings are waterproof and stretch well, so in most cases they can save your interior. To extract the water, you will have to make two neat punctures - one in the very center of the giant drop, and the other where there is no water. The easiest way to make a puncture is with an awl.
Most likely, after such a nuisance, the tension fabric will have to be replaced. However, if there was little water, the affected elastic material can be restored to good condition.
A fabric ceiling can also be damaged by water - large volumes of it will simply tear it at the attachment points, since it does not stretch. In addition, after a “water attack”, ugly stains will most likely remain on the fabric ceiling, which, however, can be corrected by ordinary painting.