During the construction or renovation of a private house, the owner is forced to look for answers to many questions - what materials to use in the construction of walls and decoration, what methods to use for construction work, how to protect the building inside and outside from negative influences, etc. Among them is the problem flooring - how and what to make it from. One of the most popular options at the moment is concrete flooring in a private home. And you will learn how to arrange it in two main options - on the ground and on the floors - in this article.
DIY concrete floor in a private house
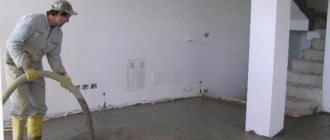
Pouring concrete screed
Even taking into account the fact that today hardware stores offer a huge variety of mixtures for pouring, it is still popular to use concrete mortar as a base or even a finishing coating (for more details: “How to make a concrete floor in a private house with your own hands - instructions”). It is durable, easy to install and low cost. Next we will talk about how to fill the floor in a private house in stages.
Filling is performed as follows:
- calculation of the area of the room and the quantity required for pouring materials;
- processing of the rough base;
- selection of tools;
- performing filling.
Correctly pouring a floor screed with your own hands allows you to create a high-quality coating that looks great in the photo and during visual inspection, which makes it possible to use the screed as a finishing coating without laying facing materials.
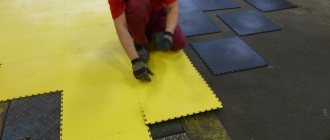
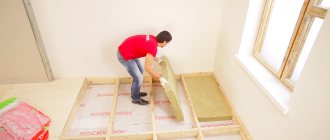
Insulation with mineral wool
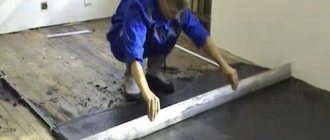
Before covering the concrete floor in a house with fiber insulation, it is necessary to prepare the base - it must be clean and dry. Irregularities are removed and depressions are filled. It is necessary to lay a vapor barrier material on the concrete floor, the joints of which can be connected using tape.
Important! The width of the slabs is selected based on the distance between the logs. The presence of gaps between the insulation and the joists is unacceptable. The height of the slabs is selected according to the height of the logs.
On top of the slabs, another layer of hydro- and vapor barrier is laid to prevent the formation of condensation and damage to the insulation.
The installation of a finishing decorative coating in the form of laminate or linoleum is carried out after installing the subfloor in the form of chipboard panels or boards attached to the joists. These materials will serve as additional thermal insulation.
Preparatory stage
All of the above points, up to pouring, can be combined into a single category - the preparatory stage. Naturally, you need to start by calculating the floor area in order to understand how much and approximately how much time will be spent on pouring.
If we are talking about how to properly fill a floor in a private house, then the calculation of purchased materials is made according to the following scheme (using the example of a room measuring 5x5 meters):
- The floor area is calculated using the standard formula: length multiplied by width (5x5=25 square meters);
- the volume of the solution to be poured is calculated by multiplying the floor area by the estimated thickness of the screed. Based on a layer of 10 centimeters: 25 square meters multiplied by 10 centimeters - 2.5 cubic meters of screed.
Taking into account the calculations made, materials should also be purchased.
For a high-quality screed you will need the following components:
- ordinary quarry sand;
- cement grade of at least M150;
- medium-sized crushed stone;
- mesh for reinforcing screeds with a cell size of 5 to 10 square centimeters;
- metal profiles for display as beacons.
From all of the above, we can conclude that before properly pouring floors in a private house, it is necessary to purchase the main components for pouring the screed in accordance with the calculations made. Regarding the height of the floor, it is necessary to know the thickness of not only the screed and bulk layers, but also all the materials being laid: steam, hydro and thermal insulation.
Pouring floors in a private house begins with cleaning the workspace. Naturally, it is necessary to remove dust, dirt, and debris from the subfloor using a broom, or even better, a powerful household or industrial vacuum cleaner. After cleaning, you can begin a process such as filling the floor in the house with your own hands, which is not the easiest.
It is worth considering the difficulty of creating the required amount of solution. If you knead manually, it will take a lot of time to prepare one portion. It is best to use a concrete mixer with a large capacity. Only with automatic mixing can a correct, uninterrupted supply of solution to the floor be ensured.
If we are talking about how to properly fill the floor in a house, then the worker should have the following tools with him:
- a long measuring device (a tape measure is best);
- building level, long wooden strip (rule);
- shovel and trowel;
- circular electric saw (grinder);
- large volume concrete mixer.
Concrete grades and concrete class
There is such a thing as ready-mixed concrete. Ready-mixed concrete is concrete manufactured in a factory and ready for delivery to the site by special machines. The second name for ready-mixed concrete is BSG - ready-mix concrete.
According to the standards, ready-mixed concrete is designated by the grade of concrete and the class of concrete. For example, concrete grade M300, class B22.5. The grade of concrete indicates the technology of its production, and the class of concrete shows its quality characteristics. Typically, the class of concrete is tied to its grade and concrete is designated by the grade of concrete with an additional indication in parentheses of the concrete class. For example, concrete grade M150 and concrete class B12.5 are the same product, which is labeled as ready-mixed concrete M150 (B12.5).
Let's see how concrete differs between different brands.
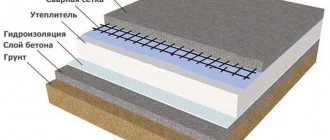
Main stages of work
At the beginning, as mentioned above, a sand or expanded clay cushion is poured. With a sufficient headroom in the room, you can make a layer of up to 15 centimeters. Naturally, the maximum thickness allows for increased thermal insulation from the ground.
In some cases, a layer of thick polyethylene is placed under the bulk materials, which acts as a waterproofing layer. It is also laid on top of a bulk cushion under a concrete screed.
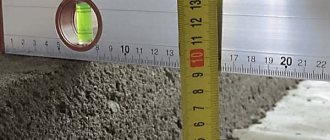
To pour the floor in a house onto the ground, it is necessary to install beacons after creating the cushion and waterproofing. You can use special aluminum profiles, ordinary reinforcement pieces or pipes for this. It is very important to use beacons with a perfectly flat surface and increased rigidity.
They are leveled using a building level so that the surfaces are located in the same plane. You can check the level using a wooden rod (rule). The interval between the slats should be about 1.5 meters, and the rule for checking the level is 10-15 centimeters longer.
The beacons are fixed to gypsum mortar. The advantage of this mixture is that it hardens quickly, but you can also remove the beacon without difficulty if its level was set incorrectly. The beacons are installed on top of the reinforcing mesh, which is first laid on the last layer of the bulk cushion or waterproofing polyethylene.
Also, if we are talking about how to fill a heated floor in a private house, it is necessary to lay a heating circuit on top of the reinforcing mesh between the beacons, if we are talking about water heating. Before pouring a warm water floor, study all the nuances of these works.
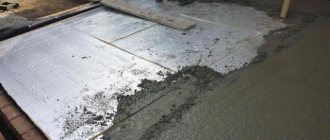
The solution is mixed at the rate of: 1 part cement to 4 parts sand and 4 parts crushed stone. The concrete solution should have the consistency of “liquid sour cream” so that it can be poured between the beacons without any problems. After pouring, the solution is leveled using a rule so that the height of the screed matches the height of the installed beacons.
Reinforcement
The larger the area of pouring concrete, the higher the risk of its deterioration, cracking or breaking. Accordingly, the floor needs additional protection. Reinforcement can cope with this task. The procedure involves installing a reinforcement or iron frame on insulating materials.
Reinforcement
Reinforcement is important primarily because it provides the floor with the necessary strength. The frame is placed on clamps evenly distributed over the surface of the future floor. With their help, the reinforcement is carried to a height of 2-3 cm. If you use a ready-made metal mesh, it should be stretched along the driven stakes. It is better to tie individual parts with wire.
Final stage
Once pouring is complete, the floor is left for about a week. At the same time, it is regularly moistened and covered with a thick layer of polyethylene on top so that cracks do not appear in the coating. After a week, the beacons are removed from the screed.
You can use a regular hammer: you need to lightly hit the insert and it will fall out of the concrete. The voids are filled with an identical solution, and the floor is put into operation after complete drying.
Bottom line
The article describes in detail the procedure for installing a concrete screed for the further installation of any floor covering. There is also an option to process the screed using a grinding machine, which allows you to use it as a finishing coating that looks no worse in photos and visual inspection than conventional facing materials.
If difficulties arise, you can always turn to specialists who will take responsibility for all stages - from purchasing the necessary materials to pouring the screed and putting the floor into operation.
Marking the level on the walls
Marking the level on the walls
The final level of the flooring should coincide in height with the door thresholds, so it is they that you need to focus on. On the walls, use a level to mark the height marks around the entire perimeter of the room. An alternative option is to stretch the cords over driven nails or draw stripes with a pencil.
After this, you need to mark the floor zero. The work will be carried out starting from there. Ideally, you can acquire a laser level, which guarantees the accuracy of marking and subsequent filling. Such equipment is not cheap, which means that not everyone can afford to buy it. If there is no such device, a building level will completely replace it.
Warm floor system
The installation of a “warm floor” consists of installing heating elements in the floor structure - under the finishing top layer. There are many options, the most common way is to install a cable, tubular and infrared floor.
Well, now it's time to finish the article. All the material I wanted to share has been reviewed. I hope it will be useful to you, and you will use it if you need to lay a concrete floor in a private house with your own hands. Improve your own practical skills and gain new knowledge, as they say: “It’s never too late to learn!” That's all, thank you for your attention, successful and easy repair!
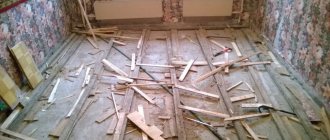
Soil preparation
All debris accumulated during the construction process must be removed from the ground.
Now you can proceed directly to preparing the soil base:
- The top layer of soil is removed, after which a little more soil is removed until the zero floor level is reached.
- The soil layer must be well compacted so that no marks or dents are left when walking. The result should be a smooth and hard surface.
- If the ground level is slightly lower than required, remove a small layer of soil, and then add sand to the required height, after which the surface is thoroughly compacted. You can use soil from the foundation pit as backfill.
To avoid the harmful effects of groundwater on the floor, additional protection can be made. To do this, clay diluted with water is applied to the layer of earth, which will serve as waterproofing.
Sprayed materials
Insulation of a concrete floor in a house using sprayed materials must be carried out by professional workers.
The essence of this method is that using special equipment under pressure, insulating porous material is sprayed over the floor surface. The result is a monolithic durable layer of insulation, as a result of the material’s ability to expand.
Important! Leveling the surface and sealing irregularities with this method of insulation is not required, since foamed polystyrene, expanding upon contact with oxygen, penetrates into all the recesses and microcracks of the concrete surface.
Important! Before laying the top covering, you must wait a day, during which time the polyurethane foam will re-expand and finally expand. If this condition is not met, deformation of the floor covering is possible if the foam insulation goes beyond the boundaries of the lag.
At the end of the drying procedure, slabs (a rough panel covering) are attached to the joists, and then the finishing material.