Beton-House.com
Website about concrete: construction, characteristics, design. We combine the experience of professionals and private craftsmen in one place
Modern heating systems - heated floors
A concrete base for a heated floor in the form of a screed is made for almost any type of horizontal heating. The main requirement for installing a heated floor is to lay the system on a flat surface.
The most common leveling method is to fill the floors with concrete. Let's consider the structure of the screed for heated floors, the need for such a base and the pouring process.
- Compound
- At the bottom
- Preparation
Necessary concepts
In order to understand how concrete can be used for heated floors, let’s define some concepts. It is important for us to distinguish between the types of floor heating systems, the levels and purposes of the screed, and the methods of its installation.
Classification of TP (warm floors)
At the moment, the market offers several different systems mounted in the horizontal plane of the floor. Some are used as the main heating, some only increase the level of comfortable stay in the room.
Heating systems can be water or electric. The latter are distinguished by the heating element used.
The device offers electric horizontal heating systems based on the following elements:
- cable;
- film;
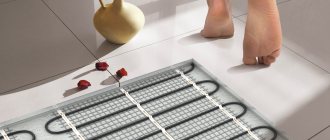
- thermomat;
- rods.
Classification of electric heated floors
Stages of work on pouring screeds
Due to the design of the horizontal heating system, the screed is done several times.
To understand the process, we divide the filling into 3 stages:
- Rough screed . Apply to the intended base for leveling. Performed when necessary.
- Leveling screed , which is poured over the thermal insulation material. The system is directly installed on this layer.
- Final fill . This is a pour over the heating system. Arranged if necessary.
Types of screeds
In addition to different heating systems and the need for different levels of pouring, there are other screed options other than pouring the floor with concrete mortar.
There are 3 types of screeds used when installing heated floors:
- Wet screed: the usual method of pouring concrete or cement-sand mortar.
- Semi-dry screed: leveling the floor with a ready-made compound, a certain degree of humidity.
- Dry: an ideal way to level the floor, recommended only as a rough layer.
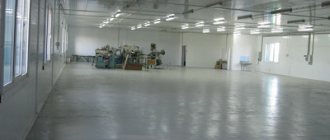
Concrete covering
This is a fairly flat and undeniably smooth floor, which is used in industrial and warehouse-type premises. This floor has a flat and smooth surface thanks to chemical additives. These chemical elements give lasting strength to the coating as a whole. Such floors are applied to the surface of a concrete base and then rubbed to a perfect shine. Due to the chemical element at the time of grouting the surface, it penetrates into the structure of the foundation, making it stronger. After watching the video, you will learn how to properly install a concrete floor.
One of the important qualities of such a floor covering is durability and lack of dust. It is also important that the cost of installing such a floor is inexpensive. The low price of materials allows you to reduce unnecessary costs.
Water heated floors
A water floor heating system is one of the most economical options for operation, but it is very expensive and complex to install. When installing it, it is very important to follow the technology. The system is poured with concrete and it is very difficult to correct any defect after pouring.
Purpose of screed for water floors:
- surface leveling;
- elimination of defects affecting heat transfer;
- formation of the heat distribution process;
- fixation of heating elements.
Video on the topic: the process of installing the Finnish foundation UFF
The construction of any house begins with laying the foundation. Its strength, stability, quality of materials and work performed affect the service life of the entire structure. Among the modern methods of constructing foundations for a house, the Finnish slab foundation option is very popular.
This technology was invented in Germany, but it is called Finnish because... it is widespread in Norway, Sweden, and Finland. And, in terms of its capabilities, it is excellent for the Russian climate.
Wet screed
Concrete for water heated floors is a classic version of this heating system.
The advantages of this installation are that by pouring the solution and forming the surface, the following is simultaneously created:
- a thermal insulation layer that can significantly reduce losses in energy use;
- flat surface that can withstand significant weight loads;
- a system of uniform distribution of heat energy is formed.
Installation of this system assumes that the warm water floors will be finished poured with concrete.
Wet screed
Compound
When installing floor heating, the type of concrete for a warm water floor and its composition are very important. Due to the fact that the screed will experience constant thermal loads, its strength should be maximized while maintaining ductility.
For this it is recommended to use:
- not sand, but screenings with a fraction of 3 – 5 mm;
- cement M300 and higher;
- plasticizers;
- fiber fiber.
According to accepted standards for pouring in residential premises, concrete of a grade not lower than M150 is used for heated floors, for industrial areas - M 300 or more.
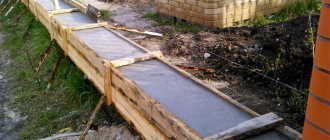
Important points when installing a rough screed
Based on the results of rough filling, the resulting surface must meet the following requirements:
- The corners of the floor and walls must be strictly at an angle of 900 - for the correct fit of the heat insulator and damper tape.
- A sector of one heating circuit should not have a depression or convexity of more than 5 mm.
After the subfloor has dried, it must be cleaned of dirt and dust and treated with a primer. The walls should be leveled and puttied. When the surfaces of the floor and walls are ready, a layer of thermal insulation is laid on the floor, covered with a reflective film, and the perimeter is taped with damper tape.
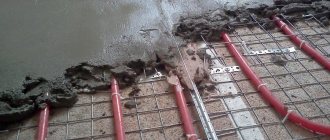
Before laying water floor pipes, you should draw on the floor plan a diagram of the layout of the pipes and the location of all control and monitoring elements. After the pipes have been laid, it will be necessary to ensure safe movement on the floor, for which it is better to install bridges from boards or shields.
Concrete water-heated floors: pipe laying schemes
Requirements for insulation
The insulation layer in the heated floor structure reduces heat loss in the lower direction, thereby increasing the efficiency of underfloor heating (the ratio of heat flow in the direction of the heated room to the total heat flow from the underfloor heating pipes).
In addition to thermal insulation properties, the insulation must have strength that ensures the absorption of loads from the own weight of the overlying floor structure and the payload on the floor. These conditions are best met by expanded polystyrene slabs with a density of at least 40 kg/m3.
The design of the heated floor must be designed to withstand the loads set out in the table. 7
.
Table 7. Floor loads
| Purpose of the premises | Load, kg/m2 |
| Attics | 70 |
| Residential, educational, sleeping, hospital wards | 150 |
| Offices, classrooms, cabins, classrooms, laboratories | 200 |
| Dining rooms in cafes, restaurants, canteens | 300 |
| Places where there may be crowds of people | 400 |
| Archives, book depositories | 500 |
When calculating, the thickness of the insulation layer should be determined from the condition that heat loss in the lower position does not exceed 10% of the total heat flow from the pipes.
Especially for the installation of water heated floors, thermal insulation boards with protrusions for fixing the heated floor pipes are produced. Connecting the plates to each other can be done in different ways. For example, in Ecopol 20 slabs, the connection of the slabs is ensured by “fastening” the release of the polystyrene cover layer onto the adjacent slab ( Fig. 8
).
Rice. 8. “Lock” connection of “Ekopol 20” slabs
And boards such as EasyFix have a tongue-and-groove connection ( Fig. 9
).
These boards are available with or without polystyrene coating. The main technical characteristics of the Ecopol 20 and EasyFix slabs are given in table.
8 .
Rice. 7. EasyFix plate
The protrusions of the slabs are designed in such a way that they provide a pipe pitch (raster) that is a multiple of 50 mm when laying straight, and a multiple of 70 mm when laying diagonally. Methods for attaching pipes to insulation boards that do not have protrusions are described in the next section.
Table 8. Technical characteristics of polystyrene foam boards for heated floors
| Characteristics, units measurements | Characteristic value for slabs | ||
| "Ecopol 20" | EasyFix | ||
| Coated | Without cover | ||
| Thickness without protrusions, mm | 20 | 20 | 20 |
| Dimensions, m | 1.1 x 0.8 | 1.0 x 0.5 | 1.0 x 0.5 |
| Height of protrusions, mm | 18 | 20 | 20 |
| Density, kg/m3 | 30 | 45 | 45 |
| Outer diameter of fixed pipes, mm | 16 | 16; 20 | 16; 20 |
| Thermal conductivity coefficient, W/m K | 0,035 | 0,036 | 0,036 |
| Compressive strength at 10%, deformation, kPa | 190 | 300 | 300 |
| Bending strength, kPa | 200 | 500 | 500 |
| Noise absorption, dB | 30 | 23 | 23 |
Semi-dry screed
The main distinguishing feature of semi-dry screed is the use of a composition with lower humidity, namely, with a significantly smaller amount of water in the solution. The quality of the solution can be easily checked by hand.
A small amount of the mixture is clamped in a fist. Water should not flow from the resulting lump, and it should not crumble. The photo shows the composition of the correct consistency.
The composition of the semi-dry screed, when clenched into a fist, should not release water or crumble
Semi-dry screed has some advantages over concrete pouring:
- lower cost;
- ease of leveling the surface;
- the heat and sound insulation characteristics of such a floor are much higher;
- does not shrink when dried;
- the readiness period is much shorter.
The heating system is installed in a semi-dry screed
Thermal insulation methods
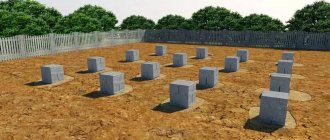
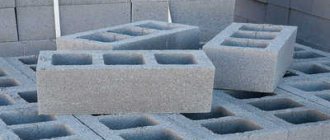
Concrete block foundation: sand cushion, blocks.
In addition to the option that involves constructing a foundation pit using liquid concrete mortar, there is another way to insulate a home. It is due to the fact that instead of mortar, individual concrete blocks are placed in the pit. They are ready-made material for the foundation, which is already reinforced and pressed into rectangular slabs. They can be columnar (have a regular rectangle in cross-section) and ribbon. They are concrete blocks in the form of trapezoids. The wide base of such slabs allows them to withstand enormous loads on the foundation and soil.
Dry screed
It is installed using special bulk compounds or materials on top of the waterproofing material. At the same time it performs the functions of insulation.
Compared to the classic screed, it has its advantages and disadvantages:
| pros | Minuses |
|
|
Dry screed for underfloor heating system
What to choose as waterproofing
For a concrete rough foundation, it is necessary to select a good waterproofing material so that in case of leaks it does not spoil the entire system and prevents water from penetrating to the neighbors below, if any.
Warm floor made of cross-linked polyethylene
[ads-mob-1][ads-pc-1] Waterproofing materials most often used for water floors:
Layout of a cake for a heated floor with waterproofing
- rolled roofing felt;
- polyethylene film. It should be dense, at least 200 microns;
- mastic is the best waterproofing material; it is what experts recommend when installing water floors in multi-storey buildings.
Waterproofing installation technology:
- When using rolled bitumen materials, they are rolled out onto a pre-leveled surface (you can use a thin screed or primer). The material is cut right in the room, the canvases are placed overlapping (allowances 3 cm). The lower surface of the canvas is heated with a burner and glued to the base. Particular attention should be paid to the joints;
Installation diagram of waterproofing for heated floors - Polyethylene film is also cut in the room. You should make allowances for the wall along the entire perimeter (10 cm is enough). The canvases are placed overlapping (leaving 10 cm at the seams) and connected with tape. This material is not recommended for use in a wooden house with a beamed floor;
- Liquid mastic is applied with a brush or using a construction sprayer along the entire perimeter of the room. It is necessary to make a layer of 2 cm and make sure that there are no gaps. The mastic penetrates into all pores, creating an ideal waterproof contour.
Tie size
Regardless of the type of screed, the basic requirement remains the same: the thickness of the concrete above the heated floor and at its base must be the same over the entire area of the room. This is important because otherwise, the process of heat transfer and heating will be at different levels, which will lead to the destruction of the floor cake.
At the bottom
Warm floors on concrete are laid on a rough screed, its minimum thickness is 5 mm. The size of the fill layer largely depends on the type of solution.
The height difference on the screed under a heated floor should be no more than 5 mm
On a note! If the base is in good condition and the thickness of the rough fill is minimal, transfer part of the floor pie under the rough fill.
By moving the thermal insulation and water barrier under the rough screed, you can begin work on laying out the heated floor immediately after the fill has dried. In fact, you will save a lot of time.
The whole pie
More often than others, warm floors are installed under concrete. The thickness of the fill with a regular cement-sand mixture is 50 mm. When adding plasticizer and fillers, the thickness decreases.
On average, you can calculate the size of the cake of a floor with a water heating system. Taking into account the laying of thermal insulation material, in urban apartments, this size will be from 8.5 cm to 11 cm, depending on the floor.
Important! To install water systems connected to central heating in apartment buildings, you must have a special permit obtained from the heating networks.
Contour calculations for beginners
Making accurate calculations causes significant difficulties for some craftsmen. This especially happens when heat transfer or other similar quantities are calculated.
There are already ready-made technical calculations, the correctness of which has been shown by practice. Beginning builders can use these calculations.
Some of them are given below:
- Using a standard pump is the best option. It creates a head of 6 m and has a capacity of 40 liters. in a minute. It is used for pipes with a diameter of 16 mm and a length of up to 65 m.
- Using the above pump and pipe, up to 12 circuits can be made using sequential mixing.
- If the length of the pipe used is 80 m, then 5-8 circuits can be created for this pump.
- It is not recommended to organize systems longer than 100 m. This will lead to increased energy consumption. It will be much better if you create two independent circuits, each 50 m long.
- If other heating devices are used indoors, the distance between the pipes should be 15-20 cm. Thanks to this arrangement of the heating elements, differences will not occur due to temperature differences.
During infrared photography, on a heated water floor made according to all the rules, there will be no shadows, and the pipes will be visible very well.
Note that a large number of different water circulation systems are produced. Each scheme has its own pros and cons, so choosing it should be approached with great responsibility.
Electric floors
When using electricity as a heat source for floor systems, everything is much simpler, but more expensive to operate. Installing an electrical system on a concrete floor does not reduce the height of the room; the thickness of the mats is only a few millimeters.
At the same time, modern infrared floors do not require a top screed; decorative roll or sheet material can be easily mounted on them.
On a note! The thickness of the tie for the cable system is 30 mm, and with the use of a plasticizer it can be reduced by a third.
Installation of an infrared floor does not require a top screed
Work order
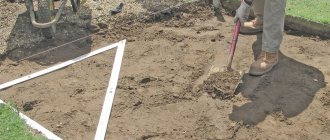
In any business there is a certain order of actions, a certain plan, following which you can achieve a result. There is a procedure when pouring a concrete floor. First of all, you need to mark the floor level so that in the future the floor will be level. Then you need to work with the soil, then lay out a layer of bulk materials, this is necessary for the strength of the floor and saving concrete. Typically, gravel is added first. For convenience, you need to drive a few pegs into the gravel before filling in the materials, and then they can be removed. Gravel can be laid out about 5-10 centimeters thick. Then the filled gravel must be compacted and watered. On top of the gravel you need to pour a layer of sand, the approximate thickness of which will be 10 centimeters. And the last layer will be crushed stone, it needs to be compacted and sprinkled with sand, preferably a thin layer. The resulting surface should be as smooth as possible.
This is followed by insulation work, as usual, it is carried out to protect the floor from various types of influences. Then reinforcement and formwork are carried out. Only after all this is concrete poured and screeded.
Pouring technology
Having understood the subtleties and nuances, let's look at how to make a concrete floor warm. When carrying out floor installation work, the room temperature should be in the range from 5 to 250C. If the base is in good condition, it should be cleaned and dusted. If necessary, a rough screed is arranged.
Preparation
Damper tape is glued over the prepared base and plastered walls.
This is done without fail in order to:
- prevent heat loss due to wall heating;
- avoid destruction of the screed as a result of thermal expansion.
If you decide to save money, you can lay strips of thermal insulation, for example, foam plastic, around the perimeter, the effect will be the same.
Important! It is necessary to install a thermal barrier not only between the system and the wall, but also between two systems. If the kitchen and corridor have different heating circuits, a damper tape must also be laid at their junction.
The perimeter of the room must be taped with damper tape
After thermal insulation of the joint area, a waterproofing film and heat-reflecting material are laid on the floor.
System installation
Laying a water floor, or any other horizontal heating system with your own hands, is done in strict compliance with the manufacturer’s recommendations. The instructions always come complete with the elements of the system itself. If a cable or pipe passes through an expansion joint, it must be protected with a corrugated hose.
Corrugated hose for laying a heating system element
After laying and fixing the system, the heating elements are connected. Before pouring concrete into the system, it is necessary to check the operation of all elements of the system. If the test run was successful, work can continue.
The video in this article will show the installation of a water floor.
Finishing fill
It is not always necessary to fill the system with concrete from above. Sometimes other materials are used for this.
- Some apartment owners, in an attempt to reduce costs and reduce the weight of the screed, are trying to fill warm floors with expanded clay concrete. What happens if you fill a warm floor with expanded clay concrete?
- The answer is nothing good. Expanded clay is a heat insulator. By adding it to the concrete solution, you significantly improve the thermal insulation properties of the screed. Therefore, it makes sense to install the floor system on such a base to avoid energy losses.
- There is no point in filling the floor heating from above with such a composition, because this will reduce the efficiency of the system. The fact is that the top layer of expanded clay will prevent the passage of heat into the room. In fact, you will simply be wasting your money this way.
Important! The layer with which the floor heating is poured must have the highest possible thermal conductivity in order to reduce the cost of operating the system.
Expanded clay concrete screed has excellent thermal insulation qualities, but requires a leveling layer
Pipe fastening
Fastening of heated floor pipes can be carried out in various ways, both “handicraft” and using special fasteners and tools.
When using thermal insulation boards with protrusions (“bosses”), as described in the previous section, no additional fastening of the pipes is required, since the protrusions ensure reliable fixation of the pipes to the thermal insulation ( Fig. 10
).
Rice. 10. Fastening pipes between the “bosses” of thermal insulation boards
In the case when slabs without protrusions are used, many installers attach the pipes to the reinforcing mesh using plastic clamps ( Fig. 11
).
Rice. 11. Fastening pipes with clamps to the mesh
Fastening pipes to the mesh using wire ties is not permitted.
On sale you can find special plastic clips that are designed for attaching pipes to reinforcing mesh ( Fig. 12
).
Rice. 12. Fastening pipes to the mesh using plastic clips
Plastic harpoon clamps are quite convenient to use, reliably fixing pipes to flat insulation. The staples can also be installed manually ( Fig. 13
), however, when using a special stapler for harpoon staples (tacker), the process of attaching heated floor pipes is significantly accelerated and does not require an inclined position of the installer (
Fig. 14
).
Rice. 13. Installing harpoon shackles manually
Rice. 14. Fastening pipes with brackets using a tucker
The distance between individual pipe fixing points depends on the material from which the pipe is made ( Table 9
).
You can fasten pipes to the insulation with special plastic clamp bars ( Fig. 15
).
Rice. 15. Fastening heated floor pipes using clamp bars
Table 9. Recommended maximum distances between mounting points for underfloor heating pipes
| Pipe type | Distances between attachment points, cm | |
| On straight sections | At turning angles | |
| PEX-AL-PEX | 50 | 50 |
| PEX-EVOH | 20 | 10 |
| PE-RT | 30 | 15 |
For example, the SHM.1620 tire allows you to fix pipes with an outer diameter of 16 and 20 mm. It is a plastic track 50 cm long. The tire can be attached to the thermal insulation with harpoon clamps ( Fig. 16
), and can also be mounted on a concrete base using dowels. Locks are provided at both ends of the tire to secure the tracks together along their length. Tire width 40 mm, height – 32 mm. The minimum pipe laying step when using this tire is 50 mm. Tires SHM.1620 are supplied in packs of 20 pieces. (10 m).
Rice. 16. Fastening the tire with a harpoon clamp to the thermal insulation
It is recommended to install rotation locks in places where pipes exit from the screed to connect them to the collectors ( Fig. 17
). This protects the pipes themselves from damage, and the screed from cracking at the junctions with the pipes. The use of rotation locks is especially important when using PEX-EVOH and PE-RT pipes, since these pipes do not retain the shape given to them during installation without reliable fixation. In addition, the PEX material has a shape memory effect, so when the coolant in them is heated, the pipes will tend to straighten.
Rice. 17. Rotation clamp VT.491 made of galvanized steel (available for pipes with a diameter of 16 and 20 mm)
In what sequence is the Swedish stove installed?
Compliance with the construction algorithm of the Swedish slab affects the strength properties of the base and energy-saving characteristics. The general scope of work includes:
The soil under the insulated slab does not freeze, which minimizes the risk of frost heaving problems in foundation soils
- Construction of the pit.
- Installation of drainage pipes.
- Laying communications.
- Laying insulation.
- Reinforcement.
- Warm floor assembly.
- Concreting.
Let's consider the main features of the stages.
Marking the area
This stage of work involves transferring the foundation project to local conditions
Before marking, it is important to carry out geodetic surveys aimed at determining the nature of the soil and the depth of the aquifers.
During the marking process, the following are determined:
- foundation contours;
- ways to connect utilities.
After marking, it is important to protect the site from precipitation by installing a storm drain
We carry out excavation work
Earthworks include the following work:
To ensure normal operation of the insulated Swedish slab (USP) and prevent frost heaving, it is necessary to provide a groundwater drainage system
- Clearing the construction site of construction debris and vegetation.
- Extraction of fertile soil layer to a depth of 0.4-0.5 m.
- Formation of a compacted sand cushion with a layer thickness of 30 cm.
- Extraction of soil around the perimeter of the pit for drainage lines.
- Filling clay at the bottom of the pits, moistening and compacting the clay layer.
After completing the excavation work, proceed to the next stage.
Setting up a drainage system
Sequencing:
- Lay down geotextiles.
- Pour in crushed stone.
- Compact the crushed stone.
- Lay drainage pipes.
- Fill in a layer of crushed stone.
After laying all layers, cover the bedding with geotextile fabric.
We lay utility lines
When performing work, observe the following sequence:
All necessary communications must be laid under the slab in advance.
- Install communications.
- Add a layer of sand.
- Compact the sand bedding.
After installation, it is important to check the correct connection of utility networks
We select insulation and install it
When choosing a heat insulator, give preference to insulation with reduced thermal conductivity.
It is advisable to use extruded polystyrene foam, which has the following advantages:
- resistance to the development of microorganisms;
- environmental cleanliness;
- resistance to moisture.
We lay the reinforcing mesh and install the heated floor
When performing reinforcement, pay attention to the following points:
- use tying wire to connect the reinforcement;
- lay the reinforcing mesh in two tiers;
- ensure a distance to the heat insulator of 30-40 mm.
Install heating lines taking into account the layout. Use plastic supports for laying pipes.
Higher thermal power of underfloor heating is achieved by denser pipe laying
Recommendations for laying underfloor heating lines
When laying heating lines, pay attention to the following points:
- ensuring a distance of 100 mm between heating lines;
- making a distance from external walls of 150-200 mm;
- correct pipe laying according to the developed diagram.
After laying the lines, check the tightness of the system with compressed air.
We install the formwork
Installation of a Swedish slab requires the construction of formwork around the perimeter of the foundation. For formwork, plywood or board panels reinforced with supports are used. The inner surface of the formwork structure is lined with polystyrene sheets. They provide thermal insulation of the foundation from the end part.
We pour the concrete mass
When concreting, observe the following requirements:
- pour concrete in a 10-centimeter layer;
- fill at intervals of no more than an hour;
- use a vibrator or slab to compact the concrete.
Advantages and disadvantages
The main disadvantages of USHP are the impossibility of repair and high cost.
Positive aspects of the foundation scheme:
- there is no need for additional insulation;
- protection from groundwater;
- versatility - construction on any soil (except rocky) is possible;
- savings – reduction in heating costs due to the provided “warm floor” function;
- quick laying - takes no more than fourteen days;
- sufficient level of resistance to mechanical damage and load.
There is no need to use heavy and large equipment in the technological process.
Despite the abundance of advantages, there are disadvantages in the characteristics of an insulated foundation slab:
- it is impossible to equip the basement and basement;
- need for backup communications;
- high manufacturing cost;
- it is difficult to correct mistakes during construction;
- existence of weight limits for future objects.
Design and characteristics of the USHP plate
A foundation made of USHP slabs can be poured without special equipment, while it has minimal labor costs, is cheaper than MZLF and is inferior in price only to screw piles.
- products or materials intended for construction (7076);
- vapor permeability of building material (25898);
- thermal insulation properties (17177);
- normalized parameters of flammability of building materials (30244);
- expanded polystyrene (15588).
When designing a “Swedish” foundation for a house, designers also necessarily take into account the joint venture:
- impacts, loads (SP No. 20.13330.2011);
- bases, foundations (SP No. 45.13330.2012 and No. 22.13330.2011;
- key provisions for reinforced concrete structures (SP No. 63.13330.2012);
- load-bearing or enclosing structures (SP No. 70.13330.2012).
The Swedish system includes:
- a ribbed slab, the thickness of which is 10 cm - this is the classic so-called ground floor;
- selected taking into account the maximum reduction of heat loss, ensuring a standard strength margin, while the ribs along their perimeter guarantee the stability of the Swedish foundation slab during probable ground movements;
- underfloor heating circuit - additional heating of homes is carried out through it, which saves energy for key heating circuits;
- reinforced belt - it consists of 2 connected reinforcement rods that prevent cracking under the influence of bending loads;
- engineering systems - they are buried below the freezing level, they are duplicated to ensure the best results;
- waterproofing - protects concrete from moisture and is designed to have vapor barrier properties;
- insulation - keeps heat inside the structure, accumulates it, preventing freezing of the ground under the cottage;
- sand cushion - has drainage properties (water will not be able to rise above the drainage layer), completely eliminates the occurrence of floor lifting;
- geotextiles - suitable exclusively for silty soil, prevents mixing of the drainage layer with soil particles.
Accordingly, the slab by default includes stiffening ribs, insulation, and elements that heat the slabs. The perimeter of the ground covered by this structure is reliably protected from freezing. The strength of the slabs is sufficient for heavy walls (brick or block masonry of several floors), as well as various roofing materials (slate, ceramic, cement-sand tiles).
In addition to being located under the foundation or instead of the foundation, as well as horizontally under buildings at the depth of reinforced concrete structures, USHP thermal insulation can also be mounted vertically along the perimeter, duplicating the shape of the slab base. Communication pipes are laid in insulating material and duplicated for each engineering system
As a rule, made using USHP technology, they are characterized by high maintainability during operation, which is especially important
Ring drainage collects storm, flood, and groundwater runoff and takes it to an underground reservoir for secondary use or instead of pumping it out using sewer systems. In contrast to mineral insulation, expanded polystyrene retains its properties even with constant contact with water, and therefore is used in Swedish systems without replacement alternatives.