The most important element of building a house is the construction of the foundation. In the process of work, you need to know how to correctly bring the base to 0 using a brick. It is important to know what technologies are used. One mistake in work can cost the stability of the future structure, so all stages of the process are carried out completely relying on the instructions.
How to lay out a zero on a brick foundation?
The most important element of building a house is the construction of the foundation. In the process of work, you need to know how to correctly bring the base to 0 using a brick. It is important to know what technologies are used. One mistake in work can cost the stability of the future structure, so all stages of the process are carried out completely relying on the instructions.
Tools and materials
It is customary to begin work on the construction of the foundation with the preparation of all necessary materials and construction equipment. To lay out the structure during the laying process you will need:
- trowel;
- shovel;
- order;
- jointing;
- mooring cord;
- hammer-pick;
- hydraulic level;
- construction level;
- trough;
- concrete mixer;
- metal rod;
- work gloves;
- bricks;
- sand;
- cement;
- lime;
- fittings
The complete list of materials depends on the nature of the work on a particular site.
Basic mistakes
Marking a zero on a foundation is a challenging task, even for some experienced builders. Often the reasons for an uneven foundation are the following errors:
- A solution with a large amount of water added. This most often happens when stirring by hand, when excessive accumulation of water occurs in one of the corners, after which a depression is formed after drying. Thus, differences of a couple of cm are possible.
- Broken mark. In some cases, during the installation of the formwork, the cords shift, with the orientation of which the uneven base is subsequently cast.
- Frost heaving. It is known that it is better to build a foundation in the winter in order to “settle it down” by spring. However, frost heaving provokes the rise of an unloaded belt, as a result of which, with the onset of the spring season, searching and setting the level becomes useless.
To avoid common mistakes and lay a perfectly level foundation, work should be carried out in stages.
What does it mean to “bring the foundation to zero”? This means leveling the surface of the foundation to a horizontal position - the upper flat part should be located in the same plane. On the one hand, the need to level horizontally arises both at the stage of pouring the mortar, and when laying a brick plinth, and at the stage of installing the embedded beam. At all stages it is necessary to constantly check the hydraulic level.
But bringing the foundation to zero is not an easy task even for some experienced builders. In private construction, the following errors are usually the causes of uneven foundations:
Marking “by eye” , lack of precise measuring instruments.
Inaccurate foundation marking or broken mark . In some cases, during the installation of the formwork, the cords shift, with the orientation of which the uneven base is subsequently cast.
Heterogeneous solution . For example, a solution with excessive water content. This happens when excess water accumulates in one of the corners, after which it dries out and forms a depression.
Frost heaving . It is known that it is better to build a foundation in the winter with the goal of its shrinkage by spring. However, frost heaving provokes the rise of an unloaded belt, as a result of which, with the onset of the spring season, searching and setting the level becomes useless.
All inaccuracies and small deviations when pouring the foundation can be leveled out when laying the brick plinth
How to avoid these mistakes? The work should be carried out in stages.
For example, frost heaving and shrinkage are inevitable. Therefore, it is better to carry out work on the final leveling to zero in the spring. Many inaccuracies and deviations when pouring the foundation can be corrected when laying the base.
So, spring... And when removing the formwork, it became clear that the foundation has different depths... This means that first of all it is necessary to carry out measuring work to find out the degree of curvature. The method of correcting it depends on the differences in the height of the foundation.
Common foundation flaws in private construction:
the foundation is poured crookedly;
angles are not respected;
dimensions are not met;
diagonals are broken;
there is not enough width around the entire perimeter;
uneven base height.
There are several common fixes. Thus, shortcomings in differences in the thickness of the monolith can be corrected by pouring a monolithic belt - this is one of the most effective methods. The second effective method is the construction of a brick belt.
Leveling the horizontal surface of the foundation is called differently:
- bringing the base to zero;
- comparison across the horizon;
- leveling, etc.
But in any case, the goal remains the same and is to maximally level the upper surface of the foundation. Most often it is proposed to re-erect the formwork and again set the horizon level using a level. The point is to determine the highest and lowest points of the concrete strip. By the way, this method can also be used if there are prefabricated blocks instead of a monolith.
It is recommended to take the highest point as the starting point. This greatly simplifies the work, since knocking down artificial stone is not required. In addition, as a result of chipping, reinforcing bars may be exposed, which is extremely undesirable.
The zero level is marked in the same way as during the initial pouring of concrete into the formwork. The only difference is the adjusted base height. Experienced craftsmen recommend cutting in the corners, making cuts in the formwork at the required level. A strong cord is driven into the prepared slots, after which it is pulled tightly between the control points. This will become a kind of long-length beacon and will allow you to abandon other marks. The disadvantage of this method is a certain mobility of the cord relative to the horizon. Beacons made of timber do not have such a disadvantage.
In places where the foundation is skewed in height by more than 50 mm, it is recommended to lay reinforcement mesh
After the preparatory work, the top of the main foundation is filled with cement mortar. It should have a thinner consistency compared to the concrete mixture that was used previously. After the initial setting of the cement, the surface is smoothed.
Fixing the foundation or building a new one?
The curvature of the lines of the foundation of the house can take various forms. Some of them can be fixed, others are more difficult. There are also those that cannot be corrected. For example, if the foundation is not only crooked, but has sufficient strength. Low strength is the largest foundation defect. Typically, such a foundation should be viewed as a bad experience.
We create a brick foundation with our own hands
Having determined the purpose of the building, they decide to erect a ribbon or pillars.
But in any of the options, waterproofing is required. The old proven bitumen, rolled roofing felt, is well suited for this. For additional protection from moisture, dig a trench and lay a drainage pipe in it.
Let's look at step-by-step instructions for creating each type of brick foundation.
Stages of construction of a columnar foundation
Its strength is sufficient for light structures:
- small country houses made of logs;
- plank utility blocks;
- summer shower and toilet;
- gazebos.
It’s easy to lay such a foundation yourself, armed with guidance from experienced builders. Its price is affordable, and there is no need to make a blind area.
Before starting work, we advise you to take into account the following recommendations:
- For a one-story frame house, pillars measuring 38*51 or 38*38 cm are sufficient.
- If this is a summer kitchen with an attic, then the dimensions of the supports are increased to 51*51 cm.
- Cement grades M400 and M500 are best suited for mixing the solution.
- The bottom of the holes must be leveled, compacted and geotextiles laid. It will become an obstacle to the penetration of moisture into the foundation, will not allow sand to go into the ground, and weeds will not grow.
- A cushion of crushed stone and sand is formed on top, and roofing felt is laid.
- After this, they begin laying the pillars in the proven old-fashioned way.
- Every 4 rows it is recommended to strengthen the supports with a layer of wire mesh.
- To ensure that all columns are in the same plane, each laid out row should be checked with a building level.
An important feature that is worth considering is that the supports under the load-bearing walls are made much thinner, approximately 25*38 cm.
A detailed guide to building a columnar foundation for a gazebo.
Construction of the ribbon
The choice in favor of this foundation is possible if you plan to build a building with a ground floor, basement, or attic on the roof. Walls can be built from stone or reinforced concrete.
According to the experts, the tape is a reliable foundation not only on hard ground, but also on sandy, heaving loam. The main thing is to perform high-quality reinforcement.
You can learn in detail about the pros and cons of strip foundations and the step-by-step installation method by reading the article: “Types of strip foundations.”
Methods for leveling the finished base
Often builders need to reach zero on an already formed base of a brick surface. The algorithm of actions looks different than in the first case and consists of the following steps:
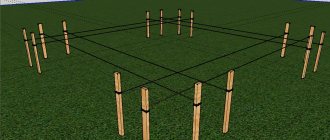
- The initial location must be marked with a hydraulic level or a special hose. The corners should be marked so that the location of all is obvious in relation to each other.
- After this, the wooden formwork is installed. It is important to take into account the moment that the design parameters coincide with the thickness of the base.
- Zero marks are measured in the corners, which in the future are transferred to the inside of the foundation.
- The reinforcing mesh is being installed in the formwork. The wooden frame is first sawn.
- A solution is prepared if the consistency of the correct mixture is poured into pre-moistened reinforcement rods.
A hose is used in the process of searching for the location of zero marks. However, it is important to remember the point that the water inside the latter moves by inertia. After the solution is poured into the formwork, it is necessary to ensure that the hose does not dry out from cracking. To avoid such problems, you should regularly moisturize the necessary areas.
Check before work
Before starting any construction activities, it is necessary to check the horizontal level of the surface. To do this you will have to use a construction hydraulic level. The check is carried out from the corners and gradually moves to areas of the base of the structure. If there are differences in the horizon, the necessary notes are taken and the orientation cord is pulled. After this, they move on to the main initial work processes.
Elimination of side irregularities
Their alignment is carried out taking into account the amount of distortion. If the discrepancies are small, you can fix the mesh with staples or dowels and lay a new layer of plaster over it.
If the difference is large enough, resort to the following actions:
- The formwork is set according to the level;
- with slight distortions, the solution is distributed over the void areas formed between the walls of the foundation base and the formwork panels;
- when the gaps exceed five centimeters, it is necessary to apply a reinforcing mesh in the places where concreting is planned.
This method helps to achieve maximum adhesion of liquid concrete and the dried surface of the base.
Video description
This video shows how to level the foundation using self-made sliding formwork: Where the difference is particularly noticeable and the thickness of the filling layer is large, it is recommended to reinforce it with masonry or plaster mesh.
Brick leveling
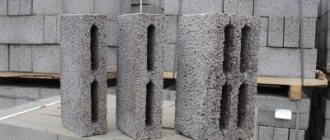
If the foundation is skewed by more than 5 cm, it can be leveled with red ceramic bricks. It must be solid, grade no less than M125.
Before laying a zero on a brick foundation with your own hands, determine the differences in height and level them out during laying, increasing or decreasing the thickness of the masonry mortar.
By changing the thickness of the seams between the rows, the top row of masonry is brought to the horizon Source sdska.ru
Brick can also be used as rubble when leveling the base with concrete mortar. It is laid in areas where the difference in height is more than 65 mm (brick thickness).
Construction of a monolithic reinforced belt
If there is a significant deviation from the level, the most reliable solution will be to build up the foundation strip with a belt of reinforced concrete. To set it up, a number of activities are carried out.
- Formwork is placed along the entire perimeter of the skewed base, aligning its upper cut horizontally.
- The height of the formwork should not be less than 12-15 cm.
- For better adhesion of the reinforced belt to the base, holes are drilled in it into which reinforcing bars are hammered.
- A metal frame made of reinforcing bars with a diameter of 10-12 mm is mounted in the formwork.
- They are connected to each other and to the rods protruding from the old foundation with 4 mm thick knitting wire.
Formwork with reinforcing frame Source chipmaker.ru
How to display zero on the foundation: two options for solving one problem
Dear readers of the Site about the dacha, I am glad to welcome you again to the pages of our site. While analyzing your most frequently asked questions, we came across this one: “How to display zero on the foundation”? On the one hand, the foundation should a priori be reduced to zero, but on the other hand, in practice anything can happen, because no one is immune from construction errors.
What to do and what not to do
Before giving advice on correcting other people’s mistakes, let’s say a few words on how to prevent them in general and bring out zero on the foundation with your own hands. It may be hard to believe, but you need to take care of the quality of the base even at the marking stage.
Pay attention to the location of the lacing.
They are initially set at the level of the upper edge of the plinth and serve as guides in the manufacture of formwork.
But why, with such a simple technology, the question: “How to level the zero of the foundation?” - sounds day after day both on construction forums and in queries to search engines? Mystic? No, just basic construction errors. Here are just a few of them:
- A solution with a high percentage of water. This most often happens when stirring by hand. More water accumulates in one of the corners and after it dries, a depression forms there. Sometimes, in this simple way you can earn a difference of 2-3 cm.
- Broken mark. It often happens that during the installation of formwork, the lacings move and builders, focusing on them, cast a deliberately crooked foundation.
- Frost heaving. And even experienced concrete workers fall for this rake. There is an opinion that it is better to build the foundation for the winter so that it is stable by spring. But the frost heave lifts the unloaded belt, even acting on it tangentially, and by April it is useless to look for the level there.
Leveling with concrete
If you are asked what is the easiest way to lay out a zero on the foundation, feel free to answer: “With concrete.” The whole procedure goes as follows:
Markers should be installed at the corners of the foundation. These can be ordinary wooden slats or pieces of reinforcement.
Then, using a water level, or even better, a laser level on markers, mark a horizontal level and take measurements from it to the foundation, thus determining the highest and lowest point of the foundation.
Nuances of masonry
In order to be able to correct defects in the masonry, it is recommended to first wet the brick. We prepare the solution, observing the proportions: sand and cement in a ratio of 1:4. Dilute the mixture with water to the desired consistency.
When building a basement floor, we reinforce it with reinforcing mesh every 2-3 rows of bricks. With a low base, such manipulations are not necessary.
Construction should begin from diametrical corners, erecting them at the same height. With each tier we use a tensioned cord to maintain level adjustment. With each row, it is initially better to lay out bricks without mortar as a sample.
It is recommended to lay the mortar in a layer of 20 cm under the basement row; after pressing, 12 mm remains on the seams, as required. Each tier is controlled using a level.
We build the corners. We control the vertical using a plumb line. Beginning builders will need an order, marking the location of seams and bricks.
We attach the mooring cord to the order - this is necessary for laying bricks horizontally. We use nails and staples to secure the cord along the length of the tier.
We lay the horizontal tier, shifting the seams in each row. The optimal deviation is considered to be ½ of the length of the brick. The role of vertical dressing is performed by tiers with transverse masonry. When laying the base, we alternate transverse and longitudinal tiers.
By doing the masonry yourself, without involving builders, you can significantly save your personal budget. By following all the recommendations for laying a plinth in one brick, it is quite possible to get a good result.
Level zero relevance
In practice, bringing the base of a structure to zero means performing construction work to ensure that the upper surface of the foundation is strictly horizontal. Moreover, its level in all places must be in a single plane. As described above, the “cushion” takes on the load of the entire upper structure of the building.
Therefore, in order to distribute the weight evenly on the foundation, it is necessary to bring its upper level below zero in order to avoid premature destruction of the foundation.
The most optimal option for such leveling is considered to be work when the concrete base is directly formed during pouring. In practice, it is not always possible to ensure the surface is perfectly horizontal at this stage of construction work. Quite often it is necessary to correct such errors after the construction of the foundation. For this purpose, the method of drawing out the zero level with a brick or stone is often used.
Articles on the topic
Installing a bathtub on bricks - what materials are used, instructions, advice from masons
How to lay a foundation with bricks - stages of work, instructions, advice from masons
Insulation of a brick facade - thermal insulation, thermal panels, instructions, advice from masons
Shrinkage of a brick house - why it happens, consequences, instructions, advice from masons
Beating plaster from brick surfaces using machines and manually, instructions, advice from masons
Brick foundation for a wooden house - types, instructions, advice from masons
Columnar brick foundation - technology, disadvantages, instructions, advice from masons
How to cover a wooden house with bricks - masonry, preparation, instructions, advice from masons
Reviews ()
Level zero relevance
In practice, bringing the base of a structure to zero means performing construction work to ensure that the upper surface of the foundation is strictly horizontal. Moreover, its level in all places must be in a single plane. As described above, the “cushion” takes on the load of the entire upper structure of the building.
Therefore, in order to distribute the weight evenly on the foundation, it is necessary to bring its upper level below zero in order to avoid premature destruction of the foundation.
The most optimal option for such leveling is considered to be work when the concrete base is directly formed during pouring. In practice, it is not always possible to ensure the surface is perfectly horizontal at this stage of construction work. Quite often it is necessary to correct such errors after the construction of the foundation. For this purpose, the method of drawing out the zero level with a brick or stone is often used.
Backfill
If the foundation was built not in trenches, but in a pit, then backfilling must be done. Moreover, this work also has its own nuances, so next we will look at how to properly fill the base.
This procedure is performed only after construction and the concrete must be completely hardened. It is very important to choose the soil for backfilling - it should not contain stones that could damage the waterproofing.
In addition, an important indicator when backfilling is soil moisture, it should be as follows:
- For heavy soils - 16-23 percent;
- For light and heavy loams – 12-17 percent;
- For light and dusty sandy loams - 9-12 percent;
- For silty sands – 8-12 percent.
After backfilling, the soil must be thoroughly compacted, after which the blind area can be performed.
Advice! After all the work on building the house has been completed, the base can be covered with siding or other facing material.
We achieve results
In order to obtain a completed foundation, the work must be carried out in strict sequence:
- The starting point is determined, for which a mark is applied in one of the foundation corners, the purpose of which is to indicate the surface level. Subsequently, using a hydraulic level, the remaining points are located at the remaining corners.
- In the absence of a hydraulic level, in order to determine points, it is possible to use a hose that has the property of bending. It stretches from corner to corner, after which it is filled with water. It is important to ensure that there are no air bubbles inside the hose. One end of the hose is brought to the marked point, and the location of the other is changed until the water reaches the edge level. After this, the hose is fixed and a mark is made on the formwork structure, which is the second starting point.
- Marks in the remaining corners are found and marked in the same way.
- The formwork is sawn vertically. The cuts are made in the amount of a couple of pieces in each corner and are located in the center of the foundation walls, and their direction should be made downwards until the fill is reached.
- The taken cord is pulled through the sawn places. This is how the fundamental zero is designated.
- The pre-prepared solution is poured to a height marked by cords pulled through the sawn holes.
Insulation of the structure
The best option for insulating a brick base is a solid heat insulator, which is usually used as slab polystyrene foam. It is easy to install, holds its shape well and does not allow moisture to pass through.
This insulation is carried out using a special glue without solvent and acetone. When laying slabs, gaps should not be allowed, and if they appear, seal them with polyurethane foam or mineral wool. After laying the insulation, the surface of the base is usually plastered, but other types of finishing can also be used.
Which brick is better to lay the plinth: advice from professionals
Before placing an order, you should familiarize yourself with a few selection tips:
- all elements for the base must be characterized by the same shape and size;
- the surface of building elements cannot have chips, cracks or protrusions;
- each brick must be in the same color scheme;
- always ask for a quality certificate or product passport: there you can see the performance characteristics, brand, production date.
Guided by the information described above, you will be able to equip the base of the foundation, protecting the building from moisture and temperature changes, as well as giving it an aesthetically attractive appearance. If you don’t know where to buy high-quality building materials, order them on our website. We will offer you a wide selection and affordable prices.
Purpose
The mentioned concept means leveling the surface of the base to a strictly horizontal position. In this case, its level should be located in the same plane. Since the foundation bears the entire mass of the building, its leveling is necessary in order to distribute it evenly, as well as to avoid a negative impact on the strength parameters.
The need for leveling arises at the stage of pouring the mortar and laying the brick base. However, an uneven earthen surface and uneven distribution of concrete can cause the entire building to become distorted during its future operation. For this reason, it makes sense to constantly check the hydraulic level.
Preparation of the solution
To lay bricks we need cement-sand mortar. To prepare it we will use the following ratio:
- 1 share of cement (shovel, bucket, kg)
- 4 shares of sand (shovel, bucket, kg)
- lime or plasticizer or liquid soap (Fairy)
- water (by eye).
The ratio of cement to sand may differ depending on the characteristics of the cement-sand mortar we need (1 share of cement to 2.5-6 shares of sand). A plasticizer is added to give the solution plasticity. This characteristic is important for comfortable work during laying.
How to cook?
- We take a container for mixing the solution. Ideally, it is better to use a concrete mixer. If it is not there, then any container convenient for these purposes (trough, etc.) will do.
- We put 4 shovels of sand into the concrete mixer, and then 1 shovel of cement. Mix.
- We add water by eye to obtain the consistency we need. At the same time, add 2-3 drops of Fairy (either plasticizer or lime) previously diluted in a small amount of water. Mix thoroughly.
The solution should resemble thick honey or cottage cheese, depending on what kind of solution we need.
You can also use our calculator to calculate the composition of the mortar and count the number of batches for a concrete mixer: Calculator for calculating the composition of the mortar
Lay out the remaining rows
Then we lay the remaining rows using the same principle with bandaging of the seams (in our case, bandaging in half a brick). At the same time, we no longer place risks like on the foundation for the first row, but we make sure that the vertical seams across the row are at the same level. In the picture, this is an example of seams in the 1st and 3rd rows. You will find more detailed information about the types and methods of dressing seams in our article “All about brickwork. Dressing the sutures."
Further, according to this principle, all the walls of our building are exposed. Don’t forget to keep the face of the masonry clean and unstitch the seams until the mortar sets. Also, if reinforcement of the masonry is necessary, we determine how many rows we will do it (usually every 5-6 rows). © www.gvozdem.ru
We stretch the cord to the mooring
After removing the corners, you can proceed directly to laying the wall. In order for the entire row to be at the same level, we pull the mooring cord between two opposite rows, which we have laid out in the same horizontal line. For mooring, you can use either nylon thread, fishing line, or an analogue. The main thing is that it is durable and visible to you when laying. The mooring can be attached:
- to order, if there are holes in it;
- using staples and nails.
We have shown both methods in the figures.
The mooring is attached with a vertical indentation of 2-3 mm from the masonry, so that there is no contact of the mooring with the brick along its entire length.
If the mooring does not have holes, then you can follow the simple and most common way to install the mooring. To do this we need 1 nail and 1 staple for 1 corner. We insert the nail into the finished seam and tie a mooring to it. Then we insert the mooring into the bracket. We place the bracket with the mooring threaded through it on the brick along which we will make a row and press the bracket with a free-lying brick on top (without mortar). The staple can be a rigid wire bent in half. The figure shows in detail how this will look visually.
If the berth sags, then you need to install so-called beacons. For this purpose, 2 bricks are taken. The first is placed, taking into account the thickness of the seam, on a mortar or rod template (12x12mm), and the second is placed with a poke on the first brick. We insert a nail between the bricks, onto which the mooring is wound tightly.