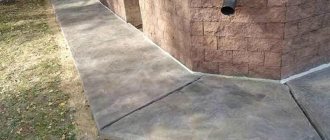
The blind area is made in the form of a strip 1-1.5 meters from the edge of the house. The material usually used is concrete or asphalt. Sometimes they finish with ceramic tiles, paving stones or paving slabs.
Today we will discuss the topic: How to properly make a blind area from paving slabs?
Advantages and disadvantages
Traditionally, the blind area is made of concrete or asphalt. However, in prestigious houses, preference is given to paving slabs. The choice is explained by a number of advantages of this option:
- increased durability;
- the ability to make it yourself without additional equipment;
- no need for a significant amount of concrete work;
- there is no need to install reinforcement;
- beautiful appearance, which can be created by choosing the desired color scheme and styling pattern;
- maintainability, the ability to dismantle the masonry and replace individual elements;
- ease of installation of new communications during the operation of the house.
The popularity of tiles is not hampered even by such disadvantages as additional costs for its acquisition or production, and the increased complexity of installation. These disadvantages are offset by design capabilities, reliability and convenience.
Requirements
Taking into account the functions performed, the covering of the blind area must meet the following requirements:
- Waterproof and moisture resistant. The coating must provide the necessary tightness.
- Sufficient mechanical strength, ensuring the ability to walk on the blind area and resistance to unexpected falls of various objects (for example, icicles).
- Resistance to temperature changes, sufficient frost resistance and resistance to solar ultraviolet radiation.
- Attractive appearance, in harmony with the interior of the facade.
The current SNiP imposes requirements on the design of the blind area itself . It should not have a flat surface and be adjacent to the foundation wall.
At the same time, a compensation gap must be provided to level out thermal expansion and the influence of soil swelling.
The blind area must have a slope to allow moisture to drain. It is laid in a continuous strip around the entire structure, with the exception of the porch.
In addition, the blind area must be wide enough for passage and installation of stairs. No heat should be lost through this element, which means that the problem of its insulation needs to be solved.
Finishing the blind area as building decoration
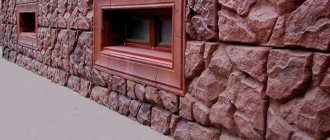
- Facing with paving slabs. If you want to expand the functionality of the blind area from protecting the foundation to decorating the facade of the building, then experts advise taking a closer look at tiling. This is a relatively inexpensive way to decorate a concrete screed around a house and at the same time give it an attractive appearance. The performance characteristics of paving slabs are very high, so you can easily use the blind area of your house as a walking path and lay paths from it to the garden, giving the exterior a holistic and harmonious look.
- Porcelain tiles. If you don’t need to save, then take a closer look at facing materials from the elite finishing sector. We are talking about porcelain stoneware; it has excellent characteristics that are valued among facing materials - low water absorption, wear resistance, impact resistance, long service life and aesthetic appearance. The technology for laying porcelain tiles is exactly the same as for conventional tiles, so you should not have any problems with its installation.
Dimensions
To perform the assigned functions, it is important to choose the correct dimensions of the blind area. Typically, the strip width is selected in the range of 0.8-1.2 m .
The reference point can be the overhang of the eaves of the roof. The blind area should extend beyond the edge of the cornice projection by 25-30 cm, which will allow water flowing from it to be drained.
The thickness of the blind area pie is formed from several parameters:
- base (compacted soil) – 10 cm;
- sand or sand-crushed stone cushion - 10-20 cm;
- layer of geotextile;
- sand, sand-crushed stone or sand-cement cushion for the blind area - 10 cm;
- blind area – 10-15 cm.
Another important geometric parameter is slope . To effectively drain water, it must be increased, but for ease of movement a flat surface is more suitable.
As a result, an alternative approach is chosen - a slope within 2-10° from the foundation wall. Most often, it is 4-5°, i.e. the edge near the wall rises by 3-4 cm.
Design of the blind area
If necessary, you can create an original design by laying out a flower garden - the simplest flower beds are created from a border or brick. Soil is poured into the created depressions, after which plants are planted. When creating flower beds, it is important to take into account that water is effectively drained from the foundation of the structure. Therefore, each recess is equipped with a special outlet. Do not forget that plant growth is possible only with periodic watering. In the absence of water drainage and heavy rainfall, the plants are covered with oilcloth. From time to time fertilizing is carried out.
Material selection
When choosing a material for a blind area, paving slabs and paving stones are often compared. Their difference is as follows:
- In terms of service life, paving stones have a clear advantage. It can last up to 100 years, and tiles - 25-30 years.
- Fit tightness. The laid tiles provide an almost flat, smooth surface. Joining pavers is much more difficult, which creates uneven areas where moisture accumulates. And it’s safer to walk on tiles.
- Paving stones have a significantly higher slip hazard in winter than tiles.
- The mechanical strength of paving stones is much higher.
- The thickness of the paving stones is noticeably greater than the thickness of the tiles, which will require digging a deeper trench around the house.
- The cost of tiles is much cheaper than paving stones.
Thus, if you choose a material for a blind area, then tiles look much more preferable . Excessive mechanical strength is not needed here (it is necessary for roads and sidewalks).
In addition, the range of tiles is much wider, which gives you the opportunity to choose in color and size. Paving stones are suitable for houses whose façade is lined with natural stone. She will harmoniously combine with him.
What is needed for construction?
Before you begin constructing a paving area, you need to stock up on the appropriate tools and materials. You will need:
- construction polyethylene;
- sand (it can be replaced with crushed stone);
- clay;
- cement;
- tile;
- curbs;
- shovel;
- rubber mallet;
- Master OK;
- level;
- cord.
Having such a simple set of tools and materials, you can safely get to work. But first you need to decide on the choice of materials, first of all – tiles.
Today you can see dozens of models on sale, differing in shape, color and material. The first two parameters depend solely on your taste. But the choice of material should be taken very seriously.
Granite paving stones look most elegant and solid. It is very durable and can withstand significant mechanical loads. But its cost is extremely high. Therefore, if you do not plan to drive along the blind area by car, it is better to give preference to ordinary paving slabs. This paving stone is just perfect for a house blind area: it costs much less, and a huge range of colors will give you the opportunity to choose the color (or colors) that will fully meet your requirements.
Pie
The blind area is made in the form of a multi-layer “pie” having the following structure:
- The base is in the form of a compacted layer of soil. You can use clay. Its thickness must be at least 10 cm. The base forms the slope of the blind area.
- Geotextile separating layer.
- Pillow. It can be laid in layers of sand and crushed stone or made from a mixture of sand and fine crushed stone. The minimum thickness is 10 cm, but it is recommended to provide 15-20 cm.
- Waterproofing. It is usually made of roofing felt, but polymer films of sufficient thickness can be used. If there was a layer of clay, it performs the function of waterproofing.
- Thermal insulation. This element is not considered mandatory, but it allows you to reduce heat loss from the house. You can use expanded clay, mineral wool, polystyrene foam and other insulation materials.
- Tile base. It can be made from sand-cement mixture or monolithic concrete.
- The top layer is paving slabs with seams sealed.
The multilayer structure allows us to ensure that all requirements are met and that the blind area has sufficient durability. In addition to the listed structural elements, installation will require boundary curbs and drainage pipes.
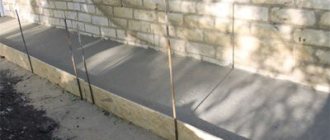
Base structure
A layer of sand about five centimeters thick should be poured onto the waterproofing layer. This layer must be carefully leveled and compacted. If the sand is dry, then you need to moisten it, otherwise you simply will not be able to lay and compact it well. To level the sand, you can use a simple piece of plywood with a straight edge.
The next layer (see photo), 8-10 cm thick, should be compacted crushed stone. A layer of sand up to five centimeters thick is again poured over the crushed stone.
After this, all layers must be simultaneously spilled with water and compacted well.
Scheme of blind area with waterproofing.
At this point, the preparatory work with the foundation structure is considered complete.
Necessary tool
To do the work yourself you will need the following tool:
- shovel and hand tamper for preparing the trench;
- knife and scissors for laying layers;
- a trowel, usually a trowel, for preparing the base for tiles;
- a mallet and rubber hammer for laying tiles, a grinder or a special guillotine for cutting them;
- building level, tape measure, metal ruler, square for measurements and control.
When making the tiles yourself, you will need special equipment, tools and accessories.
Work period
It is recommended to do the blind area after the foundation has been erected and its concrete has gained strength . So she will begin to protect him from the very beginning, because the construction of the house can take a long time.
However, a decorative blind area made of paving slabs can be installed after construction is completed, which will prevent it from being damaged during the construction of walls and roofs.
In winter, you should not make a blind area . Frozen soil cannot be compacted well, and when it thaws, it may sag. The best period for work is dry, warm weather.
Excavation and leveling of soil
In order for the blind area to not only serve as an aesthetic addition to the house, but also to protect the supporting layer of soil under the foundation, it should be installed only after careful preparation of the base. An integrated approach at this stage will ensure high durability of the coating, eliminate uneven subsidence and compensate for the effects of frost heaving.
Scheme of the blind area: 1 - soil; 2 - foundation; 3 - clay castle; 4 — geotextiles; 5 - gravel; 6 - waterproofing; 7 - sand preparation; 8 — geotextile; 9 — paving slabs; 10 - border
The width of the blind area is on average 50% of the depth of the foundation, taking into account the preparatory layer, but not less than 60 cm. Stepping back from the base by the width of the blind area and about another 5 cm, you need to hammer in wooden pegs and tighten the lacing. The fertile layer of soil is removed along it, then the bottom of the trench is cleaned and leveled so that its overall level is 30 cm below the lowest planned point of the finished coating.
Please note that if the blind area is made with a slope, it must be formed by a layer of bedding. Thus, after excavating the earth, the bottom of the trench should be in a common horizontal plane. When the bulk of the soil has been removed, a 10x10 cm depression should be dug along the outer edge of the blind area.
Step-by-step instruction
The process of making a blind area from paving slabs can be divided into several main stages. You can begin work after preparing the materials and tools.
Preparatory stage
Before starting work, you must carefully prepare the site . First of all, all construction and other debris is removed, the fertile layer is removed and all vegetation is removed. The blind area is marked around the entire perimeter of the house. Its width is marked with pegs, and the cord is pulled.
It is important to take into account that the blind area must be done from the zero cycle. It is not allowed to lay paving slabs on old concrete.
If there was already a blind area here previously, then it must be completely dismantled.
Firstly, it has already exhausted a certain resource, which means that the durability of the new design will be significantly reduced. Secondly, the old material may have various defects (cracks), which will eliminate all the benefits of the tile.
Digging a trench around the house
After completing the preparatory work, you can begin digging a trench. She digs by hand, with a shovel. Its depth should be at least 25-30 cm and take into account the design thickness of all layers. The width of the trench corresponds to the width of the blind area, taking into account the curb. If plant roots remain in the ground, they must be completely removed.
The bottom of the trench is carefully compacted using hand tools . At this stage, the desired slope is formed. From the outside, the depth of the trench increases by 3-10 cm relative to the opposite edge. The required slope can be achieved by adding clay. At the same time, it will serve as an additional waterproofing layer.
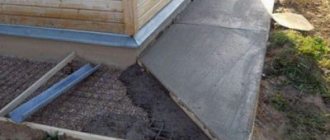
Next, a 10-15 cm thick cushion of sand or a mixture of sand and crushed stone is poured. This layer is also compacted. To form a denser cushion, the sand is moistened.
Waterproofing
Geotextiles are first laid on the pad in the trench . It will prevent sand migration and protect the waterproofing from damage by crushed stone. Waterproofing is laid on top of the separating layer. Roofing felt is popular, but thick polyethylene film is more effective.
Waterproofing is laid in a continuous strip along the entire perimeter of the house. At the joints there is an overlap of at least 15 cm. The edges of the film rise vertically upward onto the walls. On the foundation, the edge rises above the expected height of the blind area and is fixed with tape. On the opposite side it is temporarily secured with a strip.
Installing curbs and laying drain pipes
The fencing of the blind area is a curb . It is laid along the entire outer border. Its main purpose is to prevent the inclined covering from sliding down. Curb stones are installed clearly along the marking line, close to each other. Their height must strictly correspond to the height of the blind area along the outer border.
Leveling and compaction is ensured with a mallet. Horizontal control is carried out using a building level. Until construction is completed, the curb is secured with pegs driven in from the outside.
After installing the curb, drainage pipes are laid . They are designed to collect all the water flowing from the blind area and direct it to the drainage system. When laying the pipes, they are buried in the ground so that they are not visible from above.
How to make a base?
To lay paving slabs, it is necessary to form a base for it on top of the waterproofing. The most common option is a bulk pillow. It can be a layer of pure sand, a mixture of sand with fine crushed stone, or sand with cement.
The optimal base is obtained by backfilling a layer of sand about 10 cm thick and a subsequent layer of sand with crushed stone or gravel 5-6 cm thick.
The bulk base is carefully compacted . It is important to ensure the required slope angle of the blind area.
Correct styling
Paving slabs are laid on the prepared base without fixing with mortar. This allows relative freedom to compensate for temperature changes in dimensions.
The tile is fixed due to its tight installation on the bulk base , which is achieved by knocking it with a rubber hammer or mallet. To evenly distribute the impact load, it is recommended to strike through a wooden block.
It is better to lay the tiles away from you, i.e. from the curb to the wall. You should start from the corner of the house. As the installation proceeds, the evenness of the surface is controlled using a building level. If the tile sinks more than the neighboring element, then sand is poured under it using a trowel. The slope angle must be controlled.
When laying, an identical tile joint with a width of about 2-3 mm is formed . To do this, you should prepare special plastic inserts or identical wood chips in advance. As you install, you don’t have to try to specifically fill the seams.
Treatment of seams and remaining voids
The joints are filled with the same material that was used for the base under the tiles. Typically, the main filling occurs automatically when the finished masonry is swept.
After this, the seams should be moistened to shrink the sand . They are finally filled by directed filling with compaction.
If a mixture of sand and cement is used in the base, then the seams should also be sealed with it. After sealing with a dry mixture, moistening is carried out.
Cement swells when exposed to moisture and fills all voids. Excess composition is carefully removed with a rag.
Masonry on an existing blind area
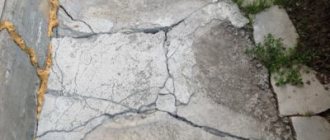
If the concrete blind area was laid earlier, it is important to properly cover it with tiles. Installation work can begin after some preparatory measures have been carried out. To do this, you should follow these instructions:
- We assess the condition of the placed blind area.
- We repair any damage or defects. This stage consists of sealing cracks and delaminations using cement paste, where liquid glass is present. If the damage is large enough, they should be removed and a new blind area should be poured.
- Installing a curb. This stage is one of the key ones in the whole work. Taking into account the placement of the old blind area, it is further strengthened with a higher layer.
- Treatment with a primer.
- Laying tiles.
Having completed all the steps, you should start sealing the seams.
Differences in technology between paving stones and tile coverings
Laying paving slabs and paving stones are not fundamentally different . When using paving stones, the process includes all of the above steps. The difference lies in the sizes of the elements.
For paving stones you have to dig a deeper trench. Its depth can reach 40-50 cm. In addition, the pattern of the masonry is more important for paving stones, and therefore the process begins from the center of the pattern, i.e. from the most visible area.
Subtleties
When carrying out work, some nuances should be taken into account:
- Paving slabs are difficult to cut. To minimize this procedure, it is recommended to choose the width of the blind area a multiple of the size of the tiles. Based on this, marking should be carried out after purchasing the material.
- You should not fasten the tile elements “tightly” with cement mortar. After the first winter, there is a high probability of cracks appearing.
- “Green seams” look attractive when they are filled with a mixture of sand and lawn grass seeds.
- When using multi-colored tiles, you must first develop a detailed plan for the relative arrangement of the elements.
- For the blind area of a house, vibropressed tiles with a size of about 15-20 cm and a thickness of 4-10 cm are most suitable.
It is easy to make a blind area from paving slabs with your own hands, but all work must be carried out carefully with constant monitoring of the slope and evenness of the surface.
The main advantages of a blind area made of paving slabs
Since we see that the blind area can be made from a large number of materials. Accordingly, we should immediately note the main advantages that a blind area around the house made of paving slabs will have.
- Long service life compared to other materials.
- All the work can be done with your own hands without professional skills and without the use of special equipment.
- Does not require reinforcement of the base (reinforcing layer), which significantly reduces the cost.
- A huge selection of shapes and colors of paving slabs, which helps to fit perfectly into almost any design.
- If necessary, it is possible to partially dismantle the blind area to repair built-in communications. If necessary, you can completely disassemble the blind area and use paving slabs in another place.
Requirements for the blind area
The formula for calculating the width of the blind area is: the length of the roof overhang from the wall + 30 cm, but the width of the blind area cannot be less than 90 cm. Do not overdo it with the width, this will greatly affect the cost.
The blind area should be continuous, without interruption along the entire perimeter of the house.
The slope from the wall is formed at the stage of foundation formation; it should be 5-7 degrees.
A drainage system should be provided. This should be done in such a way that water does not penetrate into the layers of earth immediately behind the blind area.
DIY making
You can also make paving slabs yourself to reduce construction costs . The simplest, casting method is carried out as follows.
Molds are made (wooden or metal) that exactly follow the shape of the tile. A solution is poured into them, pre-mixed thoroughly, with a fairly thick consistency. Drying is ensured within 60-70 hours.
Then, the mold with the contents is immersed in heated water for about 30-40 s, which makes it possible to easily remove the workpiece. The tile is placed on a flat, horizontal surface and aged for 23-25 days.
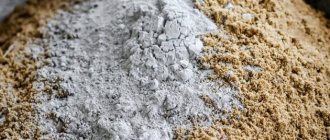
Recommended solution composition:
- cement grade not lower than M400 (20%);
- sifted river sand (55%);
- crushed stone fraction 6-10 mm (22%);
- fiber fiber (4% by weight);
- plasticizer (0.5% by weight);
- dye for concrete (up to 7%).
The water is cleared of all impurities and amounts to 6-7%. For 1 m3 of mixture, 135 liters of water are recommended.
The highest quality and most durable tiles are obtained using the vibration method. However, this requires special equipment. The molds are installed on a vibrating table, which ensures the necessary compaction of the mixture.
Choosing paving stones for the blind area of a house
The following options exist:
- Concrete elements. An affordable and popular variety. It can be of different shapes, sizes and shades, which allows you to lay out decorative ornaments and complex patterns. It is produced by two methods: vibration pressing and vibration casting. The first method allows you to end up with colored tiles that have average strength indicators. The second technology makes the product durable, but reduces the decorative variety. A modern alternative is polymer sand fragments.
Colored paving slabs make the path unique - Clinker parts. The production of such material occurs by pressing and firing special types of clay. Due to this, the products become resistant to water and low temperatures. But due to its small thickness, careful preparation of the base is required.
The performance characteristics of clinker are an order of magnitude higher than those of concrete blocks (paving slabs) - Stone products. The most durable and durable option for paving stones. Marble, sandstone, granite and basalt are used for production. The resulting fragments can be of various shapes: chopped, sawn or split-sawn. This must be taken into account, because the geometry of each variety is quite diverse.
Natural stone belongs to the elite class of paving stones
To make the right choice, you should consider the following parameters:
- Frost resistance. Pay attention to the number of “freezing and defrosting” cycles. There can be several of them during one cold period.
- Moisture absorption. The indicator should not exceed 2% of the total mass of one element.
- Strength in three categories. For abrasion - no more than 0.4 g/cm2, for bending - on average 60 kg/cm2, for compression - within 400 kg/cm2.
It is important to have all the necessary certificates.