The day has come when you decided to decorate the area of your home with paving slabs, install curbs, and make new steps. But for some reason you don’t want to buy ready-made products due to high cost or low quality. And you also have golden hands and a little free time. Try to solve this problem without large investments! It is not forbidden to make all of the above products at home. You will need a concrete mixer, molds, dyes, a tile vibrating table and the desire to make quality products with your own hands. We hope that this article will help you and inspire you to new achievements.
What is a vibrating table for tiles?
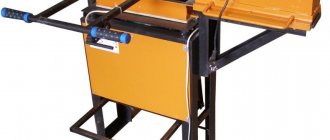
From the name itself it becomes clear: a vibrating table for the production of paving slabs is a structure with a horizontal surface, capable of making up to 2500 oscillatory movements per minute. The main task of the unit is to evenly distribute the liquid in the container and remove air bubbles that form holes in the finished product, which negatively affects the quality and appearance.
With the help of a simple device you will be able to make at home for the benefit of yourself, your neighbors and those who want to:
The technology for making a homemade vibrating table for paving slabs will be useful for those who are planning to pave paths in the courtyard of an individual house
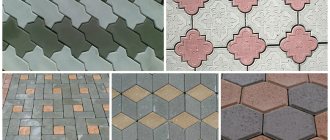
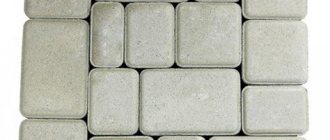
- paving slabs;
- concrete paving stones;
- fence sections;
- steps;
- window sills;
- balusters;
- foam blocks.
With the help of a vibrating table, you can not only save your family budget and improve the appearance of your yard, but also open your own small business and earn additional income. The main thing is to do everything efficiently and with soul!
Materials and tools required to assemble a vibrating table: prices and characteristics
In order to assemble the structure yourself, you will need a grinder, a welding machine, a drill, as well as the ability to handle them. Let's look at the list of necessary materials that can easily be found among handheld materials.
For the countertop, you can use plywood or a sheet of metal of a suitable size. In this case, the plywood sheet should be 14 mm thick. This will allow more vibration to be transmitted due to the small thickness, but at the same time provide the necessary structural strength. In addition, in this way you can significantly reduce the noise level during operation of the device. If a metal sheet is used, then its thickness should be within 5-10 mm.
The cost of a sheet of plywood of the required thickness, made from birch veneer, will be about 650 rubles with a standard size of 1525 × 1525 mm. But a sheet of hot-rolled metal 5 mm thick will cost more, about 1000 rubles.
On a note! If a metal sheet of smaller thickness is available, it can also be used by reinforcing the structure with metal corners or pipes welded in the center of the sheet and around the perimeter.
Metal corners measuring 50x50 mm. They will be required to create the edging of the tabletop and during the operation of the vibrating table will not allow the molds for the production of paving slabs to move from the surface as a result of vibration. Their cost will be about 140 rubles per 1 m.p.
Channel for mounting the motor (about 210 rubles/m.p.). It will need to be welded to the center of the back of the tabletop, pre-drilling holes that will be used for the bolts that hold the motor.
Metal pipes for table legs. Typically, elements with a thickness of 2 mm and a size of 40x40 are used for this purpose. The price will be 107 rubles per 1 m.p.
Pipes for forming the upper and lower parts of the frame. Since the main load will fall on these elements, it is worth choosing a fairly durable material - 40x20 and 2 mm thick for the upper part and at least 20x20 of the same thickness for the bottom. The cost will be 84 rubles/m.p. and 53 rub/m.p. respectively.
Metal plates that will be used as a sole for supporting legs. For this purpose, pieces of metal measuring at least 50×50 and 2 mm thick are suitable.
You will also need a plate for installing electrical equipment and springs, which are designed to provide vibration. It is quite possible to purchase these elements at a dismantling station. Numerous reviews indicate that the ideal option is to use springs from mopeds, the cost of which with a height of 113 mm and a diameter of 54 mm will be about 500 rubles. They are installed in the corners of the table, and if the surface area is large, another one is additionally mounted in the center.
On a note! If an additional spring was installed in the center of the tabletop, the motor mounting location and support configuration will be changed.
Types and types of vibrating tables for tile production
Vibrating machines for the production of paving slabs are of two types:
- hydraulic;
- electric.
The principle of design and operation is the same for both types. A steel sheet is fixed to the metal frame and serves as a table top. Below it is an electric motor with an eccentric on the shaft. The vibrations of the motor are transmitted to the working surface, where the molds with future products are located.
The main difference is that on electric vibrating machines the tabletop is mounted on springs, while on hydraulic machines it is not. The latter are more often used in the manufacture of large concrete structures.
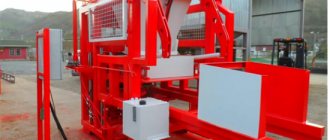
A vibrating table or vibrating press is equipment for the production of paving slabs
According to the installation method, vibrating tables for paving slabs are divided into:
- stationary;
- mobile.
According to the direction of use, the tables are intended for the following purposes:
- product formation;
- removing finished products from the mold (unmolding).
The latter type is rarely used at home and is not relevant, since the majority of forms are now made from flexible materials, and it is not particularly difficult to remove the finished product.
According to the direction of oscillatory movements, they are distinguished:
- horizontal;
- vertical.
The simplest and easiest to assemble and maintain will be a horizontal, electric, vibrating forming machine.
Important nuances, error prevention
- A edge is needed around the perimeter of the working surface of the table to prevent the form with concrete from sliding off.
- If you use long bolts as guide rods for the springs, you can slightly tension the springs by screwing in nuts and washers to more securely fix the table and limit the amplitude of vibration.
- Instead of a conventional electric motor, you can use a vibrator like IV99 or similar, with which you can more accurately regulate the vibrations and obtain a high-quality result.
Find out everything about vibropressed paving slabs on the pages of our website. You will find a description of the main characteristics and average prices for the material.
Read about how to properly lay porcelain stoneware outdoors and the features of this type of work in this article.
Read in the following material about which paving slabs are best to choose for your dacha and what you need to pay attention to when purchasing materials.
Construction of a brick making press for paving slabs
The drawing of a vibrating table for paving slabs looks quite simple, and you can look at it in any source. In words, this is a table on metal legs, diagonally connected to each other by a channel or profile in order to give maximum strength. Springs are welded between the support and the steel work surface, providing vibration to the table top. Nothing complicated or supernatural. With minimal skills, you can assemble the unit in 2 days.
The vibrating table allows you to produce not only paving slabs, but also cast concrete fence sections, monuments, decorative elements, etc.
Types of vibrating tables
There are many options on sale today. However, most of them are represented by two characteristic varieties:
- With electrical operating principle. The important element here is the engine. The table cover is located on springs. The engine, gaining speed, rotates the shaft on which the resonant element is located. Rotating, vibration is created, which is transmitted to the forms lying on the lid. The tool is used for direct work with paving slabs. Often craftsmen make just this type on their own from available materials.
- Based on the hydraulic method. This operating principle is also called springless. The vibration amplitude here increases and can be adjusted during operation. Such a mechanism is complex and expensive, so it is rarely used to work with the tiles themselves. It is used for vibration compaction of complex, large objects, such as curbs, slabs and other reinforced concrete products.
How to make a vibration table with your own hands with horizontal vibration
In order to make a homemade vibrating table for paving slabs, you need to prepare the necessary materials and tools. The number of parts needs to be calculated by picking up the drawing. Familiarization with the scheme is the first point in implementing the plan.
Next you need to stock up on:
- a sheet of metal that serves as a tabletop, of a suitable size with a thickness of 3 mm or more;
- a metal pipe, an angle/channel serving as the basis of a support;
- electric motor with a power of 250 W (depending on the size of the table);
- springs made of durable hardened steel.
Among the tools you should take care of the presence of:
- welding machine;
- drills;
- grinders/metal scissors.
This is the minimum you will need to make your own vibrating table for paving slabs.
Next, we proceed directly to assembling the spare parts and giving them the proper appearance.
The direction depends on how the rotor is installed
Materials and tools required to assemble the vibrating table
To carry out self-assembly of the structure, tools and suitable materials are required. The necessary tools are as follows: 1. Drill to create holes. 2. Welding machine for connecting individual elements. 3. Grinder, with the help of which the length of the materials used is changed.
The vibrating machine has a complex design, which consists of several components and parts: 1. The tabletop is made using a thin sheet of metal or plywood. By using the second material, it is possible to reduce the noise level during operation, as well as increase the efficiency of the device. However, plywood is less durable compared to metal. 2. A metal corner is required to create a tabletop edge. Due to such a side, the possibility of the tabletop moving during vibration is eliminated. 3. The channel is used to create a seat on which the motor will be installed. It is characterized by high strength and vibration resistance. 4. Metal pipes are used to create support. The thickness should be 2 mm, cross-section 40 mm. 5. The pipe for forming the upper cross-sections should have a smaller cross-sectional area. 6. Metal plates will be required to create the soles of the feet, which provide stability. 7. Springs are an important design element, because they create conditions for the transmission of vibration. As practice shows, springs from mopeds work well. 8. To center and fix the springs, bolts with a length of 50-70 mm and a diameter of 5-10 mm are required.
When choosing a material, care should be taken to ensure that there are no obvious defects on its surface.
Which motor is best for a homemade vibrating table?
The choice of motor directly depends on the size of the product, but the minimum power should be 220 W. A table measuring 70x70 cm is quite suitable for a washing machine motor. The downside is the low resource, but since you don’t plan to make products for the entire quarter, it will be enough for you. In the case of long-term plans for the table, experienced users advise buying a vibration motor of the IV-99E brand, with an oscillation frequency of 3000 per minute. It is enough even for a table measuring 1800x800 mm. More powerful machines are only relevant when producing tiles in large quantities and on an ongoing basis.
Choosing a homemade engine
The most primitive option and not designed for long-term use is to install a working motor from used household appliances (refrigerator, fan) with an eccentric drive installed on it, creating vibration of the platform.
It is important that the power is at least 220 W. It provides the minimum amount of vibrations necessary for the correct operation of the device. Such a device has a low resource, but for a small number of products it will be enough.
When planning long-term use of a brick making press for the production of paving slabs, as well as when it is necessary to produce a large batch of FEM, you should purchase a factory-made electric motor. 3 models are considered the most popular and affordable:
| Model name | Power | Weight, kg | Number of revolutions per min. | Forced force | Power, V | Approximate cost, rub. |
| IV-99E | 0.5 kW | 14,5 | 3 thousand | 5 kN | 220 | 7-8 thousand |
| IV-98E | 0.9 kW | 22 | 3 thousand | 11 kN | 220 | 8-8.6 thousand |
| IV-104B | 0.53 kW | 25 | up to 3.5 thousand | 6.3 kN | 380 | 12.5-13.5 thousand |
Vibrating table manufacturing technology
- According to the drawings, make metal parts of the required sizes.
- Connect the parts with a weld or bolts.
- Treat the surface with an anti-corrosion coating and paint to prevent premature corrosion.
- A channel is welded in the center of the tabletop, onto which a vibration motor is mounted.
- Springs are attached to the upper crossbars of the supports in the corners and the center of the long side, and the other end is welded to the tabletop.
- Commissioning work is being carried out to adjust engine operation.
The easiest and most economical way is to use an old motor from a washing machine, pumping station, etc.
The spun table is ready. What to do next?
After complete assembly, it is necessary to connect the finished structure to the electrical network and check its functionality.
When producing paving slabs or other products, you need to monitor the following characteristics of the vibrating table:
- Compliance with the horizontal level of the vibrating plate surface. If the loads are placed incorrectly on the table, the cushions sag and the concrete in the molds slides towards the distortion. Therefore, it is necessary to place the forms on the plate during vibration in the center. If there is a displacement of the concrete, then you can move the future product directly while the engine is running in the direction opposite to the displacement and everything will be corrected. Further, if the plate is fastened to the frame with studs, you can adjust the horizontal level;
- If the concrete in the mold is thrown out or seethes, the vibration is strong. It can be reduced by tightening the studs or changing the position of the eccentric. You can reduce its weight by replacing or grinding down the existing one. If paving slabs are being made, vibration can be reduced by increasing the load on the table. It is enough to place several other forms filled with concrete next to those that already exist. If they are not available, you can attach additional weight to the slab;
- If the product has a lot of air bubbles, then the vibration is weak. Such products will not be durable and will be destroyed in a few years by ice forming in the pores. It is necessary to reduce the load on the slab or loosen the tension of the studs (if they are used). If this does not help, then the motor selected is too weak and needs to be replaced.
To summarize, you should pay attention to the need to comply with safety regulations not only when operating a finished product made with your own hands. To make a vibrating table, you will need to use cutting and welding tools. Working with them requires increased attention and precautions.
Vibration platform
When making a removable vibration platform, you will need a sheet of metal with a thickness of at least 3 mm. If this is not available, the thinner sheet should be reinforced with corners welded around the entire perimeter. In a budget option, you can use chipboard or OSB boards. In any case, the frame must be made of rolled metal.
If you plan to make large concrete products in addition to tiles, try to avoid limiters in the form of corners - there will be more space.
How to create a vibrating plate. Step-by-step instruction
- It is necessary to manipulate the engine. If the motor is electric, then you need to remove the cover from it. This way, you can adjust the engine speed for further actions. It is best to use a motor that runs on 220 V.
- It is necessary to make cuts on the metal sheet on both sides symmetrically. The cuts are made with a grinder. Their depth should be at least 5 mm, and their depth should not be more than 10 cm from the edge.
- Using a hammer, make small bends along the edges of the cuts. This must be done so that the machine does not dig into the sand during operation. In this position, the places of the cuts must be welded with a welding machine. To create end fixation. It is worth remembering that if the cuts are not made, then it will be impossible to bend the edges to the desired angle.
- Using several rivets, the vibrator must be attached to the plate. However, they must be adjusted correctly. Care should be taken to ensure that the surfaces are evenly adjacent to each other and that the edges do not protrude. Then you need to run welding machines along the edges to secure them. The chevrons should be welded with special care, in a transverse welding position. Do this at a distance of 10 cm from each other. It is also necessary to take into account the center of the plate and the location of the mounting holes on the engine itself.
- Then you need to attach the vibrator with bolts. This is usually done with M10 or M12 fasteners. To know where to screw in the bolts, measure the distance between the mounting holes on the engine and accordingly make holes on the header, secure with bolts. The homemade vibrating plate is ready.
- You can start making the vibrating plate handle. Take a piece of pipe that will fit comfortably in your hand; you can use it to make a handle. Attach it to the base using elastic pads. You can also use silent blocks. Be sure to create something that will dampen vibration when the engine is running, otherwise the handle will jump out of your hands.
- To transport the stove and make it more convenient to use, it is also necessary to attach wheels to the top of the stove. To do this, take a piece of pipe of suitable size and weld it to the base of the vibrating plate. Using a welding machine, attach rings of the appropriate diameter to your wheels to the edges of the pipe. After this, secure the wheels inside the welded rings so that they can be removed if necessary.
- It would be useful to install a special container with water in the front part of the homemade vibrating plate. Route a hose that will be securely attached. During installation, care must be taken to ensure that water cannot in any way get into the cavity of a running engine.
Vibration motor
The vibration motor is the main unit of the structure. It is this that will provide the necessary mechanical vibrations to the platform. The choice depends on the required power and the amount of money you are willing to spend on its purchase. Otherwise, try making an eccentric motor yourself from an existing motor.
The working surface is fixed to the bed using a spring system
How to choose the right engine
The table area is selected based on the engine power, which should not be too large. Usually a power of up to 1 kW is sufficient . A table measuring 1500 by 800 mm is suitable for such an engine.
The dimensions are approximate, since the weight of the table and the speed of the motor shaft are not taken into account. In general, you need to worry not so much about the power as about the condition of the bearings or bushings.
They bear the entire load, and to ensure long-term operation, you must choose a motor with reliable bearings. If necessary, if the design allows it, you can modify the engine by removing the bushings and replacing them with reinforced bearings.
If you plan to install an eccentric directly on the motor shaft, this procedure will greatly extend the performance of the motor.
Vibrating table made from tires
The simplest option for making a vibrating table frame is used tires. Having collected the quantity necessary to provide the desired height (depending on the size of the engine), connect them together with bolts. Attached to the tabletop, the motor is inserted into the middle of the tire. Thus, it fixes the vibration platform, protecting it from falling.
By first hammering the pegs into the ground and installing tires on them, you will ensure a more static structure.
The cable is routed to the vibrator through the bottom or any hole between the tires.
Homemade vibration motor for concrete
To compact the concrete mass in foundations and other reinforced concrete structures, surface-type or submersible vibration motors are used. For a surface vibrator, a vibration motor with a power of 1 to 1.5 kW, operating on a 220 V network, is suitable. Its diagram is shown below, and it consists of:
- Handles for holding, guiding and carrying the device.
- Electric motor of sufficient power.
- Power cable.
- Eccentric unbalance.
- Bases of the required size.
Professional models of vibration motors have an adjustable eccentric, which allows you to adjust the amplitude of vibrations and the force with which compaction is performed. The eccentric is fixed on the output shaft of the electric motor. To do this, a bracket is rigidly fixed to the shaft, and the unbalance in turn is attached to it with a threaded connection. By loosening the thread, you can adjust the position of the eccentric in relation to the motor shaft, thus changing the amplitude of the device.
Recommendations
After you make a vibrating table for paving slabs and the first samples of concrete products appear, roughness will probably remain on the surface. They can be easily removed with a concrete grinder.
In order to level the surface of large areas, including floors and monuments, a vibrating screed is better suited for laying concrete.
In order to increase the strength of large concrete structures - foundations, walls, columns, etc. – a vibrating table is not enough. Here it will be useful to know how to make a deep vibrator at home. And it is done quite simply.
You will need:
- vibration motor;
- rolled metal;
- knitting gun for reinforcement;
- device for bending reinforcement.
DIY making
If there is no opportunity or desire to purchase a factory-type regulator, then you can assemble it yourself. Although regulators of the "tda1085" type have proven themselves very well. To do this, you need to familiarize yourself with the theory in detail and start practicing. Triac circuits are very popular, in particular the speed controller of a 220V asynchronous motor (diagram 5). It's not difficult to make. It is assembled using a VT138 triac, which is well suited for these purposes.
Scheme 5 - Simple speed controller on a triac.
This regulator can also be used to adjust the speed of a 12-volt DC motor, as it is quite simple and universal. The speed is regulated by changing the parameters P1, which determines the phase of the incoming signal, which opens the transition of the triac.
The operating principle is simple. When the engine starts, it slows down, the inductance changes downward and contributes to an increase in U in the “R2—>P1—>C2” circuit. When C2 is discharged, the triac opens for some time.
Read also: Brackets for laying cables on the wall
There is another scheme. It works a little differently: by providing a reverse type of energy flow, which is optimally beneficial. The circuit includes a fairly powerful thyristor.
Scheme 6 - Design of a thyristor regulator.
The circuit consists of a control signal generator, an amplifier, a thyristor and a circuit section that functions as a rotor rotation stabilizer.
The most universal circuit is a regulator based on a triac and dinistor (scheme 7). It is able to smoothly reduce the shaft rotation speed, reverse the motor (change the direction of rotation) and reduce the starting current.
The principle of operation of the circuit:
- C1 is charged until U breakdown of dinistor D1 through R2.
- When D1 breaks, it opens the junction of triac D2, which is responsible for controlling the load.
The load voltage is directly proportional to the frequency component when D2 opens, which depends on R2. The circuit is used in vacuum cleaners. It contains universal electronic control, as well as the ability to easily connect 380 V power. All parts should be placed on a printed circuit board made using laser-iron technology (LUT). You can find out more about this board manufacturing technology on the Internet.
Thus, when choosing an electric motor speed controller, you can buy a factory one or make it yourself. Making a homemade regulator is quite simple, since if you understand the principle of operation of the device, you can easily assemble it. In addition, you should follow safety rules when installing parts and when working with electricity.
Smooth engine operation, without jerks or power surges, is the key to its durability. To control these indicators, an electric motor speed controller is used for 220V, 12V and 24V; all of these frequencies can be made with your own hands or you can buy a ready-made unit.