Not only the car should feel comfortable in this place (not damp and safe), but also its owner. Why is expanded clay concrete the right option for building a garage in this regard?
And if the choice fell on this material, how to build a garage with its help? Practical advice and high-quality theory is what the reader will receive from this article.
Is it worth making a building from such material?
When deciding whether to choose expanded clay concrete as a building material for a garage, it is important to consider several points :
Expanded clay concrete, unlike brick, allows walls to “breathe” due to its porous structure. Therefore, moisture will not accumulate in the walls, but will go outside.- Expanded clay concrete does not like humid climates.
Therefore, if the garage will be built in such an area, then it needs to be additionally finished (at least with plaster). If the owner does not have extra money for additional protection, then it is better to think about using another material that would be less susceptible to moisture and could stand without external finishing. - Expanded clay concrete is a fairly durable and frost-resistant material. Therefore, in harsh climates its use is recommended by experienced builders. Expanded clay concrete products are not deformed and will not be destroyed by cold, frost, or wind. The service life of such a garage will be tens of years.
- This is a relatively cheap and economical option. Therefore, for a small budget, expanded clay concrete is what you need.
- In the event of a fire, you can be sure that the garage walls will withstand open fire for 8 hours and will not collapse. This is especially true if a lot of flammable substances (gasoline, varnishes, paints, etc.) will be stored in the garage. The amount of flammable objects will not affect the fire resistance of expanded clay concrete.
- If the car owner spends a lot of time in the garage, then he may not worry about his safety from the environmental side. Expanded clay concrete is a safe material and does not emit toxic and toxic substances (which cannot be guaranteed when using cinder blocks).
Technology
First, you should prepare the area for the start of work, clear it of debris, growth, grass, in general, make sure that nothing interferes with the work. And then you can proceed to the foundation.
Foundation
Along the perimeter of the finished site, you should dig a ditch for the future foundation, line its walls with polyethylene, fill the bottom with a cushion of sand and crushed stone and compact it well. It is necessary to pour water onto the compacted cushion so that the crushed stone, sand and water set, forming a strong slab - a guarantee of the durability of the structure.
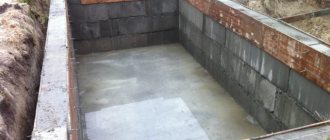
Inspection hole
The dimensions of the pit should be determined based on the size of the car. The width should be 70-80 cm less than the distance between the left and right wheels. The depth is calculated based on the owner’s height plus 10-20 cm for comfortable work.
A pit of the required size is dug and filled with a bed of gravel and clay. A film is placed on the cushion, and the concrete mixture is poured onto it. Clay waterproofs the foundation and is an environmentally friendly material.
Next, the wooden formwork is installed and filled with concrete. After time, the solution will dry and you will have a finished foundation with an inspection hole.
The principles of constructing a viewing hole remain the same when arranging a cellar. A cellar is made even faster than a pit, since it is shallower in depth and does not need such a powerful foundation.
The floor in the garage should be made powerful and durable, because the load on it will be much greater than on the floor in an ordinary residential building. First, you should compact the soil under the future floor well, cover it with polyethylene and fill it with several layers of sand and crushed stone cushion.
For a more powerful structure, we recommend placing reinforcement bars on the cushion, forming a grid along and across the space, and then filling it with a concrete mixture with crushed stone added to it.
When the solution hardens, you will get a beautiful, strong floor that can withstand shock and just heavy loads. Next, you can begin building the walls and roof of the future garage.
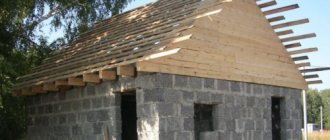
Walls
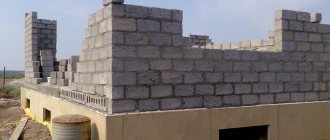
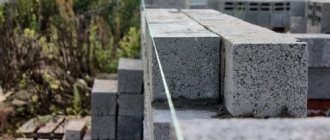
First, you need to lay reinforcing bars around the perimeter of the base and fill them with concrete. Then place two rows of expanded clay on top of each other.
The joints are always lubricated with concrete mixture and adhesive. The third row is laid in its middle at the junction of the blocks of the bottom row and so on, shifting each new row relative to the previous one by half a block.
The external appearance of expanded clay concrete blocks, of course, is not as attractive as that of brick, but you shouldn’t be upset here either, because it can be sheathed with any material you like. Very often, owners cover their facades with siding, which has an amazing choice of colors and structures and is quite low in cost.
Roof
The roof is no less important element of the building than all the others, and the fate of the entire building depends on its strength.
The configuration of the most commonly used roofs in construction is as follows:
- single-pitched;
- gable;
- hip;
- tent;
- dome;
- flat and many others.
Each type has its own advantages, but most often in construction they use a single slope or, the most economical, flat.
Warmth and waterproofing
Expanded clay concrete blocks need heat and waterproofing, and the modern market offers a variety of materials, among which I would like to note the following:
- Bitumen mastic. Plastic and viscous mastic penetrates deeply into the pores of expanded clay blocks and remains on them in the form of a waterproof film. This is a classic and frequently used material.
- PVC membrane. The material is quite young and is a film of elastic polyvinyl chloride. The seams between the sheets are sealed with hot air, which does not give a single chance for moisture to penetrate.
- Penetrating waterproofing. The substance enters the pores of expanded clay and crystallizes, forming a reliable shield against the penetration of moisture into the room.
Requirements for walls and stone
It is recommended that the construction of load-bearing external walls be carried out in 2 blocks. If we are talking about internal load-bearing structures and partitions, then you can build in 1 block.
Blocks can be of different sizes, both standard and non-standard. But the most popular dimensions are:
- 200×200×400 mm;
- 200×300×600 mm;
- 100×300×600 mm.
The first two options are suitable for the construction of external walls, and the last - for internal walls and partitions.
The strength grade that blocks for garages should have can vary from M50 to M75. Only in the first case, expanded clay concrete M50 is used for garages with a 1st floor, and in the second - for the construction of garages up to 2 floors.
The strength grade affects the energy efficiency of the building, its durability, sound insulation of the constructed walls and the reliability of the garage. The higher the strength grade, the higher these performance indicators.
The density must be at least D600 . The higher the density of expanded clay concrete, the fewer air pores it will have, so the material will be stronger, but its thermal insulation properties will be weaker.
Frost resistance for blocks used in the construction of a garage must be at least F75, i.e. 75 freeze-thaw cycles.
Gates
When all stages of work are left behind, the last thing left is to hang the gate. The following gate options are currently known:
Swing design.
This is the simplest, most economical option. Another advantage of the design is its simplicity and durability. The frame is mounted from steel corners, the doors are made from corrugated sheets.
The entire work takes no more than 3 hours. The sliding mechanism consists of a garage wall and a sash, which rides along a special roller along the wall. The design is aesthetic, but it is difficult to make it yourself, in addition, it is much more expensive than the previous version. Lifting mechanism. The design comes in several types, but in any case it consists of a lifting element and a leaf. Such gates are almost impossible to make with your own hands; they are made in workshops using special equipment.
Rules for drafting a project
Construction must begin with drawing up a project. Working without a drawing is the same as going to your destination in an unfamiliar city without a map. You can get lost and spend a lot of time and effort trying to reach your final goal. It's the same with the garage. If you do not have clear dimensions and guidelines in construction, then it is impossible to erect a reliable and strong building.
On paper or in a computer program you need to draw a plan that takes everything into account:
- Garage dimensions.
- Type and dimensions of the base.
- Roof type.
- Calculation of the amount of expanded clay concrete.
- The presence of an inspection pit, cellar and other utility rooms inside the garage.
- The size of the car so that it fits into the garage and the doors can be opened without hindrance.
For modern cars, it is enough to build a garage approximately 4 m wide, 7 m long and 3 m high. This room will fit a car and other useful things (tires, spare parts, racks with tools).
In order to calculate the number of expanded clay products required for the construction of a structure, it is necessary:
- Calculate the area of all walls being built. If we take into account the parameters mentioned above, then the area is: (4×3)+(7×3)+(4×3)+(7×3)=66 m2.
- Calculate the area of window openings and gates. Let's say the windows are 1 m wide and 1 m high, and the gates are 2.5 m wide and 2.5 m high. It turns out that the window area is 1×1=1 m2, and the gate area is 2.5×2.5=6.25 m2.
- Now you need to subtract the area of all openings from the previously calculated area of the walls: 66-1-6.25 = 58.75 m2.
- Next, you need to find out the area of one block, depending on its dimensions. If products with dimensions of 200 × 200 × 400 mm are taken, then the area is 0.2 × 0.4 = 0.08 m2.
- The last step is to calculate the number of elements to build a garage. For this purpose, the area of walls without openings must be divided by the area of one element, i.e. 58.75/0.08=735 blocks.
- If the laying of external walls will be carried out in 2 blocks, then the resulting figure should be multiplied by 2 and another 5% added to it - for possible defective products or for broken blocks during work. It turns out that about 1545 blocks are needed to lay the garage. And if there are additional rooms or partitions inside the garage, then their number is added to the resulting number.
The number of blocks for internal masonry is calculated according to the same scheme as for external masonry . The only exception is the 6th point, because the masonry will be carried out in 1 block, so there is no need to add anything.
The garage layout may look like it has other dimensions, depending on what the owner wants from the garage. Some options are shown in the photo below.
Popular sizes
The standard dimensions of a garage, and they are also the most common, are 3 by 6 meters. However, today such an area is unlikely to suit many motorists, cars have become larger, and new garages made of kerazito-concrete, as a rule, are built in proportion to the car, and maybe more.
Will it store additional materials? These can be spare parts, rags, or shelving or furniture. Will additional protection be installed from the inside (thermal insulation coat), which will also take up space inside the garage?
For example, for a VW Golf 3, the size of which is approximately 1.5x4 meters, we add 2 meters of space behind the car, 1.5 meters on the left for comfortable opening of doors and 1 meter on the right. We get an approximate size of 4x6x3 m. In the same way, you can calculate the dimensions of the future garage for your car.
Let's consider another standard example for a detached garage for 1 car.
The dimensions of the car are approximately 1.5 x 3.5 x 2.5 m, we add space for opening the doors, plus for free movement and the fact that over time the car can change, or another vehicle (scooter, bicycle) will be installed. When calculating, it turns out to be 4x7x3 m. It is safe to say that for the comfortable maintenance of a modern car (even a minivan), a garage of this size will be sufficient.
Materials and tools
Having dealt with the garage project, you need to move on to collecting and purchasing consumables and equipment for the job.
The builder will need the following:
- expanded clay concrete products;
- adhesive mixture or cement-sand mortar, which includes cement, sand, water and expanded clay (if necessary, additives are also added);
- reinforcing mesh or reinforcement;
- waterproofing material;
- shovel, trowel, spatula and comb - for mixing the solution and applying it;
- mixer or drill with a whisk - for mixing the components of the mortar mixture;
- level, square, tape measure, fishing line, cord, pencil and marker - for marking and checking the evenness of the masonry;
- wall chaser - for cutting grooves for reinforcement;
- a hacksaw, a grinder with a stone disc - for cutting elements into the required sizes and shapes;
- mallet with a rubber head - for tapping the elements in order to shrink them into the correct position;
- bucket, basins - for transporting and storing the solution;
- concrete mixer - for mixing the solution.
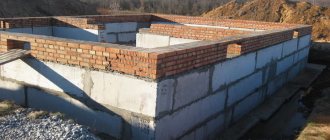
Foundation for a garage made of FBS blocks - advantages and stages of construction
Having a garage provides not only a permanent place to park your car, but also the ability to carry out minor repairs yourself. Therefore, a foundation for a garage made of blocks is an ideal solution to the problem of arranging an inspection pit.
Foundation wall blocks (hereinafter referred to as FBS) have this name because they form the walls of the basement after installation. They have good load-bearing capacity and have a number of advantages compared to monolithic foundations.
Advantages of wall blocks
- The low price, thanks to which FBS has become an affordable material for the population in individual construction.
- Fast construction speed.
- A universal material that is suitable for almost all types of construction.
- The base is erected without formwork.
- Does not require reinforcement with a metal frame.
All of the listed positive qualities of wall blocks lead to lower costs when building a garage.
Types of block bases
Garage - easy, self-build
Taking into account construction costs, we take into account the properties of FBS as a material, primarily the load-bearing capacity, and determine two types of foundations according to the construction method:
- columnar foundation made of blocks;
- strip foundation made of blocks.
A strip foundation made of blocks is laid on the basis of a trench dug along the length of the entire building. Requires significant investment of labor or the use of construction equipment. With this method of foundation construction, the consumption of FBS increases.
A strip-type block foundation for a garage does not require the construction of formwork or reinforcement with reinforcement rods.
Technology for constructing strip foundations from blocks
- Site preparation. If necessary, we level the terrain and remove construction debris. At this stage, work can be done to drain the area.
- We dig a trench 25–30 cm wider than the thickness of the FBS for ease of installation using a crane.
- We arrange a filter pad from a 10 cm layer of crushed stone and a 5 cm layer of sand. Each layer is spilled with water and compacted.
- To distribute the weight, FL blocks or blocks turned on edge (height greater than width) are laid out in the first row, forming a cushion for subsequent rows.
- The ideal option would be to construct a monolithic pad made of concrete mortar, directly on which the blocks will be laid.
- Using the brickwork method (overlapping the block of the upper row with the seam of the lower one), we build a foundation and, if necessary, a basement. Laying begins from the corners and intersections of walls.
- Having checked the horizontal level of the first row, we proceed to the construction of the second. We connect the blocks with cement mortar, filling all the voids. The thickness of the seam is 10–15 cm.
Advice! When building a foundation from blocks for a garage, use longer FBS, this way you will reduce the number of vertical seams. The base will become stronger and installation will speed up. Accordingly, the number of operating hours of the construction crane will decrease, reducing your financial costs.
Important! When choosing the depth of the inspection hole, be guided by the presence and height of groundwater. It is permissible to construct a pit at a level of less than 3.0 meters, but subject to high-quality waterproofing
Waterproofing a block foundation for a garage
Two types of waterproofing are required: vertical and horizontal. After watching the video, you will learn a lot of detailed information about protecting the foundation from water. A layer of roofing material is placed at the base of the sole to reduce contact with water and soil. In cases where the groundwater level is higher than the level of the foundation base, roofing felt is laid in several layers and each is coated with bitumen mastic.
Do the same at the border between the foundation and the walls of the inspection pit/cellar.
If, when the groundwater level is high, you have not provided for the drainage of the site in advance, then be sure to carry out vertical waterproofing.
But that is not all!
The foundation for a garage made of blocks will be highly reliable and have a long service life, provided that the FBS were manufactured at the factory, and not in a makeshift manner in neighboring garages.
DIY masonry instructions
The process of laying a garage from expanded clay concrete blocks is not much different from laying other buildings made of the same material, for example, a house.
But there are still some nuances that need to be taken into account and additionally done :
- Prepare the area for pouring and laying. The area must be thoroughly cleared of trees, tree and plant roots, stumps, grass, and debris. This stage is extremely important, especially if an inspection hole is being built in the garage, which will go several meters deep into the ground. Therefore, the area needs to be well cleaned and leveled. If you cannot do this manually, then it is better to hire special equipment. Deep holes are filled up, and excess mounds are leveled to the ground.
- Prepare the base for pouring the foundation. To do this, a trench 30 cm wide is dug. The soil is compacted and a film is laid on top of it, onto which sand and gravel are poured (layer thickness 10 cm). Then concrete solution is poured into this trench.
After the perimeter of the base has been poured, the floors themselves are poured. At the same time, the concrete must be strong to withstand the weight of the car and other items that will be stored in the garage.The load experienced by the garage foundation is several times stronger than that experienced by the foundation of a living space. A strip rather than a column foundation is suitable for a garage. When building a foundation, it is important not to forget to make an inspection hole, if it was provided for by the project.
- After the foundation has dried (and this will take 3-4 weeks), you can begin laying the walls. To protect the walls of the garage from dampness, you need to lay waterproofing (several layers) on top of the base to the width of the wall. You can use roofing felt - it is a cheap and reliable material.
Masonry starts from the corners. The first row is always mounted on a cement-sand mixture, and then, to reduce cold bridges, you can use an adhesive mixture. Then the seam thickness will be 2-3 mm. Each row must be checked with a plumb line, level and line so that the garage is level and the last row is level on all 4 corners.The second and every even row begins with laying a half block. You should not build more than 3-4 rows around the perimeter per day, otherwise the walls will shrink greatly from the total weight of the structure.
- Don’t forget to leave space for window openings and gates during construction.
- Build a roof. Any roof is suitable for a garage (gable, single-pitched and flat).
- Complete the construction by finishing the exterior walls (and, if desired, interior walls).
Construction of an inspection pit or cellar
You can implement everything at once.
Firstly, with basic car repair skills, you can easily service and repair your car yourself.
Secondly, for seasonal food storage in the house, space will be freed up for more necessary things.
Both for the inspection pit and for the cellar, the construction technologies are similar, but in the case of the cellar, the depth of the pit is smaller and the formwork is simpler.
So, to construct a hole, first we dig a pit. The width of the pit is taken to be 20 cm narrower than the wheelbase of your car and varies between 75-80 cm. The depth is taken at the rate of plus 15-20 cm to your height, for ease of work. Plus, as in the case of a foundation, we take 30-40 cm of cushion and concrete, do not forget to lay plastic film on the bottom of the pit and then follow the technology described earlier.
The next stage will be the construction of formwork around the pit. We install spacers, arrange a reinforcing mesh (you can take a chain-link) and fill the finished formwork with concrete. Along the upper edge of the pit, you can weld a frame from a metal corner, thus making the edges more durable. Subsequent work is carried out after the concrete has completely hardened.
Advantages and disadvantages of expanded clay concrete
Laying expanded clay concrete blocks requires 2 times less mortar than similar brick laying .
And the construction time is several times faster than when using brick. This plus is especially important both when doing the masonry yourself and when using specialists, where each of their working days must be paid.
Due to the porous structure of the elements, the optimal temperature and humidity coefficient are maintained in the room . Therefore, the car owner will feel comfortable staying in this room. The thermal insulation properties of expanded clay concrete are several times higher than those of brick or concrete walls.
Some even additionally insulate an already built garage with a wall of 1 expanded clay concrete block, and then finish the material.
Additional advantages of the material:
- fireproof;
- not subject to rot (unlike wood);
- non-toxic (unlike panels or cinder concrete);
- resistant to temperature changes;
- requires special care.
In addition, the products are lightweight and inexpensive. Moreover, the first indicator pleases the builders, and the second – the car owner.
On blocks made of expanded clay concrete, you can freely fix hanging shelves and cabinets with tools with dowels. The walls will withstand such a load, cracks will not appear on them, and they will not deform over time.
The downside is that the expanded clay walls of the structure cannot be left without finishing (although in the case of other building materials this point could be skipped). And the point is not that the look will be considered unfinished, but that expanded clay concrete does not tolerate direct exposure to moisture.
Rain and snow will simply fill the pores of the product and begin to destroy it from the inside. Therefore, walls necessarily require additional finishing cladding (siding, lining, plastic panels, decorative plaster or stone, ceramic tiles).
Interior decoration
Now we have come to the final stage of construction - interior decoration. This is up to everyone, whether you need it or not, but it’s worth mentioning. As always, there are plenty of options to suit every taste and budget. So, we can distinguish four finishing methods: the first is covering the walls with clapboard, the most financially economical method; second - plastic panels, we will focus on them, because they will be attractive both in price and in appearance, but environmental friendliness is poor; third - ceramic tiles, the most expensive finishing method; Well, the fourth is plastering the walls, there are also a lot of options both in color and in the variety of types of plaster.
So, let's summarize: expanded clay concrete blocks are an ideal material for building a garage, and if you have basic construction skills and this article, you can easily build your garage. And all other related work and what materials are used to carry it out will depend on what purposes you will use your garage for, and, of course, the amount of investment you can spend. Good luck with your construction!
Difficulties in work and mistakes of builders
It is better to carry out construction work from expanded clay concrete in the warm season - from late April to early October, when the thaw has already ended and the ground is ready for digging trenches, and the walls are not threatened by temperature changes and frequent rains with snow. As a result, the foundation will be strong and the walls in the structure will be reliable.
During the work process, there may not be enough expanded clay concrete blocks. And you'll have to buy them again. But only a new batch may differ in color and texture.
To prevent this from happening, it is worth remembering a simple rule: professional builders need to order 5% more blocks than indicated in the project calculations, and beginners and those who do everything with their own hands - 10% more (taking into account inexperience and defects in the finished product) .
The lack of a drainage and ventilation system is another mistake when building a garage.
The drainage system is especially important if the garage has a viewing hole or cellar. To do this, special drainage gutters with a slope are laid along the entire perimeter of the building so that the water flows into a common collector or sewer. And the ventilation system needs to be thought out at the construction stage, leaving several holes in the wall.
Pouring floors
Before starting work on pouring the floor, the soil should be compacted well and the formwork installed. Pouring the floors in your garage is done in the same way as in the case of the foundation (film, cushion of crushed stone and sand). It is better to lay a reinforcing mesh before pouring the floors, this makes it possible to avoid the appearance of cracks during operation. As before, we are waiting for the concrete to completely harden before starting the next work. To achieve a monolithic connection of your inspection pit and/or cellar with the floor surface, it is better to tie their reinforcing mesh together and level the formwork at one level. After installing all the formwork, we begin to fill the pit walls and gradually move on to pouring the floor. This way we will evenly distribute the load on the floor and walls of the inspection pit.
Prices for professional work
Not everyone has the desire, skills and ability to carry out masonry work themselves. Therefore, some hire workers so that specialists can do everything themselves. You will have to pay for such work. On average, the price in Russia ranges from 1,500 rubles. up to 2,000 rub. for 1 m3 or from 12,500 rub. for 1 m2 .
There are also construction teams that build a garage from scratch and do it for 112,500 rubles. This cost includes pouring a strip foundation (RUB 18,000), block laying (RUB 39,000), roof installation (RUB 48,000), wall finishing with facing bricks (RUB 15,000) and other work (installation of a ventilation system, drainage, installation of windows and gates).
Roof installation
There are many types of roofing from flat to pitched and multi-slope, if you have built a two-story garage. The easiest to install is a flat roof.
We build a wooden frame with a slight slope so that during precipitation the water on the roof does not stagnate and the roof lasts as long as possible. We coat the frame itself with a special antiseptic to avoid excessive rotting of the boards. We lay roofing material on top, which serves for heat and waterproofing, and on top of it the roof that you have chosen for yourself.
Choice and quality in roofing work is also a fundamental factor in ensuring the longevity of your garage.
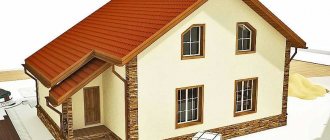
Photo
What kind of garage can be built from expanded clay concrete can be seen in the photo:
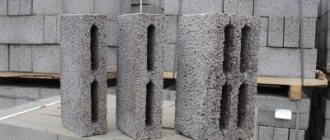
What is expanded clay block?
Expanded clay is foamed clay mixed with cement, water and sand, and past the pressing stage. The finished products are hollow blocks. They are divided into three types: structural, thermal insulation and combined. They are lightweight, have good sound insulation, are not subject to corrosion and rotting, and can withstand heavy mechanical loads.
- For the construction of walls, structural ones are used, having a density of 1400 - 1800 kg/cub.m.
- For thermal insulation, thermal insulation materials with a density of 300 – 600 kg/cubic meter are used.
Please note that blocks with a low density will crumble in your hands, and if they are too large, the sound-proofing and heat-insulating properties will be lost. There are two types of blocks:
- lightweight;
- universal.
The lightweight type has a granular surface and a density of 800 - 950 kg/cub.m.
The universal type has a smooth surface and a density of 950 - 1200 kg/cub.m. For construction, the second type is more often used. In high-quality blocks, expanded clay with a diameter of 7-9 mm is used. Frost resistance indicators are in the range F15 – F100. It is not recommended to use blocks with an indicator less than F35.
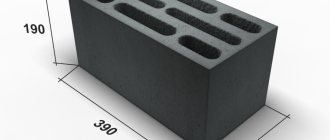
A standard block has dimensions of 39*19*19 cm, which is equal to the size of 7 bricks, but the mass is much less. The weight of seven bricks is 30 kg, and one block is 12. The walls will grow twice as fast. You can lay the masonry together, without involving a team of builders, which will significantly save your finances. Plus savings on the foundation.
By the way, the blocks are not difficult to make yourself. To do this, you need a concrete mixer with a volume of 130 liters and a trough for the finished solution. From building materials you will need:
- cement;
- sand;
- expanded clay with a diameter of up to 10 mm;
- plasticizer or liquid soap;
- water.
For one batch you need 5 liters of water, 8 kg of cement, 30 kg of sand and expanded clay, 70 grams of liquid soap. Everything is loaded into a concrete mixer and mixed well. The finished mixture has the consistency of thick sour cream. The prepared solution is filled into special forms that have projections for voids or into the formwork. In the formwork, the blocks are obtained without voids.
This is interesting: Do-it-yourself garage made of timber - we explain point by point
How much does each block cost?
Manufacturers offer a fairly wide range of wall blocks in terms of their sizes. To compare prices, we will consider a traditional block with parameters 20x20x40 cm.
- a concrete block costs 50 rubles. per piece (price averaged by region);
- expanded clay concrete - 38-40 rubles;
- cinder block - within 30 rubles;
- foam block – 120 rubles;
- gas block – 120 rubles;
- gas silicate – 100 rubles.
It should be noted that the price in each group varies greatly. Because blocks are made from different concrete solutions. This refers to the brand of material. And the higher it is, the more expensive the final product. It would be correct to say that factory-made products, and even more so those produced using the autoclave method, are many times more expensive than handicraft materials.
Here you can also add inaccuracy in dimensions and unevenness of the edges of blocks made on construction sites or in small workshops. And, as practice shows, the quality of such products is not the highest.
Two-story garage made of cinder blocksSource skb21.ru
So, now, having sorted out all the pros and cons, we can dot all the i's in the topic of our article, namely: what are the best blocks to buy for building a garage. The ideal option is cinder blocks. They correspond to the strength of low-rise construction, their price is the lowest, these are products with a fairly smooth surface that does not need to be finished, although, as mentioned above, the market offers blocks with decorative designs or painted throughout the entire body of the stone. In terms of thermal insulation characteristics, this material is inferior to its cellular materials or those filled with expanded clay, but for garages this is not the most important selection criterion.
The cinder block has one more characteristic, which is inferior to products with a cellular structure. This is the specific gravity. That is, it is larger, which means that a high-strength foundation will have to be built under the cinder blocks. And this increases the budget allocated for the construction of the garage. But even this does not stop private developers from using cinder blocks as the main material in low-rise construction.
The video shows how to build a garage from cinder blocks:
Summary
A FBS foundation is suitable for those who want to build an underground level or basement in their house, but it will require the cost of renting construction equipment. However, this drawback outweighs the speed of installation, which is often more necessary.
A solid expanded clay concrete block with dimensions of 40x20x20 is suitable for both strip and column foundations and has good thermal insulation. Installation of such a foundation is possible for one person without any outside help, which reduces financial costs for labor.
Despite all the advantages of expanded clay concrete materials, before using them as a prefabricated foundation, a clear understanding of the disadvantages of expanded clay as a filler is necessary, namely: expanded clay is a fragile material with a moisture absorption of more than 15%. Knowing these disadvantages, you can always beat them with dignity.
Ceramic
Returning to the issue of ceramic building materials, one cannot fail to note the durability and strength of a brick bathhouse.
Building a bathhouse from ceramic bricks is labor-intensive, but the result of a mason’s quality work will pay off the costs. A brick bathhouse is safe, will last a long time, creating a comfortable microclimate. The finely porous stone does not heat up quickly, but it also takes several hours to cool down.
Without a layer of insulation, the brick wall will have to be made wide and the bathhouse will have to be placed on a monolithic foundation.
Thermal insulation of the wall with mineral wool is installed on the outside of the wall, covered with wind protection and protected with façade cladding. But an insulated brick wall can be made up of one row of bricks and have a total thickness of only 40 cm.
The construction of a ceramic bath will be simplified by the use of brick stone - a larger wall element than brick. Solid brick is used on the walls of the basement and plinth, as well as on the facing masonry.
Information. Frost resistance grades of wall bricks: F100–F350. Water absorption 6–16%. For masonry of a 1–2-story bathhouse, the brick strength can be M100, M150.
The thermal conductivity of brick is 1.5–2 times lower than that of heavy concrete, but approximately the same amount higher than cellular concrete.
What blocks can you use to build a bathhouse? Non-flammable, non-toxic, heat-resistant and warm. Light stone blocks based on mineral binders actively absorb water.
As the amount of water in concrete increases, its thermal conductivity increases: 0.015–0.035 W / (m ∙ K) - increment for each percentage of humidity. Despite the textured layer on both sides of the wall and the cladding, block baths are usually kept under constant heating.
External insulation
For external thermal insulation of the building, insulation of both the facades of the bathhouse and its foundation is carried out. In the first case, insulation is performed in several ways:
- The most expensive and time-consuming method is brick cladding. In this case, insulation is placed between the wall made of facing bricks and expanded clay blocks.
- A cheaper method of insulating a bathhouse built from expanded clay concrete is to use polymer panels or siding, under which a heat-insulating material will be located.
- High-quality heat insulators are sheets of extruded polyurethane foam or expanded polystyrene, which are used to cover the facades of buildings using adhesive mortar or plastic dowels. Reinforcing mesh and decorative plaster are laid on top of the sheets.
For information, polyurethane foam is nothing more than foam rubber, and polystyrene foam is the same polystyrene foam. Extruded means obtained under pressure and having a high density, hence the rigid structure. Therefore, sheets of “foam rubber” and “foam plastic,” on the one hand, have high thermal insulation properties, and on the other, they have sufficient strength, hold their shape, and are easy to cut.