Garage buildings, generally classified as low-rise and utility buildings, require a reliable foundation due to increased humidity, vibration, and in some cases, weight loads.
Work on its laying can be done on your own. What to consider when choosing a support structure, how to make a foundation yourself and what you need to prepare for work - read on.
How to make a foundation for a garage with your own hands. Reinforcement
To make a solid foundation for a garage with your own hands, it is advisable to reinforce its structure. Such a procedure will strengthen the reinforced concrete structure and protect it from the pressure of the weight of the garage and ground shifts. A garage whose foundation is made of metal reinforcement is considered more stable than a building with reinforcement made of plastic or composite rods. It is better to fasten the rods to each other manually using reinforcing wire and reinforcing wire cutters. Welding may only be used for fittings marked “C”.
The metal frame of the garage foundation must be placed inside a concrete structure, since metal corrosion is inevitable as a result of stone crumbling. To secure the reinforcement, special glasses or other supports are most often used, which allow it to be located at a height of 5 cm from the edge of the tape.
First, two metal rods with a diameter of 1 cm are laid parallel to each other at the bottom of the trench at a height of 5 cm. Using a step of 40-50 cm, the rods must be periodically fastened. Then the same rods must be placed vertically. Their coupling should occur with the same pitch as that of horizontal rods. The upper horizontal rods are attached to the already installed vertical ones. To properly make a foundation for a garage with your own hands, and to prevent its destruction, do not forget about the distance from the top edge of the tape to the upper horizontal reinforcements.
Pros and cons of bamboo roller blinds
Bamboo roller blind is made from plant material.
Even for the threads that weave the lamellas, natural fiber is most often used. Thanks to this, a static charge does not accumulate on the surface of the product. Dust is not attracted to the mat. The product does not need to be washed; it is enough to wipe it occasionally if dirt appears on the surface. Bamboo roller blinds are easy to install according to the instructions included with the product.
In addition to hygiene, bamboo roller blinds have other advantages:
- bamboo with a dense and smooth texture does not collect or produce dust, which is why it is considered hypoallergenic;
- the lightness of the canvas makes it convenient to use;
- good light-shielding abilities: to reduce the flow of light (in the bedroom, children's room), you should hang blinds made of wide slats with a dense weave;
- the ability to pass air is due to the structure of the mat itself with small gaps between the straw;
- the versatility of bamboo canvas is that it is suitable for almost any design style, except classic ones, which require other materials;
- Possibility of use in a dry room;
- low price (the cost of a product 180x180 cm is most often up to 1000 rubles);
- Most models are easy to install on a window using above-the-opening mounting methods.
Other disadvantages include:
- limited color palette and lack of bright shades in the design;
- the maximum width of the canvas is 180 cm; curtains with a width of 240 cm are rarely sold;
- undesirability of use in damp rooms: despite the resistance of bamboo to moisture, products can change color and lose strength faster than in optimal conditions.
DIY strip foundation for a garage made of foam blocks. Monolithic tape
An alternative to a slab foundation for a garage made of foam blocks can be a monolithic strip foundation. The differences between them are that a strip monolithic foundation is laid under all elements of the building, and a slab foundation is located under the entire area of the building. It follows from this that the budget for constructing a strip foundation is lower, since the consumption of materials is less.
Although the cost of such a foundation is lower, the amount of work required to build a strip foundation is practically no different from a monolithic slab. First, you need to dig trenches of the calculated depth. Next, the sand and crushed stone cushion is added, as well as the formwork is arranged. The formwork is constructed based on the required shape of the tape. It must be fixed with supports every half meter. As with the construction of a slab base, reinforcement will be needed, but its amount will be noticeably less. The last stage of constructing a strip foundation will be pouring concrete. Its quantity is significantly less, and it becomes possible to make the solution yourself. Additional work on the foundation: waterproofing, drainage, blind area and insulation.
Strip and slab monolithic foundations are almost identical to each other in terms of the order of work. Their differences consist only in design features.
Briefly about the main thing
Before constructing a garage, you should ensure that you have a foundation with suitable technical characteristics. It will absorb the operational load, significantly increasing the service life of the structure being built. But only if the installation work is carried out using technology and high-quality materials.
Depending on the planned investment, you can choose one of the types of foundations - columnar or pile, strip or monolithic.
It will be quite difficult to create a high-quality foundation on your own. Each type of foundation has its own characteristics and imposes certain requirements for installation work.
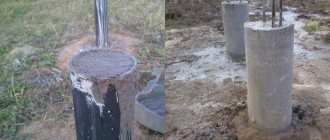
Do-it-yourself pile strip foundation for a garage. DIY pile-strip foundation
Pile-strip foundation
The foundation (consisting of pile pillars and strips laid on them) is resistant to soil movement and can withstand significant loads. In all cases, construction begins with marking the site.
Stage-by-stage work:
- calculation of the garage parameters, then the locations of the piles are marked at the corners;
- Wells are drilled with expansion in the lower perimeter. A glass-shaped roofing material is inserted into the resulting openings. Reinforcing bars with a curved hook at the bottom are placed in the resulting forms;
- steel structures in wells are filled with concrete and then compacted. After a week, each pile top is covered with bitumen.
Pile-strip foundation - laying grillage
The gaps between the piles the width of the platform are filled with sand. Roofing felt is laid on the sand. Then you should make the formwork under the level.
Before pouring concrete, the body must undergo additional reinforcement. The width of the walls made of blocks and not only should be ten centimeters narrower than the width of the garage foundation.
Pouring concrete grillage
The formwork is filled with concrete with careful compaction. The grillage is ready for use in two weeks. A two-layer waterproofing is laid on the resulting cleaned cushion. Under the grillage between the piles, the space is cleared of debris and sand to create a gap between the soil and the sheet. This gap will protect the base from damage and compensate for soil expansion in winter.
When is a shallow foundation suitable?
This type of foundation with a recess of no more than 70 cm should be made for a small frame structure, a garage. Consider the soil type so that the lower part of the platform is located an order of magnitude above the soil freezing level.
So, a shallow foundation with your own hands is much stronger than a non-buried one, since when it freezes, much less than the second one rises.
Important aspects:
- Shallow-type strip foundations are used on slightly heaving or non-heaving soil. Wet soil requires additional reinforcement with reinforcement and adding sand.
- Landscape the area not far from the garage: shrubs will reduce the depth of freezing of the ground. Such simple measures will deposit snow on the perimeter. Snow cover will reduce the freezing depth significantly.
What else does the depth and width of the foundation depend on?
Garage structures are most often standard and do not require additional reinforcement of the foundation, regardless of width. The exception is two-story structures. The classic parameters of a garage foundation are 60x40. It is necessary to expand the foundation only when the garage parameters differ significantly from the standard. If you plan to make garage walls from corrugated sheets, sandwich panels or metal profiles, then you need to make a small (up to half a meter) recess in the foundation for the garage. If the garage is built from timber, foam blocks, gas blocks, and their width is greater than the scale of the foundation, then the foundation for the garage should be expanded. When building a structure made of cinder block and concrete slabs, bricks, the length of the foundation should be at least one meter, and the width should be slightly larger than the width of the garage walls.
Do-it-yourself formwork for the foundation of a garage. Where should you start pouring the foundation?
Before making a foundation for a garage, you need to do a number of preparatory measures. Namely:
- Conduct detailed geodetic studies to determine the type of soil, freezing depth, and the height of groundwater aquifers.
- Make a drawing of the future structure, decide on the type of building materials.
- Then clear the construction site and remove the top fertile soil layer.
- Make markings for the future base, install guides, pegs and pull the cord.
- Dig a trench 40 cm wide and up to 1 meter deep along the perimeter of the garage (if geodetic surveys have not been carried out).
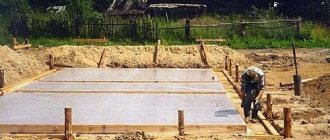
Exterior view of a finished concrete pad for a garage
Now the question arises: is it worth pouring concrete on the garage floor or is it better to leave an earthen base? Although concrete is an expensive building material, it is recommended to pour the floor to a slab thickness of at least 20 cm. In some cases, it is enough to make horizontal reinforcement in one layer, then the slab will support the weight of a passenger car.
If the garage is being prepared for a truck or large bus, then the thickness should be at least 50 cm, and at least two steps of horizontal reinforcement and vertical reinforcement should be provided at intervals of up to one meter. Building a foundation for a garage with your own hands is not a problem; it is not a costly construction, given the overall dimensions of the structure, but the rules here are similar to those for residential buildings.
Nuances of bookmarks
If you do not plan to park more than two cars in the garage, you should not build a large garage, and therefore you will not need a powerful, strong foundation. In the case of one manna, you can get by with a light, modest foundation.
Adviсe:
- Before starting construction, it is recommended to decide which communications pass through the selected construction site, so as not to touch them in the process. Thus, there will be no problems with neighbors and utilities.
- Next, it’s worth at least sketching out a sketch of what will subsequently be built, a small sketch of the area along which you will need to navigate during the construction process.
- It is quite important to timely insulate the side external walls of the foundations with foam plastic, which protects the ground from thawing and thereby prevents frost heaving of the soil.
- A massive foundation is necessary if the garage will be built from strong bricks, 1.5 masonry or foam blocks. But there is one prerequisite for all types of construction - the foundation must be 20-30 cm higher from the ground, this will prevent the appearance of moisture and dampness in the garage.
Do-it-yourself columnar foundation for a garage. Pillar foundation for a garage
The main positive quality of a columnar foundation is the ability to install it to a depth of 3.5 m or more. This makes the foundation suitable for any type of soil.
It is problematic to install a strip foundation on clay soils. The columnar foundation is installed at a depth below freezing of the soil, reinforced with reinforcement and serves for a long time without cracking or warping the garage.
When using a columnar foundation, it is impossible to create a basement in the garage.
The foundation pillars, located in the corners of the garage, sometimes go into the ground 0.5-1 m lower than others. The pillars are located under all the walls of the building at a distance of 1.5-2 m from each other.
Columnar foundations are usually made using TISE technology. Before installing the pillars, wells are drilled with a foundation drill at predetermined points.
Most often, pillars are made from reinforced concrete mixture in two ways.
An easier one is to install reinforcement into a drilled well and pour reinforced concrete mixture into it.
Another method is more expensive to manufacture, but has better load-bearing qualities. Roofing felt is placed in a free space, and wooden boards are attached horizontally to it using nails. A wooden formwork is constructed, equal in size to the future pillar. The walls of the formwork are fastened with nails so that the cement solution that has not yet taken up does not leak out. Instead of formwork, you can use asbestos-cement or metal pipes.
Reinforcing posts are installed in the formwork or pipe and reinforced concrete mixture is poured. For its manufacture, it is recommended to use cement grade 300 or 400. A base plate is made separately. Its height is at least 10 cm, and its width depends on the diameter of the pillars and the size of the step between them.
The base slab is concreted to the pillars made in the formwork, together with it they are placed in the drilled holes using a crane. The pillars, which are formed by pouring concrete mixture into the wells, have a base plate concreted after they are installed.
The diameter of the well should be 3-4 cm greater than the diameter of the previously made pillar. After placing the pillars in the wells, the remaining empty space near them is covered with soil, which ensures reliable fixation of the foundation.
Depending on the purpose and the material from which the walls are made, wooden, brick and stone columnar foundations are used.
A wooden garage is made, for example, to be installed next to a wooden house, in which case the foundation for it can be made of wood. Before laying a wooden foundation, it is imperative to protect the wood from rotting. First of all, you need to make sure that the wood is dry. After making or purchasing wooden poles, a protective coating is applied to them. You can coat wooden posts with bitumen. It is advisable to add 2-3 layers of roofing material to such a coating.
There are other treatment options, but when they come into contact with wet soil, they are washed off and the wood quickly succumbs to rot.
To treat wood in contact with moisture, organic solvents are used: solvent, white spirit. Brick and stone foundation pillars also require additional treatment with bitumen mastic. Load-bearing pillars are always made of reinforced concrete instead of brick or stone.
Installing a columnar foundation for a garage allows you to get by with minimal costs while it can be built on almost any type of soil. If you use wood or stone instead of universal reinforced concrete, there will be additional difficulties and material costs associated with the formation of pillars and their additional coating.
How to cover a garage roof? You will find out the answer to this question by reading this article.
And this article talks about insulating a garage roof.
Final stages of work
After pouring, the tape is covered with polyethylene, protecting it from the scorching rays of the sun. For the first three days, water from a hose every 4 hours . Then it is watered three times a day for 7 days, after which the formwork is removed and the tape is kept open until completely hardened, which is considered complete 28 days after pouring.
The finished tape is waterproofed with bitumen mastic or hot tar, and if necessary, insulation is installed (this is recommended if you have a basement). The filling of the trench sinuses is carried out after waterproofing and installation of insulation.
Then a blind area is poured, blocking access to the rainwater ribbon.
DIY foundation for a frame garage. Strip base for frame construction
A strip foundation for a frame garage is one of the common options for this type of building. This is facilitated by the following advantages of this solution:
- such a foundation is strong and can withstand structures of impressive size and weight;
- subject to building codes, it is resistant to deformation and shrinkage;
- the ability to make a durable floor based on concrete screed;
- You can build such a foundation with your own hands.
The disadvantages of this solution include the high cost compared to a columnar foundation, the need to use special equipment and perform additional work, such as installing and dismantling formwork. In addition, such a base can be installed at certain times of the year and only in good weather. When working with it, low temperatures and high humidity or partial precipitation are not allowed.
Before you start building the building itself, you need to wait for the concrete to harden for several weeks.
Strip foundation for a garage
After the preparatory work is completed, a trench needs to be dug along the perimeter of the construction. Its depth should be below the soil freezing level. In most cases this is about 50 cm.
The next stage of work will be the installation of formwork. For those who want to save on materials, it is possible to use simple boards made of cheap wood. For more expensive construction, formwork can be purchased or rented.
A cushion of sand and crushed stone is placed at the bottom of the trench. The next layer will be waterproofing. If necessary, the future foundation can be reinforced, and then concrete mortar will be poured into the prepared trench. During operation, the mixture must be compacted using special tools.
Afterwards, the structure is left until the concrete hardens. The foundation must first be covered with film and watered periodically to prevent the top layer of concrete from drying out.
After the structure has sufficiently hardened and the formwork has been dismantled, it is necessary to check the resulting foundation for strength. Firstly, its horizontal line must be flat everywhere. The maximum permissible difference is 1 cm. If an error is noticed somewhere, it is corrected by applying cement mortar to lower sections of the tape to level the surface. In this case, the mixture used is required to be an order of magnitude thicker than that poured into the formwork.
Secondly, all angles must be 90 degrees. All detected deviations from the norm must be urgently corrected, and only after this can we begin lining the foundation and constructing the garage.
Common mistakes and construction tips
The main mistake of beginners is saving. Reducing the depth or cross-section of structures, refusing reinforcement or insulation, or pouring mortars with a low strength grade leads to distortions and deformation of the foundation and walls of the garage. In addition, errors include:
- Construction of prefabricated or non-monolithic foundations under garages from block materials.
- Lack of base and horizontal insulating cut-offs. Garage buildings are unheated and require reliable protection from ground and internal moisture. A foundation buried in the ground or a low base, the absence of waterproofing or insulating layers between the soil, foundation and walls of the garage lead to the accumulation of moisture in the structures and subsequent destruction.
- Attempts to raise the height of the base using a brick belt given the high porosity of the garage wall material. These actions are not considered a serious violation, but when constructing a garage from aerated concrete, the brickwork does not provide sufficient evenness and does not protect the walls from moisture leakage, unlike a 2 cm layer of cement mortar or mastic.
- Laying monolithic structures without ventilation ducts or openings for communications.
- Ignoring the need for an opening. Methods for strengthening the gate and arranging the passage are thought out in advance; direct pressure from transport on the foundation is allowed, but not desirable.
To avoid such errors, the type and parameters of the foundation are justified by calculation, after clarifying the layout of the garage and its operating conditions.
Advice. It is better to calculate structures and reinforced frames using a construction calculator or entrust them to professionals.
Monolithic garage with your own hands. Construction technology
The technologies for constructing a monolithic and prefabricated garage are somewhat different from each other, so they should be considered separately.
DIY prefabricated garage
The assembly technology is very simple and accessible even to a non-professional. First of all, as mentioned earlier, it is necessary to prepare the site. When it fully meets all the criteria, construction can begin.
Pouring the foundation
First, the walls are built. They are most often presented in the form of slabs of various sizes, and there must be at least 4 of them in a set (the 4th wall is the entrance). To install walls efficiently and quickly, you need to use heavy equipment (for example, a small crane). Using a crane, the wall is lifted and placed in the desired place, where a special binder cement mortar has previously been applied. After touching the foundation, the wall is checked with special tools to ensure its level position relative to the ground and is temporarily fixed with supports.
Finished garage
The remaining walls are installed exactly according to the same principle until the wall touches the foundation. Once the wall has been installed, it must also be supported and “sewn” to the second wall.
It is sewn with special metal ties that firmly fix the walls to each other. Thus, the entire structure is erected, then a slab is placed on top, which is, in fact, a roof. After which the entire structure is left for a day so that the binding component dries, and you can begin to seal the cracks, insulate and generally arrange the interior of the building.
Important! It is necessary to insulate a collapsible garage using special sealants, as well as insulation based on PVC materials. In this case, the garage will always be relatively warm and cozy.
Making the gate