Recently, concrete has been increasingly used in construction. It has high strength, wear resistance and perfectly withstands various external influences. Considering this, the question of how to choose the necessary tool for working with this durable material has become very relevant and often arises even among professional craftsmen.
Amateur photo of a professional hammer drill at work
Makita HR2470
Our TOP opens - Makita HR2470. Makita tools are in great demand among professionals around the world for their reliability, convenience, functionality and efficiency. And this hammer drill was no exception. It is equipped with a 780 W motor with durable brushes, a dust protection system, and a special torque limiter that protects the mechanism from damage. All this significantly extends the life of the tool. This hammer drill can operate in three modes: drilling, hammer drilling, and chiselling. With its help, it will be possible to drill holes in concrete blocks and bricks with a diameter of up to 24 mm, chisel walls to expand doorways and destroy partitions. At the same time, its bit can be fixed in 40 positions. It also supports the installation of carbide bits with a diameter of up to 54 mm, drilling holes with a diameter of up to 32 mm and up to 13 mm in metal. Among the features of the hammer drill, it is worth noting the presence of a safety clutch that prevents jamming of the equipment and double insulation, which serves for reliable protection against electric shock. It weighs 2.6 kg and due to proper weight distribution throughout the body, an additional handle and rubber inserts that prevent slipping and dampen vibrations, it is very convenient to hold in your hands for a long time and work with such a hammer drill.
- Power: 780 W.
- 0 – 1100 rpm.
- 0 – 4500 beats/min.
- Max. impact energy: 2.7 J.
- 3 operating modes.
- D drilling in wood: up to 32 mm.
- D drilling in metal: up to 13 mm.
- D drilling in concrete: up to 24 mm.
- Reverse.
- Case included.
- Cable length: 4 m.
- Dust removal system.
- Dimensions: 370 x 84 x 214 mm.
- Weight: 2.6 kg.
Is it worth buying a wall chaser?
Let's just say that it all depends on the frequency of use of the device and the type of work performed. If you plan to lay wiring exclusively at home, then you can get by with an angle grinder, for example, a Makita GA 5030 with a 125 mm disk, since the grooves are usually completed in one day. In this case, purchasing a wall chaser will be inappropriate - it simply will not pay off.
By the way, if you live in a big city and you have many hardware stores, then just rent a wall chaser. For some 500 - 1000 rubles you will pierce the wall and will not overpay for a device that you will never use again.
If you plan to carry out commercial orders, installing wiring for clients, then it is better to buy a wall chaser. From personal experience, we can say that when installing wiring once a month, you can still somehow get by with an angle grinder. But with weekly orders, the speed of work is very important, so a wall chaser is needed like air.
CALIBER EP-800/26
Next in our TOP is the CALIBR EP-800/26 rotary hammer. It has 3 operating modes, is equipped with an 800 W motor and develops an impact force of 3.2 J, due to which it provides excellent performance. It can be used for drilling holes up to 13 mm in diameter in metal, up to 30 mm in wood and up to 26 mm in concrete, brick or stone, as well as for light chiselling work, be it chipping ceramic tiles, cutting out niches, chiseling stone surfaces and much more. The CALIBR hammer drill has an SDS-Plus type chuck, which ensures quick and easy replacement of equipment, and is also equipped with a drill chuck and a reverse function, which will allow you to remove the tool from the material if it jams. For ease of operation, the hammer drill is equipped with a locking button, which eliminates the need to constantly hold the trigger. This tool also has a drilling depth limiter, a key lock from accidental starting, and an additional side handle that can be locked in a position convenient for the user. Those who have already purchased such a hammer drill generally speak positively about it, noting its high power and efficiency when working with various materials, as well as its affordable price. The only significant drawback is that the hammer drill turned out to be quite heavy, so not everyone will be comfortable working with it for a long time.
- Power: 800 W.
- 0 – 5500 beats/min.
- Max. impact energy: 3.2 J.
- 3 operating modes.
- D drilling in wood: up to 30 mm.
- D drilling in metal: up to 13 mm.
- D drilling in concrete: up to 26 mm.
- Reverse.
- Case included.
- Dimensions: 420 x 110 x 275 mm.
- Weight: 3.7 kg.
How to groove a wall for wiring
Despite the fact that the tasks are different, usually grooves in rooms are made specifically for laying electrical networks. And here it is important to do everything correctly, so that later you can operate all the elements safely and comfortably.
Work order
First, they draw up a detailed work plan, outline the main stages, carefully calculate and think through everything.
The main stages of creating grooves for electrical wiring:
- Determining the location of sockets, switches, lighting wiring, etc. The plan is drawn carefully, noting each element and its location (taking into account the above rules and SNiP requirements).
- Development of routes in accordance with the locations of the main elements.
- Transfer the plan to the walls with a marker or pencil. How to do this: mark the locations of the elements (lamps, sconces, chandeliers, switches, sockets, etc.), draw lines vertically upward from them, not reaching the corner with the ceiling, mark the installation locations of distribution boxes that are connected horizontally by a straight line and go to the electrical cabinet.
- Checking all places where drilling will be carried out (both grooves and recesses for socket boxes) for the presence of old wiring using a detector. If a metal frame or lines are found, you need to adjust the plan and work around them.
- After the plan with the adjustments has been transferred to the wall, you can begin gating: first, holes are made for distribution boxes and socket boxes, then they are connected with grooves.
- After everything is done, the distances are measured and entered into the plan.
- Next, the cables are laid and fixed in grooves. All cables must be checked for insulation integrity before and after installation.
- The grooves are sealed with mortar, then the cables are checked again and the external parts of the elements are mounted.
Marking the walls for grooves
When laying grooves for electrical wiring, all general SNiP rules apply; you also need to take care of some specific points.
How to correctly mark the grooves for wiring:
- Prepare tools - these can be either modern devices (laser, electronic rangefinders) or conventional means (markers, pencils or crayons, ruler or tape measure, plumb line and level, construction cord).
- Marking with a marker the locations of lamps on the ceiling, sockets and switches on the wall, distribution boards/boxes. Measuring the distances indicated on the plan. It is advisable to outline the boundaries for gating using samples of cables and socket boxes.
- Selecting the width of the groove in accordance with the cable (here B is the width, H is the height). For a three-wire cable with a cross-section of 0.75-4 millimeters from the box to the socket box, the groove is made 1 centimeter wide and 1.5 centimeters deep.
- Possible deviations that must be taken into account when marking: the height of the floors rises after pouring and laying the covering, the ceilings will drop after installing suspended/tensioned structures, the walls can change configuration after leveling with plaster or drywall. It is also worth making adjustments for the curvature of the walls, which can often be observed in old and new houses.
- First method of performing markup
– draw straight lines with an upholstery cord: first you need to pull a construction cord soaked in any colored powder between two points at a distance of 1 centimeter from the wall, then pull the cord and quickly release it. For high-quality tension, you can use nails, screws, and steel dowels.
- Second marking method
– mark 2 control points with the obligatory use of a level, draw a strictly vertical/horizontal line between the points with chalk.
- Third marking method
– the use of laser devices that illuminate clear lines in vertical/horizontal planes.
- To apply markings to the ceiling, different methods are used, but first, determine the central point on the surface (draw 2 straight lines from the corners diagonally, taking the point of their intersection as the center).
Features of reinforced concrete walls
When gating reinforced concrete structures, the metal frame must not be damaged. First, the depth of the steel frame is determined, then the groove parameters are adjusted. If the passage of metal rods is difficult to determine, it is best to make small recesses or not at all in the wall itself, but hide it in a layer of plaster.
You can also do open wiring - make it retro or lay the wires in special cable channels. You can hire a designer who will make communications part of the interior. In Moscow and the regions, finding a professional is not difficult.
Making furrows on concrete
To make grooves in concrete, various tools are used - a hammer and chisel, an angle grinder, a hammer drill, and a wall chaser. Power tools speed up the process, but reduce safety and can generate large amounts of dust. A wall chaser is expensive, but it allows you to complete the work quickly, efficiently, and practically dust-free. Each master chooses the method of creating grooves that is suitable for him and implements the task.
Work on aerated concrete
To create grooves in aerated concrete, all the same methods can be used as for conventional concrete. But it is best to choose a special wall chaser for foam/gas blocks, which makes two grooves at once. The only disadvantage of working with aerated concrete is the appearance of a huge amount of dust, which, when using a wall chaser, goes into a special compartment; in other cases, it is necessary to use an industrial vacuum cleaner.
Dust-free chipping
Dust can be a serious problem at work, so it's worth thinking ahead about how best to deal with it.
Expert tips for reducing dust:
- Moisten the surface regularly during the process.
- Use a household vacuum cleaner.
- Use a wall chaser with a vacuum cleaner already connected to it - the device has a special casing that covers both disks and isolates the cutting space, while the dust is pulled out through the outlet of the vacuum cleaner.
- Wet cutting of concrete with a grinder - a hose is used that continuously supplies water to the disc, the entire cutting area. But here you need to be careful, because if water gets on the instrument, it will ruin it.
BISON P-26-800
Our TOP is completed by the ZUBR P-26-800. This three-mode hammer drill will be an excellent option for home use, and will also be useful in the country house and garage. It will also be suitable for professional activities, but it is worth considering that during prolonged use it begins to get very hot. But in general, those users who have already bought such a hammer drill speak positively about it, noting that it is excellent for DIY repairs in an apartment. It allows you to drill holes in concrete with a diameter of up to 26 mm with drills and up to 68 mm with crowns, and will also allow you to drill holes with a diameter of up to 13 mm in metal and up to 30 mm in wood. It also has a reverse function that allows you to use the tool as a screwdriver. One of the advantages of the hammer drill is the presence of a safety clutch to protect the operator when the drill is blocked. In addition, the hammer drill allows you to set the chisel in the desired position for more convenient work. It also has a drilling depth limiter and a “Start” key lock, which eliminates the need to constantly keep your finger on it. The build quality of this hammer drill, as noted by the owners, is good. And due to the optimal weight distribution and well-developed ergonomics, it is very convenient to work with it.
- Power: 800 W.
- 0 – 1300 rpm.
- 0 – 4800 beats/min.
- Max. impact energy: 3 J.
- 3 operating modes.
- D drilling in wood: up to 30 mm.
- D drilling in metal: up to 13 mm.
- D drilling in concrete: up to 26 mm.
- Reverse.
- Case included.
- Cable length: 3 m.
- Dimensions: 420 x 105 x 300 mm.
- Weight: 3.3 kg.
How to make a groove in a concrete wall
The main document regulating the specifics of making grooves in a concrete wall with any tool is SNiP 3.05.06-85. It specifies the rules for creating electrical wiring, all distances and basic safety requirements. By ignoring them, you can not only jeopardize the comfort and safety of people living in the premises, but also be fined.
Before starting work, you need to carefully mark everything, determine the location of the wiring, installation of sockets, switches and other elements. Installation is carried out taking into account the requirements specified below.
SNiP regulatory requirements for gating walls for wiring:
- Load-bearing walls cannot be tapped.
- Channels must be laid parallel to the structures: horizontally or vertically; diagonal grooves cannot be laid.
- The distance between the ceiling and the groove should be at least 15 centimeters.
- There must be a distance of at least 40 centimeters to the gas pipe.
- The depth of the groove is no more than 2.5 centimeters.
- Before laying new wiring, you need to check the walls for the presence of old ones (if it is not a new building).
- The grooves are laid exclusively vertically/horizontally; no oblique lines are allowed. An exception may be the need to lay wiring on walls with a slope (attic, for example), when the line can be run parallel to the slope of the wall.
- You can turn the groove between two points only once: each turn represents a bend in the cable, which heats up more in such places. And if there are a lot of turns, the danger of operation increases.
- The size of the grooves should be as follows: maximum width 3 centimeters, depth no more than 2.6 centimeters. The total length of the line from the junction box to the point should not be more than 3 meters.
- Optimal distances: from batteries and gas pipes 40 centimeters, to the door 10 centimeters, from the floor - at least 5 centimeters (but better than 10).
- It is forbidden to touch reinforced concrete structures during the gating process, but if you do this, do it in such a way as not to touch the reinforcement frame and with a minimum groove depth.
- It is prohibited to scratch internal load-bearing walls; on the first floors, work is carried out very carefully, since here the walls support the entire building.
- Grooving in the ceiling is carried out by calculating the shortest path to the lighting point.
- Cutting grooves in floor slabs is prohibited. When a line is laid across the floor, it is embedded in a concrete screed, which is poured taking into account the need to lay furrows.
- During the work process, be sure to take care of personal protective equipment - a respirator or mask is suitable for these purposes.
Rules for sharpening a rotary hammer blade
Sharpening is a process that creates the main property of a chisel. It is performed at a manufacturing plant or at home (much less often).
High-quality blades are already produced sharpened. In this case, you can pay attention to the correspondence of the angle to the scope of application:
- 35-45 degrees – soft metals;
- 60 degrees – medium strength materials;
- 70 degrees or more – fragile materials.
If the hardness of the material does not match the angle, the working edge will quickly become dull. To avoid spontaneous reduction in pungency, metallurgical and chemical processing methods are used.
At home, sharpening can be done using a sharpening machine. The following must be taken into account:
- During the process of removing the metal layer, flying chips are formed - respiratory and visual protective equipment should be used;
- Removal of the layer must be carried out evenly and by turning the nozzle;
- heating of the blade should not exceed 1100 degrees (visually dark yellow color).
It is best to request such an operation from specialists - they know what to do. An inexperienced master can worsen the blade and, as a result, reduce labor productivity.
Use of diamond installations
Diamond drilling devices are often used to make large diameter holes in concrete . These installations are attached to the wall using special fixtures. To clean dust and cool the cutting tool, water is supplied to the installation.
With diamond drilling, the hole is clear and precise in shape and size . Only a large company can afford such an installation. But if necessary, you can always order such wall drilling for yourself.
In this video you can see the process of drilling a hole for the mounting box using a diamond core bit:
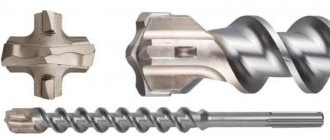
Pobedite bit for drilling
These are the most versatile and at the same time cheapest crowns. Cheapness, coupled with a sufficient working resource, makes this type of crown the most popular among other types when it comes to performing a small amount of work. This is where we will focus. The design is very simple, hence the main parameter - reliability. The main element is the “cup”; this is what you should pay attention to when purchasing products. When changing crowns, it becomes possible to select the required drilling depth. Therefore, if you need to drill a hole in depth with a crown, then it is best to choose more massive crowns. There are special (professional) crowns, they are very strong, but their price is expectedly higher. But even with a simple household tool you can make very precise cuts, but you must comply with the permissible amount of work, otherwise there is a high risk of early wear of the pobedite bit.