Adjustable wrench KRAFTOOL SlimWide PRO 27258-15
1390 ₽ More details
KRAFTOOL SlimWide, 250 / 50 mm, adjustable wrench 27258-25
2870 ₽ More details
Kraftool sledgehammers
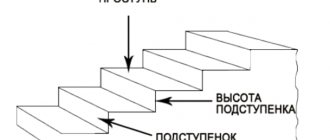
The main structural element of staircases is the step. Ease of use, appearance and other characteristics depend on what material was used in the production of the structure.
Plywood stairs are the most budget option, but there are a number of requirements for them in terms of reliability and installation methods. Therefore, this issue should be considered in detail in the context of each individual category.
This material has a number of pros and cons
How to properly make a staircase from plywood?
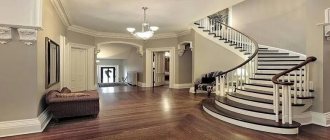
Plywood stairs are a widespread structural element that is found both in private homes and in public buildings. Let's take a closer look at what principles must be followed when making them, and the main mistakes that craftsmen make. For example, let’s take a staircase on a metal frame. A screw one will be much more difficult to make, although it looks more refined and elegant. Only those craftsmen who have already gained some experience in this field should take on such a design.
Types, designs and their shape
Craftsmen consider most plywood stair steps to be an irrational solution. Because ease of movement, service life, and stability of the structure itself depend on this. The minimum values are based on three components, which are considered key in choosing the shape and size. Reliability and quality can be ensured, as well as energy spent can be optimized by arranging intermediate sites:
- Semicircular. It is used in arranging the entrance to a turning march, in designing approaches to a private house.
- Round. It is notable for having a certain radial orientation. This form is chosen for arranging the porch. Indoors, round steps are made at the point where the flight of stairs rises to the 2nd floor.
- Straight. It is a rectangular tread. It is secured with screws from the rear side of the structure. Often used in the construction of screw structures.
- Trapezoidal. This is the standard form of steps for stairs made of plywood sheets. Here, winder treads are used, where the outer edge of the step has a disproportionate shape, selected individually for each individual place. The sides of the risers and the step itself are of unequal width and outwardly resemble a trapezoid. That's why they get their name.
You can make a plywood staircase of various shapes.
A do-it-yourself plywood staircase should fit into the design of the room without spoiling the overall picture. To ensure this is exactly the case, the following types of steps are selected:
- Open. A structure consisting of steps placed horizontally, where the distance from each other remains free. This shape gives the structure lightness. Visually enlarges the space and adds comfort to the room.
- Closed. Here treads and risers are added to cover the space between the treads. They can be made from anything: glass, wood or plywood sheets.
Flights of stairs may contain a so-called false step (additional rise). It is installed at the bottom of the structure.
False steps are not part of the design of a flight of stairs; they serve as a decorative element. Suitable for increasing ease of use.
Features of using plywood
When the width of the stairs is over 50 cm, the steps must be made with risers or secured to a metal frame made of corrugated pipe or angle iron. This is due to the fact that plywood is prone to irreversible deformation.
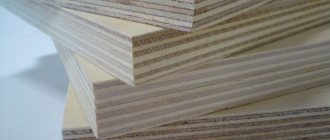
The thickness of the plywood sheet will depend on the size of the steps and the presence of stiffeners:
- if a metal frame serves as a support for the tread (the horizontal part of the step on which the foot rests while walking), you can choose a sheet 12 mm thick;
- the required minimum for steps made entirely of plywood, resting on a riser (a vertical element connecting two treads) is 18 mm;
- steps supported on a string 40-50 mm wide are best made from plywood 22 mm thick.
Do-it-yourself finishing of concrete stairs with wood: step-by-step instructions, photos, prices
- plywood sheets are resistant to temperature changes, high humidity, with the right choice of material, also does not threaten plywood products;
- as a rule, plywood blanks have better strength characteristics and are able to withstand significant mechanical loads;
- plywood is cheaper, especially if you take for comparison such expensive types of wood as oak, larch and beech.
- Level the entire structure, clean the surface from possible deposits of cement and concrete.
- Remove all dirt and dust. You can use a vacuum cleaner for this purpose.
- Cut out parts to fit the steps and risers from sheets of moisture-resistant multilayer plywood 12-20 mm thick.
- Apply a layer of glue to the surface of the concrete steps. It is better to use two-component polyurethane glue.
- Lay the plywood on the glue and secure it in the corners with dowel nails.
- Install vertical risers.
- Install posts and balusters. Drill holes for anchors at the required points. Screw them in with the long ends. Screw balusters onto the short parts.
- Attach handrails.
- Perform the finishing sheathing, securing the wood with glue and self-tapping screws. Slightly recess the screw caps into the wood.
- Fill the recesses from the caps with putty.
- If necessary, varnish the trim.
Stairs with wooden cladding can decorate any interior. They will delight owners with their attractiveness for many decades. Sheathing concrete stairs is a fairly simple task; it is accessible to every home craftsman.
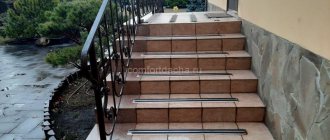
Cladding with ceramic tiles or porcelain stoneware
It is convenient to use tiles as steps. Firstly, there is no need to put a step under a wooden riser, and secondly, you can choose a beautiful contrast. As a result, we get a beautiful staircase that you will never get tired of climbing.
Expert opinion
Strebizh Viktor Fedorovich, leading construction foreman
With the plane of the risers, everything is much simpler. Their standard height varies between 150-220 mm, which means they can be faced with one laminate panel, laying it along the plane. If you want to clarify something, please contact me!
Indicative work plan
The manufacturing process of any plywood staircase takes place in several stages.
- The geometry of the metal frame is assessed. The steps must have the same dimensions, it is necessary that the platforms be parallel and perpendicular, and that there are no gaps in the structure itself. If serious violations are detected, they should be eliminated at the preparation stage. Different heights of steps can be adjusted by using boards of different thicknesses when installing. But if there are cracks in a metal structure, welding work is indispensable. Before cladding, all welds should be cleaned and hanging metal “snot” should be removed.
- It is necessary to calculate the amount of materials needed. In addition to the plywood itself, you should take into account the mounting hardware and the availability of working tools. Don’t forget about consumables: cutting discs, sandpaper for cleaning seams, and so on. Before purchasing, the amount of calculated material should be increased by 10%. This reserve is necessary in case of unproductive waste, which in any case will appear during installation.
- The material is selected based on the purpose of the staircase. Pay attention to moisture resistance, wear resistance and thickness of the plywood. The more often the ladder is used, the more durable the materials from which it will be made should be. Depending on the area of the plywood sheets, it is necessary to draw up a cutting plan in such a way that the waste remaining after cutting is minimal.
Cutting principles
Plywood is a difficult material that behaves capriciously when cutting. Let's look at several methods for cutting workpieces using various tools, taking into account the nuances that may arise during work.
- Using a jigsaw. This lightweight and compact device will allow you to make precise and even cuts along a given contour. However, the speed of work will be low. When working with a large area of plywood sheet, it is advisable to carry out the cutting work together.
- Hand-held circular saw. The edge of the workpiece will be smooth if you feed the sheet evenly, slowly and without jerking.
- Using a grinder. It is best to carry out work with this tool only by experienced craftsmen. It is desirable that the depth of cut be many times greater than the thickness of the sheet. Before starting work, it is necessary to install a disk of the appropriate diameter for working with plywood (wood).
The general rules for tools are the same: the equipment must be in good working order and the cutting parts must be sharp.
After cutting, the cuts must be cleaned with sandpaper.
What tool will you need?
Preparation of the tool will depend on which parts of the wooden railings will be made by hand. If you order all the parts from specialists, providing them with drawings, this will significantly speed up and simplify the work. All you need is a screwdriver, self-tapping screws, bolts, wood glue, clamps, and a hacksaw. And, of course, a pencil, ruler, corner or level.
It is more convenient to use a modern power tool, which allows you to cut or sand something as quickly as possible. But sometimes hand tools also become useful. Thus, the edges of the cuts are often sanded with sandpaper. Correct the shape of the parts with a chisel or cutter.
If you want to make all the details with your own hands, then you need a surface planer and a jointer to trim the bars, slats, and boards. You will need a miter saw, a wood milling and lathe or a jigsaw (if balusters are cut from a thin board), and a grinding machine.
Sequence of installation work
Sheets of plywood are cut into blanks: steps and risers.
There are 2 cutting methods.
- The first involves using a ready-made template. The disadvantage of this method is the high risk of gaps and cracks. A deviation of a few millimeters from a given standard in a metal structure will significantly affect the quality of the assembly. The advantage of the method is that the speed of work increases many times, which is important in continuous production.
- The second method is to sequentially cut each element. The speed of work drops several times, but the accuracy increases many times. With this method of creating blanks, cracks and gaps during assembly are eliminated.
Do not forget that the depth of the steps must correspond to the length of the foot. The optimal width of the tread is considered to be 30 cm. For safety reasons, the owner’s foot must fully rest on the tread.
The plywood pieces are secured using self-tapping screws. The connection points are marked in advance, making marks on all steps. In order for the finished structure to look aesthetically pleasing, all screws must be on the same line. The distances between them should be the same.
The structure should be sheathed from top to bottom. For ease of installation, you can attach temporary steps from scrap materials. The minimum thickness of plywood blanks must correspond to the load and design features, otherwise they may sag when walking. By installing a temporary false beam, cut exactly along the line of the stringer (the beam on which the steps rest from above), you can align all the steps in length.
When installing steps, first install the vertical blank, and then lay the horizontal one. Having mastered his hand, the master can connect the risers to the step separately, and then attach them to the metal frame. However, the likelihood of distortions in this case will be much higher. It is better not to screw the screws in completely until the structure is completely assembled. They can only be tightened after making sure there are no gaps or distortions.
At the last stage, the sections are decorated with rollers and belts, gluing them to liquid nails.
Useful tips
It is not very difficult to install plywood stair steps to the second floor with your own hands. It is necessary to properly sheathe the finishing layer of the product, carefully seal the joints and not forget about the decor. Sheathing and finishing are done last.
Fastening the false legs after final installation often causes certain difficulties , especially on long spans and in the absence of appropriate experience. There are several tricks that can make installation easier. Even at the initial stage, it is necessary to attach a longitudinal sheet of plywood to the intended installation site and trace it around the perimeter with a pencil. The blank will serve as a template.
Another small nuance - the steps should be made 1 mm larger than the width of the metal frame. This will ensure a tight fit of the structural elements and eliminate the formation of gaps and cracks.
Using the finished template, a false pole is prepared - one of the main load-bearing elements of the staircase to which the steps are attached. Holes for fastening are drilled in the sidewalls of the channel and corners, the false wire is applied to the metal structures and secured to the frame using liquid nails. This “trick” will simplify the final installation, since after installing the steps it is quite difficult to secure the stringer exactly.
How to decorate a concrete staircase with wood with your own hands: how to sheathe it, video, etc.
- A special corner metal profile is used to fasten the laminate. It is attached with dowels or self-tapping screws to the corner of the step.
- Laminate pieces are inserted into the corner grooves, and they are connected to each other using a tongue-and-groove lock. You can start installation from any edge.
- A panel for the riser is inserted into the lower groove of the corner.
- Laminate flooring must be laid on an adhesive composition, which is called adhesive for laminated parquet. It is applied to the concrete surface with a notched trowel.
- The corner profile is closed with a corner cover, which is made of wood, metal, or plastic. It is inserted into the upper grooves on the profile, which must be treated with an adhesive composition.
Pros and cons of the material
Plywood is moisture resistant. Unlike wood, plywood parts always shrink evenly and do not deform. If a house with plywood stairs is not heated during the winter season, you don’t have to worry that the structure will deteriorate due to temperature changes. The steps will not crack and will not lose functionality, both in heat and cold. In addition, the material is not expensive.
Plywood also has disadvantages. The material has low density. Because of this, plywood stair steps can wear out quickly. In appearance, a staircase covered with plywood is not particularly attractive. But this drawback can be easily corrected by choosing the right type of finish. You can decorate plywood with paints or cladding.
Options for cladding materials
- Concrete stairs with wooden cladding last for centuries.
- Properly selected wood does not dry out or creak.
- With the right selection of wood, the noise of concrete can be reduced to a minimum.
- Wood is a fairly light material.
- Wooden cladding has excellent thermal insulation characteristics.
- Wood is easy to process.
- This cladding decorates any interior and looks very organic in it.
- Wood insulates the steps. It’s nice to walk on it barefoot and not have to worry about your health.
How to treat the surface → Room decoration → How to choose the right paint → Surface treatment technologies → Leveling and finishing the walls → Selecting and applying a primer → Removal from the surface → Stretch ceilings and technologies → Reviews and testimonials
Staircase manufacturing process
A DIY plywood staircase requires a large amount of material. It is cheaper to install metal stringers, which have metal supports with steps covered with plywood. If the structure is made entirely of plywood, then the stringers are made of 40 mm sheets. thick.
Where is the kosour located?
The manufacturing process is similar to the process of creating a wooden staircase:
- Steps are marked on plywood strips. Then the stringers are cut. It is important to monitor their symmetry. To do this, the first part is used as a template when cutting out the second element. It is better to cut the first part according to the drawing. You can make the layout yourself or download it from the Internet.
- All details of the steps are manufactured. Each element is aligned with the previous one to avoid distortions and gaps during assembly.
- Plywood steps for the stairs are assembled. If according to the plan the structure has risers, they are assembled first. Then the treads are installed. The elements are attached to the stringers using self-tapping screws. It is recommended to pre-glue the parts. This installation will be stronger.
- Upon completion of assembly, the structure is installed in the prepared place. It is attached first to the upper ceiling, then to the floor.
- If fencing is provided, they are made of the same material. You can make fences from wooden beams or metal. The staircase to the second floor with a railing looks more impressive. In addition, it is safer, especially in families with small children. The fence can be solid or with gaps.
Safety barrier for children
For the solid version, take a sheet of plywood, cut out a proportionate part and attach it to the stringer and to the floor. Can be made from several pieces of material if there is no solid sheet.
To do the job correctly, you can watch videos from professionals in advance. Assess your capabilities and only then start working.
Wood planking process
It is important to consider that a concrete staircase itself is not a cheap pleasure, and its price is almost 2 times higher than the same analogue, made entirely of wood. In the end, we end up spending on two structures: one is concrete, the second is wooden.
In the case of constructing a completely wooden staircase, there will be no load-bearing elements. Concrete stairs are most often cast in public buildings; in dachas and private houses, wooden stairs still predominate.
Let's consider the technology of cladding a concrete staircase with wood. So:
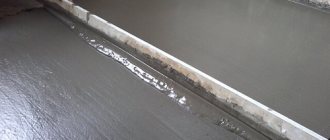
- Preparatory stage. Here all available steps are measured and the one with the greatest height is determined. All others are leveled as much as possible by using a special mixture, which tends to level on its own.
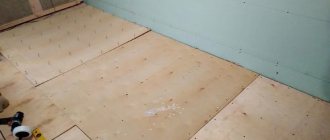
In the case where the differences in heights are small, or we have it as a given that all steps are approximately equal, then even in this case, treatment with the composition is mandatory. Before carrying out this kind of work, it is recommended to clean all steps from construction debris and dust, then apply a primer layer to increase adhesive properties. When the primer has completely dried, you can begin processing with leveling mixtures. - At this stage, the plywood is fastened. It acts as a layer that will provide moisture insulation and prevent wooden linings from accumulating unnecessary moisture. Next, another layer of soil solution is applied, and a time equal to the time it takes for it to dry completely is waited.
- Now you can think about the steps. You can make them yourself if the tools and capabilities allow. Otherwise, there is another way out - to order solid wood steps from specialized companies. The complex shape of the steps requires preparing a template on thick cardboard or an unnecessary piece of plywood. This measure will help to accurately create steps according to these values.
- After the preparatory work, it is recommended to start the finishing process from the bottom.
- You will need three bolts with a diameter of about 0.6 cm, which are screwed into the lower end of the riser. The bolts must be screwed in in such a way that protrusions are formed from them.
- Next, you will need to cut off the heads of the screws and then mark their position on the wooden riser.
- Now you need to drill holes of the required sizes and fill them with special resin and epoxy.
- Next, the plywood is processed with “liquid” nails or other high-quality adhesives, and facing boards are attached.
- Grooves of the required depth are cut into the steps to create a resting riser.
- The subsequent riser is fixed using self-tapping screws.
- The surface of the plywood is once again treated with adhesive compounds, as well as the grooves, and the starting stage is mounted. Leveling is necessary.
Applying the algorithm, we move in this way from bottom to top. You should remember a small nuance - even with the most precise and precise cladding with wooden materials, there will be cracks on the sides of the steps. They can be filled with construction foam and covered with putty or plaster over it.
Plywood as a finishing material
Finishing the stairs with plywood is an economical and practical option. If the structure is concrete, it doesn’t look very good without cladding. The plywood finish will give it a neat look. You can choose the material to match the main color of the interior or paint it yourself. After looking at different photos of finished structures, you can choose the appropriate finishing option.
To sheathe concrete with plywood, you will need accurate measurements of the finished steps, risers (if any), as well as side elements. Some people only cover the surface of the steps, without side trim. You can see in the photo what it looks like.
To correctly determine the dimensions of the cladding parts, measure the highest step and cut out the elements based on its measurements. Before laying plywood, it is important to clean the concrete from dust and dirt. It is better to rinse well with soapy water and dry.
Before laying the plywood surface, the concrete is primed and covered with mastic. The part is laid on the mastic and secured with dowels in several places. It is recommended to work starting from the bottom step. If gaps form, they are filled with foam for installation. And the top is covered with putty.
Finishing a concrete staircase: finishing steps with wood with photos
- Do not attach the solid wood to the step so that the finishing does not fall off.
- When choosing a finishing material, use boards with a thickness of more than 3 cm.
- It is best to choose a paint that will not hide the wood grain.
- Before starting work, the concrete base of the stairs should be cleared of debris and dust. This will ensure good adhesion to the glue.
- When attaching plywood, not only glue is used, but also dowels as additional fastening.
- Moisture-resistant varnish must be of good quality and coated with at least three layers. Before applying the next one, you must allow the previous layer to dry.
Pros and cons of the material
Plywood is moisture resistant. Unlike wood, plywood parts always shrink evenly and do not deform. If a house with plywood stairs is not heated during the winter season, you don’t have to worry that the structure will deteriorate due to temperature changes. The steps will not crack and will not lose functionality, both in heat and cold. In addition, the material is not expensive.
Plywood also has disadvantages. The material has low density. Because of this, plywood stair steps can wear out quickly. In appearance, a staircase covered with plywood is not particularly attractive. But this drawback can be easily corrected by choosing the right type of finish. You can decorate plywood with paints or cladding.
Advantages and disadvantages
It is believed that plywood for staircase steps can only be used as a kind of underlay, for example, leveling a concrete base before it is faced with wood. Indeed, such an application is not uncommon. But this material has properties and characteristics that allow it to be used for finishing or structural elements of stairs.
What are these characteristics?
Advantages of plywood as a material for stairs
When compared with wood, plywood has several important advantages over it:
- Higher resistance to changes in humidity . And, as a result, there is a lower risk of uneven shrinkage of structural elements.
- Resistant to air temperature fluctuations . What is important in your case when the stairs are located in a house that is unheated in winter.
- High strength characteristics associated with the properties listed above. Plywood steps are unlikely to crack due to temperature and humidity fluctuations and lose their load-bearing capacity.
- Affordable price.
For reference. To be fair, the last point requires clarification: a DIY staircase made of plywood is unlikely to cost much less than the same structure made of pine or other inexpensive types of wood. Especially if it is thick, moisture-resistant plywood, or if the staircase will subsequently be finished with veneer, deck or other similar materials.
Disadvantages of the material
Plywood has two serious disadvantages:
- Since the material is made mainly from birch, which has a low density, plywood steps for stairs can wear out quickly;
- Unpresentable appearance.
But both of these shortcomings can be corrected with high-quality finishing, the use of paints and cladding.
Staircase manufacturing process
A DIY plywood staircase requires a large amount of material. It is cheaper to install metal stringers, which have metal supports with steps covered with plywood. If the structure is made entirely of plywood, then the stringers are made of 40 mm sheets. thick.
Where is the kosour located?
The manufacturing process is similar to the process of creating a wooden staircase:
- Steps are marked on plywood strips. Then the stringers are cut. It is important to monitor their symmetry. To do this, the first part is used as a template when cutting out the second element. It is better to cut the first part according to the drawing. You can make the layout yourself or download it from the Internet.
- All details of the steps are manufactured. Each element is aligned with the previous one to avoid distortions and gaps during assembly.
- Plywood steps for the stairs are assembled. If according to the plan the structure has risers, they are assembled first. Then the treads are installed. The elements are attached to the stringers using self-tapping screws. It is recommended to pre-glue the parts. This installation will be stronger.
- Upon completion of assembly, the structure is installed in the prepared place. It is attached first to the upper ceiling, then to the floor.
- If fencing is provided, they are made of the same material. You can make fences from wooden beams or metal. The staircase to the second floor with a railing looks more impressive. In addition, it is safer, especially in families with small children. The fence can be solid or with gaps.
Mounting methods
Installation of a staircase made of plywood sheets should be based not only on the choice of shape, but also on the method of fastening. There are several of them:
- Frame. For the frame, a metal plate, channel or corner is selected. The upper elements (steps) are attached directly to them.
- Stringers. Made from natural wood or plywood sheets. Ridges (fillies) are cut out on them, into which treads are then laid. In the assembly of this type of staircase, the fixation of elements can be very different: with bolts, using nails, a lock, or sitting on an adhesive solution. In this case, the bowstring can be made retractable or mortise.
- Central support. It is used in arranging a screw structure, where the material for the stairs is plywood. The design has the form of a spiral, where each of the risers is located at the same distance from each other.
- Console. In the manufacture of this type of staircase, a frame of fixed anchors or welded reinforcement is first installed. The steps seem to come out of the wall.
When developing a staircase project using plywood, you need to study all the options and choose the most suitable one for the room, taking into account the design and purpose of the room.
Plywood as a finishing material
Finishing the stairs with plywood is an economical and practical option. If the structure is concrete, it doesn’t look very good without cladding. The plywood finish will give it a neat look. You can choose the material to match the main color of the interior or paint it yourself. After looking at different photos of finished structures, you can choose the appropriate finishing option.
To sheathe concrete with plywood, you will need accurate measurements of the finished steps, risers (if any), as well as side elements. Some people only cover the surface of the steps, without side trim. You can see in the photo what it looks like.
To correctly determine the dimensions of the cladding parts, measure the highest step and cut out the elements based on its measurements. Before laying plywood, it is important to clean the concrete from dust and dirt. It is better to rinse well with soapy water and dry.
Before laying the plywood surface, the concrete is primed and covered with mastic. The part is laid on the mastic and secured with dowels in several places. It is recommended to work starting from the bottom step. If gaps form, they are filled with foam for installation. And the top is covered with putty.
Covering a metal staircase with laminate
Laminate is a finishing material consisting of several layers.
- stabilizing and moisture-proof (resin-impregnated craft paper);
- load-bearing (HDF) - a board made of pressed wood ensures stable geometry and rigidity of the panel;
- decorative (decor paper) - imitates natural wood or stone, due to various additives it has a matte or glossy shine;
- protective - a thin sheet of paper impregnated with resins and aluminum oxide creates a reliable barrier to any external influences.
The advantages of covering stairs on a metal frame with laminate are low price and wear-resistant finish.
Useful tips for installing wood cladding
- Don’t save time on double-checking calculations, adjusting parts, or additional markings - it’s very easy to ruin expensive material
- maximum deviation in step height is 0.5 cm - this guarantees ease of use
- do not skimp on the varnish coating of the cladding - cover with no less than three layers of varnish
We complete the covering of the stairs by varnishing and sanding; if desired, you can use stain to change the color of the coating.
vote
Article rating
Choosing a laminate - what to look for
Wear resistance class. As a result of tests for abrasion, sound absorption, shock resistance, and moisture resistance, laminate flooring is divided into 4 classes:
- 31 - for residential premises with low traffic, utility rooms;
- 32 - for medium-intensity loads (service life - more than 15 years);
- 33 - for high loads (retains its appearance for more than 20 years);
- 34 - recommended for commercial premises with a large flow of people and significant loads.
The higher the class of laminate used to cover the metal frame of the stairs, the better. At the same time, take into account the installation location of the structure in the house; for example, a flight of stairs to a rarely visited attic can be finished with 31 classes.
A locking system that differs in the way the board is joined. The longer the lock, the stronger the connection between the planks. There are systems with water-repellent wax impregnation.
The width of the laminate should completely cover the plane of the treads or risers, so as not to use several boards. Such a surface will be less durable than a monolithic one. You can take a covering with a straight cut, where there is no locking system, and a laminate, the width of which corresponds to the size of the metal frame elements.
A plate with a thickness of 8 mm or more is more resistant to impacts. A laminate that is too thin, in addition to being insufficiently shock-resistant, does not absorb sound well—footsteps will be heard throughout the entire house.
Stairs to a basement or a wet room require a moisture-resistant coating. The moisture resistance of the board depends on the density of the middle layer. 900 kg/m3 is enough to withstand wet conditions for 3 hours straight.
The corners and joints of the coating for masking and decoration are covered with overlays - laminated molding or profile made of metal (aluminium, steel, brass), plastic or wood. Metal thresholds effectively protect the edges of the stairs from wear and provide an anti-slip effect. Polyurethane and plastic - easy to install. Wooden - can be painted, sanded.
We cover a staircase with a metal frame
To cover a metal frame with laminate, you need the following tools:
- hacksaw (jigsaw) for sawing workpieces;
- drill for drilling holes for fasteners;
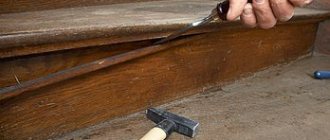
- a hammer, which is used to knock and snap the boards together;
- tape measure for measurements;
- a knife for opening laminate packages;
- pencil and square for marking.
Any base (concrete, wood) must be cleaned of old paint before finishing work. The metal frame, in addition, must be coated with an anti-corrosion protective compound. If the stairs have overhanging treads, cut off the overhanging part. On a bare metal base, make a frame of plywood, on top of which lay a backing that will reduce the noise of footsteps.
The procedure for finishing stairs on a metal frame with laminate:
- Measure the length, depth of the treads, risers and mark the dimensions on the laminate board.
- Cut out the blanks. Number the received parts so as not to confuse them when laying them. If all sizes are the same, there is no need to number them.
- Start installing the cladding from the steps, moving from top to bottom. Glue the vertical part so that there is a gap, with a height equal to the thickness of the cladding. We will push the tread of the next step into this cavity. To create a gap, use spacers or bars.
- Place a guide profile on the edge of the step and secure it along its entire length. To attach a metal corner, you need self-tapping screws (screw in every 15 cm), while a plastic corner is placed on glue (liquid nails).
- Glue the trim to the tread by sliding it under the riser. If the first step is flush with the floor, connect the flooring and cladding with a lock joint. Screw on the protective corners.
Move along the entire frame in this way. The sequence of work can be changed - first sheathe all the risers, then strengthen the corners and treads. Finishing is to cover all joints with molding. Do not step on glued sheathing for at least 24 hours. The glue dries completely after 2 days.
After covering the steps, you can sheathe the side parts of the metal frame with laminate. It is better to fasten it from the outside with liquid nails.
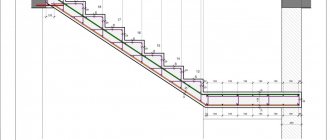
Calculations
To determine the general parameters of the staircase structure, you should first of all measure the room in the part where it will be located:
- to determine the height - take accurate measurements of the distance from the floor to the ceiling;
- if the project has a platform and it is located in front of the stairs, measurements are taken directly from it.
The dimensions of risers and treads are very easy to calculate using the formulas below:
- Comfort (ej), approximate value – 12 cm.
- Safety (j+e) is 46 cm.
- Step (e+2j) is 60-64 cm:
- (e) are the dimensions of the tread, and (j) are the riser.
The number of steps will depend on the length of the stringer. They will need to be distributed evenly to prevent disruption of the step.
Don't forget to calculate the data for the stairs
In the manufacture of stairs wider than 50 cm, the manufacture of risers is required. This will prevent the plywood from deforming. They fasten it with screws or glue it.