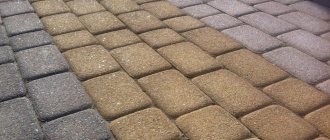
Paving slabs are valued for their practicality, high strength, durability, resistance to moisture and temperature changes. It does not emit substances harmful to humans when heated, like asphalt pavement. The variety of shapes, sizes, colors and textures of road building materials is amazing. By combining different types of products, you can create beautiful coatings. Laying paving slabs requires strict compliance with all construction regulations. If paving technology is violated, the coating quickly collapses.
Marking future paths
To correctly lay out the tiles yourself, you first need to make markings. You need to start work near a building, fence or gate. Near the structure you need to hammer in 2 pegs. The distance between them should correspond to the width of the track. It is better to adjust the width of the coating to the size of the product so that you do not have to cut the material. Since the structure will be supported by curbs, it is necessary to leave space for them (10 cm on each side). The other 2 pegs are driven near another building. 2 ropes are pulled between the pegs.
Laying street tiles over a large area is carried out after dividing it into strips 1-1.5 m wide. If the road has bends, it is divided into small sections. Each section is marked separately.
The main advantages of paving slabs
Not everyone knows how to lay paving slabs correctly. After all, this is a relatively new material. However, paving slabs have already become more in demand than the well-known paving stones.
Among the main advantages of paving slabs are the following properties:
- low cost;
- simple installation technology;
- durability;
- environmental friendliness;
- resistance to aggressive environmental influences;
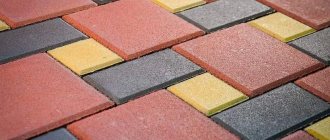
- variety of shapes and colors;
- the ability to create bright and original landscape design elements.
To lay a path or area with paving slabs yourself, you do not need any special technical skills or knowledge, only the ability to use ordinary tools. If you follow the procedure exactly during the installation process and try a little, everything will definitely work out.
Excavation and protective layer
The volume of excavation work depends on the type of soil. If the soil is dense and clayey, it is enough to remove a layer 15-20 cm thick to remove plant roots. When the soil is loose, it is necessary to remove a layer 30-35 cm thick. If you plan to lay paving slabs in winter, the paving trench must be prepared before the cold weather.
Sand is poured onto the surface of the trench. The sand is compacted together with the soil. To prevent plant seeds remaining in the soil from germinating and destroying the coating, a non-woven fabric is laid at the bottom of the trench. The strips of material should overlap each other by 15-20 cm.
Materials and tools
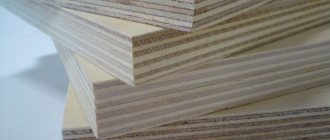
There are 2 main types of tiles used for laying sidewalks:
- Stamped.
- Vibrocast.
- Granite.
The first type is more budget-friendly and does not require any special production costs, however, the quality of such tiles is often poor. But tiles made using vibration casting technology, on the contrary, are famous for their durability, however, there is a small disadvantage of this type - it is a high price. Tiles come in a variety of sizes and configurations, widths and lengths.
The height varies from 20 mm to 70-80 mm. Considering the purpose of the site, it is worth focusing on the size and height. For small paths, high strength is not required from the tiles, so even thin tiles from 20 mm will do. But for platforms and driveways it is better to use thicker tiles from 60 mm.
In addition to the tile itself, you will need:
- Crushed stone, sand. It is better to use a crushed stone fraction of no more than 40 mm.
- Cement or special plaster mixture.
- Geotextiles. It protects the tiles from sagging.
- Borders are usually sold individually.
Important! To calculate the number of curb stones, you need to know the length of the path itself. We multiply the value by two, and then divide the value by the length of one border, in the end we find out the required number of stones.
What tools are needed to lay paving slabs:
Hammer (rubber). Level (preferably more than 1 m). Grinder with a diamond wheel. Several trowels. Manual "rammer". "Meter". Shovel. Rope (for marking). Pegs.
NOTE Additionally, purchase rubberized knee pads and mittens. There is work to be done with water and electricity.
Drainage device
Proper installation of tiles does not guarantee the durability of the coating. Groundwater and rainwater gradually wash away particles of sand and soil, destroying the base of the road. To prevent moisture from spoiling the coating, it is necessary to make a drainage layer.
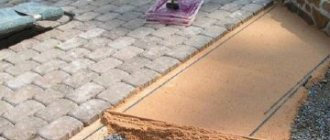
You need to pour crushed stone at the bottom of the trench. The layer thickness should be 15-18 cm. The crushed stone must be well compacted and leveled. A thin layer of sand is poured on top and also leveled, on which a non-woven fabric is laid. Care must be taken to ensure that water flows to the edges of the path. For this purpose, transverse and longitudinal slopes are made. The cushion under the paving slabs is carried out at the last stage of preparatory work.
Useful tips and tricks for your device
Despite the fact that the technology for laying paving slabs is quite simple, pay attention to the following recommendations:
- When laying the coating on a concrete base, be sure to arrange a slope for rainwater runoff. You can use a longitudinal, transverse or transverse-longitudinal slope of the coating. The optimal slope is 1 cm per meter. As a result, water will not collect between the tiles and the concrete base, which will protect the coating from swelling. In this case, a gap for water drainage is made between the tile covering and the curb.
- The width of the track is selected as a multiple of the dimensions of one covering element. Do not think that large-sized products are installed faster. Due to their significant weight, they are more difficult to lift, move and level on the base.
- All underground communications on the site are laid before the construction of paths and driveways. Otherwise, the coating will have to be dismantled. If some communications are planned to be carried out in the future, then plastic pipes are laid under the path at the place where they are carried out (the cross-section is chosen based on the size of the communications).
- To prevent grass from growing between the individual covering elements in the future, a layer of geotextile is laid in front of the foundation.
- Laying the tile covering is carried out only on a dry base, so work is not carried out during or after rain.
- The base for the tiles is carefully leveled. To arrange the pillow, purified sand without impurities and clay is used.
- The size of the track is selected taking into account the selected covering elements. If you plan to make a pattern or ornament, then it is worth drawing a diagram in advance and calculating the width of the coating, taking into account the seams. The circular method of laying products will require cutting some elements to the desired size.
At the preparation stage, it is worth considering the coating pattern. The sketch will allow you to get an idea of the future creation and calculate the required number of elements of a particular color and configuration. If paving slabs are laid by a master, the price, of course, for paving with a pattern or ornament will be higher.
Advice! The most options for patterned layouts are obtained when using rectangular paving stones.
Placement of boundary borders
Laying the curb is carried out immediately after completing the drainage work. It is better to use a ready-made concrete curb. Curb blocks are installed near the vertical cut of the soil along the edges of the road. It is desirable that the top edge of the border is 1-2 cm above the soil level. Otherwise, the paths will be constantly dirty.
Curb blocks are secured with concrete mortar. After laying the curb, you need to check how even it is. To do this, use a building level. If some blocks are installed incorrectly, their position is corrected with a wooden mallet.
How to choose a tile
Paving slabs in landscape design are used in different ways. You can lay tiles:
- paths;
- decorative areas;
- small courtyards;
- floor in the gazebo;
- adjoining parking lots for cars.
Different bases for different purposes of paving slabs
The purpose of the area on which the tiles will be laid is a determining point when choosing a material. Thin tiles (up to 40 mm) can be used to line paths and areas where people will walk or cycle. Medium-thick tiles (from 40 to 50 mm) can be used to decorate the entrance and parking area for a passenger car.
Thick tiles (more than 60mm) can support the weight of a full truck. These tiles are usually in the form of small bars. This gives the cladding additional strength.
It’s not difficult to figure out how to lay paving slabs correctly. The main condition for a novice master is to choose a small area for his first experiments. A garden path is best. It is better to choose one-color, square or rectangular tiles.
Types of bases used
Before you lay out the tiles, you need to make a base. The underlying layer helps to level the surface of the area. It gives the coating stability and increases its strength. A reliable foundation prevents the sidewalk from collapsing under the weight of people and cars. It protects the coating from destruction in the autumn-winter period, when ice forms in its gaps.
The technology for laying paving slabs depends on the method of use of the coating. If the load on its surface is small (pedestrian path), it is enough to make an underlying layer consisting of sand and cement. If paving is carried out under a car, a concrete base is required.
Concrete
Before concreting the base, reinforcement work is carried out. The reinforcing mesh is laid on metal or stone supports. The reinforcement should be 3-5 cm above the surface of the trench. The lining for paving slabs is prepared from sand and cement in a ratio of 3:1. It is better to use washed river or quarry sand. It should not contain particles of clay or lime. The solution is evenly and carefully distributed over the trench area to achieve a smooth surface.
It is better to fill the entire path with concrete at once. If part of the work is postponed until the next day, the area filled with concrete must be covered with polyethylene. The concrete base for paving slabs should have a thickness of 10-12 cm. In order for the cement pad to be strong, it must be moistened for 3-5 days. After moistening, the concrete is covered with polyethylene. The coating can be laid after 7-12 days.
From sand and cement
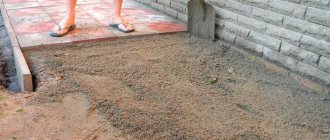
The trench is filled with a mixture of sand and cement. It is prepared in a 3:1 ratio. The thickness of the sand-cement base should be 12-15 cm. The underlying layer must be well compacted and leveled. If the depth of the trench is too deep, it can be reduced with sand. Sand is poured under the base and compacted thoroughly.
The technology of paving with paving slabs requires that the cement-sand mixture be dry. Therefore, it is better to make the base immediately before paving in dry weather. The cement-sand layer must be laid on geotextiles. If this is not done, the sand will quickly wash out and the tiles will sag.
Step-by-step instruction
To eliminate possible errors in work and prevent damage to materials, before laying paving slabs, it is recommended to carefully read the detailed instructions for this process.
To obtain a high-quality coating, it is important to follow the algorithm below for performing the work Source serp-art.ru
Marking
Immediately before starting work, you should mark the future territory or paths, which will subsequently be tiled. To do this, it is necessary to draw up a detailed schematic drawing on the site plan, taking into account the presence of plantings, buildings, and shrubs. When drawing up a plan, it is important to take into account the characteristics of the site, the presence of slopes and lowlands in which rainwater accumulates.
The second important nuance of drawing up a diagram is calculating the width of the tracks. The optimal option is 1 – 1.3 m. This width allows two people to move freely on the path. If you plan to create a road for a car, it is important to take into account that in addition to the vehicle, there may also be a person on the paved area, that is, the width in this case should not be less than 2.3 - 2.5 m.
After drawing up the diagram, you can begin marking paths directly on the territory of the area being improved. This must be done using a tape measure, rope and pegs. When installing pegs, it is necessary to add 10 - 15 cm on each side to the width of the path - this distance will be necessary in the future for installing curbs.
The first stage when laying tiles is marking Source optolov.ru
See also: Catalog of companies that specialize in landscape design.
Excavation
Before laying paving slabs with your own hands, you need to remove the protective layer from the area chosen for finishing work. The process in this case depends entirely on the characteristics of the soil. For example, if the top layer is made of dense clay, it is enough to simply level the surface to be treated. In other situations, it is necessary to remove at least 25–30 cm of turf or soil. Next, you need to pour a layer of sand no more than 3–5 cm thick, level and compact the surface.
The next stage involves laying geotextiles on the compacted surface of the paths. This process is not mandatory, but experts recommend including it in the algorithm of work being carried out. Geotextiles prevent the germination of weeds, soil shrinkage, and moisture penetration during spring floods.
When laying textiles, it is important to observe the following principle: the canvases must overlap each other at a distance of at least 15 - 20 cm. When decorating the edges of the path, it is also important to take into account the above rule. The use of geotextiles and their proper installation will significantly increase the life of the paths.
Before the main work, you need to remove the turf and dig a shallow ditch Source sovetclub.ru
Drainage
The next step before laying paving slabs with your own hands is preparing the drainage system. At this stage, it is necessary to pour a layer of crushed stone onto the textile-lined base, the volume of which should be about 12 - 14 cm. Laying it is necessary to absorb moisture, the freezing of which during cold weather can lead to the formation of unevenness and pits on the surface of the paths.
The crushed stone must be thoroughly compacted, then lightly sprinkled with sand, leveled and covered with a second layer of textile base, following the instructions given above. Laying textiles is especially necessary if the area to be improved is located in a lowland. The material will allow water to pass through, preventing its penetration onto the surface.
Installation of curbs
After completing the drainage work, it is necessary to install curbs. To carry out the work, you can use various materials, including slate, artificial and natural stone, wooden elements, and bricks. A mandatory requirement in this case is that the finishing material for the borders be flat.
Within the construction market, concrete and plastic piece curbs are especially popular. They are easy to install, have an excellent appearance and a high level of wear resistance. When choosing borders, it is recommended to take into account their compatibility with tiles.
One of the most popular types of borders is made of concrete Source vopros-remonta-info.ru
Preparing the base
One of the important stages during installation is preparing the base. The strength of the paths, as well as the external qualities, depend on the correctness of the work carried out. The type of foundation should be selected in accordance with the expected level of load on the area being improved. For example, before laying paving slabs with your own hands to design paths that are not expected to bear significant loads, it is recommended to pour a sand base.
Sandy base Source dinerocelo.weebly.com
If significant loads are expected on the surface of the tiles to be laid, for example, use as a parking lot, it is reasonable to choose a concrete base. It is the most durable, provides a long service life, but requires quite complex work. So, how to lay paving slabs by arranging a concrete base? In this case, it is important to follow the following recommendations:
- Step one. The most important task is to reinforce the base. For this purpose, you can use both a ready-made mesh, the cell size of which is 10 by 10 cm, and suitable remains of building materials, fittings, and scrap metal. Before reinforcement, it is necessary to drive metal or wooden pegs into the ground so that the grid is 3–5 cm above the surface.
- Step two. Next, the concrete is poured directly. This must be done in such a way that the surface of the concrete base is located at least 3 cm below the ground surface - this is the distance required for laying decorative tiles. Filling must be done at one time - it is important to take this into account and prepare a sufficient volume of the mixture in advance.
Concrete base Source kirpich174.ru
Treating tiles before laying
Before installation, the tiles must be treated with a hydrophobic solution. The product will increase the frost and moisture resistance of the material, and also increase its service life. Water repellents improve decorative qualities and protect against fungal microorganisms. Salt stains do not appear on the surface treated with a hydrophobic solution. The material is immersed in a hydrophobic composition and then dried. The procedure is repeated.
During processing, you need to carefully inspect all elements. Products with defects should be set aside. When you need to cut paving slabs to form corners, the defective elements will come in handy.
Laying work must be carried out in suitable weather conditions. The weather should be dry and windless. It is impossible to lay the coating on a sand-cement base at sub-zero temperatures. When the soil freezes, it expands and when it thaws, it sags. If you lay the coating on frozen ground, it will collapse after it thaws. The rules for laying paving slabs allow you to carry out work on a concrete base during frost, but it is not advisable to do this.
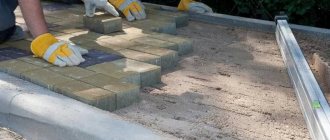
Installation
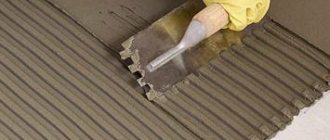
Paving slabs on a concrete base are fixed with cement mortar. The seams are completely filled with the mixture. In this case, the thickness of the seams should not exceed 3 mm. When laying elements, you need to be on the surface. You cannot step on the base. After laying each row, you need to check the quality of the work performed at the construction level. Elements that are laid incorrectly are leveled with a rubber hammer.
It is necessary to lay it on a cement-sand base, driving each element with a wooden mallet. The material must be securely fixed to the base. If the product “falls through,” you need to pour a layer of sand under it. The gaps between the tiles are filled with mixture or sand. After completing the work, the coating is moistened with a hose and sprayer. If the mixture “sags” in the gaps, you need to pour a little more mixture into them. You can use the coating after 2-3 days.
The seams of paving slabs are sealed using sand, cement or concrete mixture. If sand is used, it must first be sifted. The cement mixture is prepared from cement and sand in a ratio of 1:5. When preparing a concrete mixture, cement is mixed with sand in a ratio of 1:3. Sand and mixtures must be dry. The grout is laid out using a rubber spatula. The level of the mixture in the gaps should be from 1/2 to 3/4 of the height of the tile. Excess mixture is swept off the surface with a broom.
After this, they begin to fill the seams. When the mixture hardens (after 1-3 days), pour the mixture into the gaps and moisten it again. After the composition has dried, the procedure is repeated a third time. You may have to add the mixture to the seams a few more times. You can finish the work when the mixture in the gaps is flush with the surface of the tile.
Preparatory stage: marking and compacting the site
First you need to decide on the size of the plot and take into account all the nuances, create a plan drawing for convenience. Choose the type of tile, what pattern or color you would like. Taking into account the dimensions, we calculate the amount of material. It is also advisable to mark the area; for this, use pegs and rope.
Check all the nuances several times, take into account inconveniences and others. Pay special attention to vegetation; trees or shrubs should be bypassed or completely removed from the site, especially if they are young trees. As the roots of trees or shrubs grow, they will begin to lift the soil, due to this, swelling of the tiles will be observed, which will break, rise and sag in some places. Therefore, it is better to make a retreat from the seedling of at least a meter, and preferably more.
Before laying paving slabs, it is necessary to carry out work to prepare the soil. First of all, it is necessary to remove the top layer of soil, which will level out uneven areas, compact the soil and create a sand and gravel cushion. The characteristics of the site depend on the purpose of the site. For arranging sidewalks, make a platform 20 cm deep, and for car parking lots and entrances 27-30 cm.
After the hole has been dug, the soil must be compacted. To do this, you need to water it with a hose with a sprinkler, after which you need to walk with a tamper. The procedure, which is simple to perform, plays an important role in the durability of the paving surface, as it helps prevent subsidence, the process of subsidence of the site, which is observed over time in the operation of the road surface.
Layout of sidewalk blocks
Paving slabs and paving stones are produced in a huge range. The main task is to correctly project the paving stone design and choose the method of its placement. Those who will arrange their own plot of land must first become familiar with the types of tiles, methods of laying them and options for patterns of laying blocks.
There are many known schemes for laying paving slabs, since they are produced with a standard width-to-length ratio.
If figured paving elements of the same type are used, then the following layout schemes are popular today:
- "Linear" masonry. The tiles are placed along the path line parallel to each other, ensuring that the seams of adjacent elements match.
- "Herringbone". The shaped tile elements are laid to each other at right angles.
- "Brick" layout. The orientation of the bricks is maintained in the same way as in “linear” masonry, only a bandage is added to the floor or a quarter of the tile in adjacent rows.
- "Block" tile laying. Two paving blocks are placed parallel to each other, and the two paving elements adjacent to them are turned at right angles.
When laying paving blocks of two or more colors, a variety of paving options are used, which allow you to create a stylish and effective design of the local area. When tiles of several textures and colors are used to improve a site, they usually use a “checkerboard” laying pattern that is simple to execute but very effective.
When laying multi-colored paving slabs on platforms or paths, you should adhere to these simple rules:
- In order to accurately lay out a drawing on a paving area, it is worth drawing a sketch in the selected scale or creating a real project with the order of the shaped elements.
- To effectively and tastefully decorate and arrange a large area, an exclusive large-sized pattern is selected.
- If small areas are being developed, then use a small repeating ornament or pattern.
In almost all suburban areas there are winding places that require arrangement with the help of figured paving elements. Paving slabs allow you to quickly and inexpensively create radius patterns. Laying of paving blocks is carried out using a technology that includes the following stages:
- Creation in a special program or on a sketch scale.
- A contact layer is applied to the paving area, which includes beading, granotsev or sand. After unloading the material onto the site, it is carefully leveled and compacted.
- Laying of shaped paving elements is carried out from smaller to larger radius if the paving blocks are located along the path with a side length.
- After paving, the seams are filled with quartz or quarry sand. Then the tile is compacted with an area vibrator.
Important! If the tiles are oriented across the path, then a row of small radius is laid first. During installation, the longitudinal seams of the paving elements are shifted using a wedge of the required size.
Even if a complex laying pattern is chosen and tile trimming is required, and the patterns themselves will contain both small and large paving elements, radius patterns significantly increase the attractiveness of the furnished area and decorative value.
Rules and design schemes
The layout of the finished product depends on the specific type of paving stone, its color, the presence of a pattern, relief, and size. The appearance of the coating depends on the installation method. Also, the design of the canvas should be combined with the landscape. Let's look at the most popular masonry samples:
- Linear. This method is also called classic, spoon, brick bond. A standard type of masonry with a simple image. Paving can be done in two ways: without shifting; with offset. The first option is used extremely rarely, as it reduces the load-bearing characteristics of the canvas. The second method is the most common. The main condition for installation is that the joints should not coincide, according to the principle of building an ordinary brick wall. The offset can be half or three-quarters, and by playing with colors you can get a diagonal and caterpillar pattern.
- Linear-angular. The bearing capacity of the surface increases, so this method is good to use in places with increased load. Depending on the arrangement of the elements, two main patterns can be distinguished: herringbone and braided. In the first case, rectangular bricks must be laid in rows at an angle of 45°, with each subsequent element located on the same curve poking into contact with half a spoon of the previous one. In the second option, the paving method is no different from the previous one, only the tiles are positioned at a right angle of 90°.
- Block. Brickwork is done in blocks. You can lay modules of two elements, alternating their horizontal and vertical arrangement, and also lay pairs through one perpendicular brick. In the first case, using only two colors, a checkerboard pattern is obtained.
- Random layout. An excellent choice, the tiles used are “Old Town”, “Brick”, “Classic Rusto”, flagstone. The elements are placed in random order, which allows you to create an original, unique design.
- Spiral, circular. One of the most difficult. The components are arranged in the shape of a circle or square.
- Artistic. Thanks to different colors, combination of different methods, and a detailed design, you can lay out beautiful designs, ornaments, and geometric shapes.
What is needed for work
In order not to be distracted by trips to the hardware store while working, you should worry about materials and tools in advance.
Tools you will need:
- shovels for digging soil - bayonet and scoop;
- wooden pegs (pieces of reinforcement), cord for marking the area;
- rakes for leveling bulk building materials;
- a grinder or grinder with a disc for cutting stone;
- hammer (rubber) for trimming curbs and paving slabs;
- broom for spreading sand over tiles;
- tape measure and building level;
- long straight pipe;
- a device for compaction, such as a vibrating plate.
Necessary materials:
- paving slabs of all shapes, sizes, colors;
- curbs for fencing a paved area;
- geotextiles with parameters that exceed the area of paving stones by 20-25 cm on each side;
- building materials for laying the cushion and layer - sand, crushed stone (or gravel), cement. The quantity is calculated depending on the area of the site being developed, the number and required thickness of the layers to be filled.
- a can of spray paint, preferably a bright shade. It makes it easier to carry out preliminary markings without much effort. Paint is often replaced with lime, scattering it along the designated edges of the future site or path.
- reinforcement grid, which is needed when concreting a site for parking a car.
When buying paving slabs, they take into account various points that are important for the stylish appearance and reliability of future sites and paths.
For example, if you are laying out paths in the garden, then it is quite possible to buy tiles with a thickness of up to 6 cm. But when paving a parking lot for a car, the thickness should be greater than 6.5 cm.
When planning paths and areas, the color and shape of the tiles are immediately determined.
Today, the range of products is such that you can create exclusive, mesmerizing pictures-platforms on your site from paving slabs.
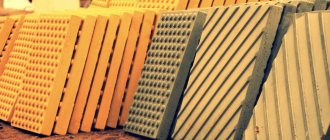
Don't get hung up on gray monotony. Think over a pattern, ornament, look for options on the Internet. As an example, the table shows frequently purchased tiles for paving the sidewalk.
When purchasing paving blocks, you should pay attention to the following characteristics:
- Even without reading the characteristics of the tile you like, you can determine its quality. To do this, you need to carefully hit one block against the second: when a dull sound is heard, the manufacturer has added a lot of water to the composition for preparing the paving stones. When you hear a ringing sound, you can be sure that this tile was produced using technology and is of high quality.
- If you like paving slabs that have a bright color, but the price is quite low (compared to other models), then 99% of the lowest quality coloring pigments were used in its production. As a result, the strength qualities of the paving stones are compromised.
- It is important to purchase paving slabs from the same batch, otherwise there is a risk that the paving stones will differ in color and composition.
Like all building materials, paving slabs should be purchased with a “reserve”, counting on 15% more than the area being developed.
Spare paving stones will be needed if a defect is discovered or an accidental fight occurs.
If you do not have much experience in cutting tiles, then it may be damaged.
Having prepared all the necessary tools and materials, you can begin marking the site.