Monolithic frame construction technology
The greatest development in modern construction of multi-storey buildings is demonstrated by monolithic frame technology.
The high strength of buildings, their increased seismic resistance, the ability to create unique structures and interior layouts at moderate construction costs determine the final choice of the customer and the construction company for monolithic concrete casting technology.
Monolithic frame construction technology
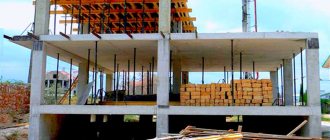
As the name implies, when constructing buildings using this method, a reinforced concrete frame is created, and walls and partitions are made from classical types of materials: brick, aerated concrete or foam concrete blocks, cinder block, natural limestone, etc.
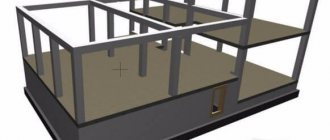
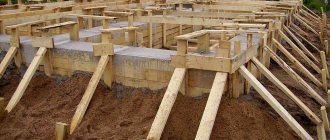
The most common frame design consists of:
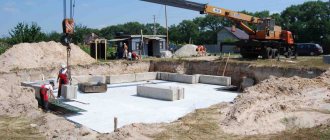
- Monolithic reinforced foundation;
- Load-bearing reinforced concrete columns;
- Horizontal monolithic slabs.
The assembled reinforced concrete box has the necessary strength, allowing the construction of buildings in seismic zones. After the construction of all walls and partitions, such multi-storey residential buildings are able to withstand vibrations of the earth's crust up to 8 points on the Richter scale.
Using this technology, all monolithic work is carried out directly on the construction site. The exception is concrete mix delivered by truck mixers.
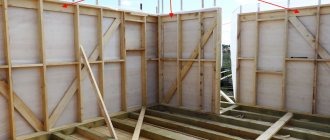
Concrete delivered to the construction site is loaded into concrete pumps and conveyed through them into a pre-assembled formwork structure. Inside the formwork, tied metal reinforcement of a certain diameter and with the design sections of the cells are placed. Concrete poured into molds is vibrated to compact and remove air pockets. After the monolith hardens, the formwork is dismantled and the production cycle is repeated.
Pros and cons of monolithic frame technology
Any type of construction of multi-storey buildings has its advantages and disadvantages. This includes the technology of monolithic frames, which is widespread today throughout the world.
Advantages of the technology:
- Construction of buildings of any complexity and configuration;
- High strength and seismic resistance;
- Durability of multi-storey buildings;
- Speed of construction of buildings;
- Possibility of creating external walls from materials with low thermal conductivity.
Disadvantages of monolithic concrete casting:
- The presence of cold bridges requires their high-quality thermal and waterproofing;
- A complex technological process requires highly qualified specialists;
- The quality of the monolith directly depends on the compliance of the concrete mixture with GOST standards, which can only be checked after the formwork has been poured and the concrete has set.
- In winter, it is necessary to constantly heat the mixture and add special additives to it, which leads to an increase in the cost of building a residential building.
To check and control the quality of concrete, test pours of several cubes measuring 10cm x 10cm x 10cm are made from each batch delivered. After they harden, laboratory tests are carried out, which finally confirm the quality of the concrete mixture.
Modern large construction companies have the necessary experience, knowledge and equipment that offset the disadvantages of monolithic frame technology.
Installation of multi-storey frame-panel buildings
When constructing multi-storey frame-panel buildings, a combined (mixed) installation method is used, which is a combination of separate and integrated methods.
As a rule, the following sequence of work is accepted.
The supporting frame structures of buildings are installed in a separate process flow. To ensure the stability (rigidity) of the above-ground part of the building during the installation process, it is recommended to follow the following work technology.
At the first stage, the following are installed: columns of the first tier, crossbars along the columns of the first tier; floor slabs along the crossbars of each floor of the columns of the first tier with monolithic seams of the slabs.
Then the columns of the second tier are installed (intended for the construction of one floor); crossbar along the columns of the second tier; floor slabs along the crossbars of the columns of the second tier with monolithic slab seams.
Installation of load-bearing frame structures on all overlying floors of the building is carried out in the same way.
Installation of external wall panels is carried out as a separate process flow after completion of the construction of the load-bearing frame of the building.
It is advisable to install the columns of the first tier, taking into account the geometric dimensions of their cross-section, height and large mass, using self-propelled cranes. Foundations for columns are usually monolithic. The installation of columns is preceded by preparatory work, including acceptance of the foundations: checking their geometric dimensions and compliance of the position of the embedded parts with the design documentation.
Using geodetic instruments, the positions of their axes (theodolite) and elevation marks (level) of the bottom of the glass are checked. Along the four edges of the foundation (column), axial marks are applied with paint on top of it. Due to the fact that the columns of the first tier, three to four floors high, have a large mass and length, they are installed using the “sliding” method (see Fig. 7). The installation of columns in the design position is carried out by a team of installers consisting of: 5th category - 1 person; 4th category – 1 person; 3rd category – 2 people; 2nd category – 1 person; crane operator of the 6th category – 1 person.
Installation of the columns of the first tier is carried out in the following technological sequence.
The column lifted by a crane is installed in the foundation shell, combining the axial marks in the lower part of the column with the axial marks on the foundation. The verticality of the column is checked using two theodolites.
The calibrated columns are secured in the foundation shell using wedges, and are also additionally secured with guy wires and spacer ties. The upper ends of the guy wires are attached to a clamp mounted on the column above its center of gravity. They are dismantled after the columns are finally secured and the concrete joint reaches a strength of at least 75% of the design value.
The specific technology adopted for the installation of columns of the first tier depends on the geometric dimensions of the multi-storey frame-panel building being erected in plan, its space-planning solution, as well as the mass and length of the mounted columns.
When constructing multi-storey frame-panel buildings with column spacing in assembly cells of at least 12 meters and a large mass (more than 10 tons) of columns of the first tier, it is recommended to use crawler cranes of the following brands: RDK-250-3, DEK-251, MKG-40, SKG-401, etc. The maximum lifting height of the main hook of crawler cranes is 14–15 m. When using self-propelled jib cranes, the columns are first laid out at the installation sites.
Slinging of columns is carried out with various friction grips or using self-balancing traverses, systems with remote slinging (which eliminates the need to lift a worker to the slinging points after installing the columns).
When constructing multi-storey frame-panel buildings up to 30 meters high with a column spacing in assembly cells of less than 12 meters and a mass of columns of the first tier up to 10 tons, it is advisable to use tower mobile cranes of the following brands: KB-100.3B, KB-408, KB-504, etc. .
Depending on the mass of the elements, the size of the building and other production conditions, tower cranes can be located on one or both sides of the building being assembled (Fig. 13, a, b).
If the mass of the structures being mounted is large, it is recommended to place the tower crane in the building area (Fig. 13, c).
Rice. 13. Tower crane location diagrams: a – on one side of the building; b – on both sides of the building; c – in the building area; 1 – temperature-sedimentation seam; 2 – transport zones; 3 – storage areas; 4 – crane tracks or movement area of the tower crane; I–IV – grip numbers
To ensure the stability of structures and parts of the first tier of the building during the installation of frame-panel buildings, the following sequence of installation work was adopted.
After completion of the work on installing the columns of the first tier into the design position, the installation of prefabricated reinforced concrete crossbars on the first floor of the frame-panel building being erected begins.
Installation of crossbars. Before the installation of prefabricated reinforced concrete crossbars begins, hemp ropes (guys) are secured to the supporting areas of the structures. Then the structure is slung using the mounting loops and transported by crane to the installation site. Installation of the crossbar in the design position is carried out by a team of installers: 5th category - 1 person; 4th category – 1 person; 3rd category – 2 people; 2nd category – 1 person; crane operator of the 6th category – 1 person.
The designs of the junction of crossbars with columns in frame multi-story buildings are different, but in all cases the crossbars are connected to the columns by welding embedded parts or reinforcement outlets from the head below the installed column and reinforcing outlets of the crossbar.
The following technology for installing crossbars is used.
Installers, being on mobile self-climbing towers, use a hammer and chisel to clear the end of the column console from concrete deposits and apply axial marks of the crossbar to the side faces of the columns. Having lowered the crossbar onto the support platforms (consoles) of the column, check the compliance of the width of the support platform with the design and the alignment of the marks applied to the ends of the crossbar with the axial marks of the columns. Using mounting crowbars, if necessary, move the crossbar into the designed position. The crossbar is secured to the design position by electric welding to the embedded parts of the column.
To create spatial rigidity, ensuring the invariability of the mounted structures within each tier (floor), upon completion of work on the installation of crossbars on the first floor, the installation of prefabricated reinforced concrete floor slabs begins.
Laying of floor slabs is carried out after completion of work on securing all crossbars in the design position on the tier. Floor slabs are laid on crossbars over a layer of cement-sand mortar no more than 20 mm thick. Laying the floor slabs in the design position is carried out by a team of installers: 4th category (1 person), 3rd category (2 people), 2nd category (1 person) and a 6th category crane operator - 1 person.
The installation of floor slabs in a cell begins with the laying of tie slabs. The embedded parts of the laid bonded floor slabs are connected to the embedded parts of columns and crossbars by electric welding, ensuring the spatial rigidity of the mounted cells. After laying the bond slabs, the installation of intermediate slabs begins. Upon completion of acceptance of welded connections of floor slabs on the floor and completion of their anti-corrosion coating, the dowels and seams between the floor slabs and adjacent elements are sealed. The dowels and seams in the slabs are monolithic without interruption to the entire height at a time with C16/20 concrete.
To create spatial rigidity that ensures the invariability of mounted structures within the first tier, which is equal in height to two or more floors of a frame-panel building, it is necessary to completely complete the installation and fastening into the design position of all crossbars and floor slabs on the floors of the first tier before the installation of columns of the second tier begins. .
Upon completion of the installation work on the installation of crossbars and floor slabs on all floors of the first tier, the installation of columns of the second tier begins.
The installation of columns of the second and subsequent tiers differs significantly from the columns of the first tier. Due to the fact that the operational reliability and durability of the entire structure as a whole depend on the accuracy of the installation of columns, they are intended for the construction of one floor of a building: their weight, as a rule, does not exceed 1.5 tons, and their length is 4.2 m.
As the practice of mass construction shows, it is possible to ensure the required accuracy of installation of columns of the second (and subsequent) tiers on lower columns only by using conductors.
The use of single conductors when installing columns on lower columns is associated with large time costs and, as a rule, leads to deviations from the design in ensuring the accuracy of the column spacing in the cells. The magnitude of deviations from the design accumulates with increasing number of spans and length of the building. In this regard, when installing multi-tiered columns of multi-storey buildings, group conductors are recommended: for example, frame-hinged indicators (RSI), developed at the suggestion of Ya.S. Deitch (Fig. 14).
Rice. 14. Frame-hinged indicator (general view): 1 – wooden lining; 2 – spatial circular scaffolding; 3, 7 – retractable rotary cradles; 4 – hinged indicator; 5 – fence; 6 – hinged supports; 8 – detachable flange joint; 9 – stairs
Installation of a building using the RSHI kit begins with the installation of installation equipment (Fig. 15).
First of all, install RSI No. 1, which is verified in plan in two mutually perpendicular directions. RSI No. 2 is aligned only in one direction; in the other direction, its position is fixed by transverse struts connected to RSI No. 1. RSHI No. 3 is also verified in one direction. RSI No. 4 is not subject to geodetic alignment: its working position is determined by longitudinal struts attached to the previously verified RSI No. 2, as well as transverse struts attached to the previously verified RSI No. 3.
After installation, fastening and alignment of the RSI set, the movable stops of the clamps are adjusted, bringing them into compliance with the cross-sectional dimensions of the columns. Then they begin to install the columns, which is carried out using the forced method.
When installing, the column is carefully brought with a crane to the corner stops of the RSHI and smoothly lowered onto the head of the column of the underlying tier. The bottom of the column is combined with the help of an assembly crowbar with abutting reinforcement outlets or axial risks of the installed column with the risks of the axes of the lower tier column. To bring the top of the column into the design position and temporarily secure it using a steel rope and a tension device, the edges of the column are pressed against the fixing edges of the corner stop. Then the elements of the column joints are welded.
For the convenience of work of installers, rotary cradles are mounted on the spatial scaffolding of the RSHI, from which the joints of the frame structures are sealed. The RSIs are rearranged after final processing of the joints of the column connections, installation and fastening of other prefabricated structures that ensure the stability of the frame.
Rice. 15. Scheme of rearrangement of RSHI blocks during the work: 1 – transverse spacers; 2 – longitudinal struts; I…IV – numbering of RSH blocks
After completing the installation and securing the columns of the second tier in the design position, installation of the crossbars, and then the interfloor slabs of the second tier, begins in the design position.
The technology and sequence of installation work for installing crossbars and interfloor slabs on the second and overlying tiers are the same as for the first tier.
After completion of installation work on the construction of the load-bearing frame of multi-storey frame-panel buildings (columns, crossbars, floor slabs), the installation of external wall fencing is carried out in a separate installation flow.
Installation of curtain panels of external walls is carried out after the construction and final design fastening of the load-bearing frame structures on the frame.
Work on their installation is carried out by a team of installers: 5th category (1 person); 4th category (1 person); 3rd category (1 person); 2nd category (1 person); crane operator of the 6th category (1 person).
Before installing curtain wall panels, installation marks are applied that determine the design position of the panels in the longitudinal and transverse directions, as well as in height. The marks for installing wall panels in plan are applied to the columns and floor slabs, tied to the corresponding longitudinal and transverse alignment axes of the building, and the marks for installing wall panels in height are applied to the edges of the columns, tied to the installation horizon.
When installing double-row cut wall panels within the grip, first install all the belt panels, and then the wall panels. It is recommended to install the panels in the following sequence: first, the ends of the panel are aligned in height, then in the longitudinal and transverse directions, and finally, vertically.
Methods for aligning curtain wall panels when installing them in the design position are shown in Fig. 16.
The height of the panel is adjusted using a corner template according to the marks of elevation marks on the columns, combining the top edge or mark of panel 1 with the stop edge of the corner template 4 attached to column 3 . The marks for aligning the panel in the transverse direction and height should be located near its ends.
Rice. 16. Methods for aligning curtain panels of external walls: a – in height using a corner template; b – vertically using a plumb line; c – in the transverse direction using a template along the installation mark; d – in the longitudinal direction using a template; 1 – curtain wall panel; 2 – bonded floor slab; 3 – column; 4, 9 – templates; 5 – crossbar; 6 – installation mark of the elevation mark on the column; 7 – plumb line; 8 – installation mark on the plate; 10 – column axis mark
465
Types of new buildings
Currently, the following types of house construction are popular: monolithic, monolithic-brick, panel. There are practically no new buildings entirely made of bricks on the market now, primarily due to the high cost.
It is planned that over time the technology of constructing wooden multi-storey buildings will become widespread, but at the moment only a few pilot projects are being implemented in other countries and our capital.
Please note that the choice of type of development depends on the soil conditions, climate characteristics, seismology of the area, the availability of material suppliers or own production resources, as well as the funds and capabilities of the developer company.
Panel construction
Apartments in new panel buildings are the most affordable
The advantages of panel construction are speed and relatively low cost. Panels are ready-made elements; construction of this type resembles the process of assembling a construction set.
If the developer needs to carry out mass development, there are restrictions on the cost of housing, and there are no restrictions on the availability of materials from suppliers - the choice of type of construction is obvious.
Advantages of a panel house
- cost of housing: the possibility of building on a limited area, the minimum required set of machinery and equipment, the price of materials - all this allows you to reduce the cost and, thus, offer a relatively low price for apartments in such a house.
— panels are inferior to other materials in terms of thermal performance indicators,
- insufficient sound insulation in apartments,
- even minor violations in construction technology can lead to the formation of cracks,
— panel multi-storey buildings are not built in seismologically unstable areas.
Monolithic construction
Monolithic new buildings are the most common
This type of construction means that the building is poured with concrete mixture directly at the construction site. Increasingly, construction companies prefer a monolith when constructing a residential building.
In order to save money, developers can use monolithic panel construction - that is, use ready-made monolithic reinforced concrete slabs. In such a development, it is important to adhere strictly to the plan, choose the right grade of cement and not violate the technology.
Advantages of monolithic construction
- open plan: moreover, often the owner of an apartment in a monolithic building has the opportunity to combine rooms/apartments not only in the horizontal plane, but also in the vertical one,
- smoothness of walls and ceilings,
- uniform draft of the house,
- high construction costs, which means high housing costs for buyers.
Monolithic brick construction
Monolithic brick houses are distinguished by good thermal insulation, sound insulation, and increased strength
Monolithic brick construction is a widely used type of construction that allows you to combine the advantages of each individual type of materials used. The difference is that after casting the first floors, the required number of brick partitions is laid out.
Advantages of monolithic brick construction
- modern technology that allows relatively quick construction of buildings of different heights and shapes,
- a combination of the unique qualities of brick and concrete - thermal insulation, sound insulation, increased strength,
- smoothness of walls and ceilings.
Flaw
There is only one monolithic-brick residential complex - the high technological level of the process does not allow developers to save money and offer the buyer very affordable prices.
Brick construction
Entirely brick new buildings are rare
Today, different types of bricks are used:
ceramic
– durable, heat-resistant and moisture-resistant material,
silicate
– is a mixture of lime and sand, cheaper than ceramic,
hollow
— due to the voids in the mass, it has a greater heat capacity and provides good thermal insulation.
Now, no matter how much we would like to talk about the good, let’s move on to the disadvantages of brick multi-story buildings:
- Time. It takes a lot of time to develop a brick building - the process is not easy, be prepared for costs as a developer and...
- Price. If you purchase an apartment in a brick high-rise building, keep in mind that the construction time will be compensated by your budget - the more effort invested, the higher the price.
Around the middle of the 20th century, the technology of constructing multi-story panel buildings became fashionable. Back then, builders relied on speed, and what are advantages of brick high-rise buildings are disadvantages here.
Monolithic house: pros and cons
Advantages: