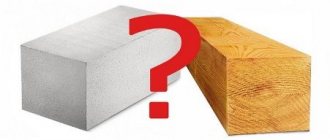
Foam block material is one of the most popular materials used in the construction of low-rise buildings. The block successfully combines reasonable cost, excellent heat-insulating qualities, and high strength. For this reason, it is used not only for the construction of partitions, but also load-bearing walls. For obvious reasons, sooner or later the question arises - how to make a doorway in a wall made of foam blocks.
What is the material
The advantages of foam block are:
- ease of processing;
- light weight;
- excellent thermal conductivity;
- good noise and vapor barrier;
- resistance to chemical and biological processes, corrosive formations.
The main difference is that during the construction process there is no need to spend additional money on thermal insulation; costs associated with heating the room are reduced by three times.
The material does not create a large load on the foundation and is easy to work with. A comfortable microclimate is maintained indoors.
There is only one drawback - fragility. Houses made of foam block material are necessarily reinforced on several levels.
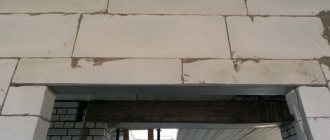
How to make lintels for window and door openings from aerated concrete?
In order to make reliable crossbars for window and door openings, when building a house from aerated concrete, ready-made reinforced concrete lintels are not always suitable. Specialized y-blocks are used as permanent formwork for monolithic lintels over openings.
What are U-blocks?
U-blocks are aerated concrete of standard overall dimensions with a recess inside. The blocks on the butt side have a contour in the shape of the letter P. Moreover, they are often made directly during the construction of a building from aerated concrete. However, not everyone is able to maintain the same ideal geometry that can be achieved in a factory way. This means avoiding additional consumption of adhesive solution and heat loss in the future.
Advantages of aerated concrete lintels.
- First of all, the absence of “cold bridges”. The blocks are glued with the same building compound as the entire wall, and they are also fitted as tightly as possible to the main blocks, the seams are 2-3 mm;
- It is important to take into account the load-bearing capacity of the supporting wall - lintels made of aerated concrete are lighter than reinforced concrete, which means they have less load;
- Compared to reinforced concrete lintels, aerated concrete has a lower heat transfer coefficient due to the porosity of the material and increased thermal insulation properties;
- U-blocks made of aerated concrete are lightweight - no special equipment is required to deliver them to the installation site; even one adult can handle it;
- Thanks to the ease of processing the material and additional blocks, it is possible to make a lintel from y-blocks of the required length (up to 3000 mm);
- Sometimes purchasing reinforced concrete products is not economically feasible (for example, they are difficult to purchase individually). Aerated concrete lintels can be made from existing building material for walls.
There are other reasons for making lintels from aerated concrete blocks over openings.
Making aerated concrete lintels with your own hands.
Has the masonry process reached the stage when it’s time to form the top lintel over the window or door? Prepare to perform the following operations:
- Prepare the U-blocks. The size must correspond to the size of the blocks from which the masonry is made;
- Prepare additional elements, if necessary;
- Make a wooden support (you need to attach the board with self-tapping screws to the side of the window opening, install a cross member from the board on top flush with the level of the masonry, strengthen the structure with oblique supports);
- Lay the U-blocks on a wooden base, observing the dressing and gluing with the same composition that is used for the entire masonry;
- *Important! The lintel must extend onto the main wall mass by at least 200 mm
- Prepare the reinforcement by cutting steel rods to the length of the resulting cavity and tying them with steel wire to create a “frame” along the width of the cavity;
- Place the armored belt in the prepared space inside the y-blocks;
- Pour a solution of concrete, sand and crushed stone inside the structure;
- * Important! To avoid voids, level the solution and smooth the top with a trowel.
After hardening and gaining strength, the aerated concrete lintel can be considered ready and the laying of the wall can continue.
Basic requirements for openings
Preparing a place for installing doors in a foam block wall is considered an important event, because the subsequent operation of the entire room will depend on the quality of the work. To know how to correctly install doors in a foam block, calculations are performed based on their position in the wall, and the type and parameters are determined. Here, first of all, it is recommended to take into account:
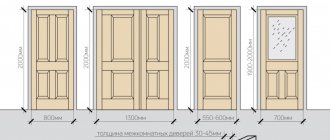
- opening height (at least two meters);
- width (standard version – 70 – 80 cm). For a sanitary unit this figure can be reduced;
- strengthening a doorway in a wall made of foam blocks. A cutout may cause the wall to partially lose its strength.
This can be completely compensated for by redistributing the load force from above by installing a jumper.
Methods for making lintels for aerated concrete blocks over windows and doors
Proper reinforcement of aerated concrete buildings is the key to the durability of the structure being built, and also helps prevent the occurrence of cracks and deformations during the entire period of operation.
- Factory solutions Ready-made version of reinforced gas silicate lintel according to GOST
- U-block construction
- Reinforced concrete lintels
- Device using U-blocks
Reinforced elements are used when it is necessary to increase the strength of gas silicate walls in cottage and private low-rise construction. Lintels for aerated concrete blocks are installed when constructing all window and door openings. This helps distribute the loads from the floors and prevent the appearance of cracks in the window area.
Factory solutions
The technology for using lintels in private housing construction has several fundamental differences from the installation adopted in modern and mass construction using cellular aerated concrete. Currently, several types of jumpers are used, which differ in design features and rules of application .
Ready-made version of reinforced gas silicate lintel according to GOST
Ready-made factory aerated silicate (aerated concrete) lintels are ordinary aerated concrete beams with a rectangular cross-section and an internal frame in the form of reinforcement coated with a special anti-corrosion compound.
Arrows on the element indicate the correct direction of installation.
The main advantages are:
- properly reinforced aerated concrete does not crack , does not “float” and does not collapse during long-term use;
- aerated concrete lintels are high-strength, lightweight structures that do not place additional load on the constructed walls and foundation;
- the cellular structure of the aerated concrete lintel is identical to the structure of the building blocks, therefore it does not cause a decrease in thermal efficiency , and as a result there is no need for additional insulation.
Main dimensions of gas silicate jumpers:
- Height - 124 mm;
- Width - 115 mm, 150 mm, 175 mm;
- Length - 1300-3000 mm.
Check on the manufacturers website.
U-block construction
The most popular option is to install precast lintels over windows in walls made of cellular aerated concrete with permanent formwork based on U-shaped elements.
The article provided by the link provides information about the manufactured sizes of these elements and the method of self-production.
Reinforced concrete lintels
These factory products are concrete beams with reinforcement inside.
In terms of thermal conductivity, concrete is noticeably inferior to gas silicate.
If you plan to insulate the walls of the house with mineral wool, then these beams can be used.
But for walls without insulation, reinforced concrete will act as a cold bridge.
In this case, the aerated concrete lintels proposed in the first option look better.
Support depth and maximum opening length
Depending on the design features, the installation technology, the depth of support of the lintels on aerated concrete blocks, and the basic operating rules may vary.
| Jumper type | Maximum opening length | Support on masonry | Design features |
| Reinforced aerated concrete load-bearing structure | 174 cm | 25 cm | Does not require additional insulation |
| Load-bearing structure made of reinforced concrete using permanent formwork in the form of U-shaped blocks | 300 cm | 25 cm | Does not require additional insulation |
| Monolithic reinforced concrete load-bearing structure | According to beam length | 35 cm | Needs additional insulation |
| Execution by reinforcement | 120 cm | Inserting reinforcement behind the opening by 0.5 m | It is advisable to carry out ordinary reinforcement over openings |
| Monolithic non-load-bearing reinforced concrete structure | 200 cm | 35 cm | Needs additional insulation |
| Non-load-bearing design based on metal corners | 120 cm | 20 cm | Needs to be buried in the masonry |
Installation methods
Let's look at how to make a lintel over a window in more detail.
Device using U-blocks
The design is intended to work with floors whose width does not exceed three meters. The use of lightweight elements eliminates the need for a construction crane and other types of special equipment.
Reinforcement is carried out with corrugated metal rods having a strength class of A400-500 with a diameter of 10-16 mm (as determined by calculation):
- when the tray width is less than 120 mm, it is recommended to use two-rod reinforcement;
- when the tray width is greater than 150 mm, it is recommended to use four reinforcing bars, which are connected using tying wire with reinforcing rods in increments of 40-50 mm to obtain a spatially reliable grid.
Methods for arranging openings
There are several known methods for creating openings for doors:
- Shock. Performed with a jackhammer. Such work should be entrusted to experienced specialists so as not to make mistakes in the distribution of impact. Such an error can cause the wall to break.
- Unstressed. In this case, diamond cutting is used. This option does not create much noise, and there is little dust from it. With the help of such a tool it is possible to create an opening for doors with maximum precision. Using this method, arches of any complexity are arranged.
The prepared opening must be reinforced with a steel corner.
Mistakes cannot be made in such work, so the right decision would be to entrust the entire process to a specialist.
Selection of binder composition
Glue
Today there are several opinions about what solution should be used for installing blocks:
- Some say it's better to use old-fashioned lime mortar. This may be so, because it is warmer than just sand and at the same time, when completely dry and with a low cement content, it has a white appearance. But it has a negative side - it is very fragile. If such a solution is used, then reinforcement of each layer must be carried out without fail. It is better suited for building thick walls rather than partitions.
- Special cement-sand glue. It contains a plasticizer and a hardener, which allows it to be spread in a thin layer, providing an almost seamless connection of blocks . That’s why we’ll look at how to lay gas blocks on glue.
But first of all you need to buy it. It is sold in paper bags on which it is written “Glue for gas blocks.” You can also use tile adhesive; it has the same properties.
Preparing the opening for installation
Such work should begin immediately after the opening is completed. Having laid out a wall, it is always difficult to cut an opening under a door block. Its dimensions should be slightly higher and wider than the structure planned for installation. To accurately mark the opening and arrange the cuts, you will need:
- reciprocating saw;
- building level;
- roulette.
In order to strengthen the top, ten-centimeter grooves are cut in the side sections of the walls, reinforcing rods are inserted, pulled apart and secured with wedges. During finishing work, void areas are filled with quick-hardening solutions.
Breaking through a brick wall
First, the brick wall is cleaned of wallpaper and plaster. Then, using a tape measure and a pencil, markings are made. After this, a reinforcing jumper is installed on top. This is necessary to ensure that the wall does not burst or collapse. The jumper is made from a corner measuring at least 35 mm. Two blanks are cut 30 - 40 cm longer than the opening.
Using a grinder with a diamond blade, the top is cut on both sides of the wall. They cut 15 - 20 cm more than the width of the future doorway, cutting depth = the size of the corner (shelf). After this, the corners are inserted into the cut made, securing them with anchor pins and filling the cracks with cement mortar.
Now you can begin dismantling the brick wall. You can quickly and efficiently remove an unwanted area using a diamond saw. However, not everyone can afford such pleasure. Therefore, a grinder, a hammer drill or a sledgehammer with a chisel is most often used.
Using a grinder, a cut is made along the marked lines of the doorway as far as the diameter of the diamond blade allows. Then, using a hammer drill or a sledgehammer with a chisel, the brick is gradually removed. After removing all unnecessary bricks, you need to finish the lintel. To do this, both corners need to be welded together from the bottom.
Installation Rules
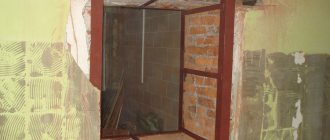
Foam block material is soft and porous, and a metal door is installed in it in several ways:
- they use anchors, which is great for narrow openings;
- use chemical anchors for aerated concrete;
- weld a metal frame base;
- arrange a timber frame;
- Additionally, a wall of brick material is laid out.
Many people are interested in how to secure a door frame in an opening made of foam blocks to a wooden frame?
When inserting a door into a wall made of aerated concrete, it is necessary to ensure that it stands on a foundation base, as a more reliable element.
A massive door creates significant loads, which cause the fastenings to become loose over time. To prevent such deformation manifestations, experts recommend installing the box in such a way that the load forces are distributed over a larger area. To do this, use a wooden frame with an embedded beam. The wood is first treated with an antiseptic composition.
It is recommended to use larch as it is more resistant to moisture.
If a small door is planned for installation, then embedded beams are buried in the aerated concrete, or overhead panels corresponding to the wall thickness are placed in the openings. Such panels can be solid or installed as separate elements. Upon completion of installation, the free space between the wall and the door frame must be foamed. This will allow the frame to lock more firmly.
Under a large door, a frame is made of wood material; the installation of the frame is more durable. The anchors are installed every sixty centimeters, to a depth of at least fifteen.
To strengthen the openings, frames are made from metal angles or profile thick-walled pipes. They are installed from floor to ceiling, the ceilings are fixed with anchors. Pipes are allowed to be buried in foam blocks, but for this you will have to prepare grooves. After this, holes are drilled in the frame to secure it to the aerated concrete.
Maximum reliability of fixation is provided by metal mortgages installed during the construction of the wall. These elements are plates with welded reinforcing bars, which are embedded into the walls during masonry work. The frame is fixed using a welding machine or bolted connections.
Partition with corner and doorway made of blocks
Often it is necessary to make an interior partition that would be located in an L-shape, in which two walls would form an angle of 90 degrees and would be joined to the outer walls.
Such a partition is equipped with a doorway, and often also a window into the living space of the room. Such an interior partition can be easily made from aerated concrete blocks laid on glue. It will be simpler and cheaper than plasterboard. But the soundproofing qualities of an aerated concrete wall are mediocre.
However, in most cases, solid sound insulation is not required here - it is only important to separate the space. How to make a corner partition with an opening in the most simple and cheap way...
Materials and tools
It is necessary to stock up on structural aerated concrete blocks with a density of 500 kg/m3 with a thickness of 10 or 12 cm, with a standard length and width of 20 (30) x 60 cm. The materials you will need are aerated concrete adhesive, for example, Ceresit ST21, corner plates with anchors and nails for concrete for fastening blocks to load-bearing walls, as well as polyurethane foam and plastering and finishing materials - gypsum starting and finishing putty.
To strengthen door and window openings, reinforcing bars with a diameter of 14 mm and a length of 20 cm greater than the width of the opening are used (for a narrow door 70 cm - 98 cm long, for example). And also the door is included, with platbands on one side. If there is a window, a wooden frame with one glass...
Special tools you will need are a drill with a mixer for mixing glue, a hammer drill, and a reciprocating saw for cutting blocks, preferably a motorized one...
Clean the surface and mark
It is unacceptable to lay blocks on dust. The surface is removed from weaknesses, dusted with a vacuum cleaner or wet cleaning. Dry, clean planes of walls, ceilings and floors are created.
The reference point for the location of the corner in the room is marked on the floor. The laser plotter is oriented towards it, which is used to mark a mirror point on the ceiling, as well as lines on the floor, ceiling and walls, along which the partition will be laid out. The markings are applied using dye thread or manually.
If there is no laser plotter, then the point is placed on the ceiling and projected onto the floor with a plumb line. Using equal diagonals, a right angle and projection on the walls are found (or the position is searched from the wall...), using plumb lines, the line of connection with the walls is marked...
When laying out, ligation of seams is observed. A typical masonry order is shown in rows from the corner.
We install the marking frame and prime it
Using markings, it is much easier to install metal profiles vertically along the walls and along the corner, as well as lay them along the floor, and orient the masonry along them using mooring cords, than to rely on marking lines... In any case, you need to install at least one profile vertically where it will be corner and attach mooring threads to it.
According to the markings, where the glue will interact with the surfaces, a deep penetration primer is applied. It’s more convenient to simply spray it with a sprayer, or, as usual, with a brush.
Making glue and laying blocks
Glue for blocks must be made according to the instructions, but it should not be too viscous. It should flow out of the mixer and then be easily squeezed out from under the blocks.
- The key point of the entire masonry is to make it non-shrinking. Therefore, the glue layer is kept to a minimum. When laying the blocks, they are rubbed against the base - they are placed on the adhesive layer and, with translational movements and pressure, they sit down until they rest on the base. Then, in one motion, the block is pressed against the adjacent one in the row, with the vertical seam first filled with glue.
We join the partition to the walls and ceiling
For joining with walls, it is better to use a not entirely rigid method, since the partition is not load-bearing, it is lightweight, and is located anywhere on the concrete floor.
Connecting the partition to the wall using anchors. Here 4 is sealant, 6 is mineral wool, 7 is a plate, 8 is a dowel.
It is proposed to join using corner plates installed in each row of blocks. The plates are attached to the concrete wall with dowel nails, and to the blocks with three nails, while the gap with the walls is filled with foam (mineral wool and sealant on the sides) and then plastered.
The blocks are laid out at such a height that there is a gap of 1–2 cm between the masonry and the ceiling, which is foamed on both sides with polyurethane foam and then plastered.
Attention, when applying foam you must not make any gaps to ensure sound insulation. Foaming is carried out after 48 hours of exposure of the finished partition.
Doorway
It is more expedient to cut the opening to the required dimensions in the finished masonry. To do this, the blocks are placed unedged, forming a narrowed opening only approximately. After waiting 48 hours, the opening is marked (it must be no closer than 10 cm from the corner in order for the trim to fit) using a laser builder, or with plumb lines and a level (for a door 70 cm, the opening width is 78 cm). Then the opening is cut out using a reciprocating saw, preferably an electric one.
The top of the doorway is reinforced with a pair of steel rods. In the upper part, grooves are cut 2 cm high and 10 cm wider than the opening. A pair of reinforcement bars with a diameter of 14 mm are inserted into them and pressed against the upper edge of the opening using mounting wedges. After this, the grooves are filled with mortar and plastered.
All that remains is to prime and putty the partition, then paint or paste it over....
Bookmark the opening
How to block a doorway with foam blocks? The work is performed in the following sequence:
- the old door structure is removed;
- all sides of the opening are completely cleaned;
- The masonry adhesive solution is mixed in the container, following the manufacturer’s recommendations;
- Spray the surface of the opening area a little with water;
- We take measurements using a tape measure and make marks on the foam blocks;
- cut the material with an electric saw;
- we carry out the masonry from the lower section, moving gradually upward;
- the blocks are laid in a checkerboard pattern;
- the adhesive mass is applied evenly, in a thin layer on each side;
- to shrink the blocks we use a rubber hammer;
- in certain places we screw self-tapping screws into the side parts of the opening to create additional support points for the structure;
- the outer row is cut out separately, leaving a gap between the ceiling and the edge;
- then it is filled with foam for installation work;
- The seams are cleared of excess glue and cleaning is carried out.
Perhaps, no more questions will arise about how to fill an opening in a wall with foam blocks.
Steep slopes
Are you here
When a quarter is cool
“The steeper the mountains, the lower the Priors.” In the context of this article, a slope is not a characteristic of the terrain, but the plane of a window opening perpendicular to the wall.
When brick was used to build walls, the problem of preparing openings was solved in a standard way - a so-called “quarter” was made - a 60 mm protrusion (a quarter of the length of a traditional Russian format brick) of the outer “spoon” (120 mm thick) - cladding, or masonry “under plaster” . Nowadays they rarely build from brick - mostly they only cladding (at the same time, they also make that very “four” in the cladding relative to the main wall - from cellular concrete, porous ceramics, etc.).
But what if the developer is not rich and decides to build a house from aerated concrete? At the stage of wall construction, a private developer rarely thinks about how windows will be installed in the openings, hoping that there are standard solutions for this problem. What pitfalls can a developer expect if this unit is not implemented correctly?
When installing windows, it is customary to fill the gap between the window and the slope with polyurethane foam, which is destroyed under the influence of ultraviolet radiation. Also, due to the significant coefficient of thermal expansion of a plastic window (and such windows are installed by the vast majority of developers), polyurethane foam takes on the role of an element with elastic deformation that maintains integrity when the window geometry changes. Traditionally used polyurethane foams have elastic deformation properties, but due to their vapor permeability they are able to accumulate and retain moisture under certain conditions - when so-called. “points of saturated water vapor” into the layer of polyurethane foam. At the same time, the foam that gets wet during the autumn period freezes in winter, becomes brittle and gradually collapses. Therefore, the task of extending the integrity of the window as a structure is to protect the foam layer from the effects of factors of its destruction - exposure to ultraviolet radiation and the penetration of water vapor into the foam layer.
Let's consider the first factor - protecting the foam layer from the outside. When a developer invites a team of masons to lay masonry using aerated concrete, the offer to lay openings in a wall using aerated concrete and a quarter is taken as an insult - after all, the labor intensity of this operation is high, and aerated concrete installers refuse to do it at the usual cost of masonry. In addition, if for vertical slopes of a window opening in a wall made of aerated concrete this is theoretically possible (why is it theoretical - aerated concrete installers rarely manage to make simple slopes even), then for a horizontal (upper) slope this is also associated with the need to correlate this task with the manufacture of window jumpers - from U-shaped blocks, or ready-made ones, and it is better not to saw either one or the other.
What solutions can be applied? You can install a window in a straight opening, plaster the outer slope and use a plastic flashing - “cheap and cheerful”. At the same time, in order for it to look aesthetically natural, the gap under the mounting foam should be small, which limits the thickness of the insulation of the internal slope.
Why insulate the slope from the inside? The thickness of a plastic window does not exceed 120 mm (some manufacturers of plastic windows have profile models with a thick frame that serves as an external slope). Accordingly, the thickness of the wall separating the external slope from the internal slope is no more than 120 mm (mostly 60-70 mm). Of course, such a thickness is not enough for thermal insulation (if it is -20 outside and +20 inside), and the part of the slope adjacent to the window will condense, which is unpleasant in itself - condensation from the slope will flow onto the window sill, and subsequently into the slope Fungus and mold can grow from aerated concrete.
How can you insulate a slope? It is more convenient for construction installers to carry out “dry” processes - and therefore sandwich panels filled with polyurethane are popular. Not everyone is satisfied with the aesthetics of a “plastic” slope, aggravated by the need to use plastic profiles - corners, etc. Insulated plaster slopes are more aesthetically pleasing, but also more labor-intensive. Returning to the first option of an external slope - with a stripping, we can state that in combination with it you can only use a thin sandwich panel, which will not ensure that the condition of not forming condensation inside the wall is met.
The output is still “a quarter”. It is advisable to carry out only this quarter of the aerated concrete wall opening after completion of the masonry, first correcting the flaws of the aerated concrete installers.
For example, like in this video
The quarters are made from the same aerated concrete - strips are cut from blocks 100 mm thick (blocks of a different thickness will not turn out so smooth, although this option is also possible). This operation can be performed manually - with a saw on aerated concrete, or using mechanisms - for example, a reciprocating saw, or a circular saw with a disk with pobeditovy tips.
The option of using special machines for cutting aerated concrete for a private developer looks too speculative. Aerated concrete blanks are glued to the aerated concrete opening using glue (cement), and plastered with additional reinforcement with alkali-resistant fiberglass mesh, so as to cover the adhesive seam by at least 50 mm. This method will ensure structural integrity, the slope “will not come off.” With this arrangement of aerated concrete opening, it becomes possible to use sufficient layers of thermal insulation on the inside of the slope.
A little about insulation
If the master plans to make an opening in an external load-bearing wall, he should take care that the steel lintel does not become a cold bridge and does not lead to heat loss in the room. After installing the channel, if necessary, insulation materials should be installed on the outside of the wall.
It should be remembered: direct contact of the jumper with insulation such as polystyrene foam can lead to metal corrosion.
To prevent this, you will need to apply anti-corrosion paint to it before installing the jumper or use galvanized steel channels.