Marking
It is more convenient to mark on the ground by pulling a cord, such as a nylon cord. The ends of the cord can be secured with wooden stakes or pieces of reinforcement stuck into the ground. It is more advisable to stick pegs outside the marked area.
If the marked area has a rectangular shape, then right angles are checked by comparing the diagonals - for a square and a rectangle, both diagonals must be equal. For unequal diagonals, one base side is taken, which will remain unchanged, the other three are moved until equal diagonals are obtained.
However, it is not always possible to measure the diagonals; moreover, the geometry of the concrete slab can be complex. A ninety-degree right angle can be set aside in a fairly simple and effective way.
The diagonal of a right triangle with two sides of 100 cm is equal to 141.4 cm. The principle of marking and checking right angles is based on this. The larger the conditional triangle we can put aside, the more accurate the marking will be. The main thing to remember: for every meter of right angle there are 141.4 cm of diagonal. At a right angle, with sides of 5 m, the diagonal will be equal to 141.4 * 5 = 707 cm. This method is applicable in all construction and finishing work, I highly recommend that you learn it well
.
How to place beacons under a floor screed using dry technology
Dry screed involves the presence of backfill without the presence of water. On a wooden floor, it is easier to use timber logs as beacon elements. They are permanently fixed to the base. The step is kept relatively frequent, approximately 50 cm. This will prevent the sheet or board flooring from sagging.
In the case of concrete slabs, removable strips are used. They can subsequently be used for other purposes. This will save time, money and effort. Here it is more convenient to take flat slats or a U-shaped profile, placing their soles up.
Backfill is used for fastening. It is easy to distribute the bulk material, so there is virtually no pressure on the supporting structures. On large areas, the beacon elements are moved one by one as the backfill is leveled; on small areas, it is more convenient to remove them as the hard flooring is formed.
Soil sampling and backfilling
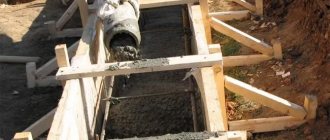
When excavation to a certain depth is planned, it will be useful to install the formwork posts first. A block of 50mm*50mm or more is used as racks, depending on the height of the pour above the ground level. The block is sharpened with an ax and driven to a depth below the expected level of soil removal. The racks must be installed taking into account the thickness of the formwork boards, with a distance of 1-1.5 m from each other.
When the rack bars are hammered around the perimeter of the future formwork, the marking cords can be removed.
Before sampling the soil, it is very useful to mark the concrete pouring level on the hammered blocks. This will make it easier to control the depth to which the earth is removed.
Sometimes the question arises: why go deep into the ground at all? If this is done by 10-20 centimeters, then in order to prevent washing away by melt and rain water. To prevent movement of the slab during frost heaving of the soil, the concrete must be buried below the freezing depth of the soil.
There is a lot of controversy about backfilling under concrete, and this question can only be answered unequivocally by knowing exactly the properties of a particular soil. In the case of monolith concrete, in general, bedding is not required - the concrete will fill all unevenness and deviations from the level. If sand predominates in the soil, a small layer of gravel will be useful. Gravel will allow you to compact the soil well, partially penetrating into it. Five centimeters of gravel padding will be more than enough. You need to understand that here we are talking about concreting a concrete site, and not about a strip foundation - competent preparation for the foundation should be carried out by a specialist, based on the geology of a particular place.
Regardless of the use or absence of bedding, it is necessary to thoroughly compact the soil. This operation is performed with a vibrating plate or a manual tamper - a piece of heavy timber with handles.
Definition of zero level
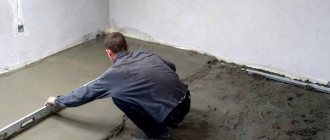
In order for the beacons to be installed evenly, before starting work you need to determine the zero level and carry out markings. A laser or regular hydraulic level will help you with this. The first option is preferable - it will make the work faster and easier.
It is more convenient to mark using a laser level
Stepping 1 m up from the floor, place a starting point on the wall. Retreating a similar distance from the base, place points at a meter height, walking along each wall of the room.
Align the markings to the highest point and connect the marks with a solid straight line, thereby setting the base level. Step back 1 m from the created line and draw a new solid line parallel to it along the entire perimeter. This is how you get level zero. To set the required thickness of the screed, simply step back up from the zero level to the required height (usually from 3 cm) and draw a new line.
Definition of zero level
You will place the beacons along the last of the created lines - the upper part of these landmarks should be at the same height as the markings on the wall.
Formwork
Since our vertical posts are already hammered in and the horizontal concrete level is marked on these bars, installation of the formwork will be very simple. It is better to take boards in the range of 20-50 mm in thickness and any width that is available. Naturally, the board needs to be edged.
The top boards are installed according to the marks on the rack bars. To make it easier to dismantle the formwork, it is better to screw the board from the side of the block - when removing it, the screws can be unscrewed without breaking.
After placing all the upper boards around the perimeter, the lower ones are screwed in if the width of the first ones is not enough. For formwork, it is enough for the board to extend just below the level of the external soil. All gaps between the soil and the formwork are covered with earth from the outside. Since concrete exerts considerable pressure on the boards during pouring, the formwork must be reinforced with oblique struts. Spacers are installed next to the posts, and if the board is thin, then spacers should be installed more often.
The formwork is ready!
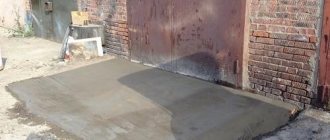
Formation of concrete surface
When arranging a concrete screed at an angle, it is best to pour concrete in two layers: first, use a mixture with a large content of crushed stone without careful leveling, in the second go, cover it with concrete after a maximum of 24 hours, pour the mixture almost without crushed stone, in a layer 2-4 centimeters thick - the concrete should be liquid and easily distributed over the surface. This will reduce the consumption of materials and significantly reduce the cost of all work.
The procedure for pouring concrete at an angle is simple: when the solution is ready, it is unloaded between the beacons, evenly distributed over the base so that the level of concrete does not exceed the height of the beacons. Excess mortar is removed with special vibratory slats: they are placed on the formwork and driven along the concrete, as if on rails, performing reciprocating movements and gradually compacting the mixture. The procedure is repeated at least 2-3 times.
Poorly mixed concrete is immediately visible - it does not want to shrink properly. Therefore, the next batch must be prepared with a large amount of water. A poorly mixed mixture will also be immediately visible. Compacting the concrete must be done to remove air bubbles.
After pouring at an angle, the concrete is left to dry, periodically spraying water to moisturize and prevent the appearance of microcracks.
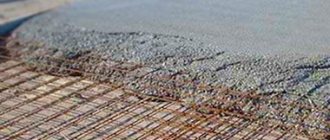
Armature
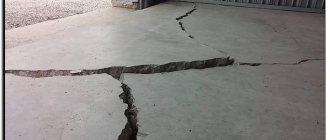
Reinforcement is necessary in almost all concrete work, with rare exceptions. A concrete platform is no exception - without reinforcement, there is a high risk of cracking during operation. The choice of reinforcement thickness, cage size and configuration is a complex engineering calculation. We will make do with basic concepts and key points.
The size of the cage and the thickness of the reinforcement should be chosen for economic reasons; as a rule, a thickness of 16 mm and a cage size of 20*20 cm is more than enough. I emphasize that this is all by eye. It all depends on the thickness and purpose of the concrete. The only thing I can say for sure: if the thickness of the concrete slab allows you to lay two floors of reinforcement, you need to do two. Because the layer of reinforcement only from below will work when there is a load on the middle of the slab from above; when the load is applied to the edges, the top layer works. Naturally, if concrete is poured to a thickness of only 10 cm, two layers of reinforcement will be superfluous. With a slab thickness of 15-20 cm, it is better to take thinner reinforcement, but make two layers. One layer of reinforcement in a thick slab, in the middle, performs much worse than two layers of thinner reinforcement at the top and bottom.
One important point is that the reinforcement must be protected from the environment by a minimum layer of concrete. Then the metal will not receive enough oxygen necessary for decay. In simple terms, the reinforcement will not rot, even in constantly damp concrete. By the way, moisture is absolutely harmless to concrete; on the contrary, it becomes stronger. But moisture and sub-zero temperatures gradually destroy concrete.
The protective layer of concrete around the reinforcement is prescribed in SNIP 52-01-2003 and has different values, depending on different conditions. The minimum layer ranges from one rod diameter to 70 mm. A layer of 70 mm can be considered optimal. Such a layer of concrete should protect the reinforcement in foundations without concrete preparation (when concrete is poured directly onto the soil or bedding, as in our case). However, this rule will have to be neglected, for example, when pouring a concrete floor 10 cm thick, with the reinforcement located in the middle, the distance to the edge will be less than 5 cm. Naturally, all the numbers in the regulatory documents are given with a margin and in some cases you will have to show flexibility of thinking.
So, we’ve decided on all the sizes, it’s time to knit the reinforcement. It is knitted with a special knitting wire made of mild steel. It is not recommended to bind with aluminum wire - undesirable oxidative processes will occur in the concrete, there will be enough oxygen for this (according to experts). It is more convenient to twist the wire with a special hook, which you can make yourself from 5-8 mm steel wire. On the opposite side of the pointed hook you need to make a bend for easy grip with your hand.
There is a lot of information and videos on the Internet where craftsmen adapt a hook for a screwdriver. In my opinion, this is extremely inconvenient in reality and only looks beautiful on video. The reinforcement is crocheted perfectly with regular crochet; more time is spent on gripping the rods and forming a loop than on twisting.
The reinforcing mesh must be somehow fixed at a distance of 7 cm (see above) from the soil/backfill. This can be done by placing in some places underlays made of non-rotting material. Pieces of concrete, paving slabs, or, in extreme cases, cakes of dried mortar will do. It is undesirable to use sand-lime bricks - they rot and collapse in the ground; if you use them, then only red bricks.
The second layer of mesh is fixed above the first by tying vertical posts made of the same rods. The frequency and location of racks are selected based on convenience.
It may happen that, for structural or other reasons, concrete must be poured in two or more stages. To maintain the integrity of the entire structure, the reinforcement must be solid at the seam. This can be achieved by releasing reinforcement sections from the first part of the slab. The protruding rods must be no shorter than 40 cm. Subsequently, a further mesh will be tied to these rods and filling will be done. Of course, some percentage of strength will be lost, but when this is the only possible solution, it will do.
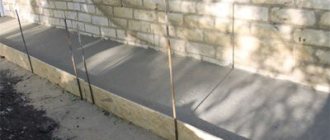
The final stage before flooding will be the installation of beacons. The edges of the formwork serve as beacons; where the edges are not enough to support the rule or board (acting as a rule), additional beacon blocks are placed. These beacons are removed after pouring and curing.
How to properly pour a monolithic foundation slab - diagram of the future foundation
A technology proven in practice, according to which a monolithic reinforced concrete slab is poured, guarantees the reliability of the foundation.
It is important to construct a multi-layer structure in the correct order. When thinking about how to pour a concrete slab, you should study the order of the foundation layers
Guarantees the reliability of the foundation - proven technology
Let's look at how the slab is constructed, starting from the soil level:
- geotextile fabric. Placed on a horizontal surface of compacted soil. The material acts as a separating layer between the sand-crushed stone cushion and the soil;
- damper cushion. Constructed from a mixture of sand and gravel. The bedding is designed to smooth out soil shifts and level the base. Drainage lines are located inside the massif;
- layer of footing. It is formed from concrete mortar. The footing allows you to plan the surface and increase the load characteristics of the foundation slab;
- waterproofing. It inhibits the penetration of ground moisture to the base of the base and allows you to maintain the required moisture concentration in the concrete solution;
- crumbly or sheet insulation. The thermal insulation layer reduces heat loss, which helps ensure a comfortable indoor temperature;
- permanent or composite formwork. The formwork is erected along the contour of the foundation slab, gives it the required shape, and also prevents moisture from seeping out of the concrete during hardening;
- reinforcement grid. Does not allow the concrete base to crack under the influence of loads and soil reaction. The power frame extends the service life of the foundation;
- layer of concrete. After gaining operational strength, the concrete absorbs the weight of the structure and evenly distributes the load over the area of the foundation surface.
Component calculation
If the volume of poured concrete is more than 4 cubic meters, it is more practical to order ready-made concrete.
When smaller volumes are needed or machine access to concrete is not possible, batches are made independently. To calculate the required amount of cement, sand and crushed stone, I suggest that you familiarize yourself with the table below. Table of proportions of cement, sand and crushed stone for different grades of concrete
| Concrete grade | Mass ratio cement: sand: crushed stone (kg) | Volume of components for 1 m³ of concrete C:P:SH (m³) |
| M100 | 1 : 4,6 : 7,0 | 0.13(≈3.4 bags) : 0.53 : 0.79 |
| M150 | 1 : 3,5 : 5,7 | 0.156(≈4.1 bags) : 0.5 : 0.78 |
| M200 | 1 : 2,8 : 4,8 | 0.185(≈4.8 bags) : 0.46 : 0.78 |
| M250 | 1 : 2,1 : 3,9 | 0.232(≈6.1 bags) : 0.44 : 0.79 |
| M300 | 1 : 1,9 : 3,7 | 0.243(≈6.4 bags) : 0.41 : 0.78 |
| M400 | 1 : 1,2 : 2,7 | 0.322(≈8.5 bags) : 0.35 : 0.77 |
| M450 | 1 : 1,1 : 2,5 | 0.345(≈9 bags) : 0.34 : 0.76 |
*Table is for M400 cement
Many people are accustomed to using the data from the second column, measuring components with buckets during batches. This is a slightly incorrect method: the proportions are given in kilograms, not liters. And the volumetric weight of the ingredients is completely different. In addition, the weight of sand can vary greatly depending on its moisture content. It is much more correct and accurate to use the third column of the table, where the components are given in fractions of a cubic meter; for those who don’t know: there are 1000 liters in one cube.
The third column is initially convenient for calculating the final amount of materials, but the numbers are easily transformed into proportions for the batch: brand M200 - 0.185 cubic meters is 185 liters, reduce by 10 times - 18.5 liters per batch, sand and crushed stone also need to be reduced by 10 times. Need to adjust the proportions for a small concrete mixer? It’s easy - all three numbers of the volume of cement, sand and crushed stone can be divided by any number of times, the main thing is to divide all three volumes by one number.
The numbers in the third column can be used as a coefficient when calculating the final quantity: just multiply the required amount of concrete in m³ by the volume fraction of the required component. For example, consider the most common brand M200: you need to get 3 m³ multiplied by 0.185 (≈4.8 bags) 3 * 0.185 = 0.555 m³ of cement = 555 liters or 3 * 4.8≈14.4 bags of 50 kg. I think anyone can handle such calculations.
Cement is indicated in approximate terms per liter 50 kg = 38 liters. It is problematic to make an exact calculation, because the volumetric weight of cement can vary from 1100 kg/1m³ to 1500 kg/1m³, so the average density is taken as 1300 kg/1m³. It is worth noting that density depends on freshness - older, caked cement weighs more.
Sand and crushed stone are often sold in tons, not cubes, so for correct calculation you need to know the volumetric weight of these rocks. A cubic meter of sand weighs about 1700 kg. I completely forgot to mention: river sand is used for concrete, in fact, as for all construction and finishing work.
The weight of a cubic meter of crushed stone is considered to be 1360 kg. The weight of crushed stone depends on the fraction and humidity, so the figure is very approximate. For concrete, a fraction of 10-20 mm is more suitable. In general, I think it’s useless to accurately calculate crushed stone: when buying several tons, it’s unlikely that kilograms will be counted. Therefore, a reserve of 15% -25% should be added to sand and crushed stone.
Features of arranging a screed slope in a shower room
In shower rooms and baths, screeds at an angle are performed with certain nuances. Here it is important to take care of laying a heat and waterproofing layer under the concrete. For the thermal insulation layer, use penoplex with a thickness of 30-50 millimeters with a density of at least 35 kg/cm2. Foam plastic with a thickness of 50-100 millimeters and expanded clay 150 millimeters are also suitable. It is better not to use mineral wool.
To protect concrete from moisture, roofing felt or waterproofing film (thickness more than 200 microns) is usually used. And plasticizers are added to the concrete mixture to make the inclined plane more durable and resistant to moisture.
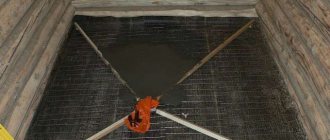
Before pouring concrete at an angle in such rooms, a reinforcing frame is also made - a good choice would be a polymer or metal mesh with a cell of 50-80 centimeters, made of a rod with a diameter of 3-4 millimeters. Clamps or knitting wire are selected for it. It is also worth taking care of the drainage elements in the inclined surface, which are planned to be installed in the shower.
Fill
All work should be performed at a temperature not lower than +5. Pouring is carried out by compacting the concrete particles using a trowel. It is necessary to ensure that the mass gets into all hard-to-reach places of the formwork and fills all the voids. Since the pouring process can continue for a considerable time, you should try to avoid setting the composition in underfilled areas. In other words, you should try to fill small areas from bottom to top, rather than evenly raising the layer over the entire area. This way we will avoid the formation of layers in the thickness of the concrete.
Leveling is done using a rule or a suitable block. Beacon bars should be removed immediately after pouring or after gaining strength. After pouring, to prevent concrete from cracking due to rapid drying, the entire formwork should be covered with plastic film.
Gain Setting
Reinforcement allows you to increase the strength of the concrete screed at an angle, provide better adhesion to the base, and will not allow the layer to deform and slide off this surface. Strengthen inclined surfaces using steel reinforcement with a cross-section of 4-5 millimeters. First you need to cut the blanks to the size of the future concrete base.
Then the reinforcement frame is assembled from the blanks using knitting wire, connecting the rods located perpendicularly. The result is a grid with a cell of 50-80 centimeters. You can also use a ready-made mesh for reinforcement.
The structure is laid between the beacons, on prepared non-metallic pads, which will ensure the required distance between the concrete and the reinforcement. The concrete will be evenly distributed under and above the reinforcement, which will protect the frame from corrosion and the effects of external negative factors.
Removal of formwork and strengthening
The formwork can be removed in a day or two or much later. I recommend dismantling after 1-2 days after pouring. In the first days of gaining strength, this is easier to do, because there may be places in the formwork that are clamped with mortar. You should remove it carefully, the concrete is still too fragile. After removing the formwork, it would be a good idea to spill the surface with a small amount of water - water is useful for the chemical reaction when gaining strength. After moistening, you need to cover the surface again with film. After a week, you can safely remove the polyethylene and leave the slab to “finish” as is.
It is recommended to carry out further finishing work or other construction operations after the concrete has fully gained strength. Under normal conditions this is 28 days. Moreover, 70% of the strength is gained in the first week. Therefore, if deadlines are very tight, you need to wait at least a week.
This concludes our already long publication, which covered all the stages of pouring a concrete slab.
What types of lighthouses are there?
Floor beacons can be divided into 2 groups: ready-to-use and homemade. The first are represented by planks or tripod devices (benchmarks), the second are installed from gypsum mortar or a similar screed. This also includes a tensioned metal cable. Installation is carried out according to a similar scheme:
- the zero level is determined;
- point landmarks are set;
- straight segments are formed.
Additionally, for the plaster beacon, you will need a rule or other straight-line material at hand to level the mixture along the supports. To tension the cable, you will need to install special anchors at the extreme points.
Types of rack beacons for floor screed
A beam, plasterboard or T-shaped profile, or a metal pipe can be used as a rack beacon for the screed. All options must be smooth, without pronounced deformations. All options must be removed from the dry screed; only galvanized materials without damage are left in the wet solution.
Pour concrete floors in a bathhouse with a slope for drainage - step-by-step instructions
To perform a high-quality inclined surface, you first need to remove the fertile layer of soil, clean everything, and compact it. The hole in the drain pipe is plugged with a plug, and a fence made of boards or roofing felt is mounted around it. The area needs to be covered with sand in a layer of 10-12 centimeters and compacted. Pour gravel or crushed stone on top so that it is compacted into the sand (layer thickness is about 15 centimeters).
Next, you need to dismantle the box that encloses the sewer drain pipe and fill the space around it with concrete and foam chips. Cover the roofing felt (or waterproofing film at least 200 microns thick) with an overlap of 12-15 centimeters, coat the joints with warm bitumen mastic, add a layer of roofing felt, glue it along the perimeter of the room to the wall at a height of about 20 centimeters. For the drain pipe, leave a hole in the waterproofing and immediately install the lower part of the drain ladder.
A metal mesh is mounted on the roofing felt with knitting wire for reinforcement with cells of 5-8 centimeters. Beacons are placed on the grid (on a gypsum slide) with a level step of no more than 2 cm.
To fill an inclined surface, concrete is prepared with special additives - the construction industry today offers high-quality waterproofing additives (Crystal, Penetron, etc.) that will improve the structure of the solution and protect it from moisture.
Concrete is poured at an angle, the solution is leveled with a rule and a trowel, and distributed among the beacons. Concrete must be compacted to remove air pockets. Then the inclined screed is given the opportunity to gain primary strength (about 7-10 days) and insulation is laid, and another layer of reinforcing mesh is placed on it. Then the beacons are installed again and the leveling screed is poured with a layer of concrete of 50-60 millimeters and compacted.
Waterproofing impregnation is applied to the dried concrete, and decorative finishing is laid (usually ceramic tiles).