Brick is a universal material used in private and multi-storey municipal construction. It is used for the construction of load-bearing walls, partitions, foundations, fences, fireplaces and chimneys. The strength of structures depends on the quality of the mortar and the professionalism of the craftsman who knows how to lay brick in different conditions. The work of a mason is influenced by the weather, the thickness of the walls, the type of masonry, and the characteristics of the material used. It is necessary to control the viscosity of the solution, the linearity of the position of the brick in the row and the tightness of its fit.
What is needed to build a flat, strong wall or partition? In addition to knowledge of how to lay brick, you will need tools and proper preparation of masonry mortar. When working, the main attention is paid to laying corners and uniform thickness of seams. Proper organization of the work process and a well-chosen pace of work will help you gain experience in the construction of brick buildings.
Tools and materials
For work you will need the following materials:
- hollow or solid brick;
- cement grade M400;
- sand;
- water.
Cement and sand can be replaced with ready-made masonry mortar, which is offered by manufacturers of dry building mixtures.
Mason's personal tools:
- trowel - a small spatula for laying mortar, leveling it and removing excess mixture;
- cord - used to create horizontal lines that serve as a visual guide during operation;
- plumb line - a cord with a weight to determine the vertical level of the wall;
- pickaxe – used for splitting bricks into halves;
- building level - helps determine the accuracy of the masonry geometry;
- square - used when drawing out the corners of walls and partitions;
- ordering - a device for forming masonry corners;
- tape measure - necessary to control the size of structural elements.
You will need a shovel for mixing the mortar and a container for preparing the masonry mixture. For large volumes of work, a concrete mixer is used. A wheelbarrow is used to transport material to the work area.
Joining
After the walls or cladding have been erected and the mortar has completely dried, the wall is carefully swept and the seams are filled with a special mortar. It can be of different colors; now in construction stores you can find a wide range of grouting products.
Building walls is one of the most difficult operations in construction, but you should not be afraid of this work. Follow our recommendations, study photo and video descriptions of the technology for laying brick walls and practice. Rest assured, soon you will definitely be able to erect walls or cladding smoothly and efficiently.
Preparation of masonry mixture
The solution is prepared from cement, sand and water. Add 3 to 5 parts of sand to one part of the binder and mix. The mixture is mixed with water: this must be done gradually, thoroughly mixing the finished solution. Its consistency should resemble good sour cream. The recommended one-time volume per bricklayer is 40-50 liters of solution. The “lifetime” of the masonry mortar is 1.5-2 hours.
To increase the plasticity of the solution, slaked lime is added. The volume of this material should not exceed half the volume of cement used. Lime can be replaced with clay or plasticizers. When working with hollow bricks, it is important to monitor the fluidity of the mortar. It should not be very plastic; this will lead to it flowing into the cavity, which will increase consumption and reduce the thermal characteristics of the wall being built.
What kind of mortar is the brick placed on?
The recipe for a quality mixture consists of two components:
- cement M400 – 1 part;
- construction (river) sand – 4 parts.
The ingredients are mixed dry. When mixing by hand, sand and cement poured into a heap are thrown with a shovel three times from place to place, mixing. The dry mixture is poured with water to the desired consistency.
First stage of work
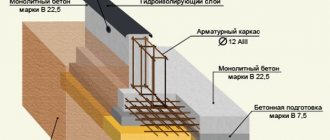
It is recommended to carry out masonry at an average daily temperature of more than +5ºС. Morning frosts will not allow the solution to set - it will freeze without gaining strength. The base for masonry must be dry and level. The first row, laid on the foundation, is separated from the concrete by waterproofing. This will protect against capillary suction, prevent the appearance of dampness and premature destruction of the building.
Masonry begins with the installation of lighthouse stones in the corners of the walls, in the places of doorways. If the wall is long, the lighthouse brick is additionally laid in the middle. This is necessary for proper tension of the laces. Be sure to use a cord that does not stretch. The lace forms a line that corresponds to the outer top edge of the brick being laid. It will help you lay out the first row correctly. Particular attention is paid to the absence of sagging of the cord.
Next, we continue with the corners, which are formed to a height of three to five rows. To determine the horizontal, use a level, check the vertical with a plumb line. After laying the corner to a height of 4-5 rows, you can use the order. This tool is made from an aluminum angle that is secured to the brickwork with staples. Laying lines are marked on the outer surface. It takes into account the thickness of the brick and seam.
When setting the order, a plumb line is used. It helps to set the ideal vertical. The order has a height of 1.5 meters; it can be made independently from a thin-walled iron corner or two even boards located at an angle of 90 degrees. Using the tool allows you to form the ideal geometry of the corners and achieve the same height of each row of bricks.
How to lay brick correctly?
The whole process is carried out in several stages:
- Prepare tools and materials;
- Lay out 2 rows without mortar to evaluate the feasibility of the installation method;
- Stir some solution;
- Before forming the wall, place a couple of sheets of roofing material on the dried foundation - make two-layer insulation;
- Build the corners of the wall 3 bricks high. For guidance in your work, use a square and orders. First, the corners are formed, since the next row of bricks in the masonry is oriented precisely towards them;
- Stretch the cord using a level (placing the cord along the top of the intended row);
- Lay the bricks on the mortar, checking their position each time with a plumb line and level;
- Tap the bricks with the handle of a trowel so that they take the optimal position;
- Unstitch the seams (stretch the mixture over the entire seam with limited consumption of the masonry mixture for laying bricks; a template for laying bricks also helps control the consumption);
- Repeat steps 6-9.
Basic masonry technique
Having completed the removal of the corners, you can begin the main masonry. If the wall is long and the work is being done without an assistant, then before starting it is worth demolishing the brick. Its quantity should be sufficient to lay 1-2 rows. A layer of mortar 6-8 mm thick is applied to the base. Masonry mortar is applied to the end that will be adjacent to the formed corner, and the brick is pressed tightly. Its upper outer edge should lie exactly along the stretched cord.
Using more cement-sand mixture helps to simplify the vertical alignment of laid bricks. If the stone is 1-3 mm above the cord line, it is carefully lowered by tapping the end of the trowel handle. The excess mortar that emerges is removed with a trowel into a bucket or onto the surface of the masonry.
During the work you need to act carefully, there is no need to rush. The solution hardens slowly, allowing the necessary correction to be made. Beginners may have time to disassemble a row if its geometry has significant deviations. It is recommended not only to control the level “by eye” and by lacing. Regular use of the building level will help you achieve good results.
Checking the diagonals of the foundation
The second important point when checking the foundation is to pay attention to the diagonals. Ideally, the diagonals in a rectangular foundation should coincide. According to the figure, we displayed the coincidence of the diagonals in the small equality D1=D2. If they are equal, we can judge that all our parallel sides have the same length and all 4 angles are at 90 degrees. These conditions are important to us so that our walls turn out smooth.
If there is a slight discrepancy in the diagonals, then this inaccuracy can be compensated for during laying by reducing the long side and increasing the short side. Of course, if the thickness of the foundation and the thickness of the masonry allow us to do this.
Bandaging brickwork seams
The strength of the wall depends on the correct dressing of the seams. The meaning of the technology: vertical seams in the first row should not coincide with the seams of the top row. To do this, 1/3 or 2/3 of the brick is laid at the beginning of a new row. As a result, all seams in the row are shifted by this distance.
Parallel rows are connected using the butting method; for this, every 2-3 bricks laid along the lacing, one is placed perpendicularly. At the same time, make sure that the end line of the stone is along the cord. Every five rows of masonry are tied with reinforcing mesh. This material is laid on the top of the wall, covered with mortar and work continues.
Advice from an experienced mason
You can achieve good results if you use the following recommendations:
- you need to start with simple objects - the steps of an outbuilding, the posts of a small fence. After the first skills have appeared, you can begin to work on more complex objects - internal partitions, walls of a summer kitchen;
- A detailed plan of all rows of masonry will help reduce the cost of materials; when calculating the amount of bricks, it is necessary to take into account the presence of breakage - about 10%;
- For the first work, you should not use used material or inexpensive products of poor quality for general construction work. It is better to develop skills with facing bricks that have an ideal geometric shape;
- At the preparatory stage, you can perform dry masonry - without mortar. This will help you understand whether there is enough material, choose a method for tying parallel rows, and get your first ideas about the location of vertical seams;
- when laying corners, you should use only whole bricks, this will increase the strength of the structure;
- During the process, each brick is immersed in a bucket of water for a few seconds before laying. This will ensure better adhesion of the solution to the material and prevent moisture from being “pulled out” from the masonry joint;
- When constructing load-bearing walls, it is necessary to prevent mechanical impact on the structure. Scaffolding should not rest on it;
- the masonry cannot be covered with a vapor-proof material, this will change the dynamics of strength gain.
You should not increase the thickness of the seams to 10-20 mm; such a wall will definitely “float” with an inexperienced builder.
"Stick to it"
In this technique, the mortar is placed directly on the first row of bricks, the mortar is laid out in the middle of the row so that it does not reach the edges by 15 mm. This avoids squeezing out the solution.
The brick is brought to the mortar at a slightly angle, the mortar is, as it were, spread over the base and pressed against it. Excess solution is removed with a trowel back into the bucket.
When using this technique, the seams are not completely filled. This reduces the thermal insulation properties of the masonry and makes it more fragile. Approach end-to-end for cladding buildings or erecting partitions.
Brick joints
Seams are 10-15% of the surface of the brickwork. When hardened, the solution forms strong and rigid concrete, which can no longer be deformed. For this reason, attention is paid to the seams during the brick laying process. Often it is not enough to remove excess cement mortar from the external or internal surface of the wall. It is necessary to form a seam, which may look like this:
- pustoshovka - the solution is pressed by jointing 3-4 mm deeper than the wall surface line. This technology is used for subsequent plastering. The presence of deep cracks facilitates the adhesion of plaster;
- convex and concave seams - perform a decorative function and are used when working with facing bricks. You can give the shape with a special semicircular or a piece of small diameter pipe;
- trimmed - the gap is filled completely, a smooth surface is formed. This type of seam is relevant in the construction of stoves and fireplaces - it protects against the formation of soot accumulation on the surface.
The shape of the seam can be not only flat or semicircular, but also cut at a slight angle.
You can ignore the shape of the seam only in one case - if you plan to use a hinged ventilated facade. In this case, it is enough to simply remove excess cement mortar. They cannot be left: frozen pieces can break the tightness of the vapor-waterproofing film and create problems when installing the guides. You can remove excess in the intervals between laying the main rows.
Knowledge of bricklaying technology will allow you to save on workers during the construction of small projects, correctly calculate the estimate and the amount of materials needed on the site. Personal skills and experience will help you monitor the progress of work during the construction of a country house with the involvement of professionals. If you follow the technology, rules and recommendations, bricklaying will not put you in a difficult situation.
Checking the horizontalness of the foundation with a hydraulic level
First, we need to determine how level the horizontal surface of the foundation is relative to the ground level?
For this purpose, we will use a hydraulic level and check first the corners, and then the entire perimeter of the foundation. (When filling the hydraulic level with water, make sure that there are no bubbles in the tube, otherwise the measurements may not be accurate).
In the figure we see that both corners are at the same level. As the masters say, “located at zero.” But this method of measurement cannot be used if our foundation has discrepancies relative to the level. So let's move on to a more practical method.
Let's lower the 1st flask of the hydraulic level relative to the foundation so that o is 5 cm below the upper surface of the foundation (with the condition that the maximum difference across the foundation at the maximum point is slightly less than 5 cm). Opposite the o on the flask we place a mark on the foundation. We will not touch this flask now. First, let's check all the outer corners of the foundation, in our case there are 4 of them. To do this, we will move the 2nd flask to all 3 corners, and put a mark on the foundation opposite the o, which is on the 2nd flask. Then we repeat the steps with the 2nd flask, transferring it to other measured points on the foundation.
When we have placed all the marks, we begin to measure the distances between the mark on the foundation and the upper edge of the foundation. In the figure we measured the distance on two segments: a and b. Let's assume the distance a=5cm and b=5cm (a=b). Consequently, the foundation at these points is set to “0”.
Second option a=5cm, b=3cm. Therefore, there is a difference relative to zero of 2 cm. Such a foundation needs to be leveled, and we take the highest point on the foundation as zero. You can align in several ways:
- leveling screed on cement-sand mortar using formwork,
- brickwork, changing the thickness of the horizontal seam.
If the difference is large, then it is better to level it using mortar; if it is small, then using masonry. Just remember that the permissible horizontal seam thickness according to SNiP should be 12 mm with a tolerance of +3, -2 mm (according to SNiP 3.03.01-87). When reinforcing, the maximum thickness of the seam should not exceed 16mm. And just for reference: the permitted permissible deviation from the horizontal per 10m of masonry is up to 15mm, which is then eliminated by the next row.
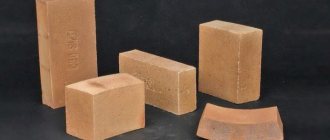
Requirements for building materials
When buying bricks for building housing, it is necessary to take into account the average climate data in the construction area. In damp climates, it is advisable not to use sand-lime brick. For cold regions, it is necessary to build cottages from traditional red brick, which has increased frost resistance.
When choosing a wall material, first of all, check the certificate for it and compliance of the characteristics with the requirements of the project. Next, the bricks are visually inspected. Those that are made according to the rules will produce a ringing sound when struck . They have a uniform red-brown color, most saturated in the middle of the product.
Lightly fired brick has a pinkish color and a dull sound when tapped. And burnt, as a rule, has scorch marks along the edges and a dark gray, almost black center.
The brick is marked with the letter “M”, indicating its strength. Next is a digital designation indicating the surface pressure in kg/cm2 that it can withstand. In the retail chain you can purchase red bricks marked with grades from M 50 to M175. The brand has an impact on the weight of the block; the higher the brand, the heavier it is.
Areas of use of bricks according to marking:
- M50, low unloaded structures, partitions and fences.
- M75-100, load-bearing walls of objects up to 2 floors.
- M100-150, load-bearing walls of objects up to 3 floors.
- M150-M175, basement and foundation structures.
- M175, external wall cladding.
The main properties of solid brick M 150 for making single brick walls:
- strength characteristics, 150 kg/cm2;
- volumetric weight of bricks, 1800-1920 kg/m3;
- thermal conductivity of red brick, 0.70 W/mS.
Additional Information
Tips that may be useful:
- The seams in successive rows must be different, otherwise the wall will reduce the degree of stability.
- Approach the construction carefully and draw a construction plan, indicating the required amount of bricks and the number of rows laid out.
- If it is difficult to lay out facing bricks, use traditional building bricks.
- Facing is more aesthetically pleasing in appearance and has a different purpose.
- When planning the required amount of solution, the volume must be increased by an additional 10%; the craftsman will break this part during work.
- In order for the solution to ensure a strong attachment, first pour water over the brick before use.
- The mortar takes a long time to dry; if necessary, the bricks can be moved, removed or re-laid.
- To lay brickwork, reinforcement mesh is placed every 5–6 rows.
- For a tight grip, add more mortar, tap with the end of a trowel, and level it along the cord. Excess solution is picked up with a trowel.
How to learn to lay bricks? Having completed the training, building simple structures (columns, steps), in the future the builder will lay out the brick barbecue itself, the walls of a barn or house, or a summer gazebo in the garden.