You can reconstruct ready-made monolithic structures or strengthen the foundation of a building by using additional elements embedded in concrete. The use of parts requires auxiliary tools: drilling, pneumatic tools for making openings on the surface. You will also need a drill and a drill corresponding to the required size and diameter of the intended openings.
Embedded parts have different configurations and are used for subsequent fastening of reinforcement or other elements to them. There are many varieties of such parts. The configuration depends on the subsequent load.
Why are mortgages needed?
The foundations are made of concrete; it is very difficult to dock and connect two such products. Therefore, the embedded part is immersed in the concrete, leaving a thread, plate, and other seat on the surface. It is enough to weld these elements to each other to obtain complex spatial structures made of reinforced concrete. Mortgages are used for construction:
- prefabricated foundation
- elevator shafts
- stairs, porches
- supports, floors
- façade elements
- enclosing structures
- overpasses, bridges
Almost the entire assortment of rolled metal products (circle, sheet, reinforcement, strip, channel, angle, rod) is used for the manufacture of embedded parts.
Classification of embedded elements
To increase strength, concrete structures are reinforced with meshes of wire, rods of periodic and constant cross-section. These elements also apply to closed-type embedded parts. Classification is made according to the following criteria:
- anchor rod type – round/corrugated reinforcement, straight/curved, threaded/without thread
- installation method - ZDA (rebar studs between two conductors) or ZDF (pipe with flange)
Any embedded part must comply with GOST 10922-90, since they bear a significant load. For the foundation, an anchor rod or reinforcement A-III - A-II class 25 - 8 mm in diameter is used. If the temperature in the operating region drops below 30 degrees, choose plates made from VSt3ps6 steel.
In other cases, VSt3kp2 steel is used.
Anti-corrosion treatment consists of galvanization, galvanizing, painting. For light loads, stamped parts are usually placed in reinforced concrete products. When shearing and tearing forces increase, anchor rods welded to the plates are used.
Embedded manufacturing technology
When designing metal elements inside the foundation, it is necessary to take into account the following nuances:
- the plate can completely or partially cover the edge of the concrete product, so holes are left in it to allow air to escape from the mixture during vibration compaction
- elements made of rolled metal (channel, angle, strip, sheet) actually cut the concrete; holes are also needed to compensate for delamination
- the thickness of the plates is taken from 6 mm, shelves, walls of the shaped assortment can be slightly thinner (5 mm)
- for non-designed parts manufactured by welding, 5 mm plates are sufficient, 4 mm shaped bars are sufficient
The stamped type embedded part is manufactured in accordance with the RS9903 album, developed by leading reinforced concrete designers: NIIZhB, MNIITEP. The sketches given in the album allow the use of ready-made schemes of the minimum possible reinforcement in the area where the building is located.
The design should include the minimum possible sections of rolled profiles and reinforcement. To do this, part of the effort is distributed to stops made of strip steel or short rods.
Which is better: heated floors or radiators?
Warm floorBatteries
The secret to a stronger connection between the pillar and the concrete
In order for the metal pole to hold more firmly in the concreted part, additional fastenings need to be made. Options for such fastenings on the bottom of the pillars:
- Cut the metal post in the shape of the letter “H” and unscrew the resulting ends at an angle of 90 degrees. At the same time, the pillar will have “ears” (two on opposite sides). This is the most rational option that allows you to do without welding.
- Weld two small pieces of reinforcement to the bottom of the post (preferably perpendicular). An option for those who find it easier to use welding.
- Make a rectangular cutout in the profile pipe at a distance of 12-15 cm from the edge of the lower part. The length of the neckline is arbitrary (also 12-15 cm). This is the simplest option, which allows concrete to get inside the pillar and thereby further strengthen it. It will be almost impossible to pull out such a pillar.
Thanks to such fastenings, the post will better adhere to the concrete and will not be pulled out by a strong gust of wind or other impact.
Welded joints
To increase the adhesion of stamped joints inside the concrete foundation parts, 6 cm hooks with two or more ledges are created at the ends of the strips. The rods are connected to the plates, rolled profiles by welding in accordance with the requirements of GOST 19292:
- T-weld - manual or automatic submerged arc welding (in some cases zigzag, relief surfacing), roller welds, contact-relief, semi-automatic in carbon dioxide
- inclined seam (joint) - submerged straight or at the end
- overlap joint - an extended seam, along two or one relief (manual arc, contact, respectively)
Relief spot welding is prohibited for welding joints used in concrete products that experience vibration loads during operation (for example, flights of stairs).
Installation locations, use of embedded elements
The main operations of building a foundation and other enclosing structures are:
- installation of service and observation platforms
- installation of door/window blocks
- production of crane tracks
- joining of enclosing/supporting structures
- assembly of elevator shafts, tunnels
- installation of grilles, blinds
- construction of road barriers
- production of berths, parking lots, hydraulic structures
- arrangement of internal, fire escapes, porches
- installation of towers, columns, masts
- fastening of equipment, tanks, heat exchangers
- facade cladding
For individual developers, the industry produces a range of embedded elements for monolithic foundations. The simplest modification of an anchor for attaching a wooden stand has the following design:
- U-shaped plate - has holes for self-tapping screws
- reinforcing bar - welded at the bottom, immersed in concrete when pouring the base
Mortgages for attaching gates and gates to fence posts are made independently:
- plate – used for hanging sections, wicket hinges
- corner – connects the plate with the profile pipe of the pole reinforcement belt
Homemade embedded elements are usually not calculated, are made from scrap materials, and are immersed in concrete without connection with the reinforced belt of the structures. Most often, an individual developer uses mortgages in the following operations:
- immerses plates for fastening railings into the concrete of a homemade internal staircase
- rests on a U-shaped part embedded in the foundation of the porch slab, a post made of timber to support the balcony
- mortars plates for fencing sections and entrance gates into masonry or monolithic columns of fence posts
- supports the frame of a greenhouse, winter garden on anchors
For more serious reinforced concrete structures and buildings, it is necessary to purchase factory-made products with embedded parts. All of them undergo flaw detection, laboratory tests for permissible loads, have accompanying documentation, and manufacturer’s warranties.
Installing fence posts - how to make a reliable base for a fence on your own
If you think that installing fence posts with your own hands is difficult, then this review will prove otherwise. After reading it, you will learn how to quickly and efficiently carry out work and save money on the services of builders. Just follow all the recommendations, and in 1-2 days the supporting structure for the fence will be ready.
In the photo: the strength of the entire structure depends on the quality of installation of the pillars
Pillars can be made of different materials
Types of structures and technology for their installation
We will consider 4 types of work:
- Installation of metal poles;
- Installation of wooden elements;
- Use of concrete pillars;
- Construction of brick supports.
Each option has its advantages and disadvantages. You need to familiarize yourself with all the information and make a choice of material based on it.
Brick elements have an attractive appearance
Option 1 - installing metal posts
I’ll say right away - I think this solution is the simplest and most reliable. The metal has great strength; the service life of such elements usually exceeds 30 years. If you periodically renew the protective coating, this period is doubled.
As for the workflow, it consists of the following actions:
- First you need to purchase the supports themselves, and there may be two options. The first involves purchasing a profiled pipe measuring 60x60 or more and welding strips to it to attach the veins. The second involves the purchase of ready-made elements on which fasteners are already welded and the surface is covered with soil. The price of the first solution is lower, the second is much more convenient, the choice is yours;
Regular corrugated pipe is ideal for fence posts
Finished products are much more convenient to use
I advise you to never buy poles that are already painted. During their storage, transportation and installation, the surface will inevitably be scratched and will still have to be painted. Choose options covered with primer, they are protected from moisture and you don’t mind scratching them.
- In addition to the pillars themselves, you will need cement and sand to prepare the solution. Also don't forget about crushed stones or stones to fill the holes;
- The tools you have at hand should be a level, a shovel, a concrete mixer or a drill with a mixer. To mark the territory, it is necessary to have a construction cord;
- The work begins with marking work. You need to determine the exact line of the fence. A cord is pulled along the line, for this purpose pegs are driven in every 5-10 meters;
The cord will allow you to see a clear reference point while working
- When considering installation methods for metal poles, the most common consideration is driving or digging in and concreting. I do not recommend using the first option at all, and below is a photo showing why this should not be done. If the soil moisture is high, the supports may simply fall. Therefore, we will consider concreting as a reliable and durable installation method;
This is what you can find if you simply bury the pillars in the ground
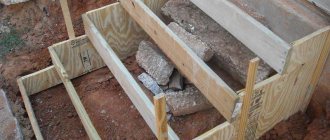
- The location of the pillars is marked; most often they are placed at a distance of 3 meters from each other, although the length of the spans may vary. Next, holes are dug for concreting. Usually their depth is 100-110 cm so that the lower part of the base is located below the freezing point;
The hole is dug so that the post in it is located along the cord
- The depth of the metal fence post must be at least 60 cm. You can place it at the full depth of the hole, but this is not necessary. You can fill broken bricks, large crushed stones and stones to the desired level and place a post on them so that it is located at the height you require. Then stones and bricks are poured almost to the top of the pit, most often due to them the element will stand level and without support;
The pillar is placed on the stones at the required height, after which the hole is filled to the top with filler
- If desired, you can make a small formwork on top to concrete the element above the soil level. The solution is prepared at the rate of 1 part cement to 4 parts sand. The consistency is made liquid so that the mixture penetrates into all the voids between the stones and fills the hole to the very bottom. After pouring, be sure to check the position of the element with a level and correct it if necessary;
Be sure to check the position of the support while the solution is still fresh and you can align the element evenly
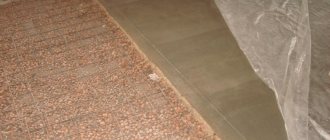
- If you decide to make a strip foundation along the entire fence, then formwork is installed. The depth is 20-30 cm, and reinforcement material must be laid. This can be either reinforcement in several rows or a mesh. The solution is poured to the required level and leveled with a trowel;
The sides of the formwork can be fastened together from above to ensure their reliability
- You can continue work 1-2 days after pouring the solution. Next, the veins are fastened, the elements are painted with a protective composition and the fence is installed.
Most often, corrugated sheeting is attached to metal poles
Option 2 – installation of wooden poles
Wooden posts are used infrequently as their lifespan is 5-10 years, which is much shorter than any other option. But if you need to make a fence cheaply or this material suits your design style, then you can use it.
This is what a classic wooden fence looks like
The workflow goes like this:
The scheme is quite simple and clear
- For pillars, you can use either ready-made timber with a cross-section of 100x100 mm or larger, or entire tree trunks. The elements must be dry, bark and dirt must be removed from the surface;
Beam is one of the options for posts
- The surface is first treated with an antiseptic. Processing is carried out in 2-3 layers to ensure the best effect. After this, the part that will be located below ground level is additionally covered with bitumen mastic;
- Next, the area is marked with a cord, the location of the pillars is determined, and holes are dug. The depth must be at least 1 meter; on heaving soils, the depth of the hole must be at least 20 cm below the soil freezing line. The holes can be dug with a shovel, or they can be made using a special drill;
- Now let's figure out how to properly install wooden fence posts. A layer of crushed stone or broken brick 20 cm thick is poured into the pit, a pillar is placed on it, after which the entire space around the support is filled with filler in the form of stones, broken concrete or large crushed stone.
A liquid solution is prepared from 1 part cement and 4 parts sand and poured so as to fill the hole to the top. After this, the column is leveled again and left for a day to harden;
For additional reliability, the underground part of the posts can be additionally wrapped with roofing felt.
This is what the finished structure should look like
- Next, the veins are attached to the posts, and the surface is additionally coated with weather-resistant paint. The fence itself is installed last.
There is another mounting option, which appeared recently, but has already gained great popularity among developers; its differences are as follows:
- Only the above-ground part of the pillar is made of wood;
- A concrete base is poured in which the embedded part is located. Mortgages can be of different configurations, they are shown in the diagram below;
This kind of fastening can be made at the base of the pillars
- The pillars are attached to the embedded elements, after which the fence is installed.
This option should also be considered
The biggest advantage of this solution is that you can replace the poles if necessary without having to make major repairs. The foundation will remain strong for many years.
Option 3 - installation of concrete pillars
Concrete pillars are reinforced with a reinforcement cage, which gives the products strength. Also worth noting is the reasonable cost. As for the disadvantages, the main one is the large weight of the products. It takes two or even three people to work, since carrying and placing reinforced concrete is not an easy task.
Such supports weigh a lot
Let's figure out how to install posts for this type of fence. If you install conventional fencing options made of wood or metal profiles, the technology will be no different from installing iron supports.
We will analyze the option of installing elements under a sectional reinforced concrete fence, which is very popular.
The work is carried out as follows:
- The width of the sections is 200 cm, so the pillars will be located at the same distance from each other. To begin with, a cord is stretched as a guide and the locations of the pillars are marked. Next, holes are dug measuring 50x50 cm with a depth of 70-80 cm;
- Crushed stone is poured into a layer of 20-30 cm at the bottom of the pit. It is necessary that there be 50 cm from the pillow to the surface; this is exactly the part of the support that should be located in the ground. Below is a diagram of the installation of such structures;
This is how the structure is installed
- The first pillar is installed in the hole, after which broken brick, concrete or stones are thrown there. It is important to align the element evenly and fill everything with concrete, all the way to the top. The solution must be liquid in order to penetrate into all voids and create a monolithic block that will ensure reliable fastening of the support;
- The second post is placed in the next hole; to position it at the required distance, a block 205 cm long is taken. It is located in the grooves and provides the required distance. After pouring the concrete and leveling the elements, the block is removed and the bottom slab is inserted between the supports. The work also continues further, the lower plates are put in place and ensure the strength of the structure.
The lower sections are inserted immediately and ensure the correct positioning of the posts
Option 4 – installation of brick pillars
When considering methods for constructing fence posts, one cannot fail to mention brick supports. This option is the most labor-intensive of all, but if you do everything correctly, you will get a structure that will last for half a century or more. The work requires a certain set of materials, the list is given in the table.
There are many options for bricks, everyone will choose the optimal solution for their site
| Material | Description |
| Brick | You need to choose this material so that it matches the buildings on the site. If your house is lined with red brick, then it is advisable to select something similar for the fence. Don’t skimp on quality and don’t buy the cheapest options, they are usually not reliable |
| Armature | The base needs to be very well strengthened; for this purpose, reinforcement is used, which is placed in 3 rows along the entire length of the fence. The thickness of the rods should be 8-10 mm |
| Metal poles | They will be located inside the brick supports and provide rigidity to the structure. You can use a channel or a corner. Some people install an armored belt and fill the internal cavity with concrete after constructing the columns. All options provide reliability, choose the one that is easier to implement |
| Cement, sand and crushed stone | A solution for constructing the foundation will be prepared from these components. Instead of crushed stone, you can use stones, broken bricks or other suitable filler |
Reinforcement will make the structure much stronger
To work you will need the following set of tools:
- Shovel for digging trenches;
- Concrete mixer for preparing the solution;
A concrete mixer can be rented for the duration of the work.
- Level for erecting pillars;
- Trowel for applying the solution.
The work instructions look like this:
- First of all, you need to mark the area with a cord. First, the fence location line is determined, and then the installation locations for the pillars are marked. Usually the distance between the supports is 2.5 meters, but it can vary depending on what material the fence will be made of;
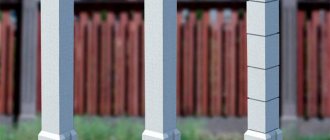
This is what a fence design with brick pillars looks like
- Then a continuous trench is dug 20-30 cm wide and 30 to 50 cm deep. At the locations of the pillars, holes 120 cm deep are dug in order to create a solid foundation under the heavy pillars;
The trench is dug along a stretched cord; holes 120 cm deep are dug at the locations of the pillars
- Metal pillars are placed in the pits, the space around is compacted with stones, if any. If they are not available, then prepare a solution of 4 parts sand, 4 parts crushed stone and 2 parts cement. The supports are poured to the level of the main trench, after which the structure must be left for a day for the concrete to harden;
- A reinforcing belt is placed in the trench, supports are cut and placed every 1 meter, and longitudinal elements are attached between them. The bottom row goes 5 cm above the bottom, and the other two are placed after 10 cm. After this, formwork of the required height is constructed. Square areas are made at the locations of the pillars, the rest may be narrower to save mortar;
This is what the structure looks like with formwork and laid reinforcement belt
- Concrete is poured to the level you need, there is a lot of work to do, so it is better to use a wheelbarrow to deliver and quickly unload the solution into the formwork. Immediately level the surface to create an even base for the future fence;
It is advisable to fill the entire base in one go.
- After a day, you can remove the formwork so that nothing interferes with further work. But it is better to start laying bricks no earlier than after 4-5 days, so that the concrete sets well and gains primary strength;
The foundation must stand for several days
- The masonry mortar is prepared (the easiest way is to buy a ready-made mixture and dilute it with water). The first layer of mortar is applied, on which the brick is laid. The next row is placed so that the elements are knitted. To ensure that the seams are identical, a metal square is placed around the perimeter, which is removed after the elements are aligned. When working, be sure to use a level;
A post level is a must-have tool if you want a perfect result.
- The work is carried out row by row until the elements are brought to the required height. Don't forget about the mounting plates; they are easiest to weld at the desired level as the work progresses. Then the rows of bricks will fit perfectly, and you won’t have to redo anything;
The fastener is welded in the right place
- The void inside the pillars is filled with liquid mortar, this makes the structure even stronger. A couple of weeks after filling the cavities, you can install caps for the pillars. They are attached to the mortar and protect the top from water, and also give the structure a more attractive appearance.
Caps give the posts a finished look
If your fence is entirely brick, a reinforcing mesh is laid in every third row of pillars to connect the structure. This option is shown very well in the photo below.
The mesh allows you to ensure a reliable connection between the posts and the fence
Conclusion
I am sure that after reading the article you will easily choose the best option for pillars and carry out the work yourself. The video in this article will help you understand some of the features of the workflow even better. If you have questions on the topic, write them in the comments, we will analyze your case and recommend the best solution.
Embedded part of the support foundation: features of flange and anchor products
The stable position of lighting supports and other long structures (masts, lightning rods, flagpoles, etc.) is ensured thanks to special embedded parts located underground. They are installed in the foundation body in advance, and subsequently connected to the ground part of the pillars using highly reliable bolted or anchor connections.
Correct laying of communications in the foundation
At the zero-cycle stage, communications input nodes should be provided in the slab and strip foundations. There are usually two engineering systems underground - water supply and drainage. Therefore, it is necessary to place a sleeve under the sewer and water supply pipe.
The gas pipeline entry point is usually located at a height of 1.2 - 1.8 m from the level of the blind area, therefore it is not considered when designing foundations. Electricity can be supplied to the cottage either by air or underground. In the latter case, the depth of the cable is 0.7 m minimum, so the sleeve for its passage must be laid before concreting the tape or slab.
Types of embedded parts for lighting supports
There are two groups of embedded products on the modern market that are capable of reliably fixing a power line support to the foundation, regardless of its height and weight. The main difference between the elements under consideration is the option of nodal fastening. Based on this criterion, foundation embedded parts are divided into:
- flanged (ZF or ZDF) - with a square (type K) or round (type D) support part (flange);
- anchor (ZA or ZDA) - with square or round conductors.
These products are designed to hold lighting poles in a vertical position without external bracing or spacers. They are dug to a depth of three meters, after which they are concreted. In this way, compressive and overturning loads are transferred to the ground. The embedded parts for lighting supports are made of metal.
They have several sizes and different weights. They are recommended for use in:
- zones with moderately cold, moderately humid, moderately warm and hot dry climates;
- areas with different wind loads;
- slightly aggressive external environment.
Parts of embedded elements of supports and masts protruding from the foundation block, including fasteners, are treated with anti-corrosion compounds. They can be galvanized or bitumen coated.
Why is concreting necessary?
The main goal of this fastening method is to extend the service life and increase the stability of the structure.
Installation of supports with concrete mortar:
- Prevents the structure from loosening and makes the fence more resistant to wind loads.
- Increases the load-bearing capacity of the structure.
- Protects metal poles from corrosion.
But it is important to understand that supports can only be concreted on stable soils.
If you do this on heaving soil, then when it gets cold, they will simply start to be pushed out and the surface will become cracked.
You should not use the solution even if the groundwater level is high; in swampy areas it is better to choose other options.
It is important to maintain the proportions of the ingredients when mixing the solution so that it does not turn out too liquid or thick.
Flange embedded parts
The products are made from steel pipes of different diameters, ranging from 168mm to 426mm. A thick round or square flange is welded to the top of the rolled metal, having a hole in the middle corresponding to the internal diameter of the pipe. The cutouts intended for bolted connections are located in the following way:
- type K (square flange) - 4 pieces in total, only in the corners;
- type D (round flange) – along the perimeter (the number of holes depends on the diameter of the applied element).
The bearings of the lighting supports are screwed to the flanges.
Metal supports in the form of gussets are placed on the back side of the flange. They significantly strengthen the overlay pad, preventing it from deforming in the horizontal plane. An oval-shaped through hole is cut out on the side surface of the metal pipe.
The window is intended for supplying underground electrical cables to the lighting support.
Flange embedded parts for supports or masts are designated by letters and numbers. For example, the product ZF-24/12/D396-2, 5-b stands for an embedded part with a round flange connection. Along the perimeter it has 12 mounting holes for bolts with a diameter of 24 mm.
Round slots are located along a diameter of 396mm. The length of the pipe is 2.5 meters, and the protective coating is made of bitumen.
Butting with crushed stone
The use of this method is quite justified when the site has heavy soil. This operation is also called “dry concreting”.
- A hole is drilled;
- The support is installed;
- The remaining space is filled with crushed stone;
- The surface is compacted, for which a vibrating plate is used.
As a result, the liquid will freely go into the soil, seeping through the crushed stone. The stability of the pillar increases significantly due to the fact that water in winter does not linger inside the pit, but seeps through the crushed stone layer. It goes away completely, the supports remain in place and the liquid does not push them out.
This method can be used to install any fence, on any soil. When the fence structure has a large mass, the support is installed to a depth that should exceed one meter. In this way, you can successfully concrete fences made of wood.
Anchor embedded parts
The products consist of several pins distributed in a circle, or four – installed in the corners of a square. In both cases, individual elements are fastened into a single structure by conductors located in the upper and lower parts of the embedded part. Using mounting holes, they are strung onto pins with a diameter of 30-42mm.
The total diameter of round anchor products intended for installation of a support or mast is determined by a conventional circle connecting the centers of the studs. The size ranges from 540 to 1500mm. For square elements, this indicator indicates the distance between two corner pins.
The support thrust bearing is mounted on the ends of the studs protruding from the concrete mass, which are actually anchors. Fixation is carried out using fasteners provided for by the work technology. Typically, anchor parts require nuts and washers that thread onto studs.
The symbol for the anchor element for supports includes:
- abbreviation details;
- diameter and number of studs;
- the diameter of the holes on the jig along the circumference or the distance between the corner slots;
- length of the embedded part;
- symbol of the protective layer (ХЦ – cold galvanizing, b – bitumen mastic).
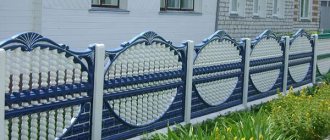
Types of concrete fences
A concrete fence can be made:
- monolithic;
- prefabricated
Each of them can be done independently and without the use of any special lifting equipment. The choice of fencing type depends solely on the construction and installation skills of the people erecting it; as well as the characteristics of the soil on which the fence is planned to be built.