A pile foundation is an opportunity to build buildings on soils that do not allow the use of any other type of supporting structure.
A feature of piles is their ability to sink to the required depth, reach dense layers of soil and provide a reliable foundation for buildings of any category, including the most massive, critical and specific ones.
The possibilities of a pile foundation are very wide, which is clearly demonstrated by the number of varieties and design options for supports.
There are powerful and heavy samples that can only be worked with using construction equipment.
There are also lighter types available for self-installation, for example, screw piles.
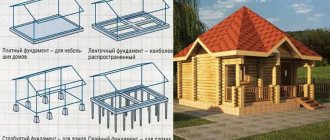
Types of pile foundations
The classification of pile foundations includes many positions.
They differ in the following characteristics:
- Method of action (hanging and pile-racks).
- Barrel type (monolithic and shell)
- Material (wooden, metal, reinforced concrete)
- Immersion method (driving, bored or screw).
NOTE!
In private housing construction, the most common are bored and pile-screw options, which allow working in densely built-up areas without causing damage to surrounding buildings.
Immersion depth
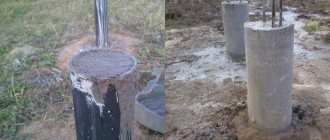
The pile is screwed into the ground until it stops, until it stops going in even with extreme effort. This means that a layer of such density has been achieved that it can withstand the support under load. You can lay the foundation.
After this, the supports are cut, maintaining the cutting height according to the level.
Sectional diagram of a screw pile foundation
Related video: Instructions on how to tighten screw piles
Publications on the topic
DIY screw pile options
Arrangement of a pile-grillage foundation with your own hands
The procedure for manufacturing a pile foundation with a grillage
Types of piles
Screw piles have two main types:
- Welded.
- Cast.
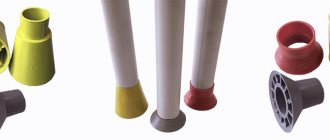
The difference between them is the design of the tip. This is an important element that takes on the main load during a dive.
The quality of the tip determines how the pile will behave when it comes into contact with a man-made or natural obstacle that is not a dense soil layer. Welded tips are less durable in this regard; when encountering rock fragments, they are often deformed and fail.
The cast tip is much stronger and is able to pass obstacles, destroying them and without losing the functionality of the pile.
In addition, there are differences in the number of blades.
There are screw piles:
- Single bladed.
- Multi-lobed.
Single-blade piles have a single spiral-shaped blade that provides translational motion as the pile rotates around a vertical axis. They are designed for installation in relatively soft and homogeneous soil that does not have dense or rocky inclusions.
The bearing capacity of such piles is lower than that of multi-bladed samples, which are much more stable and more firmly connected to the ground. The presence of several support units makes it possible to reduce the diameter of the barrel, which facilitates installation and ensures structural integrity.
Complete with a cast tip, they are optimally suited for working on dense soils, in permafrost zones or with a large number of man-made inclusions.
Based on the type of protective coating, piles are divided into galvanized and non-galvanized . The latter are practically not protected in any way from the effects of ground moisture, since the layer of paint, which is applied to give the products greater solidity, comes off when screwed.
In addition, all types of screw piles are practically not protected from electrochemical corrosion or the effects of stray currents, which is difficult to foresee or determine in advance.
Carrying out marking
Before starting work, you need to make markings.
Driving the piles according to plan requires careful marking on the ground. The racks are placed at the required distance, not exceeding 3 meters. Increasing the run leads to sagging of the grillage trim. The perimeter is marked on the site, and diagonals are measured to check, the size of which must match.
First, mark the corner elements and twist them in the center of the bar. If the extreme dimensions of the grillage are indicated, subtract 0.5 of the width of the bar on both sides. After installing the first rod, determine the position of the second support, focusing on the dimensions of the foundation and the distance between the centers of the heads.
The house is placed parallel to the fence, the road, the red line of the street, so from this line they measure the same distance as the first support and place the second rod. They dig a pit, insert a post, check the vertical and measure the gap between the axes. Screwing begins if there are no deviations or the element is aligned to the design and planned position.
The place of the third support is found at the intersection of two linear distance indicators, the accuracy of the marking is checked by comparing the legs and hypotenuse of the formed triangle. Use pegs, nylon cords and a tape measure. The work is carried out together. The permissible error for horizontal measurements is 5-10 mm, and for vertical measurements - no more than 2°.
Which ones are best suited for private construction?
The choice of a specific brand and size of trunks is, first of all, made based on the type and characteristics of the soil.
After determining the most suitable variety (single or multi-bladed, length, tip type), the trunk diameter is selected. The calculation is made based on the bearing capacity of the support.
For private houses, trunks of relatively small diameter are usually used:
- VS-57.
- VS-76.
- VS-89.
- VS-108.
Large diameters require significant effort when immersing, so they are practically not used for private housing construction.
Preparation of a well for screw piles larger than 76 mm
A hole is drilled at the intended location for a large-diameter screw support. Its size should be slightly smaller than the diameter of the pipe.
- For drilling on the site, a manual or motorized drill is used. The latter is much easier to work with, especially when it is necessary to install a large number of pillars.
- It is necessary to go deeper into the soil to a third of the planned depth of the pillar. For example, if you need to deepen by 1.8 meters, then you need to drill a well 60 cm deep.
- After preparing the well, pile blades are installed on it and deepened slightly by turning clockwise. This will allow you to secure the post in the ground.
What soils are they suitable for?
The screw piles are driven to a sufficient depth to eliminate the impact of vertical loads of frost heaving. Only lateral influences remain, which, due to the small contact area, are not capable of exerting a decisive influence on the supports.
Therefore, when determining the suitability of a soil, it is customary to consider only mechanical qualities.
The most suitable types are the following types of soil (in descending order of suitability)::
- Sandy.
- Sandy loam.
- Loams.
- Clayey.
Absolutely unsuitable soils are rocky and rocky-clastic types. In addition, biogenic types - peat bogs, or loose subsidence soils - are contraindicated.
Caution should be exercised in heavily flooded areas subject to strong seasonal fluctuations in groundwater levels..
When constructing in such areas, it is necessary to carry out test drilling and increase the immersion depth to the maximum.
Determining the length of the pile
On stable soils, it is enough to screw in the piles to a length of 2.5 m.
The length of the supports used to construct a screw foundation will depend on the soil, the depth of its freezing and the level of the grillage.
If there is stable soil on the site, it will be enough to install supports 2.5 m long. On complex terrain with differences in height, structural elements of various lengths will be needed, depending on the height of the terrain.
On unstable soil, the support should be of such length that it reaches stable, compact soil. Its location is determined by test drilling.
You need to screw in the screw structure to the depth where sand and clay lie. Stable soil will ensure that the load-bearing element is firmly anchored in the soil. The presence of a dense fraction is determined by the particles remaining on the blades.
After this, the depth of the formation is measured. Lower a pebble into the well on a rope until it touches the bottom. Make a mark on the string, lift it and measure the length.
In seismically active areas, the length of the well must be at least 4 m. Supports are purchased half a meter longer than the design ones. It is better to cut off the excess later than during the drilling process it turns out that the length of the pile is not enough.
General scheme for installing a pile-screw foundation
Step-by-step instructions for installing piles with your own hands consists of the following steps:
- Preparatory work. Marking the site, checking the parallelism of the lines and compliance with right angles.
- Immersion of corner shafts.
- Installation of intermediate supports.
- Trimming trunks. The surface of the supports should form a flat horizontal plane.
- Concreting the internal cavities of piles to enhance strength.
- Installation of heads. They are installed on the upper end, welded and serve as attachment points for the grillage. All areas located near the weld or areas with damaged protective coating are immediately touched up.
IMPORTANT!
When marking, you should proceed from the axes of the walls, and not from the boundaries of the perimeter of the house. Walls should stand on the heads and not hang from them.
How to calculate the amount of material?
The number of supports is calculated in two directions:
- Along the lines of the greatest load.
- According to the bearing capacity of the pile.
The first stage consists of counting the number of piles along all lines of the external and internal load-bearing walls. The distance between them should not exceed 2-3 m (the heavier the house, the closer to each other the supports should be installed).
The second stage is to check the resulting number of supports. The total weight of the house, together with the calculated additional loads (the weight of snow, furniture and household appliances, floors, people, etc.) must be divided by the permissible load on one pile.
If the resulting number is less than what was found in the first stage, then the calculation is correct. If the second stage shows a higher value, it is necessary to increase the number of piles along the load lines.
You can do it easier and use an online calculator, which will do the entire calculation on its own. You just need to insert your parameters into the required fields and get an answer.
How to correctly mark installation locations?
To perform this operation, you will need a plan of the first floor of the house. First, corner points and junctions of load-bearing walls, internal and external, are marked. Then the remaining number of piles is evenly distributed along all lines.
If there are large gaps, provide intermediate supports to support the floor beams.
NOTE!
A distance of more than 6 meters between supports is considered unacceptable.
How to determine diving depth?
Determining the immersion depth of the supports can only be done on the basis of an analysis of the soil and its composition. In addition, an important factor is the depth of soil freezing, above which it is not recommended to bury piles, especially for critical (residential) buildings.
For auxiliary buildings and structures (gazebos, fences, sheds, etc.) erected on suitable soils, the minimum immersion depth is 1.5 m.
For residential buildings, the recommended immersion depth should be equal to the height of the house . In practice, it is often less, which is primarily due to illiteracy or the desire to reduce builders’ time.
When diving, you must know the maximum value of soil resistance and not exceed the permissible limits established by the manufacturer. Otherwise, there is a risk of collapsing the technological hole before reaching the required depth, which means the pile will be damaged and will need to be replaced.
Immersion of piles into the soil
There are two ways to drive piles:
- Manual diving.
- Mechanical method.
Manual installation is allowed only for relatively thin piles and during the construction of non-critical auxiliary structures. For residential buildings it is necessary to use construction equipment . First of all, this is due to the inability to properly screw in a pile with a diameter of 108 mm by hand.
The failure rate of piles is too high, and reverse is unacceptable due to the loss of proper connection strength. In addition, the permissible vertical skew of the barrel is only 2°, which is impossible to ensure manually.
The mechanical method allows you to ensure high-quality immersion while maintaining the vertical and a given amount of force . For residential buildings, only the mechanical method is permissible, although advertisements in every possible way claim that it is possible to act in any situation with the help of muscular force.
This creates the opportunity for various violations when inexperienced builders begin to act on their own and, as a result, end up with an unstable and moving foundation. In practice, a mini-excavator with a mounted pile driver is usually used.
It is capable of immersing trunks with a diameter of up to 159 mm to a depth of up to 12 m, which in most cases is quite sufficient for private construction.
How to align horizontally
Submerged screw piles must be leveled horizontally. To do this, install a laser building level (you need a model that can outline a horizontal plane) at the required height from the soil surface.
All trunks are trimmed according to the existing mark . If any of them are too short, a preliminary extension is made.
An additional pipe is welded to the trimmed part of the trunk (the section with the technological hole is cut off), increasing the missing length, after which trimming is performed at the general level.
All welds and areas of metal exposed during trimming must be immediately tinted with protective polymer paint. It is necessary to choose types that are impervious to moisture or use bitumen mastic.
Pouring concrete
The internal cavities of the piles are filled with concrete. This allows you to significantly increase the mechanical rigidity of the pipe and reduce the risk of corrosion inside the barrel.
Concreting increases the load-bearing capacity of the trunk by a third, allowing you to obtain a certain margin of strength for the foundation, necessary for resistance to unforeseen situations . For pouring, dense grades of concrete are used - M200 and higher. Filling is done to a level slightly lower than the cutting height.
In the first hours, the concrete in the well will sag by several centimeters, so after filling, a dry sand-cement mixture is poured to the top of the shaft. It will absorb water particles squeezed out during subsidence and form a plug that seals the barrel before installing the head.
Choosing the right diameter
The diameters of piles produced in production and their purposes are indicated in the table:
| № | Diameter | Purpose |
| 1 | 5.7 cm | Suitable for installing chain-link fences. |
| 2 | 7.6 cm | They are used as supports for concrete fences, small utility buildings, and country houses. |
| 3 | 8.9 cm | Suitable for the construction of one-story houses. One such pile can withstand a load of 3 to 5 tons. |
| 4 | 10,8 | They are used in the construction of two-story houses made of light building materials. A support of this diameter can withstand a load of 5 to 7 tons. |
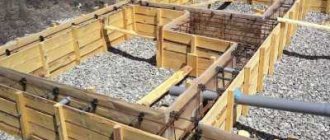
Grillage strapping
A grillage is a strapping belt that connects individual supports into a single system. It is needed to bear the weight of walls or other structural elements of the house and distribute the load evenly across the entire pile field.
There are different methods for installing a grillage, depending on the material of manufacture.:
Wood
A wooden beam with a minimum thickness of 150:150 mm is used. As an option, you can use packs of boards 50 mm thick and 200 mm wide, connected into a single package measuring 150: 200 mm. High-quality dry lumber of grade 1 or 2 is used.
The surface of the wood is coated with an antiseptic and fire-retardant composition (currently there is an impregnation that performs both functions). The connection of the beams is made halfway across the tree and only above the head of the pile.
Joints located in the span are not allowed. A double layer of roofing material (waterproofing) is laid between the metal and wood in all places. The installation is carried out so that the pile is located exactly along the longitudinal axis of the beam.
Metal
Various types of rolled metal are used:
- Channel.
- I-beam
- Rectangular pipe.
When using a channel, no heads are needed, although their presence is required for a pipe or I-beam. For the channel, special embedded parts are used, installed in the pipe when pouring concrete.
It becomes possible to do without waterproofing between the heads and the trim, but between the metal and the wall it is used in any case . The parts are connected by welding with mandatory reinforcement with bolts.
With increased strength of the metal grillage, a large metal structural element appears that requires maintenance - periodic painting with protective compounds.
Reinforced concrete
This is the most labor-intensive and time-consuming option for creating a grillage, but also the most durable and reliable, not subject to corrosion or rotting. To create it, it is necessary to make formwork installed on top of the heads.
A reinforcement cage is placed inside, after which they begin pouring concrete.
The inside of the formwork is covered with a layer of roofing felt or polyethylene to prevent moisture leaks. Sometimes the grillage is poured below the level of the caps, welding the reinforcement cage directly to the trunks. Most often this is done at a sufficient height at ground level.
In such cases, horizontal trimming is carried out after the concrete has hardened (28 days), and the filling of the trunks is carried out after trimming.
Necessary tools and equipment
Device for screwing piles
Before work, you must have a set of piles and heads made of the material specified in the project. The simplest head is placed on the top of the rod and secured with a pin in the holes. Brackets for levers are welded to it, or the yoke is inserted directly into the technological slots of the pile. An evenly distributed force is required to ensure that the tip does not break before it reaches a stable layer of soil.
There are two ways to screw in elements without involving specialists:
- manually using long metal levers;
- using mechanical means that are powered by an engine.
For the lever, take 2 pieces of thick metal pipe (from 5 mm) about 2 - 3 meters long. There are pile drivers on sale, which are mechanized devices. In private construction, you can connect a gas drill or drill using a drive.
List of required tools:
- marking pegs;
- shovel, metal marker, tape measure;
- building level, level;
- crowbar, grinder with metal circles;
- welder.
For monolithic filling you will need sand and cement, as well as a trough for the solution. Weld seams are treated with an anti-corrosion agent.
How to make a false base
The false base is designed to protect the space of the pile field under the house from the penetration of animals or birds, snow sweeping in winter, from wind and moisture. To create such a base, various materials are used.
The most budget-friendly and aesthetically attractive option is a strip of corrugated board along the outer perimeter. It is attached at the top to a special wooden board installed around the perimeter of the grillage.
The lower part is attached to a wooden beam laid on stands made of brick, cinder block, etc. to cut off contact with the ground .
A concrete ebb should be installed along the lower edge, and an ebb should be installed along the upper edge to drain rainwater.
Calculation of the mass of the house
Calculate the total weight of all construction and finishing materials that will be used during construction. The estimated maximum weight of furniture, household items, and people who will be in the house are taken into account. Calculate the mass of the bathtub or pool, taking into account that the tank will be filled with water.
Take into account the load of the snow layer that may lie on the roof in winter. This indicator is calculated on the map depending on the region:
Recommendations from the pros!
Accessories for a bath Do-it-yourself gazebo Concrete fence Do-it-yourself potbelly stove Do-it-yourself veranda Screw foundation Do-it-yourself country toilet Decorative brick Stone fence Pouring a foundation How to make a fence Wicket from corrugated sheets Do-it-yourself fireplace Brick fence Do-it-yourself flower beds Forged gates Do-it-yourself porch Pool for a bathhouse Chicken coop do it yourself DIY staircase Metal gates Installation of lining Installation of polycarbonate Pump for a summer house Arrangement of a garage Fences for flower beds Do-it-yourself blind area Steam room in a bathhouse Railings for stairs Do-it-yourself cellar Painting walls Press with your own hands Grilles on windows Rolling gates Do-it-yourself barn Alarm system for a summer residence Benches for a summer residence Fence posts Floor screed Solid fuel boilers DIY greenhouse Fence installation House insulation Attic insulation Foundation insulation
Scope of application
The main provisions and requirements for the design and conditions of use of pile foundations are regulated by SP 24.13330.2011 and SP 50–102–2003. In accordance with these regulatory documents, foundations are designed based on engineering surveys. The main areas of application (the basis for the arrangement) are considered to be the presence of soils on the building site with weak bearing capacity. Such soils include:
- Loams.
- Peat bogs.
- Sandstone.
- Quicksands.
- Heaving, vegetative, loess-like soils.
- Other types of soil with unstable or weak structural connections.
The following factors are also considered the basis for the use of pile foundations:
- High level of hepatitis B.
- Swampy area.
- Seasonal flooding of the area during floods.
- Seismic activity in the development region.
- Significant difference in height between the surface of the site.
In addition, the foundation for a building on stilts is organized in cases where the construction of other types of foundations is irrational from an economic point of view. For example, a large volume of excavation work for the construction of a monolithic or slab foundation.
Another area of application for pile foundations is the construction of prefabricated buildings, since the speed of their arrangement allows maintaining a high pace of construction.