- Home /
- Articles /
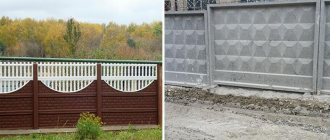
- street porch
- / Installation of concrete ramps for disabled people. Now anti-slip
Many people with disabilities live near people who do not have serious health problems, including those who have difficulty moving. For them, a routine visit to the store turns into another test, especially if their interests were not taken into account during construction. Fortunately, the Russian authorities paid attention to wheelchair users by developing the “Accessible Environment” program, which includes the installation of concrete ramps for the disabled and other devices that can make the lives of people with limited physical abilities more comfortable.
Where are ramps installed and for what purpose?
For some time, a wheelchair ramp, which also facilitates the movement of parents with strollers, could be seen mainly at the entrance to medical and some institutions. Disabled people experienced considerable difficulties, and often could not even get into the entrance of their home without outside help. There were no products that would make their life easier near shops and other establishments, but now the situation has changed, and wheelchair users breathed a sigh of relief. Ramps that compensate for the difference in height between the ground and the porch of a building are appearing everywhere; with them, people with limited mobility and mothers with strollers have become much less likely to have problems.
What types are there?
First of all, let's determine what types of ramps there are. Depending on the material used:
There are also ramps:
Stationary ones are installed at the entrance to the building. They don't clean up. Folding ones are used when space is limited and are lowered if necessary. They are fixed to the wall of the passage. They are often installed in houses where the installation of a stationary one will interfere with the free passage of other residents. Removable ones are installed temporarily to overcome an obstacle at a specific moment. They, in turn, also come in different types:
- Sliding telescopic - two ramps that extend lengthwise and when assembled do not take up much space.
- Roll ramps are an option for those who have very little space. Thanks to a special frame, they roll up like a carpet.
- Ramps are a folding model that is used to overcome rapids and other small hills.
Ramps can also be classified into:
- monolithic;
- with wall support;
- with full support on the ground or bedding.
Return to contents
Requirements for ramps
In fact, a ramp is a backup for a flight of stairs, and it is intended for the movement of light wheeled vehicles. The structure is located on a slope, so great attention should be paid to the issue of safety. Understanding the seriousness of the issue, designers and installers are doing everything to ensure that the movement of people is safe and does not cause much trouble. Therefore, this porch element is installed in accordance with the requirements of GOST and other regulations, and the following must be taken into account:
- the angle of inclination, and the design of the ramp, if the area allows, should be as flat as possible and not exceed 10 degrees, although in some cases this figure is higher;
- the surface is even, and it should not have cracks or other obstacles that complicate movement, and it is better if it is a monolithic concrete ramp;
- precipitation and constant temperature changes - to avoid this, the concrete surface must have additional protection.
- the presence of anti-slip properties, because climbing a ramp after rain or on a slippery surface in winter is difficult and often impossible.
Despite the general requirements for ramps, according to SNiP 35–01–2001, each design has its own distinctive features. As in the case of concrete stairs, ramps can rest entirely on the ground, have support in the form of a load-bearing wall, but the best solution to the problem is to construct a monolithic concrete ramp.
The importance of a garage entry device
Puddles, mud, and ice formed in front of the garage create a lot of difficulties for entry. An icy threshold on which the car's tires slip creates the risk of an emergency situation and increases the load on the car's suspension.
The water accumulated at the threshold tends to penetrate into the garage. Difficulties, especially at dusk, in directing the car through the garage door, constantly at risk of hitting some obstacle with the body. All this emphasizes the importance of organizing the entry device.
This type of device includes
:
- ramp;
- blind area;
- screed
A ramp is an inclined, gently sloping platform for vehicles and other vehicles to travel to different height levels.
How to make a garage entrance with your own hands from concrete? What else can you use to make an entrance to a private house? We'll tell you in more detail, step-by-step instructions for your attention.
The ramp itself is a fairly simple structure. The main purpose of its creation
– organize a convenient entry into the garage. The flatter the ramp, the more convenient it is to use.
Type of ramp
depends on the location of the access roads to the garage - it can be a direct entrance or an entrance with a turn. The ramp can be made up or down (if it leads, for example, to a basement garage).
For a ramp with an ascent, curbs are installed to prevent the car from sliding down; for ramps with a descent, the role of these limiters is played by the walls.
The width of the ramp is usually 30 centimeters greater than the width of the garage door; at the far end the ramp widens slightly, making entry easier. Its most optimal length is 5 meters, but it can vary depending on the wishes of the owner.
The ramp also provides a surface slope and a drainage system.
, and in front of its threshold, a groove is installed to drain water, covered with a grill, so that precipitation flows to the edges and is diverted away from the device.
Together with the ramp from the side of the garage floor, a ramp from the threshold of the garage door, the so-called counter-ramp, is often used; it makes the entrance soft and reduces the load on the car suspension.
If desired, a canopy
, which protects it from heavy rain or snowfall.
The options from which a ramp is made can be completely different - it can be wood, metal, or concrete. Their pros and cons
:
- Wood
: simple and easy to make, but short-lived ramp, it has to be replaced every 2-3 years. - Metal
: durable and reliable, but at low temperatures it becomes very slippery. - Concrete
: the most optimal option in terms of price-quality ratio. A concrete ramp can be used for many years if all the rules specified in the relevant SNiP are followed during the construction phase.
Installation of a ramp for entering the garage.
Blind area
A blind area is a strip of concrete or asphalt sloped away from a building to drain water.
The most optimal blind area for a garage
– creating an inclined floor with a slope of 15-20 degrees (or 20-30 mm per 1 m of length). The width of the blind area can be made from 1 m to a value that seems optimal to the car owner. Often the blind area occupies the entire area in front of the house and is tiled, which looks very interesting.
Screed - a cement-sand or asphalt concrete layer to level and stiffen the surface. In the garage version, this is a flat concreted area, used when the soil layer is insufficiently rigid.
Even if the garage floor level coincides with the driveway level
, you can raise the threshold, which will protect the garage from precipitation. The best level of threshold rise: 20 cm. A ramp slope of 25 degrees is optimal in this case.
Design options and ramp calculations
Even at the stage of designing the porch of the entrance group of the building, it is necessary to worry about the construction of a ramp, and their design features are described in SP 59.13330.2016 “Accessibility of buildings and structures for people with limited mobility.” Its design depends, first of all, on the distance to the surface of the porch. If the elevation angle is too large, you need to worry about constructing intermediate platforms. Accordingly, the length of the platform is added to the dimensions of the structure as a whole.
Depending on the height of the porch, one- or two-flight structures and structures with a large number of intermediate elements can be installed. At the same time, it is important that the lifting height of one flight, according to the requirements of SNiP, does not exceed 8 meters, while the length of the lifting part should not be more than 9 meters in length. Flat areas must be equipped before entering the ramp and after ascending (not counting intermediate areas).
It is important that after completing the ascent, wheelchair users are not disturbed by other obstacles in the form of doors, partitions and other structures. The width of the ramp should not be less than 180 cm with a mandatory fence in the middle. There are also designs with separate entry and exit. Ramps can have a flat or curved design.
Calculation of the length of the “assistant” for a “limited” person
The design of a concrete ramp, naturally, will directly depend on the height of the area in front of the front door relative to the ground surface. For example, let’s calculate the dimensions of a specific inclined structure. Let's assume that the height difference (H) between the platform and the ground level is 40 cm. To calculate the optimal angle of inclination (5%), we use the formula from the regulatory documents H/S=1/20. Then the length of the ramp will be: S=H×20=40×20=800 cm=8 m. If there is not enough free space in front of the porch of the house, then we increase the angle of inclination of the ramp to the maximum permissible value (8%). Based on the ratio: H/S=1/12.5; we get S=H×12.5=40×12.5=500 cm=5 m.
Important! A further reduction in the length of the ramp can lead to the fact that the concrete “helper”, erected with such difficulty, will become an insurmountable obstacle for a wheelchair user close to you. By the way, in order to simplify the preparation of a preliminary project, you can use an online calculator, which is easy to find on the Internet.
Security requirements
Guardrails are an important aspect of constructing concrete ramps and one of the requirements of safety standards. The presence of railings is a prerequisite, and if the height of the structure exceeds 150 cm, it is assumed that two-level railings will be erected. The bottom row must be placed at a height of 60 cm, and the top at a height of 80 cm, while they should protrude about 30 cm on both sides and bend at the same time, and in the case of two-level railings they are often combined into a single structure.
The length of the platforms should also be comfortable, and a stroller should fit on it without any problems. According to regulatory requirements, the depth of the structures should be 150 cm, which corresponds to the width of two ramps. To prevent the stroller from slipping, a 5-centimeter high edge is installed along the edges of the platform.
How to do it yourself?
Determination of design parameters
Calculation of ramp slope for disabled people.
Concrete ramp is one of the most stable types. They can be single-flight (one span) or multi-flight (with intermediate platforms). It depends on the lift height. The maximum length of one strip should not exceed 9 meters, so you cannot make one long plane over a long distance. It is also taken into account that the maximum height of the march is 80 cm. Based on this, when calculating the dimensions of the ramp, you need to take into account the areas at the beginning, at the end of the ramp, as well as intermediate areas. When constructing a ramp, it is important to know that there should be nothing obstructing the ascent, such as a door. The platforms must be of sufficient size to provide enough space for the stroller to turn around freely.
The minimum width of the ramp plane should be 1 m if one-way traffic is provided, and, accordingly, 2 m if two-way traffic is provided. The law also provides for the mandatory installation of sides on the ramp so that the wheels of the stroller do not jump off the surface. Their minimum height is 5 cm. For safety and ease of movement with a ramp, it is equipped with railings on both sides. Handrails should be located along the entire length, their height should take into account the needs of children and adults. Therefore, the railings are placed at a height of 50 cm for a child and, accordingly, 70, 90 cm for an adult.
Return to contents
Ramp calculation
Before starting work, you need to prepare, make all the necessary calculations and measurements, that is, draw up a project. According to the standards, the height of the ramp should be related to the length in the calculation of 1:12. This means that to build a structure with a height of 1 meter, you need to make it 12 meters long, and with a height of 1.2 meters - 15 meters. However, according to the standards, it is prohibited to do this, so you need to divide it into 2 flights of the same length - 7.5 meters each, the platform between the flights will be at a height of 0.6 meters (h1/2 = 1.2/2)
Let's take the size of the area between the flights to be 2 m2. Based on this, l1 17 m2 is needed (15 m and 2 m platform).
V1 = 1/10 s = 1/10 17 m2 = 1.7 cubic meters.
V2 = h1 * l1 = 1, 2 * 15 = 18 m2 * ½ brick thickness (0.125 m) = 2.225 cubic meters.
m = 2.25: 0.002 = 1125 pieces.
We also determine the volume of fill used (9 m3) and the required length of reinforcement bars (243 linear meters):
- area – s;
- ramp height – h1;
- platform height – h2;
- slab length – l1;
- volume of concrete – v1;
- wall volume – v2;
- number of bricks – n.
Return to contents
Sequence of work
Ramp reinforcement.
Step 1. We make markings for the structure with cords and pegs. In this case, the internal width of the future structure is taken into account.- Step 2. Pour the foundation under the walls.
- Step 3. We stretch and set the slope.
- Step 4. We are laying out brick walls. After this we wait about a month.
- Step 5. Fill in the distance between the walls.
- Step 6. It is necessary to make a protective layer between the backfill and concrete (polyethylene is often used).
- Step 7. We reinforce the structure.
- Step 8. We make the flanging.
- Step 9. Concreting. It is better to pour concrete grade no lower than M300 from bottom to top. Since the top layer will dry quickly, it is lubricated with water so that everything dries evenly. If cracks appear after it has completely dried, they can be corrected with a cement screed.
- Step 9. Install the railings.
- Step 10. Cover the structure with paving stones or other material.
Return to contents
Features of installation of wheelchair ramps
The sequence of installation of wheelchair ramps is similar to the installation of a concrete staircase base. At the first stage, careful measurements are taken, and first of all it is necessary to maintain the width of the product. If the ramp is adjacent to a wall, only one brick support wall is laid; if it is located at a distance from the building, you will need to lay two support walls.
After laying the brick, it is worth waiting 21 days, after which you can proceed to installing a monolithic structure of a reinforced concrete ramp. After laying the waterproofing layer, we begin filling with sand and compacting. We cover the backfill layer with polyethylene (ideally geotextile) and proceed to reinforcement, while the distance from the surface to the lower horizontal reinforcement should not be less than 50 cm. We must also not forget about going into the wall structure. We make formwork, install flanging and panels that are pressed in from the outside. All that remains is to pour and level the concrete, and this must be done from the bottom up. The formwork can be dismantled the very next day, but before installing fencing and cladding you will have to wait 4 weeks until the structure is completely dry.
Example of making a screed
First, it is necessary to say a few words about heaving soils
, since construction on this type of soil is very common in our country.
All clayey soils (including clay, loam and sandy loam) with a high groundwater level are called heaving soils. Clay in heaving soils retains moisture well, and when the soil freezes, it expands in all directions, which can lead to the rise of buildings located on it.
For shallow construction work
the fight against soil heaving involves removing part of the soil under the building and replacing it with materials that do not retain moisture. Additionally, measures are taken to prevent soil freezing near the building; For this purpose, the soil is insulated, for example, with expanded polystyrene.
Expanded polystyrene as insulation shifts the temperature isotherm closer to the surface, i.e. prevents the soil from freezing, which does not lead to its rise.
How to fill a garage entrance? How to concrete correctly? Stages of work on arranging and concreting a screed
:
- Remove the soil to a depth of approximately 40 cm according to the size of the future screed.
- Lay the first layer of sand (sand cushion), compact it tightly, and pour water on it.
- Place a second layer of sand, compact it, and pour water on it.
- Lay a layer of fine crushed stone to the top of the dug pit.
- If the screed is not arranged for the entire length of the car, the remaining distance can be covered with a layer of crushed stone, after first removing the vegetation in the backfill area and laying geotextiles (so that the crushed stone does not sink into the ground).
- Separate the future screed from the foundation using a strip of linochrome if you do not plan to tie the screed to the garage foundation. Leave a gap of approximately 3 cm between the tie and the gate frame.
- Make formwork for their boards on three sides. The formwork can be made from boards with a thickness of 25 mm. Carefully secure the formwork (you can sprinkle it with crushed stone on the outside over the entire area of the boards), leveling it exactly horizontally. The boards can be lubricated with special formwork oil to make it easier to separate them from the concrete without damaging the screed. Hormusend HLV-37 lubricant is well suited for these purposes.
- Place insulation (extruded polystyrene foam slabs 5 cm thick) over the entire area on the crushed stone cushion.
- Tie a frame made of reinforcement for pouring mortar with crushed stone.
- To prepare the solution, you can add “Fairy” as a plasticizer.
- Pour the base concrete layer using a vibratory compactor.
- After laying the main concrete layer, place a mesh with a 50x50 mm cell (reinforcement) on it.
- Mix the solution, without adding crushed stone this time (only plasticizer, cement, sand), pour in the finishing screed.
- Level the finishing screed using a board.
- Iron the screed after a sufficient amount of moisture appears on the surface of the screed.
- Immediately cover the resulting screed to protect it from birds and animals while drying.
The concrete screed will gain hollow strength in about 15 days
. The screed must be watered for 5 - 7 days so that it remains constantly moist. You can also cover the screed with film, and if sufficient moisture in the screed is maintained, it does not need to be watered.
In the future, it is necessary to make a drainage drain near the screed so that the ground underneath remains dry.
Dimensions and materials for manufacturing
:
- cement grade M400;
- sand, layer thickness: 15 cm each;
- crushed stone, layer thickness: 10 cm;
- concrete, layer thickness: 15 cm;
- mortar proportions for basic concreting: sand – 3, cement – 1, crushed stone – 5;
- mortar proportions for finishing screed: sand – 4, cement – 1.
“Fairy” as a plasticizer makes the solution more elastic (due to the addition of glycerin). Ratio: 1/3 cup of plasticizer per 1/4 cubic meter of solution.
Iron plating increases the protective properties of concrete and increases its waterproofing characteristics. Technology - dry cement is poured onto the screed (wet).
Would you like to suggest photos on the topic for publication?
Please help us make the site better!
Leave a message and your contacts in the comments - we will contact you and together we will make the publication better!
Ramps are called inclined ramps designed to level out height differences. People with limited mobility should pass through them without hindrance, as well as carts and wheeled devices. Ramps and ramps (as such structures are sometimes called) are installed in a building designed for visitors of any kind - from employees to clients. The installation of a ramp is a necessity stipulated by law, and the cost of neglecting it can be very “painful” for the building owner.
carries out all work on industrial, commercial, warehouse and other prefabricated facilities. We will install electric lighting and arrange a ramp suitable for the customer. Typically, the design consists of three parts:
Horizontal platform at the entrance to the building;
An inclined descent on which the necessary parameters are maintained: the slope is no steeper than 5-8%, the length of one span is no more than 9 m;
Horizontal platform at the base of the building.
It is advisable to equip all parts with fencing and sides - building ramps without them is fraught with accidents and inconvenience. Depending on the characteristics of the structure and additional work carried out, estimates are calculated at various prices.
Features of facing concrete ramps
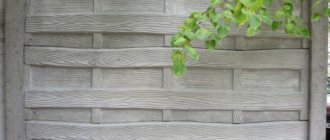
Experts keep repeating that the main conditions for comfortable movement along a ramp are an inclination angle not exceeding 10 degrees and a non-slip lining. Safety depends no less on the covering of an inclined structure than on a correctly installed supporting structure. It will be difficult to move on glossy ceramic tiles and other slippery surfaces, especially in winter.
You can make the structure more flexible by using various rubber and aluminum linings, anti-slip tapes and other products. They protect designs, but for a short time, after which they have to be reinvented. The best solution today is the technology of cladding concrete stairs C3, which should be described in more detail.
Why choose C3 stairs
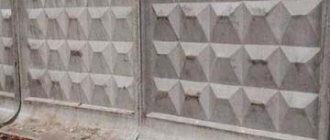
If we talk about the advantages of products made using C3 technology, then first of all, since we are talking about disabled people and mothers with children, it is worth dwelling on the anti-slip properties of facing slabs. They have a relief pattern (“wave”, “gabbro” and others) that prevents slipping in any weather and these are not just words. Hundreds of clients have already been convinced that C3 stairs do not slip, and the photos presented show that the landings look unique due to the presence of the pattern.
I would also like to dwell on the high strength characteristics, and the brand strength of products made using this innovative technology, M1200, is comparable only to granite. Ramp covering. In addition, it will not allow water to pass through (due to the treatment of the seams with epoxy grout and coating with a water-repellent water repellent). The products have good frost resistance and can withstand 500 freezing/thawing cycles or more.
Returning to the issue of safety, it is worth noting that the anti-slip rating of the ramps is C3 R13, which means that disabled people can climb at an angle of 35 degrees without any problems, even after rain and during frost. And these are not all the advantages of the technology, which is written about in more detail here:. About the advantages of C3 technology in a short video:
Purpose
The ramp is installed at the entrance to the room or on a flight of stairs. Its main purpose is that it connects horizontal planes of different heights in cases where a structure that differs from a staircase in technical purpose is needed: for the disabled or for transport.
- The angle of inclination of the ramp should be minimal so that a disabled person in a non-powered chair can climb it independently.
- The surface should be non-slippery, straight, and free of any irregularities. Nothing should interfere with movement.
Return to contents