A blind area is a concrete or asphalt strip around the perimeter of a building. Many people underestimate its functionality, although this design affects a number of technological and aesthetic factors of the building. With a blind area, the construction looks complete, which emphasizes the architectural design of the building. The structure is also often used as a path. In addition, by constructing ebbs along the building, we make the necessary adjustments to the design solution: the blind area not only performs protective functions, but also serves as a protector for the foundation and the entire building as a whole.
But even a finished structure loses its appearance and functionality over time. This happens not only due to environmental factors or the wrong topcoat. Destruction of the blind area can occur in the absence of expansion joints if the thickness of the protective layer is incorrectly calculated. There are a number of requirements for building a blind area; certain rules and skills during its construction also play a role. What to do if the ebb of a house that has been put into operation for a long time requires restoration, what technologies exist for repairing the blind area?
Let's figure out how to eliminate flaws in a finished structure, how to make a new one without affecting the old one. In this article we will tell you how to prepare a solution and properly seal the seams between the foundation and the blind area. We will look at how to avoid repeated mistakes and obtain a protective structure that is functional and has long-term performance characteristics.
Repair features
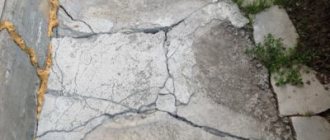
The following types of damage indicate the need for restoration work:
- cracks, crevices;
- subsidence and delamination of the coating;
- vegetation germination;
- swelling and small potholes;
- cracks or dips in corners;
- partial shedding and crumbling.
When examining areas around the house, the boundaries of damage and the causes of destruction are determined. Depending on the type of building materials used, blind areas are:
- concrete;
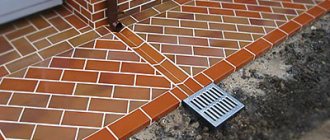
- tiled;
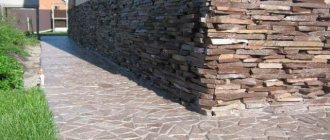
- cobblestone;
- asphalt.
To eliminate single defects on a concrete surface, building mixtures are used that quickly harden and completely fill the depth of the gap. Cracks are sealed with moisture-resistant foam or special polymer materials. Damaged corners are added and lubricated.
When repairing a tiled blind area, the cracked element is replaced. The old covering is removed, the empty space is covered with sand and new tiles are laid. If a large area is damaged, shotcrete is used. Thanks to this method, all cracks and pores are filled, and strength under stress and deformation increases. A dry mixture of sand and cement is applied to the surface, then it is moistened with water for 2 weeks.
Restoring a strip of cobblestones is done using a hammer and chisel. Deformed stones and crumbled parts are removed from damaged areas. To level the layer, gravel and sand are poured into the recess, compacted, filled with cement mortar and covered with a cleaned round boulder. The resulting seam is hidden using cement laitance. When repairing an asphalt strip, the damaged areas are dismantled to their full depth. The crumbling parts are removed from the pit, the bottom and sides are coated with liquid resin and filled with new asphalt. The new coating should be higher than the old one for better adhesion of the layers. Compact the new layer with a roller until the asphalt stops moving and the prints disappear.
Preparing the site
Laying paving slabs on a blind area begins with preliminary site preparation. The builders call it a bed. If there is an old coating, it will have to be dismantled. You should also remove part of the foundation hidden under the pillow. If the house is new, the soil layer should be removed. If you want to install a storm sewer system, you should take care of the recess on the side opposite to the foundation.
The depth of the blind area is chosen taking into account the height of the foundation layers. Most often it is 150 mm, but when installing a stock, a parameter of 400 mm is used. If the soil layer consists predominantly of clay, there is no need to build a clay castle.
When land is removed, large soil piles appear. It is necessary to foresee in advance where they can be placed. Otherwise, the embankment will create a number of problems when moving around the site. The bottom layer is pre-compacted until it becomes as dense as possible and stops moving.
Why do cracks and cracks appear on the blind area?
During operation, the top layer of the blind area may begin to collapse. This happens due to non-compliance with device technology, the use of low-quality materials, and untimely repair of defects that have formed. Reasons for cracking of the blind area:
- The coating is subject to thermal expansion during freezing and contraction during warm periods. As a result, heaving and movement of the soil occur, and the blind area cracks. Over time, microcracks expand more and more.
- Loose connection of the tape to the foundation. Excess moisture stagnant between the base and the blind area deforms and destroys the foundation.
- Poor compaction of the leveling layer causes soil subsidence.
- Absence or incorrect calculation of gutter parameters. Streams of water flowing from the roof create potholes in the covering.
- Overgrowth of mosses and lichens. Plants destroy the leveling layer.
Causes of destruction
There may be several reasons for the destruction of the blind area:
Builder mistakes:
- Lack of cement or excess water in the concrete solution, which means low frost resistance. As a result, over several years, microcracks will destroy the surface of the concrete winding.
- When backfilling, lower density soil was used - loam instead of clay, sandy loam instead of loam, sand instead of sandy loam. As a result, even after compacting the backfill, it absorbs flowing water in larger volumes than untouched soil and the heaving increases. And differences and uneven pressure from below will quickly destroy the concrete “sidewalk” around the house.
- The fundamental mistake of builders from the “warm south” is laying asphalt concrete as a hard surface directly on leveled ground, without sand backfill and temperature expansion joints. The seams perform two functions: compensation for expansion during heat and compression during frost, and also ensure mutual horizontal and vertical movements of the blind area blocks during soil heaving. After a winter on heaving soil, the asphalt “path” will get cracks and after a few years will fall apart into large and small pieces.
- After concreting in the summer, the surface of the blind area was not wetted and the solution dried out before it had time to gain strength.
- Lack of gutters - water dripping from the roof will break through grooves in the concrete.
Typical mistakes when constructing blind areas
Arranging a permanent blind area helps keep the building dry and warm, as well as save money on structural repairs. Reducing costs for materials and the wrong choice of installation technology lead to deformation changes on the surface. Errors during construction:
- Width of the structure. A narrow blind area will not provide reliable protection against flooding. For loams of medium heaving, the size of the tape is 1.5 m, for highly heaving and soils with karst - up to 3.0 m. On normal soils, the width of the blind area is 0.8-1.2 m. When the drainage is located above the blind area, its size should be 0.2 m wider than the roof overhang.
- Insufficient thickness of the leveling layer. The leveling layer must be at least 0.3 m. The required thickness is measured after compaction.
- No sand layer. A sand cushion is used to stabilize the base. Laying the covering top layer on the ground without using bedding will lead to sagging of the slabs and the formation of level differences.
- Using fine sand. When forming the leveling layer, it is allowed to fill in coarse sand. It must be clean, sifted, without impurities. The use of a fine fraction will lead to large shrinkages and disruption of waterproofing.
- No slope. The transverse slope in the direction from the wall should be 3-5% for elements made of clay, concrete, asphalt, and 5% for cobblestones and paving slabs.
- Reducing the size along the outer edge. Thin edges of the tape (less than 100 mm) are quickly destroyed by the flow of water. To preserve the coating, drainage trays, boxes with metal gratings or curb paving stones are installed along the outer perimeter.
- No expansion joint. A waterproofing barrier is needed to protect the load-bearing structures of a building from cracking due to temperature changes and differences in shrinkage rates.
- Incorrect concrete mix composition. Violation of the weight ratio and sequence of mixing components leads to the formation of microcracks and cavities. If there is too much crushed stone and water in the solution, the concrete will delaminate.
- The blind area is not insulated. The insulation reduces the impact of low temperatures and protects the foundation from frost heaving of the soil. Freezing and thawing of individual areas occurs at different rates, which leads to distortion and destruction of the protective tape.
- Lack of waterproofing materials. The top finishing layer of the soft blind area does not protect the foundation from the penetration of precipitation. The waterproofing material is laid under the covering with an overlap on the wall of the house.
- The concrete strip was not reinforced. The reinforcing mesh gives strength to the concrete layers, since blind areas are movable structures (compression and tension). The lack of material reduces the service life of the blind area and its maintainability.
- Concreting areas without dividing into segments. Over time, solid tapes can tear into separate parts, and the blind area will collapse. Concrete divided into segments will not be damaged by annual soil fluctuations and temperature changes.
- Delamination of a concrete structure. The defect appears due to uneven hardening of the concrete solution or too thick a surface layer. The thickness of the blind area should not exceed 100-150 mm.
- Chips on the corners. Insufficiently compacted sand and a thin layer of gravel (less than 0.1 m) are washed away with water, causing corners to crack and collapse.
General principles
Depending on the soil on the site and the purpose of the building, different materials and layer structure can be used, but there are some points that are always present:
- the blind area has a general slope “away from the house”, its minimum value is 3% (3 cm per meter);
- There must be an expansion joint of 1-2 cm between the protective coating and the foundation (lay roofing material in two layers, polystyrene foam or EPS, cover with sand, fill with sealant);
- when waterproofing and insulating the foundation, the material rises to the level of the blind area;
- the base should hang over the expansion joint and it should not interface with the protective coating (a gap of 1-2 cm is left).
Another popular type of protective coating for house formwork is paving slabs or paving stones.
When is a major overhaul needed?
The protective strip with restoration of more than 25% of the total area requires major repairs. Before starting work, you need to inspect the damaged areas, examine the condition of the base, sections of the tape located near the drainpipes. Major restoration includes the implementation of a large complex of construction work:
- repair or replacement of slabs;
- restoration of the drainage system;
- repair of reinforcement frame;
- restoration or renewal of waterproofing;
- replacing areas with peeling concrete;
- complete replacement of the blind area;
- treatment of cover from vegetation.
Types of defects
There are many defects in these designs. For example, a thin layer of concrete without reinforcement with masonry mesh and without fencing with curb blocks, the absence of a simple drainage groove. The result is that the water does not flow into the storm drain, but gets under the outer edge, freezes and breaks off part of the edge.
The absence of borders does not prevent the roots of trees and bushes from growing under the concrete.
The absence of an expansion joint of 10 - 15 mm between the wall and concrete, filled with two strips of roofing felt, PVC, or even thick polyethylene. The joint can be filled with bitumen or bitumen mastic. As a last resort, ordinary sand. It is impossible to connect the covering to the foundation, because when the soil heaves, the blind area, even reinforced along with the foundation, will still break off. Let it move relative to the wall.
How to make a blind area correctly - read here.
Necessary materials
To carry out DIY repair work, you will need the following tools and materials:
- tools for excavation work (crowbar, pickaxe, shovel);
- bulk materials (sand, clay, crushed stone, cement);
- construction tools (trowel, trowel, hammer, chisel);
- container for preparing the solution;
- components for preparing concrete mortar;
- insulation;
- piece elements for replacement (tiles, paving stones, cobblestones);
- tamping log, construction level.
Cosmetic solution
Of course, in order to repair the concrete blind area, you can resort to the help of hired force. But why take this costly step if you have skillful hands?
First, you need to assess the scale of the tragedy and understand what this design requires at the present time. This can be either cosmetic or major repairs.
In the first case, you will only have to partially disassemble the structure - specifically in those places where there is damage. Ideally, you need to arm yourself with the following tools:
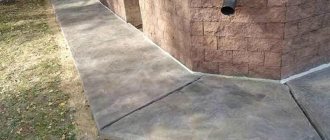
Wide blind area
- hammer;
- chisel;
- putty knife;
- hammer drill
Next, the action plan is as follows: the area to be restored must be thoroughly cleaned of dirt, leaves and branches, and if the crack is not deep at all, it can be treated with a cement-sand mixture and smoothed over with a spatula. But if the crack has already “spread”, it will be necessary to carry out jointing, which will further increase the area and depth of the damage. The resulting hole must be filled with concrete or filled with bitumen mastic, sprinkled with sand and left to dry.
Minor damage repair technology
minor damage to the blind area
damage to the blind area of the house
Current repairs involve the elimination of small cracks, chips and breaks in concrete. Repair methods depend on the depth of the damage. The technological process involves performing the following actions:
- Cracks up to 1 mm do not destroy the structure. Such defects may disappear during operation of the blind area. If the protective tape is not used as a path, surface cracks are sealed with a primer.
- If the damage depth is 1-3 mm, cracks are filled with a solution of cement and water.
- When peeling, the surface is cleaned, the areas are filled with a composition containing 75% bitumen mastic, 15% asbestos and 10% slag. After sealing, the coating is covered with a layer of sand.
- Crevices from 3 to 30 mm are preliminarily expanded to a cone-shaped shape, primed and filled with concrete. To form a hydroseal, putty is used.
- During delamination and crumbling, problem areas of the structure are removed; the edges are treated with a primer and filled with a solution of water, cement and liquid glass in proportions 1:1. The restored area is covered with film until completely dry.
- Splits with a depth of more than 30 mm are eliminated by pouring concrete.
Prices
The price of repair work depends on several factors:
- type of materials;
- complexity of work;
- type of blind area;
- degree of deterioration of the structure;
- region of the country.
Both expensive sealants and affordable bitumen mastics can be used as materials. Repairs can be cosmetic or major, which directly affects the cost of the work.
For example, in Moscow the price per 1 sq. a meter of blind area repair costs 400 rubles. At the same time, in St. Petersburg, construction companies will take on the work for 450 rubles. In the city of Krasnodar, they will ask for repairs from 430 rubles per square meter.
In the attached estimate you can understand how much money will have to be spent on repairing a blind area 15 cm thick:
A lot of important and useful information about repairing the blind area around the house is presented in this section.
DIY blind area repair
Restoration work is carried out in spring or early autumn. First of all, large defects that have reached the very foundation are eliminated.
Step-by-step instruction
Repair of severe damage begins after removing contaminants from the surface.
- If the blind area has moved away from the building, but the integrity of the coating has not been compromised, the empty space is expanded, and the base is treated with bitumen mastic. In case of large delamination, the depression is sealed with concrete, small cracks - with cement mortar.
- If the structure peels off and its edges are completely destroyed, repairs begin with finishing the base. The plaster is removed from the base and the cleaned area is dried. To protect against dampness and fungi, an antiseptic is applied. The basement is insulated and plastered. On the blind area, all peelings and collapsed parts are knocked down. The pit is filled with fill materials; When repairing large areas, a mesh of reinforcement is laid and filled with cement mortar.
- Repairing chips at corners begins with setting marks. The crumbling concrete is beaten with a hammer, and crushed stone or gravel is poured into the recess. To increase strength, a thick metal mesh is laid on the bedding. Half the area is filled with concrete, metal corners are installed along the edges and completely filled with mortar.
- If the blind area fails, the edges of the tape are broken down to a solid base and bedding is added. The broken edges are washed and treated with sand-cement mortar. Lay a layer of concrete and level it.
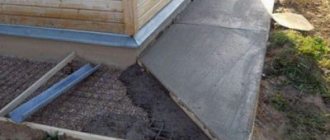
- When completely replacing the blind area, old materials are removed along the entire perimeter. 0.2 m of clay is laid at the bottom of the trench; everything is compacted. Layers of 0.1 m of sand and gravel are poured on top; put insulation and mesh. The formwork is being constructed; Using pegs and thread, the slope is marked. Crushed stone is poured along the markings (at an angle). The surface is poured with concrete.
The importance of timely completion of work
The timeliness of current or major repairs of the blind area helps to protect the foundation from external influences - temperature changes (frost - heat), duration of operation, preservation of strength, thermal insulation, resistance to precipitation, flood (in some areas).
The blind area gives a complete aesthetic appearance to the building, helps with movement around the building, and correctly distributes the load on the foundation of the house.
The consequences of lack of repair are as follows:
- Penetration of water to the plinth and base of the building.
- Gradual complete destruction of the path near the house with the impossibility of movement and washing the facade.
- Germination of various plants, tree roots located next to the house into its foundation.
- Lack of good thermal insulation and additional protection from frost.
- The appearance of cracks on the base leading to the base, fungi or mold.
- Lack of aesthetics and decorativeness of the structure.
Melt water and swollen soil will annoy home owners less if the surface is restored. The repair will preserve the structure itself and make the owner’s costs ergonomic (save money).
For example, a person will be too lazy to buy some cement to repair cracks that appeared on the blind area after winter or improper use, and next year he will have to replace a larger area or the entire structure.
How to repair holes in a brick or concrete wall
The extent of repair work to the surface of a brick or concrete wall will depend on the extent of the damage. If these are holes left when old nails, screws or dowels were removed, then it is enough to cover them with putty or a special repair mixture.
Let's take a step-by-step look at how this can be done:
- To do this, take a long nail or screwdriver and widen the hole. This must be done so that the putty penetrates as deeply as possible inside.
- Then use a dry brush or vacuum cleaner to remove any accumulated dust and crumbs.
- Now moisten the resulting hole with water. For this purpose, you can again use a brush or a spray bottle, or a piece of foam rubber. This should be done so that moisture from the repair mixture or putty does not quickly absorb into the wall.
- After a few minutes, putty the damaged area, carefully rubbing the mixture into the hole.
- Once completely dry, sand the surface with fine-grained sandpaper.
- Now the area can be painted over or wallpapered.
If the hole in the wall is large and deep enough, for example, it was left after replacing pipes or dismantling an electrical outlet, then putty alone will not be enough. You will need either cement, gypsum, or a ready-made concrete repair mixture, which can be purchased at a hardware store.
What to do in this case:
- Before you fix a hole in the wall, prepare the hole by clearing away any debris and moistening it with water.
- Then fill the void with pieces of stone or brick mixed with cement mortar. This will save putty and strengthen the area being restored. Cement mortar for this purpose is prepared from one part cement and three parts sand. In such a case, you can also use building gypsum or concrete repair mixture.
- When this cement (or plaster) “patch” has dried, putty it, carefully filling and leveling the remaining voids and cracks that have formed.
- The area treated in this way should dry well. This will take at least 12 hours.
- When everything is fairly dry, smooth the surface with fine-grit sandpaper. To prevent this place from showing off as an ugly bump, it should be leveled with the rest of the wall surface.
- The wall is leveled, and now it can be painted or wallpapered.
If, during the shrinkage of the building in the room, the interpanel seams have come apart or a deep crack has formed, then there is no need to rack your brains about how to repair such a hole in the wall. In this case, use polyurethane foam, which is sold in aerosol cans at any hardware store. It perfectly fills voids, easily penetrating even hard-to-reach places. In this article you can learn how to repair cracks of varying complexity.
Polyurethane foam adheres perfectly to various surfaces and quickly hardens in air. So you are guaranteed a good result in the process of eliminating deep cracks and holes.
- Before you start work, prepare the place - clean it of dirt, dust and other debris. Wet the wall surface.
- Before applying the foam, you need to shake the can well so that its contents turn into a homogeneous mass. This will take you at least a minute.
- During operation, hold the container upside down, since the gas contained in it, which displaces the polyurethane foam, is lighter than it.
- Vertical cracks should be filled from bottom to top.
- If the hole is too deep, apply the contents of the can in layers, applying a new layer after the previous one has dried.
- After filling the hole, do not touch the damp polyurethane foam with your hands, this can change the structure of the material and slow down the process of its hardening. Wait until it dries.
- Remove excess dried foam with a knife and putty the surface.
- When the putty is dry, smooth the area with fine-grit sandpaper.
Now you can see for yourself that it is simple and easy to repair any hole in a concrete or brick surface, no matter what size, without outside help.
The main thing is to correctly assess the scale of the repair work and carry it out in accordance with the rules for using the material that you will use when restoring your wall.
How to prevent cracks from appearing
The blind area will last a long time and will not collapse if it has a slight slope away from the building to quickly drain water, which will prevent the base from getting wet and gradual destruction. Ideally, insulating slabs should first be laid on a sandy base to protect against frost, then geotextiles and a drainage membrane, and gravel should be poured on top. If the blind area is made of tiles, then you will need another layer of sand on top.
To prevent damage, a special expansion joint is made between the building and the blind area to cover the entire depth of the foundation; it ensures free shrinkage of the structure. Correct proportions and transverse reinforcement with metal mesh add strength to the concrete layer.
Any blind area can collapse over time, so it is necessary to regularly inspect it and, if signs of deformation are detected, immediately repair and eliminate the causes of cracking. Then the base will be in order, and the blind area will last a long time, looking neat and beautiful.
Is insulation necessary?
The thermal insulation layer helps to increase the temperature in the basement, which will prevent the twists, fruits and vegetables that are there in winter from freezing.
In general, insulation is not a mandatory measure, but many homeowners who are faced with freezing of food in the basement prefer to make flashings with thermal insulation. It is also used for buildings with shallow foundations, as well as for heaving soils.
During the work process, it is better to use extruded polystyrene foam, which is characterized by its high density and ease of installation.
Sequence of actions for the construction of an insulated blind area:
- Create formwork similar to the concrete version.
- Fill the trench 15 cm with dry sand.
- Cover the sand with roofing felt and extend onto the walls.
- Cut the sheet insulation according to the required dimensions and lay it on top of the roofing material.
- Secure the polystyrene foam to prevent it from moving with smaller pieces of material. The insulation must be of the same thickness and same structure.
- Place a reinforcing mesh on top of the insulation.
- Lastly, pour a layer of concrete.
The insulation of ebb tides with extruded polystyrene foam is no different in appearance from ordinary concrete pouring.
Which seams need to be sealed?
It is impossible to say which seams are primary and which are secondary when it comes to bathroom renovation.
Carefully seal every seam between the bathtub and tiles, on the walls and ceiling with a special sealant solution. Then be sure to check them and, if necessary, modify them to avoid moisture getting into places where it shouldn’t be.
- Seams between the bathtub and the wall. They must be sealed; water constantly gets here during hygiene procedures. The accumulation of liquid between the plumbing and the wall will not only ruin the repair, but will also be a source of bacteria and unpleasant odors. And this is already harmful to human health.
- Seams between the wall and the shower stall The seams should be sealed with sealant for the same reason; in addition, moisture can cause short circuits and damage to electrical appliances if it gets on the electrical wiring under the wall and floor slabs.
- Corner joints, baseboards and moldings. It doesn’t matter where exactly the trim is located - condensation always accumulates in the gutters, creating ideal conditions for mold growth. Therefore, they need to be sealed too. Liquid colorless silicone is often used for this purpose.
- Seams between ceramic tiles or tiles. To treat these seams, a special grout is usually used, with or without a tint. It also ensures tightness between the finishing material and the wall, floor or ceiling, and protects against the formation of fungus. And, in addition, the bathroom takes on a more aesthetic appearance.